gRPC Introduction and Implementation Using .NET Core 6
A step-by-step tutorial on the implementation of gRPC with .NET Core 6 with guide pictures, the pros and cons of gRPC, and the scenarios where gRPC plays a vital role.
Join the DZone community and get the full member experience.
Join For FreePrerequisites
- "Visual Studio 2022"
- Basic Knowledge of C#
Agenda
- Introduction of gRPC
- Scenarios Where gRPC is Used
- Pros and Cons of gRPC
- Implementation of gRPC
Introduction
- gRPC stands for Google Remote Procedure Calls.
- gRPC is a modern, open-source, high-performance remote procedure call (RPC) framework that can run in any environment. It can efficiently connect services in and across data centers with pluggable support for load balancing, tracing, health checking, and authentication. It is also applicable in the last mile of distributed computing to connect devices, mobile applications, and browsers to back-end services. — gRPC Website
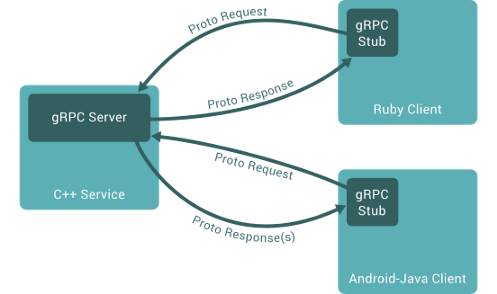
Figure From grpc.io
- gRPC is the framework used to implement APIs using HTTP/2.
- gRPC uses protocol buffers (protobuf) for serialization and the HTTP/2 protocol, which provides more advantages than HTTP.
- gRPC clients and servers intercommunicate using a variety of environments and machines. It also supports many languages like Java, C#, Go, Ruby, and Python.
- The binary layer of gRPC will do all data operations like encoding and uses protobuf as an intermediator between client and server, improving performance.
- It is also used for communication between multiple microservices efficiently.
Scenarios Where gRPC Is Used
- When we use microservice architecture, we use it for internal communication from one or more servers.
- When performance is a high priority and low latency.
- When we require duplex communication between services with different types of data.
Pros and Cons of gRPC
gRPC Pros
- High performance—faster than REST and SOAP
- Lightweight messages—gRPC messages are more lightweight than other types like JSON.
- Higher efficiency
- Duplex data streaming
gRPC Cons
- Limited browser support
- Uses binary data because it’s not easily readable like JSON or XML.
Implementation of gRPC
Step 1
Create a new gRPC project

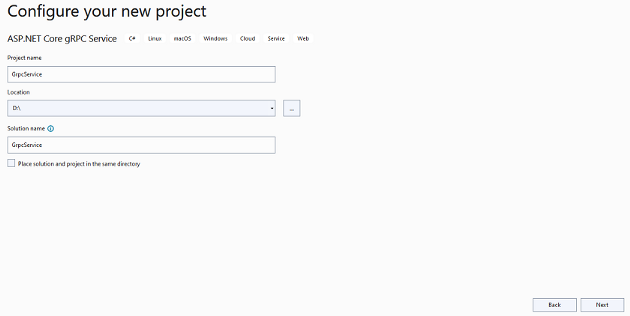
Step 2
Configure the project
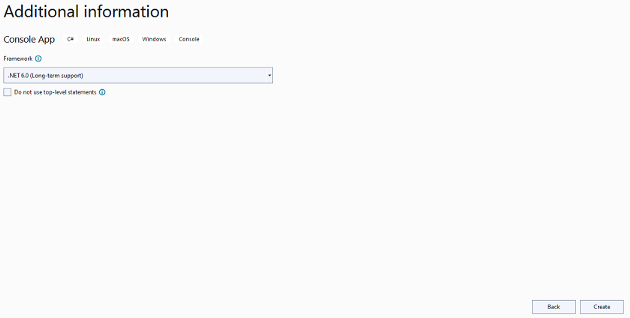
Step 3
Provide additional information

Step 4
Project structure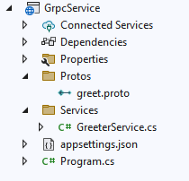
Here you will see the default project structure with greet proto and Greeter Service:
syntax = "proto3";

option csharp_namespace = "GrpcService";

package greet;

// The greeting service definition.
service Greeter {
  // Sends a greeting
  rpc SayHello (HelloRequest) returns (HelloReply);
}

// The request message containing the user's name.
message HelloRequest {
  string name = 1;
}
// The response message containing the greetings.
message HelloReply {
  string message = 1;
}- Protobuf is an Interface Definition Language (IDL) for gRPC and is used to store data and contracts between clients and servers.
- Line No 1 to 5, as you see; there we declare types of protobuf syntax, namespace, and package.
- Line No 7 to 11, there is a Unary Service Definition, which takes a single request, the server sends back the response, and it works as a function.
- There are also many service definitions like Server Streaming, Client Streaming, and Bidirectional Streaming RPCs. To learn more, read the grpc.io document.
- Later on, there is a request and response function in order.
using Grpc.Core;
namespace GrpcService.Services
{
    public class GreeterService : Greeter.GreeterBase
    {
        private readonly ILogger<GreeterService> _logger;
        public GreeterService(ILogger<GreeterService> logger)
        {
            _logger = logger;
        }
        public override Task<HelloReply> SayHello(HelloRequest request, ServerCallContext context)
        {
            return Task.FromResult(new HelloReply
            {
                Message = "Hello " + request.Name
            });
        }
    }
}
This is the Greeter Service which inherits from Greeter.GreeterBase, and inside that, we inject ILogger, and there is one method that takes the message sent by the client and sends it back as a response.
Note: Build Application whenever you add a new proto and Service
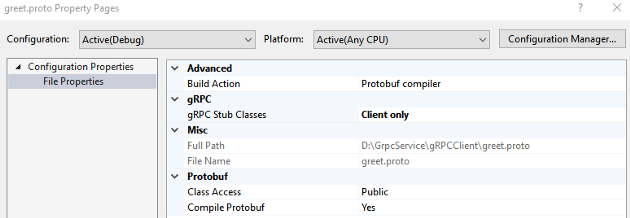
Also, make sure the proto property is configured properly, as shown below:
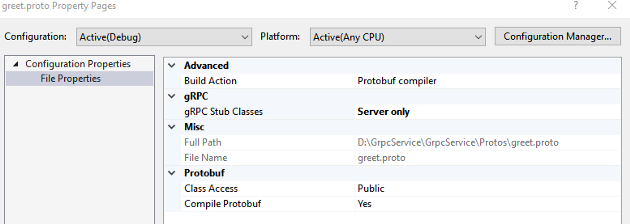
Here we can see the Build Action Protobuf compiler and gRPC Stub Classes are servers only.
Create a Client Console Application
Step 1
Create a new console application

Step 2
Configure your project

Step 3
Provide additional information
Step 4
Copy the greet proto file from the server, change the gRPC stub classes to client only, and build it

Step 5
Add the client code inside the program file
using Grpc.Net.Client;
using GrpcService;
using GrpcService.Protos;
var message = new HelloRequest { Name = "Jaydeep" };
var channel = GrpcChannel.ForAddress("http://localhost:5045");
var client = new Greeter.GreeterClient(channel);
var srerveReply = await client.SayHelloAsync(message);
Console.WriteLine(srerveReply.Message);
Console.ReadLine();- Here we create a channel after configuring the server’s URL and creating a channel.
- Later on, call the method after passing a parameter to the server and print the response message on the console.
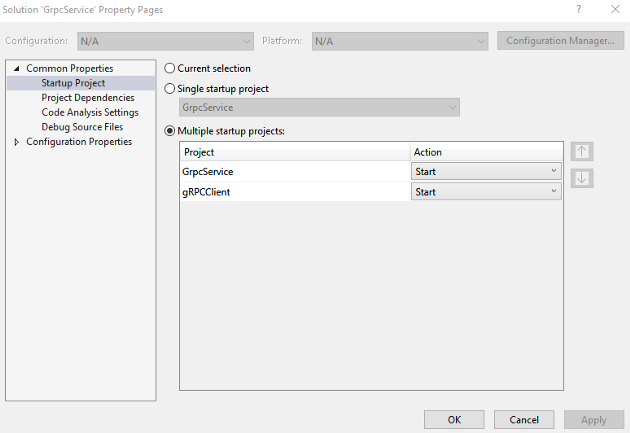
Step 6
Run your code after configuring your projects as startup projects in the proper order
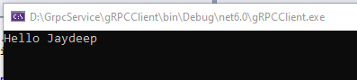
This is the final output:
Adding a New Proto and Service
Now we are going to add our new proto and service related to the product application in which we pass the product id from the client, and the server will send the particular product details back to the client.
Step 1
Create a new product proto file, change the properties to protobuf compiler and servers only, and build the project
syntax = "proto3";
option csharp_namespace = "GrpcService.Protos";
package product;
service Product {
	rpc GetProductsInformation (GetProductDetail) returns (ProductModel);
}
message GetProductDetail{
	int32 productId = 1;
}
message ProductModel{
	string productName = 1;
	string productDescription = 2;
	int32 productPrice = 3;
	int32 productStock = 4;
}
Here you can see that we define a service that takes a product id as a parameter and sends product details to the client.
Step 2
Create a product service
using Grpc.Core;
using GrpcService.Protos;
namespace GrpcService.Services
{
    public class ProductService : Product.ProductBase
    {
        private readonly ILogger<ProductService> _logger;
        public ProductService(ILogger<ProductService> logger)
        {
            _logger = logger;
        }
        public override Task<ProductModel> GetProductsInformation(GetProductDetail request, ServerCallContext context)
        {
            ProductModel productDetail = new ProductModel();
            if (request.ProductId == 1)
            {
                productDetail.ProductName = "Samsung TV";
                productDetail.ProductDescription = "Smart TV";
                productDetail.ProductPrice = 35000;
                productDetail.ProductStock = 10;
            }
            else if (request.ProductId == 2)
            {
                productDetail.ProductName = "HP Laptop";
                productDetail.ProductDescription = "HP Pavilion";
                productDetail.ProductPrice = 55000;
                productDetail.ProductStock = 20;
            }
            else if (request.ProductId == 3)
            {
                productDetail.ProductName = "IPhone";
                productDetail.ProductDescription = "IPhone 12";
                productDetail.ProductPrice = 65000;
                productDetail.ProductStock = 30;
            }
            return Task.FromResult(productDetail);
        }
    }
}
Here you can see we created a Product Service that inherits from a Product.ProductBase, and after that, we inject an ILogger of type Product Service and create one method, and inside that, whatever product details the client wants, we check and return as a response corresponding to the particular product which is sent by the client.
Step 3
Map the product service inside the program class
using GrpcService.Services;
var builder = WebApplication.CreateBuilder(args);
// Additional configuration is required to successfully run gRPC on macOS.
// For instructions on how to configure Kestrel and gRPC clients on macOS, visit https://go.microsoft.com/fwlink/?linkid=2099682
// Add services to the container.
builder.Services.AddGrpc();
var app = builder.Build();
// Configure the HTTP request pipeline.
app.MapGrpcService<GreeterService>();
app.MapGrpcService<ProductService>();
app.MapGet("/", () => "Communication with gRPC endpoints must be made through a gRPC client. To learn how to create a client, visit: https://go.microsoft.com/fwlink/?linkid=2086909");
app.Run();
Step 4
Build a server project
Step 5
Copy the product protobuf file inside the client and change the properties to "client only"
syntax = "proto3";
option csharp_namespace = "GrpcService.Protos";
package product;
service Product {
	rpc GetProductsInformation (GetProductDetail) returns (ProductModel);
}
message GetProductDetail{
	int32 productId = 1;
}
message ProductModel{
	string productName = 1;
	string productDescription = 2;
	int32 productPrice = 3;
	int32 productStock = 4;
}
Step 6
Add client functionality inside the program class
using Grpc.Net.Client;
using GrpcService;
using GrpcService.Protos;
//var message = new HelloRequest { Name = "Jaydeep" };
//var channel = GrpcChannel.ForAddress("http://localhost:5045");
//var client = new Greeter.GreeterClient(channel);
//var srerveReply = await client.SayHelloAsync(message);
//Console.WriteLine(srerveReply.Message);
//Console.ReadLine();
var channel = GrpcChannel.ForAddress("http://localhost:5045");
var client = new Product.ProductClient(channel);
var product = new GetProductDetail { ProductId = 3 };
var serverReply = await client.GetProductsInformationAsync(product);
Console.WriteLine($"{serverReply.ProductName} | {serverReply.ProductDescription} | {serverReply.ProductPrice} | {serverReply.ProductStock}");
Console.ReadLine();
Here we create a channel after configuring the server’s URL and then create a model object with a user id and pass it to the method, which gets the product details as a response. Finally, we print the product details on the console.
Step 7
Build and run your two projects after setting them us as start-up projects
This is the output of our service:
 In this section, we understand the basic workings of gRPC with Product Application. But, in real-time scenarios, there are many ways to implement that, like using background services and some different gRPC streaming techniques that we will discuss in upcoming articles.
The GitHub repository for this tutorial is available here.
Conclusion
In this article, we discussed gRPC and the pros and cons of gRPC. Also, the scenarios in which gRPC plays a vital role and step-by-step implementation using .NET Core 6.
Published at DZone with permission of Jaydeep Patil. See the original article here.
Opinions expressed by DZone contributors are their own.
Comments