Getting Started With Istio in AWS EKS for Multicluster Setup
Here's a tutorial on how to install Istio in AWS EKS and implement it for handling multi-cloud and multiple Kubernetes clusters, like AKS.
Join the DZone community and get the full member experience.
Join For FreeWith many microservices deployed across multi-cloud and hybrid infrastructure (cloud, containers, and VMs), the manageability of the network becomes challenging. The transactions among services happen on the public network, so the sensitivity of the matter increases magnitudinally with rising incidents of hacking and cyberattacks.
Istio service mesh is becoming a center of app modernization for large and medium enterprises. Due to Istio’s phenomenal ability to manage and secure the network across cloud and container workloads, the cloud team and DevOps platform teams consider Istio service mesh for the first round of evaluation.
Configuring Istio for multiple clusters in the same cloud (say AWS EKS- US-west and US-east) is comparatively easy. But organizations may have their microservices in different clouds (say database transaction in AWS and AI/ML processing in GKE), and Istio implementation can be tricky in those instances.
So this article will help and guide anyone who wants to implement Istio in AWS EKS and wants to manage multiple clusters (say GKE, AKS).
Prerequisites
- Istio version 1.17
- Ready-to-use AWS EKS (primary cluster) and AKS (secondary cluster)
- Configure the environment variables
- Terminal to access primary and secondary clusters through kubectl
- Refer to all the files in the Github repo
Full Video on Multicluster Istio Setup in AWS EKS
If you are comfortable referring to a video to implement Istio in AWS EKS, then watch the following video:
Steps
There are four simple steps to implement Istio in AWS EKS and manage AKS clusters:
- Install and configure Istio in AWS EKS
- Configure the remote cluster- AKS
- Allow Istio in GKE to access the remote cluster
- Deploy applications in each cluster and validate mTLS
Note: We will not implement L4 and L7 authorization policies using Istio. You can refer to the full video in the above section or the how to implement Istio in multicloud and multicluster (GKE/AKS) blog post.
Step 1: Install and Configure Istio in AWS EKS
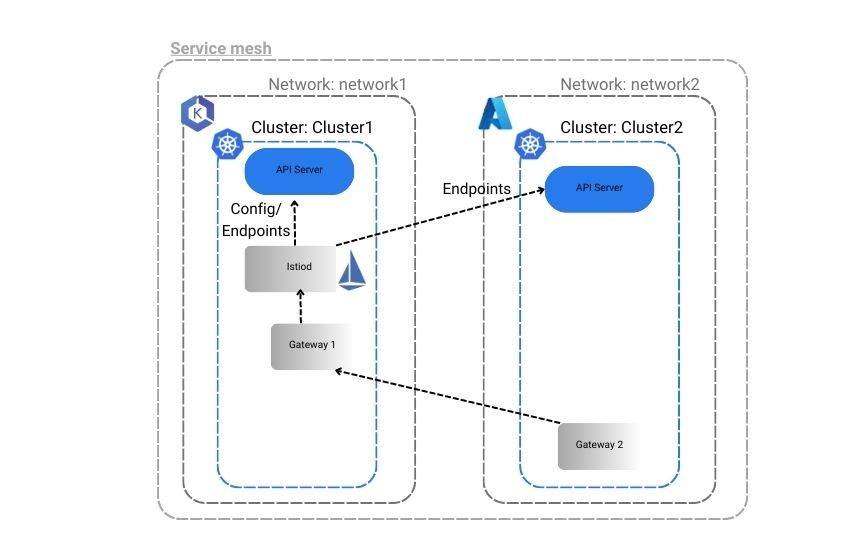
First, we have set the environment variables in our PowerShell for each cluster — AKS for the AKS cluster and EKS for the EKS cluster. We have set up and configured Istio in clusters EKS and AKS so that apps in each cluster can talk to each other using an east-west Istio ingress gateway. Please refer to the image of the Istio configuration we aim to achieve.

Step 1.1: Install Istio
Use the following command to install Istio in EKS.
istioctl install -f cluster-eks-primary.yaml -y %EKS%You will see the following output.

Step 1.2: Install the Istio Gateway in the EKS Cluster
We will use the Istio operator to install an ingress east-west gateway in the AWS EKS cluster that can handle traffic from outside the cluster — from AKS.
(Please note: For this demo, we have added service annotations in the YAML file to create a network load balancer [NLB] instead of the classic load balancer. Classic load balancers will not have a static IP which can be problematic while scaling and descaling resources. But with NLB, we will get a static IP, and the secondary cluster AKS can access the primary cluster. For production, it is advisable to implement Istio with a classic load balancer.)
You can refer to the east-west-gateway-cluster-eks.yaml file below:
apiVersion: install.istio.io/v1alpha1
kind: IstioOperator
metadata:
  name: eastwest
spec:
  revision: ""
  profile: empty
  components:
    ingressGateways:
      - name: istio-eastwestgateway
        label:
          istio: eastwestgateway
          app: istio-eastwestgateway
          topology.istio.io/network: network1
        enabled: true
        k8s:
          env:
            # traffic through this gateway should be routed inside the network
            - name: ISTIO_META_REQUESTED_NETWORK_VIEW
              value: network1
          service:
            ports:
              - name: status-port
                port: 15021
                targetPort: 15021
              - name: tls
                port: 15443
                targetPort: 15443
              - name: tls-istiod
                port: 15012
                targetPort: 15012
              - name: tls-webhook
                port: 15017
                targetPort: 15017
  values:
    gateways:
      istio-ingressgateway:
        injectionTemplate: gateway
        serviceAnnotations:
         service.beta.kubernetes.io/aws-load-balancer-type: “nlb”
    global:
      network: network1
You can run the following command to install the ingress east-west gateway:
istioctl install -f east-west-gateway-cluster-eks.yaml %EKS% -yStep 1.3: Expose Istio Services in EKS
You can expose the Istio service in EKS so that secondary clusters can access it. Use the following command:
kubectl apply -f expose-istiod.yaml %EKS%

Kubectl apply -f expose-services.yaml %EKS%
Step 1.4: Get the IP of Istio East-West Gateway in the EKS Cluster
Run the command to get the address of the network load balancer created by the Istio east-west ingress gateway.
kubectl get service -n istio-system %EKS%Copy the external IP address of the network load balancer (east-west gateway) and ping it to get the IP. We will use the IP address in the AKS cluster in the below setup.

If you want to deploy an application in the EKS cluster into any Istio-enabled namespace, then an Envoy proxy will be attached to each workload.
Step 2: Configure the Remote Cluster AKS
Step 2.1: Create a Namespace in AKS by Specifying EKS as the Primary Control Plane
Use the following yaml file to create a namespace called istio-systems in AKS with EKS as the primary cluster for the Istio control plane. We have named it cluster-aks-remote-namespace-prep.yaml.
apiVersion: v1
kind: Namespace
metadata:
  name: istio-system
  labels:
    topology.istio.io/network: network2
  annotations:
    topology.istio.io/controlPlaneClusters: cluster-eks
Deploy the AKS remote in PowerShell using the command:
kubectl create -f cluster-aks-remote-namespace-prep.yaml %AKS%Step 2.2: Install the Istio Operator in Azure Kubernetes (AKS) Cluster Using the IP of LB in the Primary Cluster EKS
We have used the following declaration in cluster-aks-remote.yaml to install Istio in the AKS cluster. You can use the IP address copied from the above step in the remotePilotAddress section.
apiVersion: install.istio.io/v1alpha1
kind: IstioOperator
spec:
  profile: remote
  values:
    istiodRemote:
      injectionPath: /inject/cluster/cluster-aks/net/network2
    global:
      remotePilotAddress: <replace with ip of east-west gateway of primary cluster>
      proxy:
        privileged: true
Use this command to install Istio in AKS:
istioctl install -f cluster-aks-remote.yaml %AKS%We need to ensure the primary cluster can access the remote cluster. This is only possible by exposing the secrets of the remote cluster to the primary cluster.
Step 3: Allow Istio in EKS to Access the API Server of AKS
The Istio control plane in EKS needs to access the API server of AKS to perform its core activities, such as service discovery, patching webhooks, etc. We can achieve that by generating a remote secret and applying the remote secret in the primary cluster AWS EKS.
Step 3.1: Create Remote Cluster Secrets in AKS Cluster
Use the following command to generate the remote secret of the remote cluster (AKS) and store it in a secret yaml file:
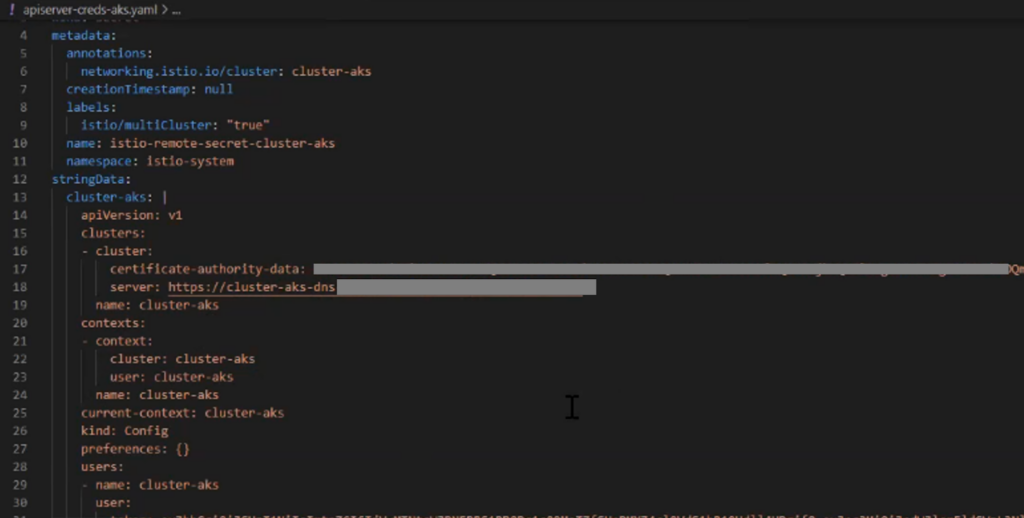
istioctl x create-remote-secret -name-cluster-aks > apiserver-creds-aks.yaml %AKS%The output file apiserver-creds-aks.yaml will look something like below:

Step 3.2: Apply the Remote Cluster Secrets in the Primary Cluster (EKS)
Use the following command to implement the secrets in EKS so that it can access the API server of AKS:
kubectl apply -f .\apiserver-creds-aks.yaml %EKS%Note: Apply the remote credentials first to connect both clusters and then expose the clusters’ services. Otherwise, there will be errors.
Step 3.3: Install East-West Ingress Gateway in Remote Cluster AKS
Use the command to install east-west ingress gateway controllers in AKS.
istioctl install -f east-west-gateway-cluster-aks.yaml %AKS%After the controller is installed, we will create a gateway of an east-west kind in the remote cluster by applying the following commands:
kubectl apply -f .\expose-istiod.yaml %AKS% kubectl apply -f .\expose-services.yaml %AKS%All the configurations for the multicluster Istio setup are done. Now we will deploy applications and check the multicluster communications.
Step 4: Deploy a Multicloud Application and Verify How Istio Handles the Traffic
You can refer to the Git source URL to download and deploy the demo-app to your cluster. The demo-app has 4 microservices: accounts, dashboard, profile, and sleep. The idea is that when we send a request to the dashboard service with an ID (say 4), it will communicate with the profile services to identify the person’s name and communicate with the account service to find the respective account balance.
The deployment and service yaml files are in the Git repo. We have created an Istio-enabled namespace called multicluster and deployed all the applications there.
- Deploy all four services in the EKS cluster.
- Deploy just the
profileservice in the AKS cluster
We will realize that though we have mentioned the count of replicas as one in all the deployment files, there will be two pods for each service: one application pod and one envoy proxy.
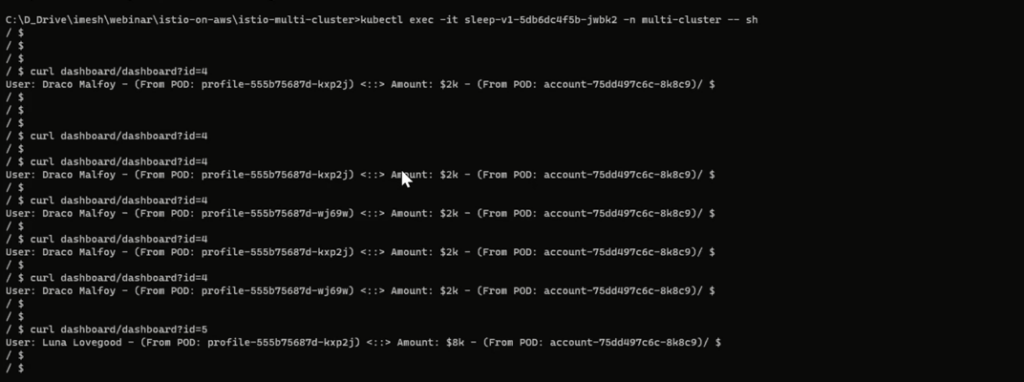
After the deployment, if you want to access the profile services from one of the pods of sleep service in EKS, then you will see the east-west gateway is load-balancing the communication between the pods of profile services in AKS and EKS.

You can also log in to any Envoy proxy pods to see how these proxies carry out the message.
That’s the end of conjuring Istio in EKS for managing the network of multi-cloud and multicluster applications.
Conclusion
We have seen how Istio can abstract the network layer out of the core business logic or the cloud-native applications. It becomes effortless to manage the network and apply advanced strategies such as timeouts, retries, and failovers to ensure the high availability of applications.
With the network getting abstracted, ensuring 100% security (or zero trust) becomes extremely easy. Stakeholders can make a global decision to encrypt all the east-west traffic with mTLS or granular authorization (RBAC) for chosen workloads. Platform and cloud engineers can quickly implement the security policies with the Istio control plane.
Published at DZone with permission of Debasree Panda. See the original article here.
Opinions expressed by DZone contributors are their own.

Comments