FreeRTOS 10.0.1 With NXP S32 Design Studio 2018.R1
Need help updating your FreeRTOS 10.0.1? Here's how to do it with the NXP S32 Design Studio 2018.R1.
Join the DZone community and get the full member experience.
Join For FreeNXP not only sells a general purpose microcontroller, but a portfolio of automotive devices that includes the S32K which is ARM Cortex based. For this device family, they offer the S32 Design Studio (or S32DS) with its own Eclipse distribution and SDK. The interesting part is that the S32DS includes Processor Expert (which is a bit different from the ‘mainstream’ Processor Expert). It comes with its own components for the S32K SDK that includes a component for FreeRTOS. But that component in S32DS 2018.R1 comes with an old V8.2.1 FreeRTOS component:

FreeRTOS 8.2.1 in S32DS 2018.R1
So, what do I do if want to use the latest FreeRTOS (currently 10.0.1) with all the bells and whistles?
This article describes how to upgrade it to the latest and greatest FreeRTOS V10.0.1:

FreeRTOS 10.0.1 in S32DS 2018.R1
Outline
The latest FreeRTOS V10.0.1 has many benefits: it is under a more permissible license, plus it comes with all the latest features like static memory allocation or direct task notification. Because it is not possible to directly update the FreeRTOS component in S32DS, I’m using the McuOnEclipse FreeRTOS component for S32DS. That component version is always up to the latest FreeRTOS version, supports multiple IDE’s (CodeWarrior classic, CodeWarrior for MCU 10.x, Kinetis Design Studio, MCUXpresso IDE and now as well S32DS) and a broad range of microcontroller (S08, S12, DSC, ColdFire, Kinetis and now as well S32DS). Additionally, it seamlessly integrates SEGGER SystemView/RTT and Percepio FreeRTOS Tracealyzer.
At the time of this article, not all McuOnEclipse components have been ported to S32DS. More components will be released in the future.
This article describes how to add and use the FreeRTOS 10.0.1 McuOnEclipse components in S32DS, followed by a tutorial how to create a FreeRTOS project for the S32K144EVB board.
Example projects like the one discussed here are available on GithHub: https://github.com/ErichStyger/mcuoneclipse/tree/master/Examples/S32DS
Creating the Project
In a first step, we create a basic project we can debug on the board.
In S32DS, use the menu File > New > S32DS Application Project:
New Application Project
Provide a name for the project and select the device to be used:
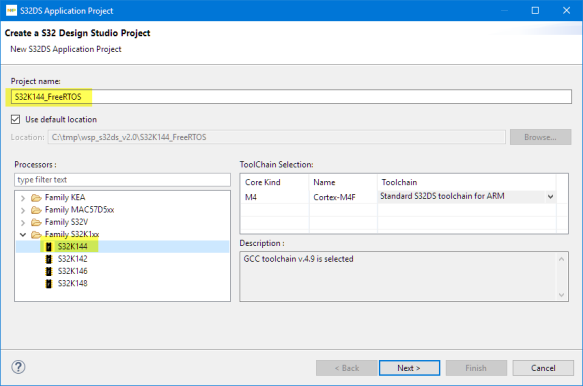
Create a S32 DS Project
Press Next. Click on the browse button to select the SDK:

Choose SDK
Select the S32K144_SDK_gcc SDK:
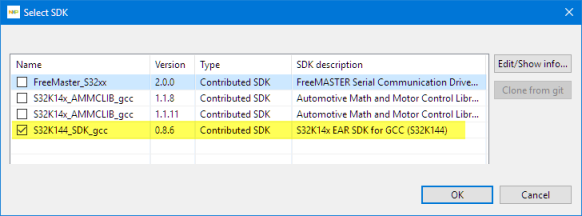
S32K144 SDK
Press OK. Now, the SDK is selected:

Press Finish to create the project. In Eclipse, I have now the project created:
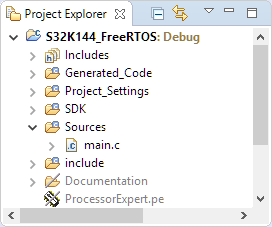
Basic Project
Now, it would be good time to build (menu Project > Build Project) and debug (Menu Run > Debug) the project to verify everything is working so far. Doing the Debug, it will ask me for which configuration I want to use. I select the Debug one:
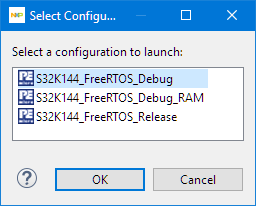
Debug Configuration
Depending on the debug connection, I can set it to OpenSDA:

OpenSDA
With this, I should be able to debug the project:
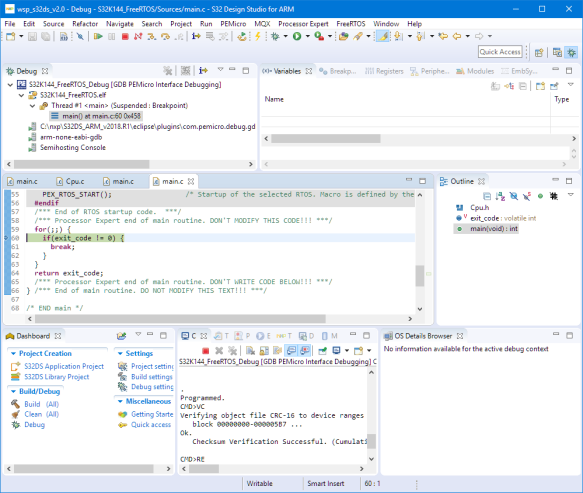
Debugging the Initial Project
Congratulations! You can now terminate the debug session with the red ‘stop’ button and switch back to the C/C++ perspective.
Blinky LED
In a next step, we mux the RGB LED pins on the S32K144EVB board. For this, double-click on the PinSettings component to open the Component Inspector for it:

Pin Muxing Settings
The RGB LEDs are on PTD0, PTD15, and PTD16. Route them in the Inspector as shown below:
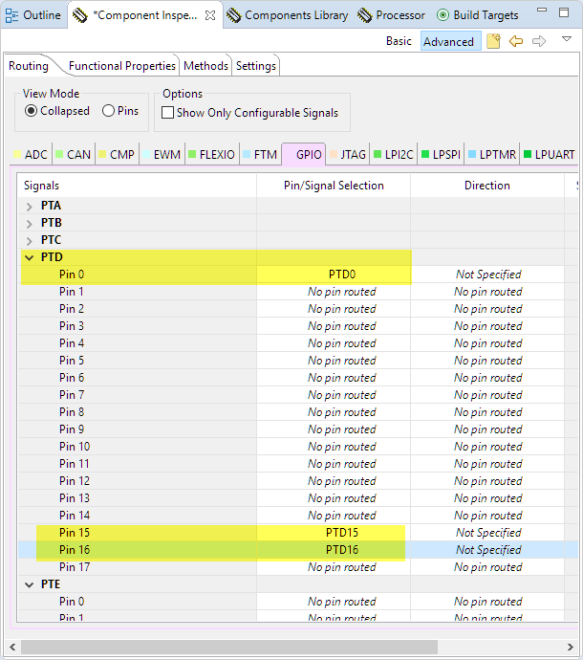
Routed Pins
Then, generate code with the button in the components view:

Generating Code
Next, add the following code into main():
CLOCK_SYS_Init(g_clockManConfigsArr, CLOCK_MANAGER_CONFIG_CNT, g_clockManCallbacksArr, CLOCK_MANAGER_CALLBACK_CNT);
CLOCK_SYS_UpdateConfiguration(0U, CLOCK_MANAGER_POLICY_FORCIBLE);
PINS_DRV_Init(NUM_OF_CONFIGURED_PINS, g_pin_mux_InitConfigArr);
PINS_DRV_SetPinsDirection(PTD, (1<<0U) | (1<<15U) | (1<<16U)); /* set as output */

PINS_DRV_SetPins(PTD, (1<<0U) | (1<<15U) | (1<<16U)); /* all LEDs off */
PINS_DRV_ClearPins(PTD, (1<<15U)); /* RED pin low ==> ON */
PINS_DRV_TogglePins(PTD, (1<<15U)); /* RED pin high => off */
Added Code to Main
This is to initialize the clock and GPIO pin drivers, followed by turning all LEDs off and then the Red one on and off.
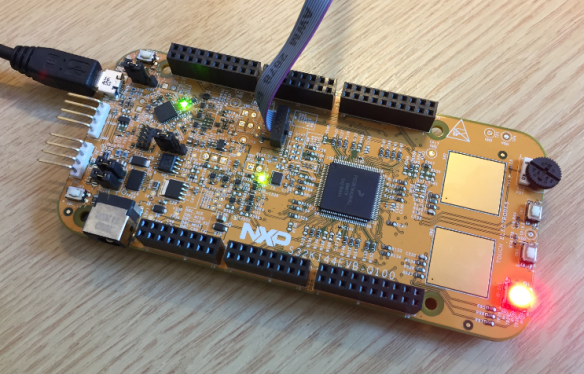
Build and debug it on the board to verify everything is working as expected.
McuOnEclipse Component Installation
You need at the 1-July-2018 release or later.
Download from SourceForge the latest zip file and unzip it.
Use the menu Processor Expert > Import Component(s):
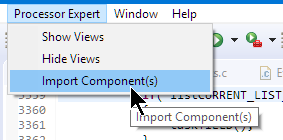
Processor Expert Import Components
Select *both* *.PEupd files and press Open:

Open .PEupd Files.PEupd Files
Specify/Select the component repository where to import the components:

Component Repository
If that repository does not exist yet, add a new one:
I’m using below the McuOnEclipse folder inside the S32DS installation folder. Create that folder first if it does not exist yet.

Add Repository
Because the Processor Expert in S32DS does not include all needed Processor Expert include files, another manual step is required. These extra files are present inside the package you have downloaded from SourceForge:
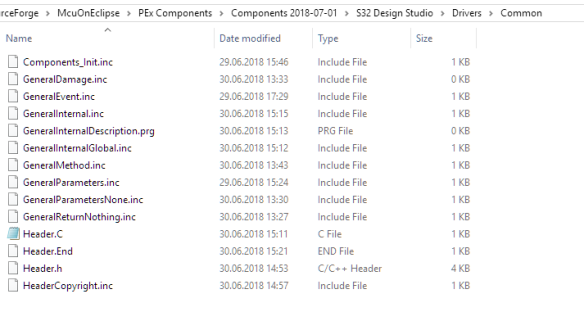
Adding FreeRTOS
Next, add the FreeRTOS component from the McuOnEclipse repository to the project:

Adding FreeRTOS Component to Project
This will bring in a few other components into the project. Open the Inspector view for the McuLibConfig component:

Configure it to use the S32K SDK:
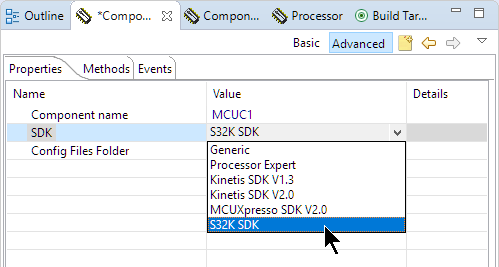
In the FreeRTOS settings, verify that the ARM core is matching your board:
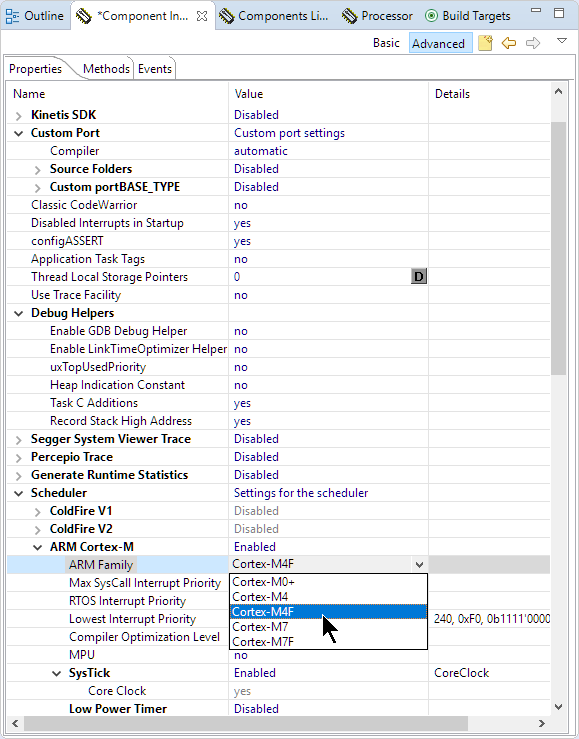
This completes the settings. Generate code:
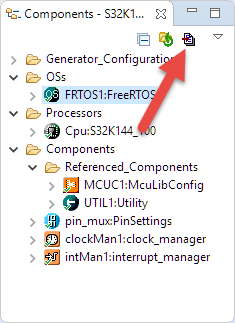
Initializing Component Drivers
In other IDE’s (Kinetis Design Studio, CodeWarrior, …), the Processor Expert will initialize the component drivers. Because this is not implemented in the S32DS version, I have to call the Init functions separately. For this, add the following template to main.c:
static void Components_Init(void) {
  #define CPU_INIT_MCUONECLIPSE_DRIVERS
  /* IMPORTANT: copy the content from Cpu.c! */
/*------------------------------------------------------------------*/
/* copy-paste code from Cpu.c below: */

/*------------------------------------------------------------------*/
}
You find the code to copy at the end of Generated_Code\Cpu.c:
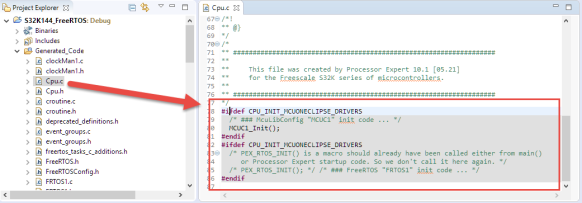
Initialization Code in Cpu.c
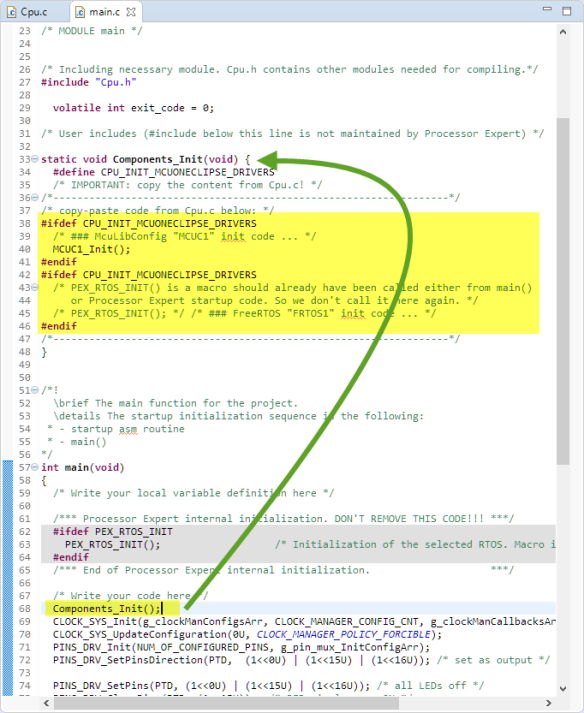
Copy that code and place it inside Components_Init() in main.c:
Unfortunately, this is a manual process. Whenever you add/remove a component, make sure you update the Components_Init() function.
Events
The next manual thing is about Processor Expert events. In other IDE’s, the Processor Expert is creating proper event modules. In S32DS, it only adds the events to the Events.c, which is not complete.
To solve this, first exclude the file Events.c from the build. Use the properties and turn on ‘Exclude resource from build’ (see “Exclude Source Files from Build in Eclipse“).

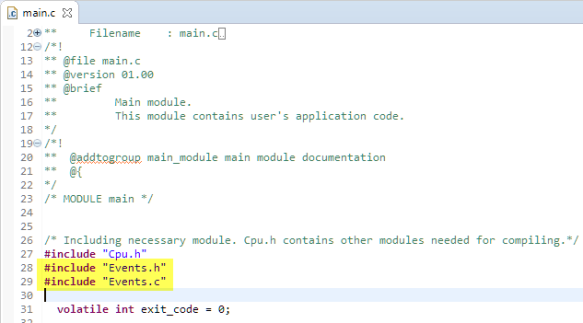
Then, include the header file and source file into main.c:
#include "Events.h"
#include "Events.c"
This uses the preprocessor to place the event code into main.c:
FreeRTOS Task
Add the following code for a FreeRTOS task to main.c which blinks the green LED:
static void AppTask(void *param) {
  (void)param; /* not used */
  for(;;) {
    PINS_DRV_TogglePins(PTD, (1<<16U)); /* blink green LED */
    vTaskDelay(pdMS_TO_TICKS(1000)); /* wait 1 second */
  } /* for */
}
Next, create the task in main() and start the scheduler:
if (xTaskCreate(AppTask, "App", 500/sizeof(StackType_t), NULL, tskIDLE_PRIORITY+1, NULL) != pdPASS) {
    for(;;){} /* error! probably out of memory */
  }
  vTaskStartScheduler();
Now, build and debug.

Debugging FreeRTOS Application in S32DS
And, enjoy the blinking green LED:

Summary
It is great to see that Processor Expert at least continues to exist in the automotive part of NPX with the S32 Design Studio. However, that Processor Expert has been reduced to the S32K SDK and automatic component initialization and event handling needs a manual setup. Other than that, the first components work great in S32DS. And, for everyone using S32DS, the McuOnEclipse components offer the latest FreeRTOS and extra features like tickless idle mode, Segger RTT, Segger SystemViewer and Percepio Tracealyzer.
Happy updating!
Published at DZone with permission of Erich Styger, DZone MVB. See the original article here.
Opinions expressed by DZone contributors are their own.


Comments