Fill Forms and Submit With JMeter - Made Easy
When testing web apps that require interactions with forms being able to create these tests is key. Our friends at Blazemeter show us how to make this process quick and easy.
Join the DZone community and get the full member experience.
Join For FreeWhen performance testing, we often need to interact with web forms and perform actions. These actions include login, signup, contacts and payment forms, purchase requests, etc. But filling forms via Apache JMeter is not always straightforward. In this article, we will make sure it’s not a challenge anymore. I’ll provide practical guidelines that you can easily follow and fill out a form by using JMeter in just a few minutes.
Let's start with a few introductory terms. First of all, we need to define what a “web form” is. A web form is a special HTML element that is used on web pages and allows you to enter data, which can afterward be sent to the server.
To keep it simple, let’s visualize a workflow that shows what goes on behind the scenes of filling a random form:

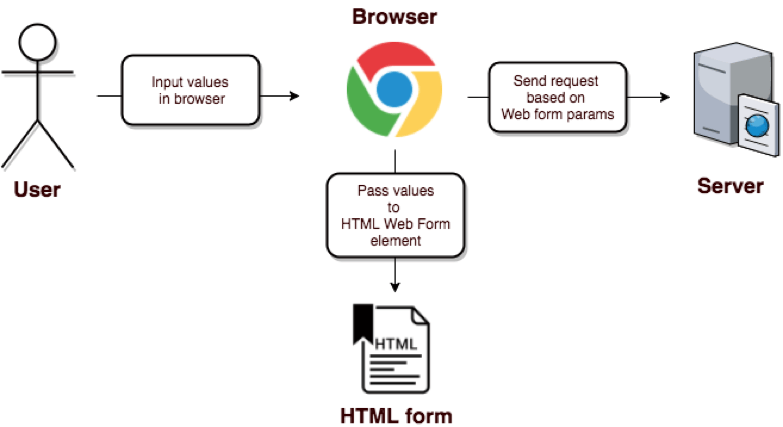
At first glance, the web forms filling the workflow seem absolutely unique, making it tricky to implement in performance testing. But I will reveal a secret and say that it is absolutely the same as any other performance request and you actually don’t need to input any values into web form elements.
In fact, each web form submission is just a simple request to the server. There are always some exceptions, but usually, the form submission is a POST request with specified params in the request body, which are transferred from the form to the server.
If we go back to our performance script workflow picture, we can make it much simpler:

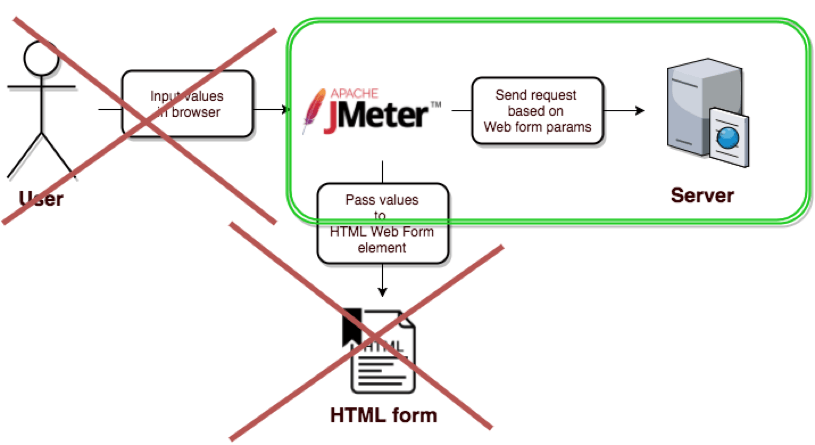
And basically, that’s it. All we need to do is send one request with specified parameters, and then send the request to the server.
Now that you feel comfortable with the theory, we can go further with performance script creation. One of the best examples of a part of the form filling workflow is the user registration process.
Building a Web Form Test Scenario
We have a very stable and always available web application that can be used for trying out performance scripts. In addition to a flights purchase functionality, the BlazeDemo has a separate page where you can perform new user registrations and login workflows. On this page, you have to fill in a user registration form.
Since registering one user seems too trivial for a performance test example, I decided to implement a simple script that simulates registering 100 random users and their login into the http://blazedemo.com/ application. This performance scenario is pretty common.
For example, it makes sense to run such a performance test for a marketplace or web store, where you might have some time limited special offers that force users to register in your web application. In the case of an interesting offer, you might get a large spike of new users coming to perform registration and login workflows. Let’s implement that script step by step.
1. First, we need to add a Thread Group.

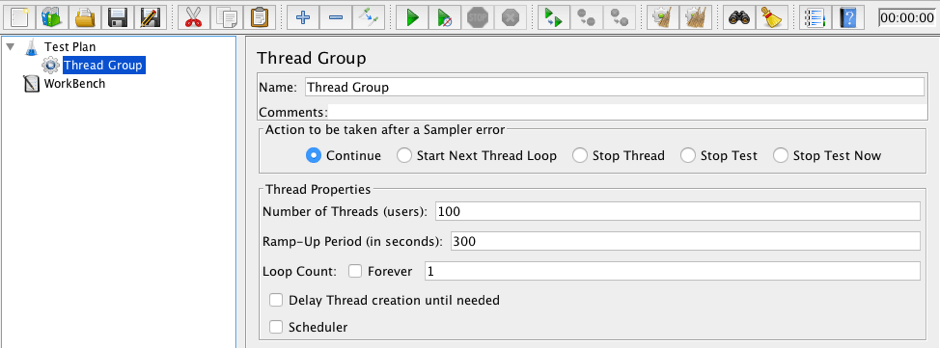
We want to simulate a scenario when, during 5 minutes, we have a spike of new users coming and registering on to the web application. An example of such a scenario could be when you have a web store and you announced a sale, but users who want to enjoy the sale need to register via your web application. This a scenario that is especially relevant before Black Friday, when a lot of users try to register. Since the user registration happens only once, we need to leave the “Loop Count” as 1.
Before implementing the main performance test steps, let’s think about our workflow. We are going to perform a registration of 100 unique users. As we want to run the same performance test, again and again, we need to manage the fact that each user should have a unique name and email, at least.
2. So for each thread, we should create a unique string that we might use when filling out the form. Thanks to JMeter’s powerful capabilities, we can use the built in JMeter function “${__UUID()}”, which returns a random UUID (a unique 128-bit number in text representation). We just need to place the assigned value of that function to a certain variable. To do that we can use the “User Defined Variables” JMeter config element:


As this function is placed under “Thread Group,” it will be triggered for each user. As a result, each user will have a unique string that might be used as a prefix for an email, name, company, and password, to make all of them exclusive.
3. The next step is to open the registration page and verify that any user can open it. To do that, add the HTTP sampler that simulates the registration page request:


4. Once we have opened the registration page, we need to proceed with the action we are afraid of at that moment: filling out and submitting the form. But as we discussed before, it is basically the same as sending a simple POST request.
5. To confirm and find out which request should be sent, you can use the Chrome Developer Tools (if you are using Chrome as a browser. If not, you can use Firebug for Firefox or other similar tools if you prefer a different browser).
Now, open Developer Tools on the “Network” tab and perform user registration workflows. Do not forget to check the “Preserve log” checkbox. During the form submit action you will be redirected to another page and without that option ON you will miss all the historical requests from the initial web page, including the request for form submission:

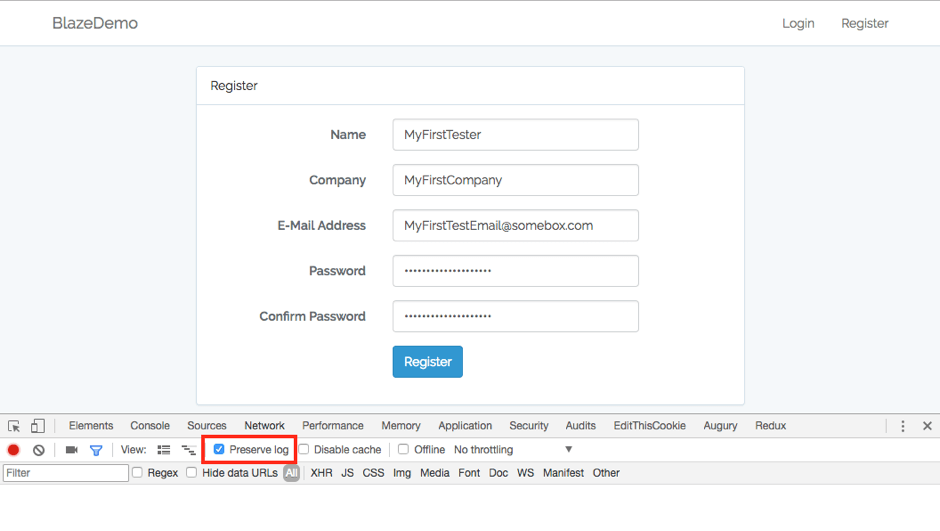
6. Once you click on“ Register,” you should be able to see the first request that was sent to the server:


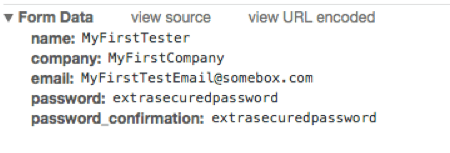
As you can see, form submission is just a simple POST request with a few parameters in the POST body. In this example, they are the name, company, email, password, and password_confirmation.
7. Let’s add the same step into JMeter. To do that we need to add an additional HTTP Sampler:

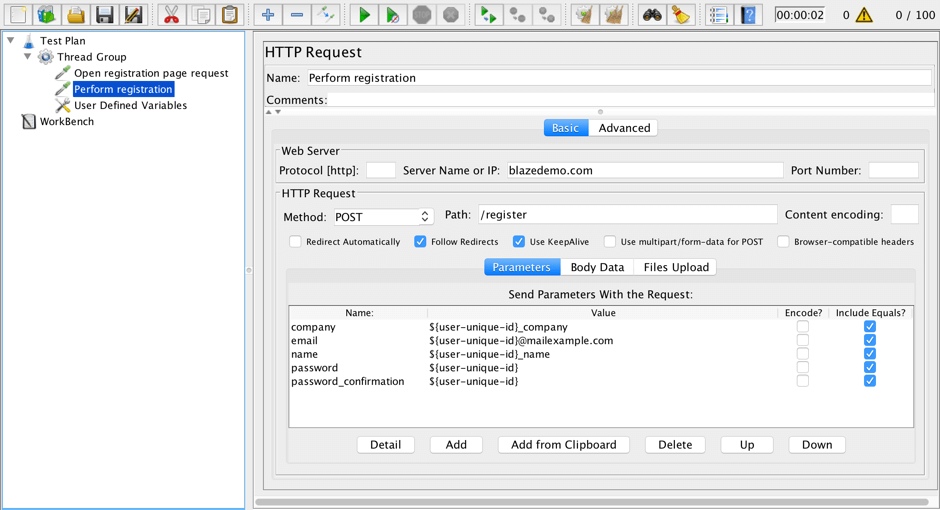
8. As you can see, to make each user unique, we used our ${user-unique-id} variable, created at the beginning of the script creation as a prefix for each request parameter. Actually, this pretty simple HTTP Sampler simulates the completion and submission of the web form, and we don’t need to care about any additional steps in this workflow.
9. To ensure that our test succeeded and that we were able to create a new user, we need to simulate a login action with a newly created user, by adding one more additional HTTP Sampler:

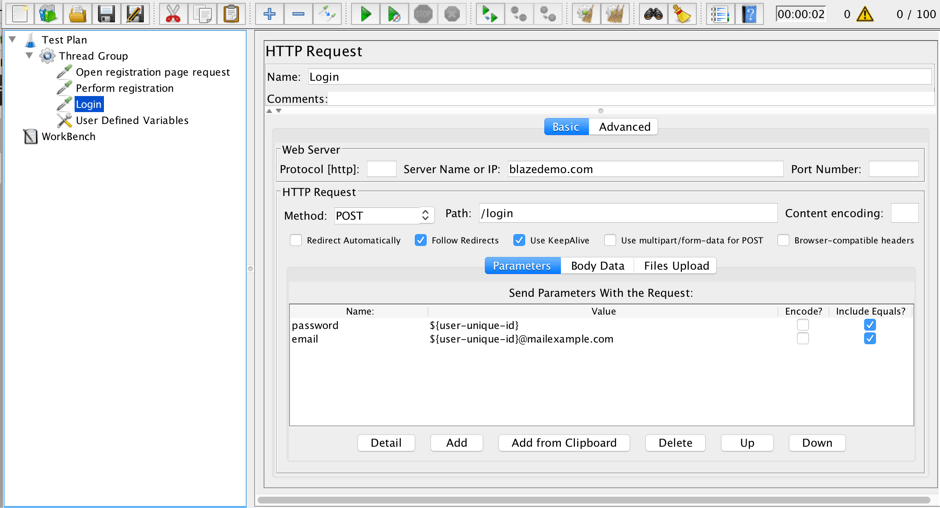
In the HTTP Sampler, we need to ensure that, for our login request, we’re using the same password and email that were used during the registration processes.
10. Our script is ready and we can trigger the performance test run:

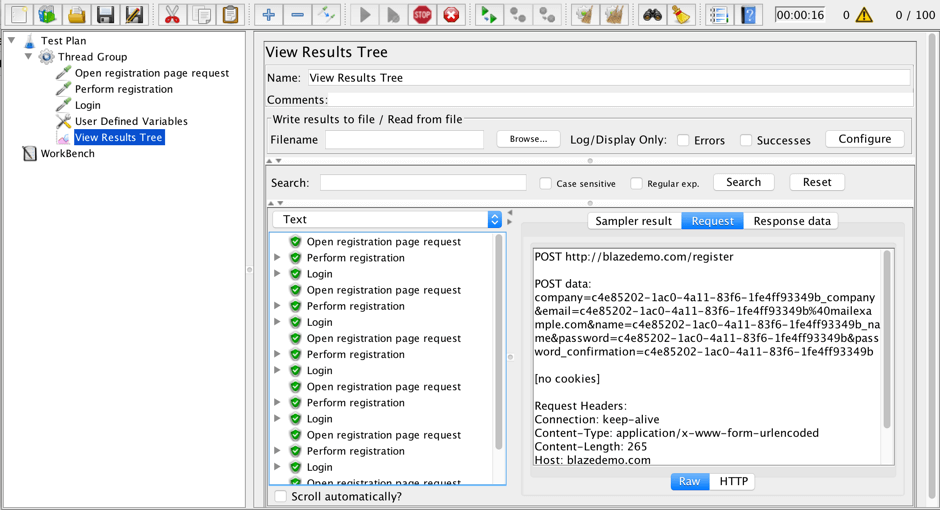
That’s it! As you can see, web forms completion and submission is simple! So simple that we were able to register 100 unique users and fill in 100 web forms in 5 minutes. You just need to think about it from the server side and to treat the submission of web forms as simple requests coming to the server from the client, and nothing more. I hope that the above article helped you to dispel fears and be ready to fight against any web form which you can face during the implementation of performance tests.
Published at DZone with permission of Anastasia Golovkova, DZone MVB. See the original article here.
Opinions expressed by DZone contributors are their own.

Comments