Face Detection using HTML5, Javascript, Webrtc, Websockets, Jetty and OpenCV
How to create a real-time face detection system using HTML5, JavaScript, and OpenCV, leveraging WebRTC for webcam access and WebSockets for client-server communication.
Join the DZone community and get the full member experience.
Join For FreeThrough HTML5 and the corresponding standards, modern browsers get more standarized features with every release. Most people have heard of websockets that allows you to easily setup a two way communication channel with a server, but one of the specifications that hasn't been getting much coverage is the webrtc specificiation.
With the webrtc specification it will become easier to create pure HTML/Javascript real-time video/audio related applications where you can access a user's microphone or webcam and share this data with other peers on the internet. For instance you can create video conferencing software that doesn't require a plugin, create a baby monitor using your mobile phone or more easily facilitate webcasts. All using cross-browser features without the use of a single plugin.
As with a lot of HTML5 related specification, the webrtc one isn't quite finished yet, and support amongst browsers is minimal. However, you can still do very cool things with the support that is currently available in the development builds of Opera and the latest Chrome builds. In this article I'll show you how to do use webrtc and a couple of other HTML5 standards to accomplish the following:
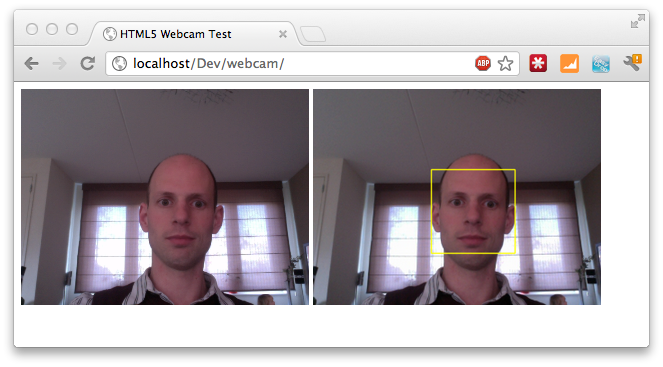
For this we need to take the following steps:
- Access the user's webcam through the getUserMedia feature
- Send the webcam data using websockets to a server
- At the server, we analyze the received data, using JavaCV/OpenCV to detect and mark any face that is recognized
- Use websockets to send the data back from the server to the client
- Show the received information from the server to the client
In other words, we're going to create a real-time face detection system, where the frontend is completely provided by 'standard' HTML5/Javascript functionality. As you'll see in this article, we'll have to use a couple of workarounds, because some features haven't been implemented yet.
Which tools and technologies do we use
Lets start by looking at the tools and technologies that we'll use to create our HTML5 face detection system. We'll start with the frontend technologies.
- Webrtc: The specification page says this. These APIs should enable building applications that can be run inside a browser, requiring no extra downloads or plugins, that allow communication between parties using audio, video and supplementary real-time communication, without having to use intervening servers (unless needed for firewall traversal, or for providing intermediary services).
- Websockets: Again, from the spec. To enable Web applications to maintain bidirectional communications with server-side processes, this specification introduces the WebSocket interface.
- Canvas: And also from the spec: Element provides scripts with a resolution-dependent bitmap canvas, which can be used for rendering graphs, game graphics, or other visual images on the fly.
What do we use at the backend:
- Jetty: Provides us with a great websockets implementation
- OpenCV: Library that has all kind of algorithms for image manipulation. We use their support for face recognition.
- JavaCV: We want to use OpenCV directly from Jetty to detect images based on the data we receive. With JavaCV we can use the features of OpenCV through a Java wrapper.
Frontend step 1: Enable mediastream in Chrome and access the webcam
Let's start with accessing the webcam. In my example I've used the latest version of Chrome (canary) that has support for this part of the webrtc specifcation. Before you can use it, you first have to enable it. You can do this by opening the "chrome://flags/" URL and enable the mediastream feature:
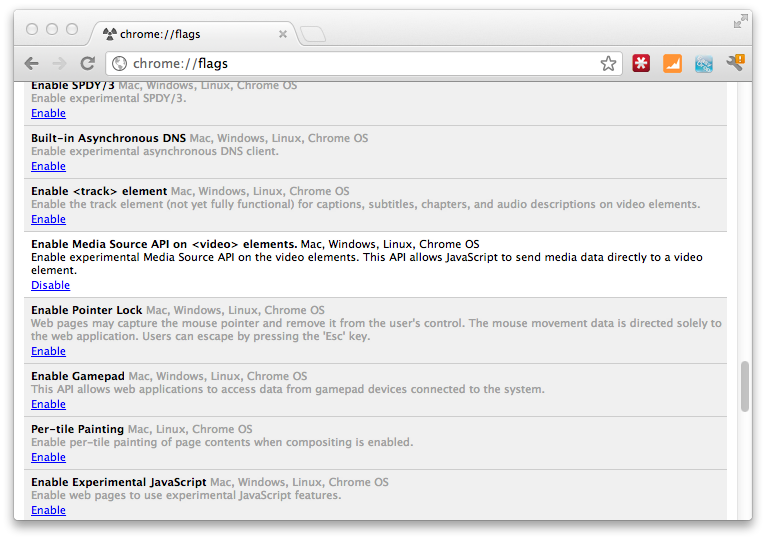
Once you've enabled it (and have restarted the browser), you can use some of the features of webrtc to access the webcam directly from the browser without having to use a plugin. All you need to do to access the webcam is use the following piece of html and javascript:
<div>
    <video id="live" width="320" height="240" autoplay></video>
</div>
And the following javascript:
 video = document.getElementById("live")
    var ctx;
    // use the chrome specific GetUserMedia function
    navigator.webkitGetUserMedia("video",
            function(stream) {
                video.src = webkitURL.createObjectURL(stream);
            },
            function(err) {
                console.log("Unable to get video stream!")
            }
    )
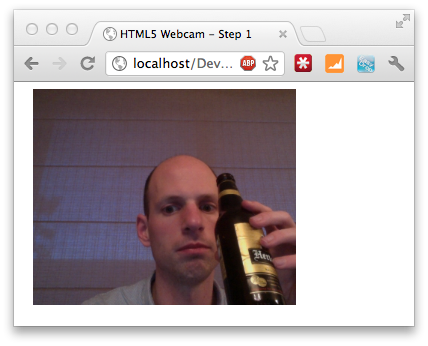
With this small piece of HTML and javascript we can access the user's webcam and show the stream in the HTML5 video element. We do this by first requesting access to the webcam by using the getUserMedia function (prefixed with the chrome specific webkit prefix). In the callback we pass in, we get access to a stream object. This stream object is the stream from the user's webcam. To show this stream we need to attach it to the video element. The src attribute of the video element allows us to specify an URL to play. With another new HTML5 feature we can convert the stream to an URL. This is done by using the URL.CreateObjectURL function (once again prefixed). The result of this function is an URL which we attach to the video element. And that's all it takes to get access to the stream of a user's webcam:
The next thing we want to do is send this stream, using websockets, to the jetty server.
Frontend step 2: Send stream to Jetty server over websockets
In this step we want to take the data from the stream, and send it as binary data over a websocket to the listening Jetty server. In theory this sounds simple. We've got a binary stream of video information, so we should be able to just access the bytes and instead of streaming the data to the video element, we instead stream it over a websocket to our remote server. In practice though, this doesn't work. The stream object you receive from the getUserMedia function call, doesn't have an option to access it data as a stream. Or better said, not yet. If you look at the specifications you should be able to call record() to get access to a recorder. This recorder can then be used to access the raw data. Unfortunately, this functionality isn't supported yet in any browser. So we need to find an alternative. For this we basically just have one option:
- Take a snapshot of the current video.
- Paint this to the canvas element.
- Grab the data from the canvas as an image.
- Send the imagedata over websockets.
A bit of a workaround that causes a lot of extra processing on the client side and results in a much higher amount of data being sent to the server, but it works. Implementing this isn't that hard:
<div>
    <video id="live" width="320" height="240" autoplay style="display: inline;"></video>
    <canvas width="320" id="canvas" height="240" style="display: inline;"></canvas>
</div>

 <script type="text/javascript">
    var video = $("#live").get()[0];
    var canvas = $("#canvas");
    var ctx = canvas.get()[0].getContext('2d');

    navigator.webkitGetUserMedia("video",
            function(stream) {
                video.src = webkitURL.createObjectURL(stream);
            },
            function(err) {
                console.log("Unable to get video stream!")
            }
    )

    timer = setInterval(
            function () {
                ctx.drawImage(video, 0, 0, 320, 240);
            }, 250);
</script>
Not that much more complex then our previous piece of code. What we added was a timer and a canvas on which we can draw. This timer is run every 250ms and draws the current video image to the canvas (as you can see in the following screenshot):
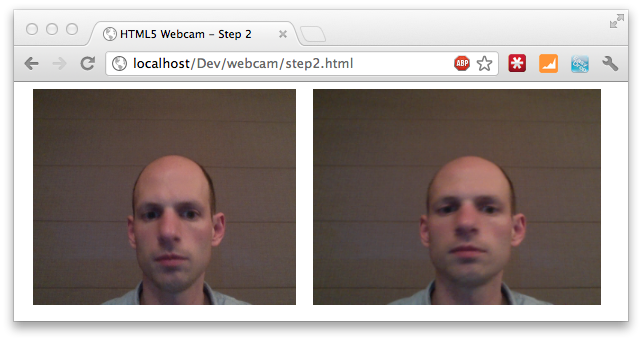
As you can see the canvas has a bit of a delay. You can tune this by setting the interval lower, but this does require a lot more resources.
The next step is to grab the image from the canvas, convert it to binary, and send it over a websocket. Before we look at the websocket part, let's first look at the data part. To get the data we extend the timer function with the following piece of code:
    timer = setInterval(
            function () {
                ctx.drawImage(video, 0, 0, 320, 240);
                var data = canvas.get()[0].toDataURL('image/jpeg', 1.0);
                newblob = dataURItoBlob(data);
            }, 250);
    }
The toDataURL function copies the content from the current canvas and stores it in a dataurl. A dataurl is a string containing base64 encoded binary data. For our example it looks a bit like this:
data:image/jpeg;base64,/9j/4AAQSkZJRgABAQAAAQABAAD/2wBDAAEBAQEBAQEBAQEBAQEB
AQEBAQEBAQEBAQEBAQEBAQEBAQEBAQEBAQEBAQEBAQEBAQEBAQEBAQEBAQEBAQEB
AQH/2wBDAQEBAQEBAQEBAQEBAQEBAQEBAQEBAQEBAQEBAQEBAQEBAQEBAQEBAQEBA
QEBAQEBAQEBAQEBAQEBAQEBAQEBAQH/wAARCADwAUADASIAAhEBAxEB/8QAHwAAAQU
.. snip ..
QxL7FDBd+0sxJYZ3Ma5WOSYxwMEBViFlRvmIUFmwUO7O75Q4OSByS5L57xcoJuVaSTTpyfJ
RSjKfxayklZKpzXc1zVXVpxlGRKo1K8pPlje6bs22oxSau4R9289JNJuLirpqL4p44FcQMkYMjrs+z
vhpNuzDBjlmJVADuwMLzsIy4OTMBvAxuDM+AQW2vsVzIoyQQwG1j8hxt6VELxd7L5caoT5q4kj
uc4rku4QjOPI4tNXxkua01y8uijJtSTS80le0Z6WjJuz5pXaa//2Q==
We could send this over as a text message and let the serverside decode it, but since websockets also allows us to send binary data, we'll convert this to binary. We need to do this in two steps, since canvas doesn't allow us (or I don't know how) direct access to the binary data. Luckily someone at stackoverflow created a nice helper method for this (dataURItoBlob) that does exactly what we need (for more info and the code see this post).At this point we've got a data array containing a screenshot of the current video that is taken at the specified interval. The next step, and for now final step, at the client is to send this using websockets.
Using websockets from Javascript is actually very easy. You just need to specify the websockets url and implement a couple of callback functions. The first thing we need to do is open the connection:
    var ws = new WebSocket("ws://127.0.0.1:9999");
    ws.onopen = function () {
              console.log("Openened connection to websocket");
    }
Assuming everything went ok, we now have a two-way websockets connection. Sending data over this connection is as easy as just calling ws.send:
    timer = setInterval(
            function () {
                ctx.drawImage(video, 0, 0, 320, 240);
                var data = canvas.get()[0].toDataURL('image/jpeg', 1.0);
                newblob = dataURItoBlob(data);
                ws.send(newblob);
            }, 250);
    }
That's it for the client side. If we open this page, we'll get/request access to the user webcam, show the stream from the webcam in a video element, capture the video at a specific interval, and send the data using websockets to the backend server for further processing.
Setup backend environment
The backend for this example was created using Jetty's websocket support (in a later article I'll see if I can also get it running using Play 2.0 websockets support). With Jetty it is really easy to launch a server with a websocket listener. I usually run Jetty embedded, and to get websockets up and running I use the following simple Jetty launcher.
public class WebsocketServer extends Server {

	private final static Logger LOG = Logger.getLogger(WebsocketServer.class);

	public WebsocketServer(int port) {
		SelectChannelConnector connector = new SelectChannelConnector();
		connector.setPort(port);
		addConnector(connector);

		WebSocketHandler wsHandler = new WebSocketHandler() {
			public WebSocket doWebSocketConnect(HttpServletRequest request,	String protocol) {
				return new FaceDetectWebSocket();
			}
		};
		setHandler(wsHandler);
	}

	/**
	 * Simple innerclass that is used to handle websocket connections.
	 *
	 * @author jos
	 */
	private static class FaceDetectWebSocket implements WebSocket,
			WebSocket.OnBinaryMessage, WebSocket.OnTextMessage {

		private Connection connection;
		private FaceDetection faceDetection = new FaceDetection();

		public FaceDetectWebSocket() {
			super();
		}

		/**
		 * On open we set the connection locally, and enable
		 * binary support
		 */
		public void onOpen(Connection connection) {
			this.connection = connection;
			this.connection.setMaxBinaryMessageSize(1024 * 512);
		}

		/**
		 * Cleanup if needed. Not used for this example
		 */
		public void onClose(int code, String message) {}

		/**
		 * When we receive a binary message we assume it is an image. We then run this
		 * image through our face detection algorithm and send back the response.
		 */
		public void onMessage(byte[] data, int offset, int length) {

			ByteArrayOutputStream bOut = new ByteArrayOutputStream();
			bOut.write(data, offset, length);
			try {
				byte[] result = faceDetection.convert(bOut.toByteArray());
				this.connection.sendMessage(result, 0, result.length);
			} catch (IOException e) {
				LOG.error("Error in facedetection, ignoring message:" + e.getMessage());
			}
		}


	}

	/**
	 * Start the server on port 999
	 */
	public static void main(String[] args) throws Exception {
		WebsocketServer server = new WebsocketServer(9999);
		server.start();
		server.join();
	}
}
A big source file, but not so hard to understand. The import parts are creating a handler that supports the websocket protocol. In this listing we create a WebSocketHandler that always returns the same WebSocket. In a real world scenario you'd determine the type of WebSocket based on properties or URL, in this example we just always return this same one.
The websocket itself isn't that complex either, but we do need to configure a couple of things for everything to work correctly. In the onOpen method we do the following:
		public void onOpen(Connection connection) {
			this.connection = connection;
			this.connection.setMaxBinaryMessageSize(1024 * 512);
		}
This enables support for binary message. Our WebSocket can now receive binary messages up to 512KB, since we don't directly stream the data, but send a canvas rendered image the message size is rather large. 512KB however is more then enough for messages sized 640x480. Our face detection also works great with a resolution of just 320x240, so this should be enough. The processing of the received binary image is done in the onMessage method:
		public void onMessage(byte[] data, int offset, int length) {

			ByteArrayOutputStream bOut = new ByteArrayOutputStream();
			bOut.write(data, offset, length);
			try {
				byte[] result = faceDetection.convert(bOut.toByteArray());
				this.connection.sendMessage(result, 0, result.length);
			} catch (IOException e) {
				LOG.error("Error in facedetection, ignoring message:" + e.getMessage());
			}
		}
This isn't really optimized code, but its intentions should be clear. We get the data sent from the client, write it to a bytearray with fixed size and pass it onto the faceDetection class. This faceDetection class does its magic and returns the processed image. This processed image is the same as the original one, but now with a yellow rectangle indicating the found face.
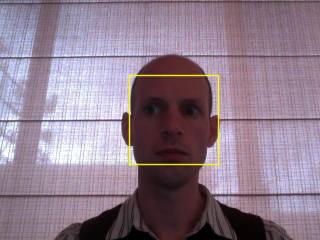
This processed image is sent back over the same websocket connection to be processed by the HTML client. Before we look at how we can show this data using javascript, we'll have a quick look at the FaceDetection class.
The FaceDetection class uses a CvHaarClassifierCascade from JavaCV, java wrappers for OpenCV, to detect a face. I won't go into too much detail how face detection works, since that is a very extensive subject in it self.
public class FaceDetection {

	private static final String CASCADE_FILE = "resources/haarcascade_frontalface_alt.xml";

	private int minsize = 20;
	private int group = 0;
	private double scale = 1.1;

	/**
	 * Based on FaceDetection example from JavaCV.
	 */
	public byte[] convert(byte[] imageData) throws IOException {
		// create image from supplied bytearray
		IplImage originalImage = cvDecodeImage(cvMat(1, imageData.length,CV_8UC1, new BytePointer(imageData)));

		// Convert to grayscale for recognition
		IplImage grayImage = IplImage.create(originalImage.width(), originalImage.height(), IPL_DEPTH_8U, 1);
		cvCvtColor(originalImage, grayImage, CV_BGR2GRAY);

		// storage is needed to store information during detection
		CvMemStorage storage = CvMemStorage.create();

		// Configuration to use in analysis
		CvHaarClassifierCascade cascade = new CvHaarClassifierCascade(cvLoad(CASCADE_FILE));

		// We detect the faces.
		CvSeq faces = cvHaarDetectObjects(grayImage, cascade, storage, scale, group, minsize);

		// We iterate over the discovered faces and draw yellow rectangles around them.
		for (int i = 0; i < faces.total(); i++) {
			CvRect r = new CvRect(cvGetSeqElem(faces, i));
			cvRectangle(originalImage, cvPoint(r.x(), r.y()),
					cvPoint(r.x() + r.width(), r.y() + r.height()),
					CvScalar.YELLOW, 1, CV_AA, 0);
		}

		// convert the resulting image back to an array
		ByteArrayOutputStream bout = new ByteArrayOutputStream();
		BufferedImage imgb = originalImage.getBufferedImage();
		ImageIO.write(imgb, "png", bout);
		return bout.toByteArray();
	}
}
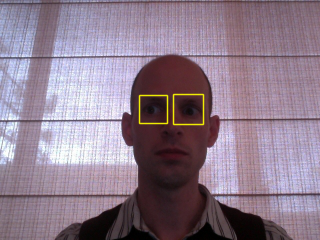
The code should at least explain the steps. For more info on how this really works you should look at the OpenCV and JavaCV websites. By changing the cascade file, and playing around with the minsize, group and scale properties you can also use this to detect eyes, nose, ears, pupils etc. For instance eye detection looks something like this:
Frontend, display detected face
The final step is to receive the message send by Jetty in our webapplication, and render it to an img element. We do this by setting the onmessage function on our websocket. In the following code, we receive the binary message. Convert this data to an objectURL (see this as a local, temporary URL), and set this value as the source of the image. Once the image is loaded, we revoke the objectURL since it is no longer needed.
    ws.onmessage = function (msg) {
        var target = document.getElementById("target");
        url=window.webkitURL.createObjectURL(msg.data);

        target.onload = function() {
            window.webkitURL.revokeObjectURL(url);
        };
        target.src = url;
    }
We now only need to update our html to the following:
<div style="visibility: hidden;  width:0; height:0;">
     <canvas width="320" id="canvas" height="240"></canvas>
</div>

<div>
    <video id="live" width="320" height="240" autoplay style="display: inline;"></video>
    <img id="target" style="display: inline;"/>
</div>
And we've got working face recognition:
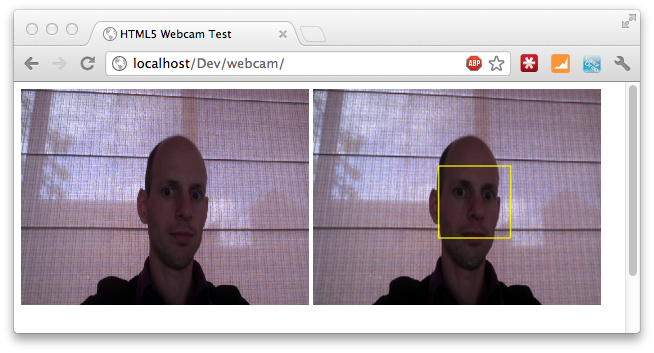
As you've seen we can do much with just the new HTML5 APIs. It's too bad not all are finished and support over browsers is in some cases a bit lacking. But it does offer us nice and powerful features. I've tested this example on the latest version of chrome and on Safari (for Safari remove the webkit prefixes). It should however also work on the "userMedia" enabled mobile safari browser. Make sure though that you're on a high bandwith WIFI, since this code isn't optimized at all for bandwidth. I'll revisit this article in a couple of weeks, when I have time to make a Play2/Scala based version of the backend.
Published at DZone with permission of Jos Dirksen, DZone MVB. See the original article here.
Opinions expressed by DZone contributors are their own.

Comments