Event-Driven Microservices With Vert.x and Kubernetes (Part 2 of 3)
In Part 2 of this tutorial, you'll learn how to deploy your event-driven microservice application to Kubernetes for easy scaling and failover.
Join the DZone community and get the full member experience.
Join For FreeIn part 1 of this article series, we learned how to create an event-driven microservice application using Vert.x. We deployed the application locally, using the multicast cluster capabilities of Hazelcast to connect the microservices. In part 2, we want to deploy this application to Kubernetes, so we can scale the application easily and make usage of the failover and scaling features in Kubernetes. Before we go into detail, I want to introduce some Kubernetes and Hazelcast concepts, which are needed to understand this scenario.
Brief Introduction to Kubernetes
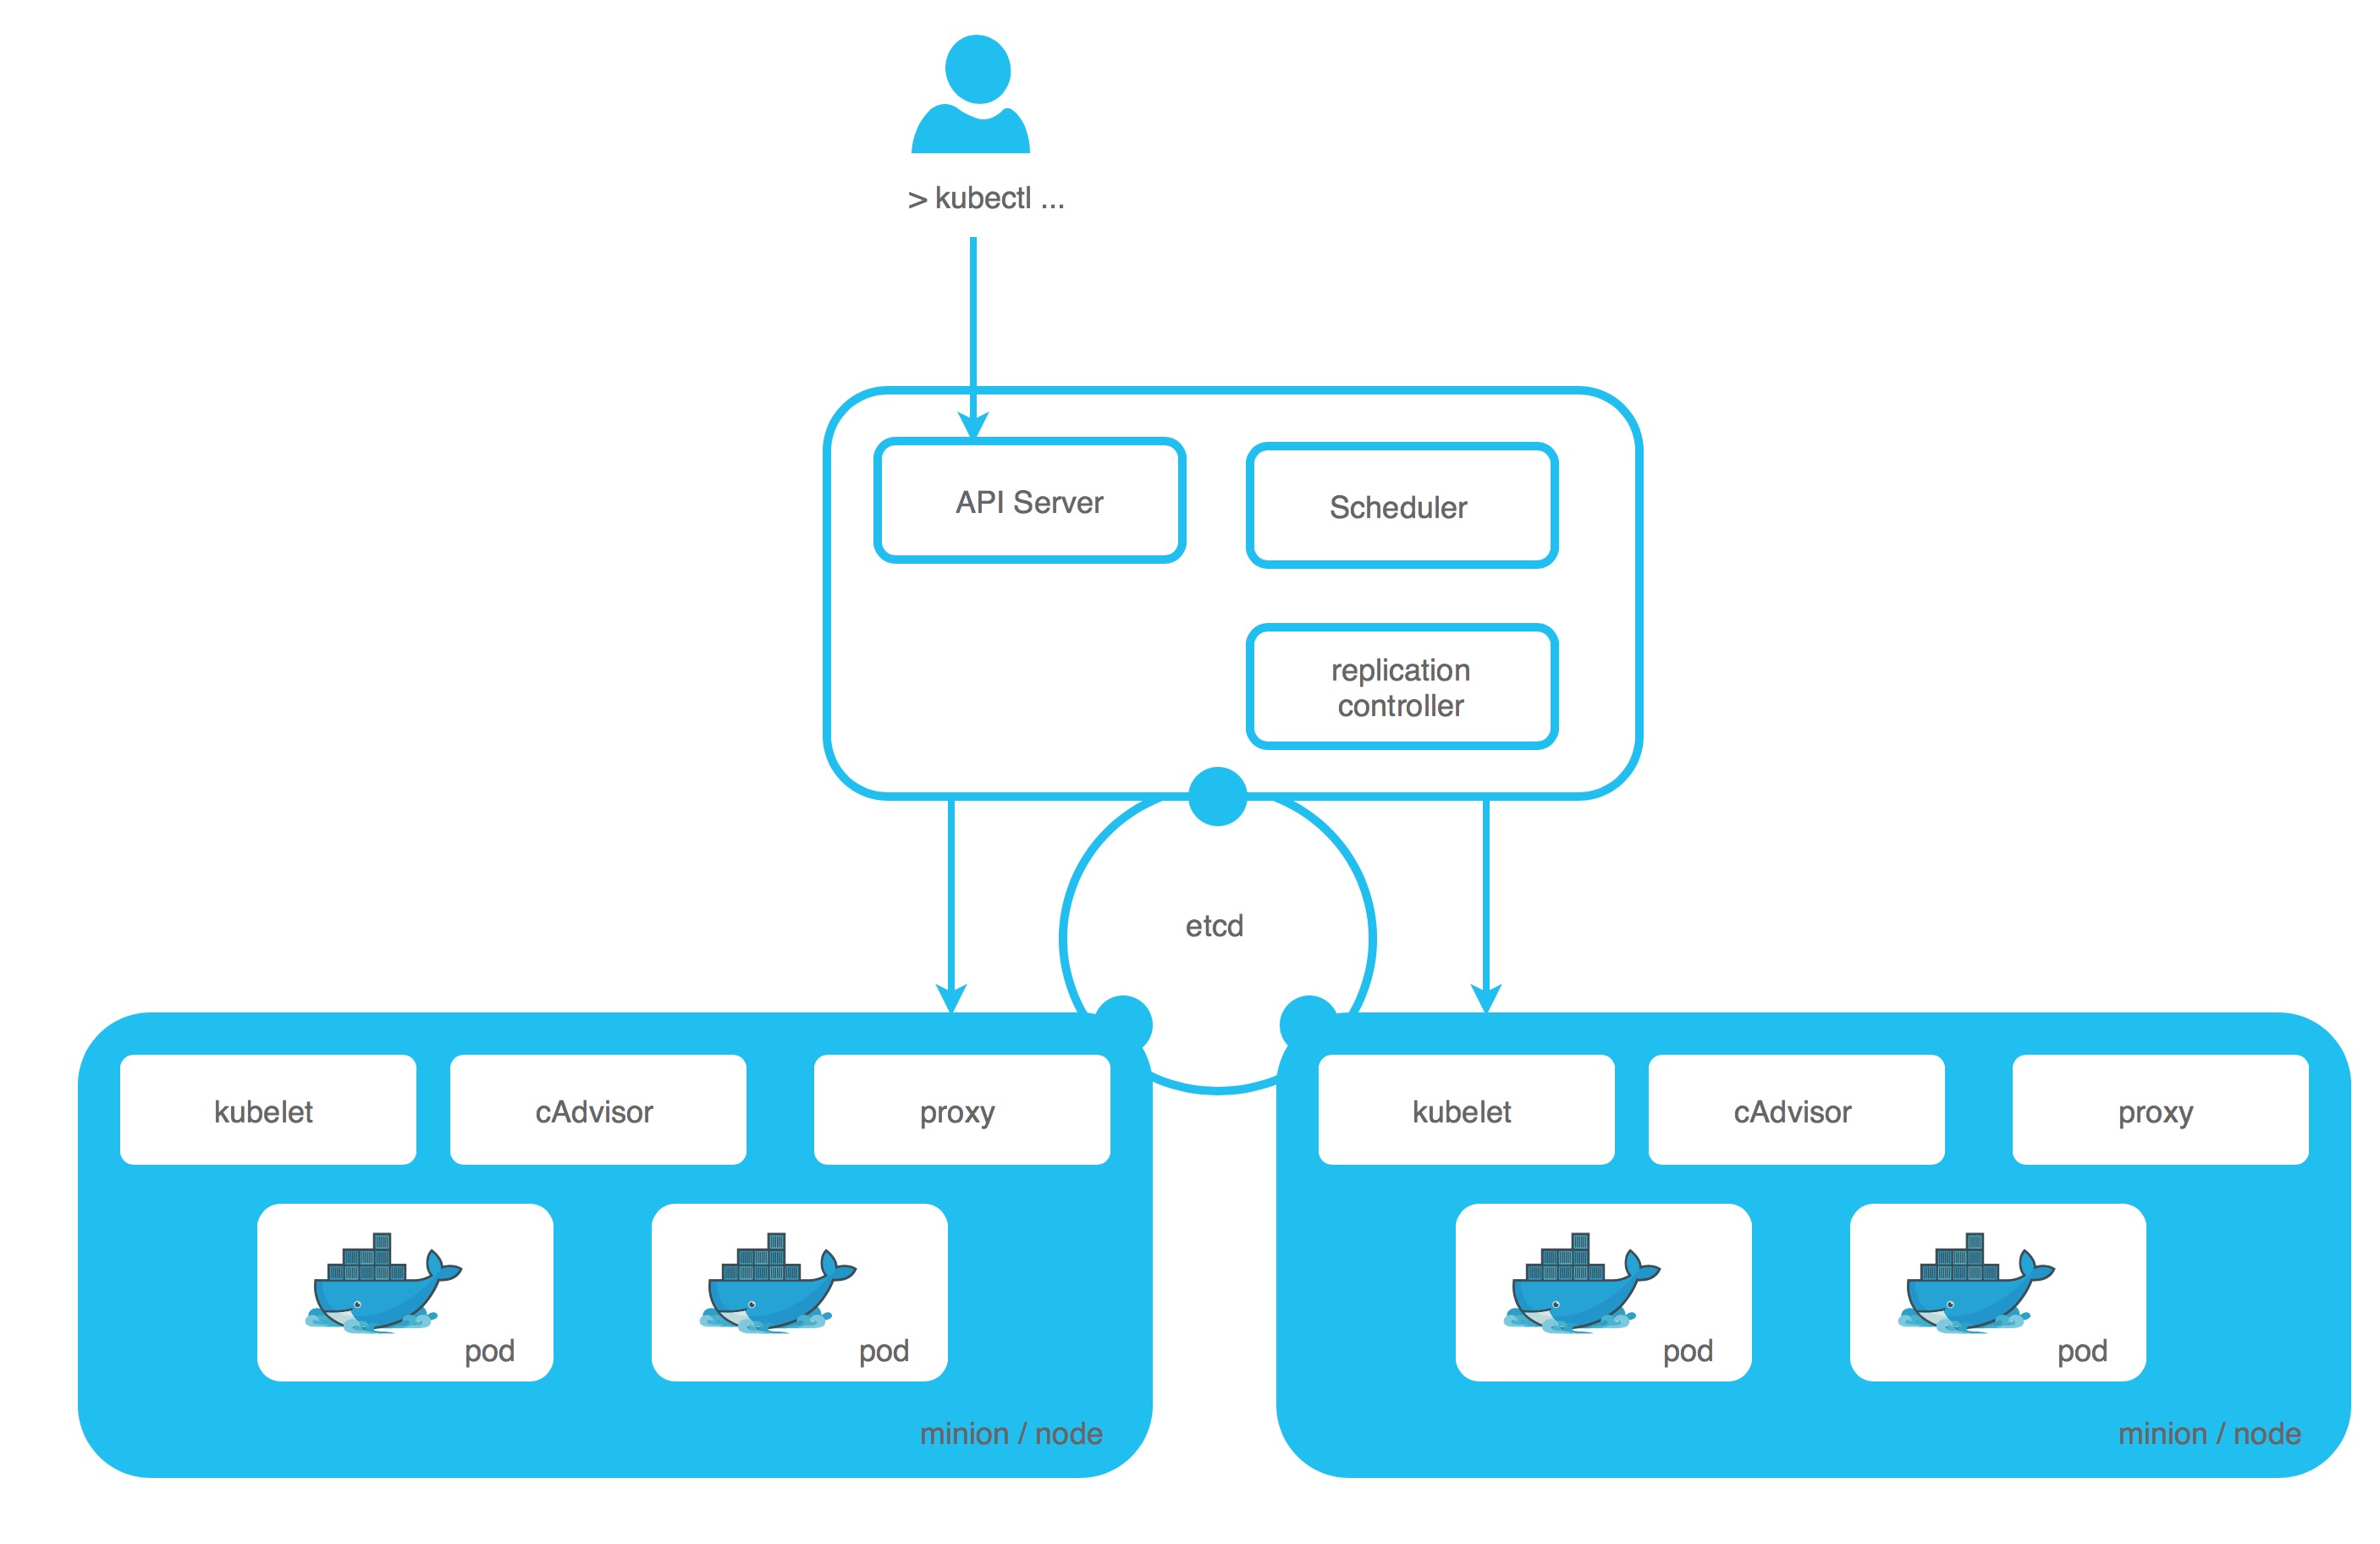
Kubernetes is a platform for hosting and managing containers in a cluster of nodes. It provides a layer over the infrastructure, so developers can manage applications and not the infrastructure itself.
Cluster
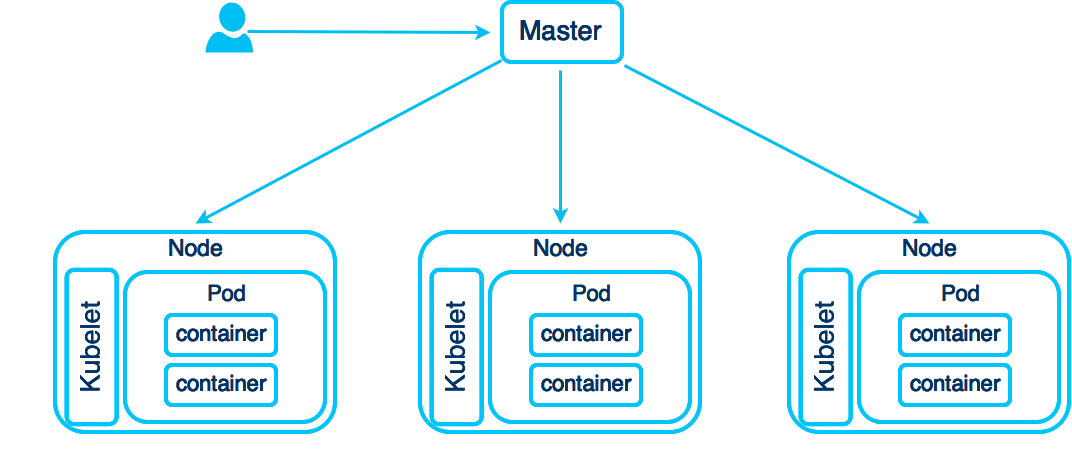
A Kubernetes cluster is a set of machines (physical/virtual), resourced by Kubernetes to run applications.

Pod
A Pod is a group of containers, sharing the same network/namespace/volume/IP. A Pod can contain 1..N containers, that are scheduled as one application. You can have your application container and your database container in one Pod, but typically you should create one Pod for your application and another one for your database, so you can scale and control them separately.

Controller
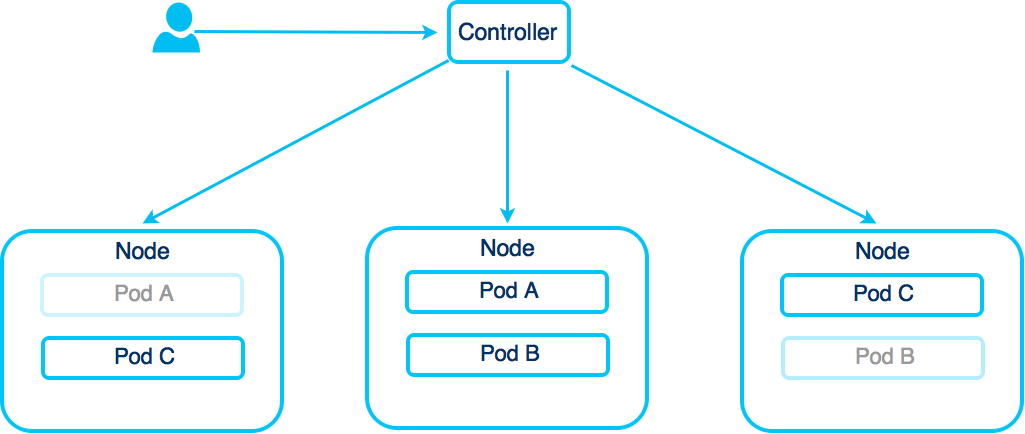
A Replication Controller (RC) manages the lifecycle of a Pod. While you are free to deploy a single Pod, you need the Controller to ensure that a certain amount of Pods are running. If a Pod dies, the RC creates a new one, if you scale up/down Pods, the RC creates/destroys your Pods. There are currently three types of Controllers, Replication Controller, Replica Set, and Deployment. A Replica Set allows set-based selection and the Deployment is basically a Replication Controller with capabilities for rolling updates.

Service
A Kubernetes Service provides a name and a network address for a set of Pods working together. Services are routing the request by the help of labels/selectors provided by Pods. 
Usage and Pre-Requirements
For this article, I assume you have a working Kubernetes instance. If you are working locally, you can use minikube or minishift to test the example.
Small Introduction to Hazelcast
Hazelcast is an in-memory data grid for caching, distributed computing, messaging and more. It is open source (with an option for commercial support and additional functionality) and the default cluster provider of Vert.x. Whenever you run Vert.x in clustered mode, Hazelcast is utilized to create the cluster and to distribute the Vert.x event bus. In part 1, we have already seen the multicast cluster capabilities of Hazelcast, we used it to connect the frontend-, the read- and the write-Verticle. In part 2, we want to create a Hazelcast cluster inside Kubernetes, to connect the Vert.x services running in 1-N Pod(s). Since Kubernetes does not support multicast, we need additional configuration steps to ensure that the Hazelcast node discovery works correctly.
Possible Clustering Strategies for Vert.x/Hazelcast in Kubernetes
We have two common scenarios in Kubernetes, which must be supported by Hazelcast clustering.
Scenario 1: We have deployed one Verticle, running in one Pod. Now we want to scale up/down this Pod (by the help of the Controller / Horizontal Pod Autoscaler) to N Pods. In this case, each Pod is creating a new Verticle instance and we want to ensure that all instances are running in the same Hazelcast cluster (sharing data, communication).
Scenario 2: We have deployed many (different) Verticles, each running in a separate Pod, handled by its own Controller and accessible through a (Kubernetes-) Service. In this case, we want to ensure that those different Verticles (services) are connected to each other.
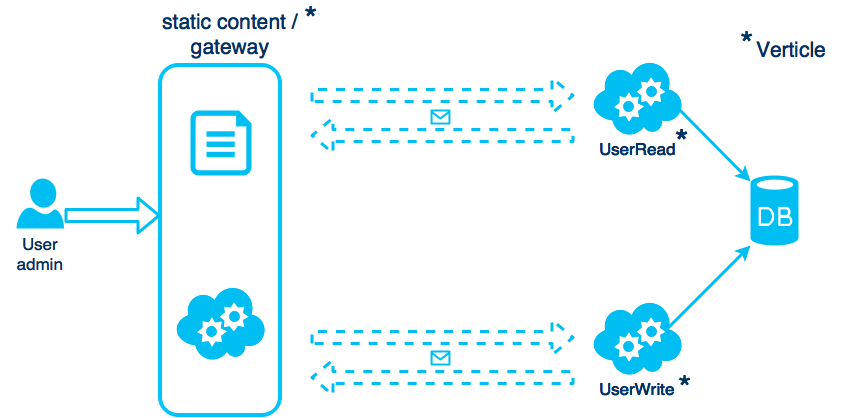
In our case, this means, that we want to ensure that the Gateway-Verticle can access the Read- and the Write-Verticle using the event bus.

Configure Vert.x/Hazelcast to Run in Kubernetes
As mentioned before, Kubernetes does not support multicast, and so we must add an additional Hazelcast configuration to discover all Vert.x instances running in Kubernetes.
You could configure the Hazelcast TCP discovery, but this approach is not very cloud friendly, since internal IP addresses may change at any time. To solve this, Hazelcast introduced a Discovery Plugin API and released a Kubernetes plugin. Also the Vert.x team has released its own Kubernetes plugin based on Hazelcast's discovery API, I will focus here on the Discovery Plugin released by Hazelcast. This plugin has some additional useful options and the examples in this article will run out-of-the-box.
The Hazelcast plugin offers two main approaches to discover cluster members in Kubernetes.
1) DNS discovery: if DNS is enabled in your Kubernetes deployment, each Kubernetes service creates a DNS entry (in the Kubernetes namespace they are running). The plugin retrieves each record and tries to connect to a specific service. If no service name was provided, it connects to each service found in the namespace (fallback). This approach has the following disadvantages: you either use a single Kubernetes service as the entry-point for all of your Verticles or you connect all your Verticles (in one Kubernetes namespace), even if you don’t want it.
2) Kubernetes Service Discovery using the REST API: The Kubernetes master provides a REST API for service discovery. This API is quite powerful since you can also get access to Services using labels and other metadata. This gives you the freedom to group/partition your Hazelcast cluster according to your needs in one Kubernetes namespace. The approach to discover services by labels is one of the most flexible ways to do service discovery in Kubernetes and makes versioning of services very easy.
A third approach for Service Discovery in Kubernetes is the usage of the provided environmental variables. This can be used to discover other REST endpoints of your application in a cluster, but it is not available in the Hazelcast / Kubernetes Plugin.
Kubernetes Service Discovery Using the REST API
To configure the Hazelcast service discovery, either a cluster.xml (Vert.x only) or a hazelcast.xml must be provided (the content is the same). Vert.x/Hazelcast scans the classpath for those files. If no files are found, the *-default.xml files are used. You can either put the cluster.xml file into your /resource/ folder or user - cp /folder/cluster.xml at start time. The following example is a valid configuration for the Hazelcast service discovery using the Kubernetes REST API.
<hazelcast>

    <network>
        ...
        <join>
            <discovery-strategies>
                <discovery-strategy enabled="true"
                                    class="com.hazelcast.kubernetes.HazelcastKubernetesDiscoveryStrategy">
                    <properties>
                        <property name="service-label-name">cluster01</property>
                     </properties>
                </discovery-strategy>
            </discovery-strategies>
        </join>
    </network>
</hazelcast>
In this example, Hazelcast is scanning for all Kubernetes services containing the label service-label-name=cluster01 and grouping them in one cluster. This way, you can group different Vert.x services/containers and run different Hazelcast clusters in one Kubernetes namespace. If no additional namespace configuration is provided, the plugin assumes "default" as the namespace to look for services. A typical Kubernetes service description would look like this:
kind: Service
apiVersion: v1
metadata:
  labels:
    service-label-name: cluster01
When running in Kubernetes, you can externalize the Hazelcast configuration to a ConfigMap:
metadata:
  name: hazelcastconfig
data:
  hazelcast.xml: |
    <hazelcast xsi:schemaLocation="http://www.hazelcast.com/schema/config hazelcast-config-3.9.xsd"
               xmlns="http://www.hazelcast.com/schema/config"
               xmlns:xsi="http://www.w3.org/2001/XMLSchema-instance">
      <network>
        <join>
          <!-- deactivate normal discovery -->
          <multicast enabled="false"/>
          <tcp-ip enabled="false" />
          <!-- activate the Kubernetes plugin -->
          <discovery-strategies>
            <discovery-strategy enabled="true"
                class="com.hazelcast.kubernetes.HazelcastKubernetesDiscoveryStrategy">
              <properties>
                 <property name="service-label-name">cluster01</property>
                <property name="namespace">myproject</property>
              </properties>
            </discovery-strategy>
          </discovery-strategies>
        </join>
      </network>
    </hazelcast>
This configuration can then be linked to a Kubernetes Pod template:
metadata:
  annotations:
    configmap.fabric8.io/update-on-change: hazelcastconfig
spec:
  replicas: 1
  template:
    spec:
      volumes:
        - name: config
          configMap:
            name: hazelcastconfig
            items:
              - key: hazelcast.xml
                path: hazelcast.xml
      containers:
        - name: vertx
          ports:
          - containerPort: 8181
          volumeMounts:
           - name: config
             mountPath: /usr/src/app/config
          env:
          - name: JAVA_ARGS
            value: '-cluster -cp /usr/src/app/config'
Deployment in Kubernetes
There are many different ways to deploy an application in Kubernetes. One approach is, to create your own Docker image and push it to a Docker repository, which is accessible to your Kubernetes master. While building the Docker image, you can copy the cluster.xml into your image like this:
FROM maven:3.3.3-jdk-8
RUN mkdir -p /usr/src/app
WORKDIR /usr/src/app
ONBUILD ADD . /usr/src/app
ADD cluster/cluster.xml /cluster/
COPY . /usr/src/app
CMD ["java", "-jar", "/usr/src/app/target/frontend-verticle-fat.jar", "-cluster","-cp","/cluster/"]
Once you push the image to a repository, you can configure the deployment like this:
apiVersion: v1
kind: ReplicationController
metadata:
  labels:
    name: frontend-verticle
    visualize: "true"
  name: frontend-verticle-controller
spec:
  replicas: 1
  template:
    metadata:
      labels:
        name: frontend-verticle
        visualize: "true"
    spec:
      containers:
      - image: gcr.io/kubernetestests/frontend-verticle:01
        name: frontend-verticle
        ports:
        - name: frontend-verticle
          containerPort: 8181
          hostPort: 8181
        ports:
        - name: hazlecast
          containerPort: 5701
          hostPort: 5701
In combination with Vert.x we use Hazelcast typically for the communication (the event bus). When using Hazelcast to store data, you should configure the CPU/memory limits of your containers (since you may require a huge amount of memory). Also using a Kubernetes statefulSet might be a good idea, depending on your use case.
A good example, how to build/deploy this scenario by creating your own Docker images and deploying the Kubernetes descriptors manually, you can find here.
A more convenient way of working with Kubernetes and Java applications is to use the Fabrich8 maven plugin. This plugin works well with plain Kubernetes and OpenShift and allows you to specify your own Kubernetes descriptors inside the project. Instead of providing full descriptors of your Service, Deployment and ConfigMaps, you can specify only the delta with your "special" configuration. The rest will be added by the plugin while deployment. A working example for this scenario you can find here. The demo application is a Vxms application, which will be introduced in part 3. Since Vxms is built on top of Vert.x, you can use this application skeleton with all configurations 1:1 in a pure Vert.x application. To run the application in Kubernetes, you basically need to deploy a mongodb (kubectl apply -f kube/) and execute mvn clean install fabric8:deploy in all three projects (frontend, read, write).
Scaling the Application in Kubernetes/OpenShift
In terms of scaling (and some other things), there are some minimal differences between Kubernetes and OpenShift. Generally, you can deploy a "pure" Kubernetes setup in OpenShift (with Service, Deployment/Pod). When using the Fabric8 maven plugin for deployment in OpenShift, typically a deploymentConfig will be generated instead of a "plain" Deployment (or a Replication Controller). A deploymentConfig is an OpenShift specific controller that is not available in plain Kubernetes.
Scaling is always applied to a Controller (Replication Controller, Replica set, Deployment and deploymentConfig in OpenShift). You can apply scaling directly, by setting a number of instances, or define an autoscaler, which scales your Pods in a defined range.
To scale a Deployment in Kubernetes, you can do following:
-
kubectl scale --replicas=3 deployment frontend-verticle
If you run a Deployment in OpenShift, you can simply replace the command "kubectl" with "oc." If you are using OpenShift deploymentConfig, simply use oc scale --replicas=3 dc frontend-verticle
To use the autoscaler (horizontal pod autoscaler) capabilities in Kubernetes, you can do the following:
-
kubectl autoscale deployment frontend-verticle --min=2 --max=5 --cpu-percent=80
Again, when using OpenShift, replace "kubectl" with "oc" and the "deployment" with "dc".
In part 3, we will extend this use case by combining event bus with REST-based communication. I will show how to do RESTservice discovery using labels and how to communicate across namespace boundaries. I also will introduce Vxms, which is a modular framework on top of Vert.x.
Opinions expressed by DZone contributors are their own.

Comments