Developing Minimal APIs Quickly With Open Source ASP.NET Core
In this comprehensive guide, we'll explore how to leverage ASP.NET Core to develop minimal APIs rapidly, covering key concepts, best practices, and practical examples.
Join the DZone community and get the full member experience.
Join For FreeIn today's web development landscape, the importance of crafting lightweight and efficient APIs cannot be overstated. Minimal APIs provide an efficient way to build APIs with complexity cutting down on unnecessary code and boosting developer efficiency. ASP.NET Core, Microsoft's open-source framework designed for web applications and services offers a platform, for developing minimal APIs. This in-depth guide will delve into utilizing ASP.NET Core to create APIs covering essential concepts, best practices, and real-world examples.
Grasping the Concept of Minimal APIs in ASP.NET Core
Introduced in ASP.NET Core 6 minimal APIs present a method of constructing APIs without the traditional reliance on controllers and routing setup. Developers can now define endpoints using straightforward C# code that taps into the language's versatility and clarity. This streamlined approach minimizes the setup complexity involved in configuring APIs making it particularly suitable for small-scale projects, prototypes, or microservices without worrying much about the development infrastructure to host and run APIs.
Key Characteristics of Minimal APIs
1. Simplified Syntax
Minimal APIs are known for their way of defining endpoints using C# code, with lambda expressions or methods instead of traditional controllers and routing setups. This approach cuts down on code making API implementations cleaner and more concise.
2. Built-In Dependency Injection
ASP.NET Cores minimal APIs make use of the frameworks built in dependency injection container enabling developers to inject dependencies into endpoint handlers. This promotes separation of concerns, enhances code reusability, and allows for the injection of dependencies like database contexts, services or repositories without manual setup. This also helps drastically when writing unit tests.
3. Integration With ASP.NET Core Middleware
Minimal APIs seamlessly work with ASP.NET Core middleware giving developers access to features like authentication, authorization, logging of requests/responses, and handling exceptions. By incorporating middleware components into the application pipeline without compromising simplicity developers can enhance functionality while maintaining a development experience.
4. Support for OpenAPI/Swagger
ASP.NET Core Minimal APIs offer built-in support for Swagger integration, which helps in simplifying the process of generating API documentation. When developers add Swashbuckle.AspNetCore package to the project and add a few lines of code to Program.cs, Swagger endpoints get created which can automatically create API documentation that explains request/response structures, parameters, types, and error messages. This makes it easier to document and explain the API details to end users.
Exploring the Basics of Minimal APIs in ASP.NET Core
Now that we've delved into the concept of APIs, in ASP.NET Core let's dive into how to kickstart the process:
Step 1: Creating a New ASP.NET Core Project From CLI
You can open a new minimal API solution using Visual Studio or using dotnet CLI. Let's use CLI to create an empty minimal API solution by running the below command. Now open it using Visual Studio by navigating to the folder where the MinimalApiDemo solution was created. Click on MinimalApiDemo.csproj file to open the solution
dotnet new web -n MinimalApiDemo
Step 2: Defining Minimal API Endpoints
Define minimal API endpoints within the Program.cs file using the WebApplication class.
var builder = WebApplication.CreateBuilder(args);

var app = builder.Build();

app.MapGet("/", () => "Hello World!");

app.MapGet("/greeting", () => "Welcome to my article about Minimal API!");

app.Run();
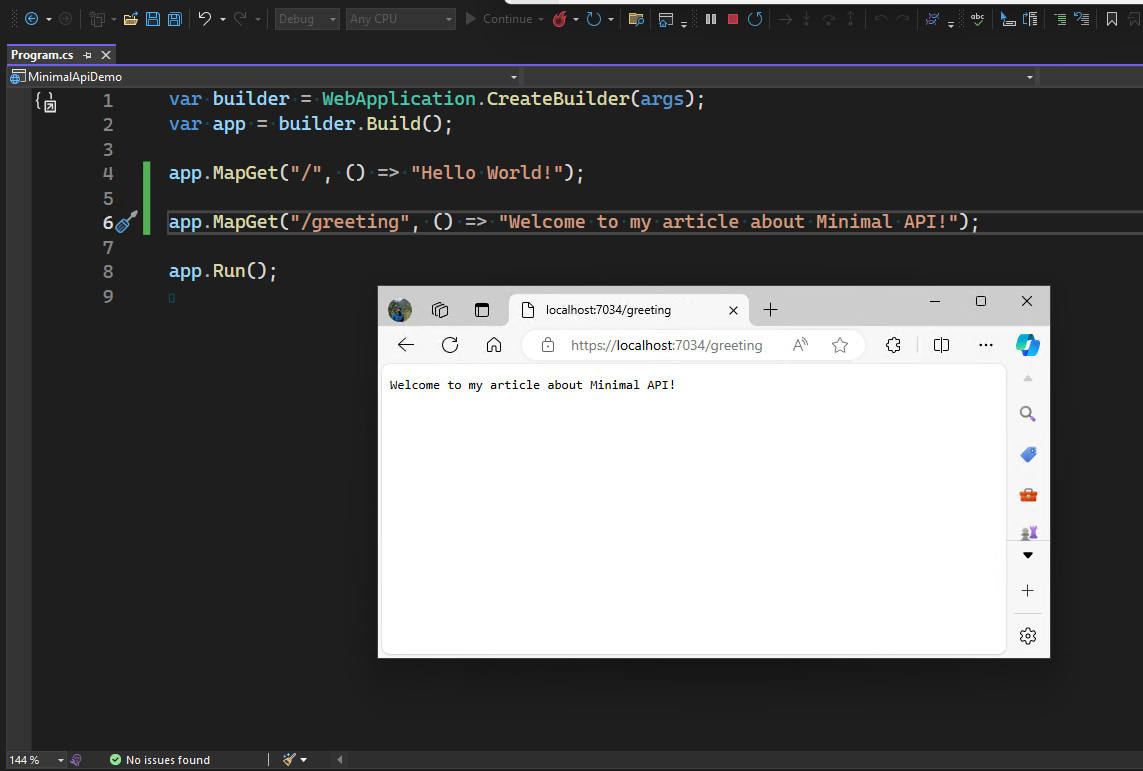
By default, you will get the Hello World endpoint out of the box, lets add another endpoint as shown in the above code snippet. we created an API endpoint that produces a greeting message by writing a single line. Creating API services can't get any simpler than this.
Step 3: Launching the Application
Use CLI to run the application or directly press F5 from Visual Studio.
dotnet run
Visit http://localhost:5000/greeting in your web browser to view the response from the API endpoint to see the output (or) visual studio will automatically open the browser as shown in the below figure.

Step 4: Adding Swagger Endpoints
To add Swagger to your project, you need to first Install the below package directly from your Visual Studio package manager console.
dotnet add package Swashbuckle.AspNetCoreModify your Program.cs to add the swaggerGenerator method and define the swagger UI endpoint as shown below.
var builder = WebApplication.CreateBuilder(args);

// Add services to the container.
builder.Services.AddEndpointsApiExplorer(); // This is required for Swagger
builder.Services.AddSwaggerGen(); // This adds Swagger Generator

var app = builder.Build();

// Enable middleware to serve generated Swagger as a JSON endpoint.
app.UseSwagger();

// Enable middleware to serve swagger-ui (HTML, JS, CSS, etc.),
// specifying the Swagger JSON endpoint.
app.UseSwaggerUI(c =>
{
    c.SwaggerEndpoint("/swagger/v1/swagger.json", "My API V1");
});

app.MapGet("/", () => "Hello World!");

app.MapGet("/greeting", () => "Welcome to my article about Minimal API!");

app.Run();
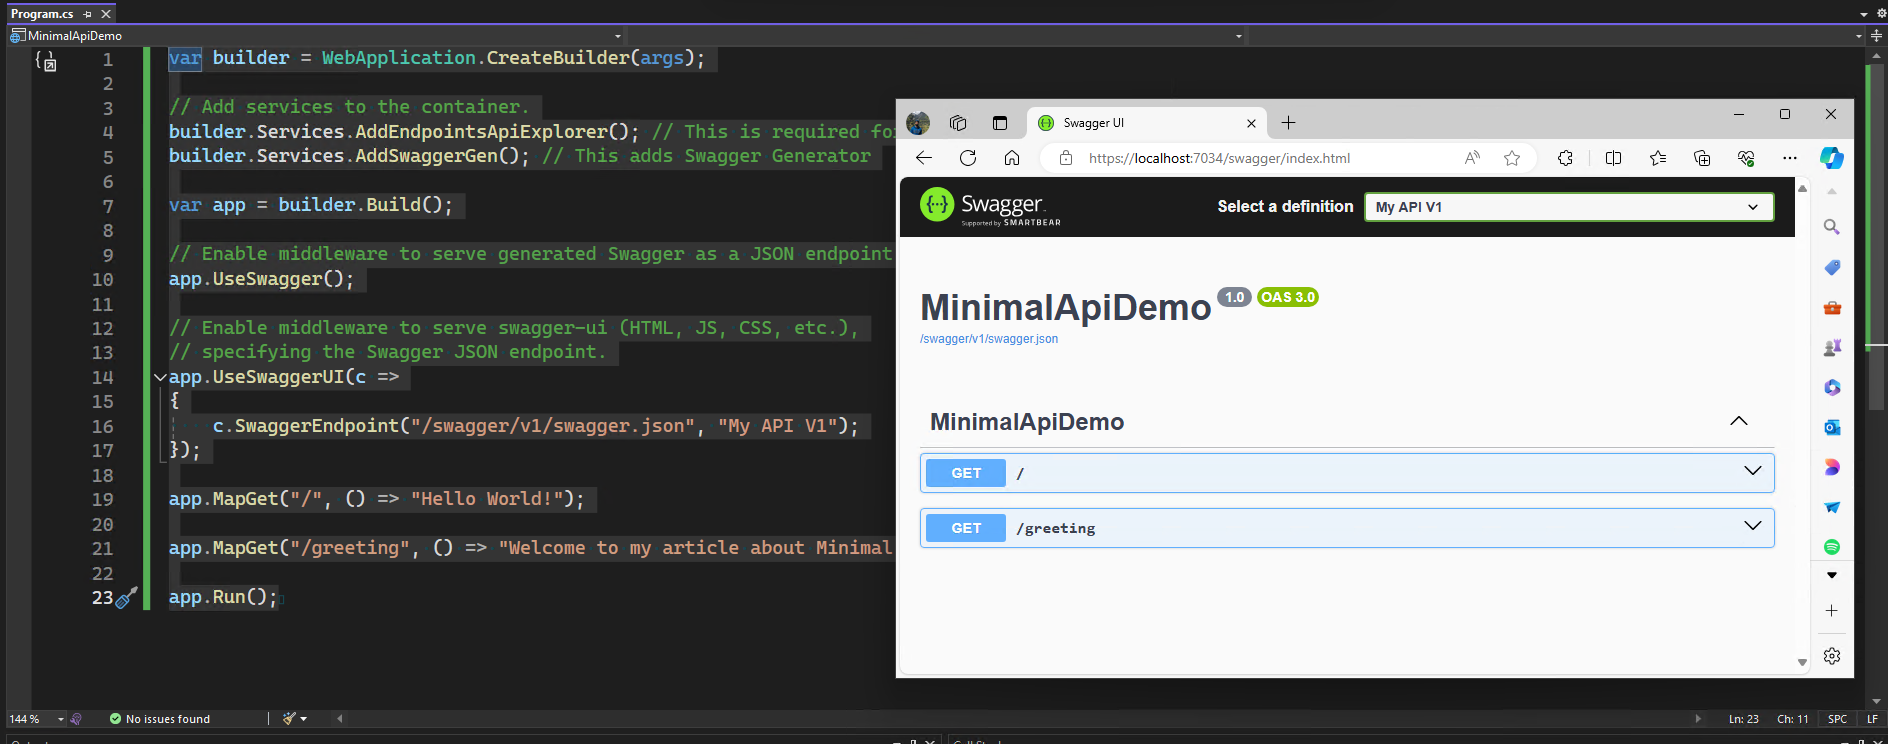
When you run the application, you can now go to the Swagger endpoint by adding /swagger to the URL, which will open below the Swagger UI with details about your endpoints.

Best Practices for Developing Minimal APIs in ASP.NET Core
To ensure fast sailing with your API development endeavors it's crucial to adhere to these best practices.
1. Simplify and Focus on Endpoints
Make sure to create specific and straightforward endpoints for each task. Avoid creating complex endpoints that try to do too many things. Keeping your endpoints simple and focused makes your code easier to understand and debug.
2. Harness Dependency Injection
Use ASP.NET Core’s built-in tool for dependency injection to add dependencies into endpoint handlers. It’s crucial not to tie your endpoint logic with dependencies, instead, inject them as services. This approach enhances code reusability, testability, and maintainability by allowing for a separation of concerns.
3. Manage Errors Effectively
Ensure that your code includes error-handling mechanisms to manage exceptions and unforeseen issues in a manner. Utilize HTTP status codes and clear error messages to effectively communicate any errors to users. Be cautious not to reveal data, in error responses and offer instructions, on how users can address the problem.
4. Incorporate Validation and Input Sanitization Procedures
Make sure to check and clean up the input data to avoid security risks, like SQL injection or cross-site scripting (XSS) attacks. Employ data annotations, model validation attributes, or customized validation methods to maintain data security and integrity. Discard any incorrect input. Offer helpful error messages to users when needed.
5. Embrace Versioning and Documentation Practices
Utilize version control and documentation methods to guarantee operation and simplify connection, with customer programs. Employ OpenAPI/Swagger for the creation of API documentation. Offer thorough explanations of endpoints, parameters, and response structures. Maintain versions of your APIs to ensure support for iterations and offer explicit instructions on transitioning clients to updated versions.
By adhering to these recommendations you can construct APIs in ASP.NET Core that are effective, adaptable, and easy to manage. Ensure that your endpoints are straightforward and make use of dependency injection, manage errors with care, incorporate validation, input cleaning procedures, and offer documentation. By adopting these recommended approaches you can develop APIs that cater to user requirements and facilitate integration with client applications.
Practical Instances of Minimal APIs in ASP.NET Core
Let's delve into some real scenarios demonstrating the power of creating minimal APIs in ASP.NET Core. Imagine you have an e-commerce application with product information inside a database. You want to spin up APIs to perform basic functionalities like create/read/update/delete products from the DB.
Let's write Minimal APIs for performing CRUD operations on the product class. I am using an in-memory database for simplicity.
Create Product class and ProductContext class inherited from DbContext (using Entity Framework to retrieve data from DB.)
public class ProductContext : DbContext
{
    public ProductContext(DbContextOptions<ProductContext> options)
        : base(options)
    {
    }

    public DbSet<Product> Products { get; set; }
}

public class Product
{
    public int Id { get; set; }
    public string Name { get; set; }
    public decimal Price { get; set; }
}
Create/Read/Update/Delete API Endpoints inside a single file (program.cs) as shown below.
using Microsoft.EntityFrameworkCore;
using Microsoft.AspNetCore.Builder;
using Microsoft.Extensions.DependencyInjection;
using Microsoft.EntityFrameworkCore.InMemory;


var builder = WebApplication.CreateBuilder(args);
builder.Services.AddDbContext<ProductContext>(options => options.UseInMemoryDatabase("Products"));

// Add services to the container.
builder.Services.AddEndpointsApiExplorer(); // This is required for Swagger
builder.Services.AddSwaggerGen(); // This adds Swagger Generator

var app = builder.Build();
// Enable middleware to serve generated Swagger as a JSON endpoint.
app.UseSwagger();

// Enable middleware to serve swagger-ui (HTML, JS, CSS, etc.),
// specifying the Swagger JSON endpoint.
app.UseSwaggerUI(c =>
{
    c.SwaggerEndpoint("/swagger/v1/swagger.json", "My API V1");
});


app.MapGet("/products", async (ProductContext db) =>
{
    return await db.Products.ToListAsync();
});

app.MapGet("/products/{id}", async (ProductContext db, int id) =>
{
    return await db.Products.FindAsync(id) is Product product ? Results.Ok(product) : Results.NotFound();
});

app.MapPost("/products", async (ProductContext db, Product product) =>
{
    db.Products.Add(product);
    await db.SaveChangesAsync();

    return Results.Created($"/products/{product.Id}", product);
});

app.MapPut("/products/{id}", async (ProductContext db, int id, Product inputProduct) =>
{
    if (await db.Products.FindAsync(id) is not Product product)
    {
        return Results.NotFound();
    }

    product.Name = inputProduct.Name;
    product.Price = inputProduct.Price;

    await db.SaveChangesAsync();

    return Results.NoContent();
});

app.MapDelete("/products/{id}", async (ProductContext db, int id) =>
{
    if (await db.Products.FindAsync(id) is not Product product)
    {
        return Results.NotFound();
    }

    db.Products.Remove(product);
    await db.SaveChangesAsync();

    return Results.NoContent();
});

app.Run();
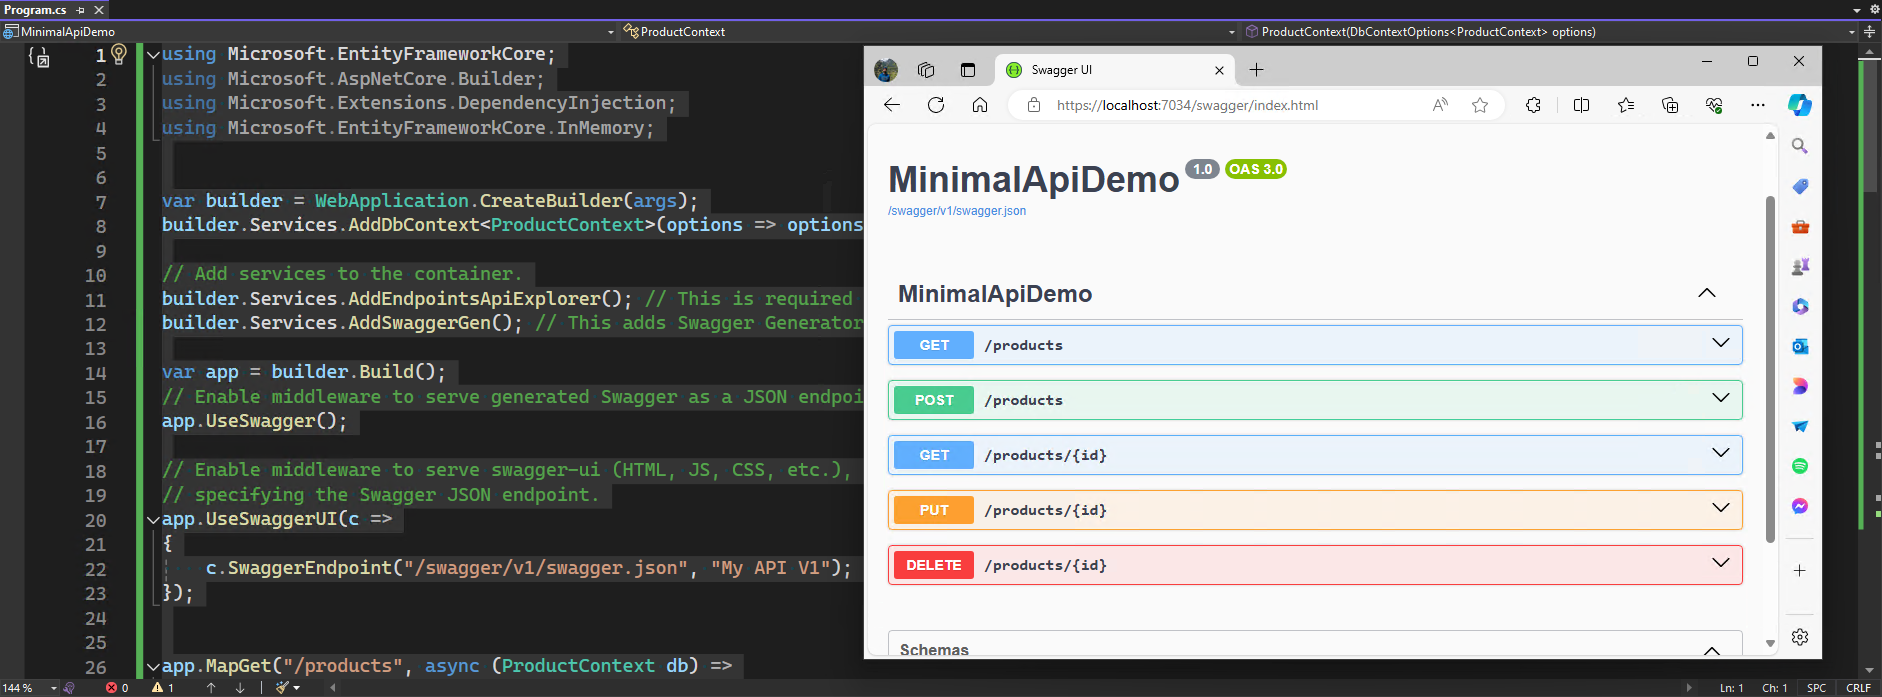
We can spin up an API so fast by leveraging the power of Minimal APIs. Press F5 to open the browser. Navigate to Swagger UI by adding /swagger to the URL. Swagger UI will display all the endpoints as written in the above code block.

How to Quickly Test It
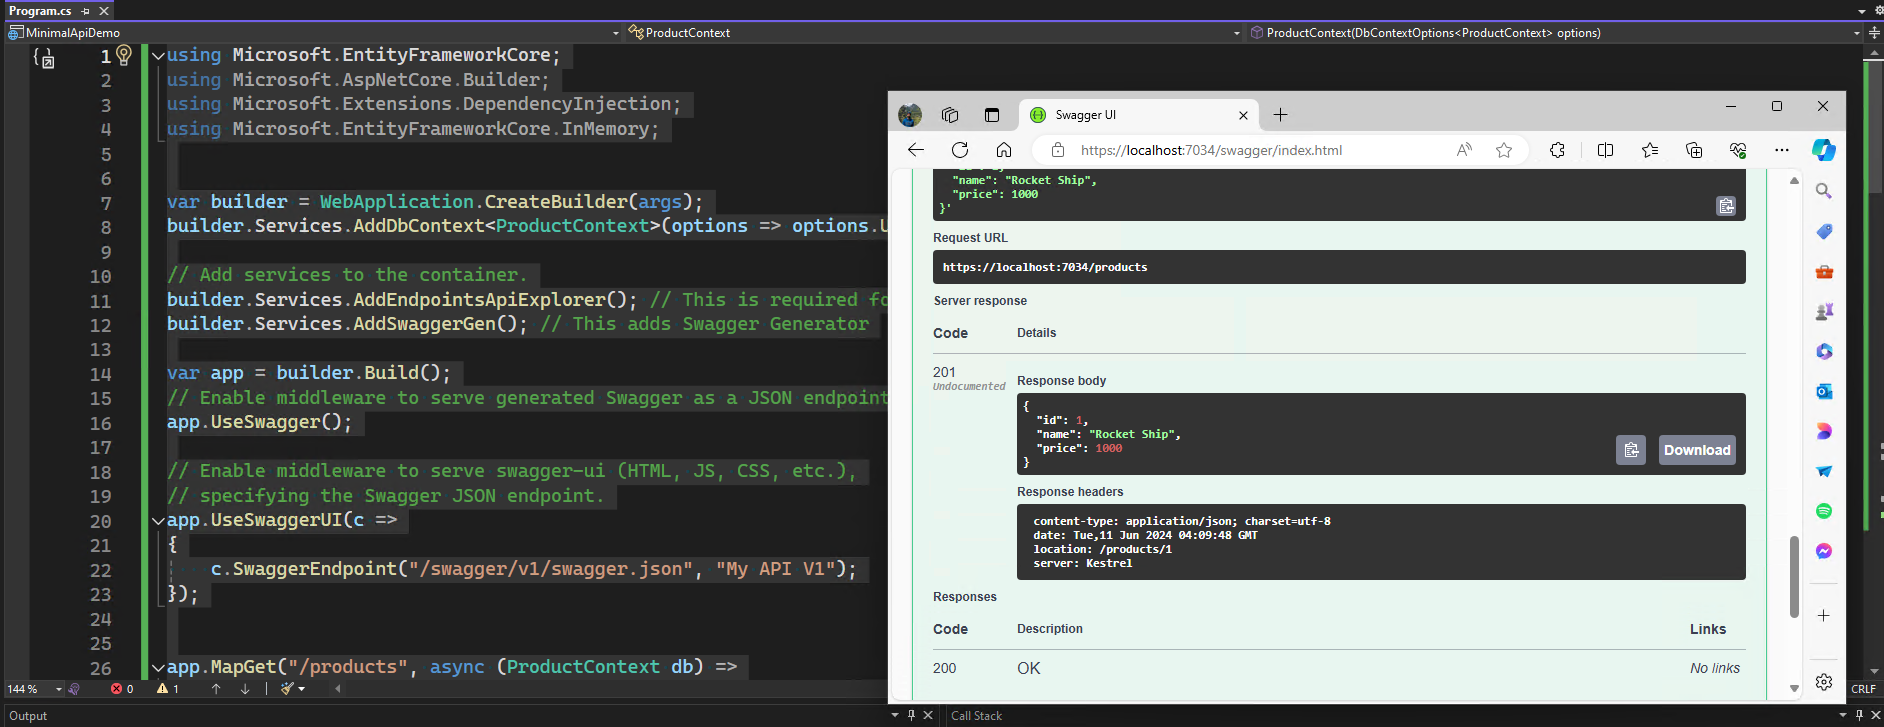
Click on any of the collapsible endpoints to see documentation. click on a button to try it out and execute. I clicked on the HTTP post request to add a new Product called "Rocket Ship" to the in-memory database, which can then be retrieved by calling GET Endpoint.
Conclusion
Rapidly developing APIs using the ASP.NET Core framework presents an approach towards constructing web APIs that are lightweight yet effective. By using the syntax, built-in dependency injection, and seamless integration, with middleware provided by ASP.NET Core developers can easily craft APIs without complexity or extra steps. Adhering to recommended strategies like maintaining targeted endpoints utilizing dependency injection effectively and managing errors with finesse are key to ensuring the success of your API development journey.
Opinions expressed by DZone contributors are their own.

Comments