Deep Learning via Multilayer Perceptron Classifier
In this article, we will see how to perform a Deep Learning technique using Multilayer Perceptron Classifier (MLPC) of Spark ML API and more!
Join the DZone community and get the full member experience.
Join For FreeIn this article, we will see how to perform a Deep Learning technique using Multilayer Perceptron Classifier (MLPC) of Spark ML API. An example of deep learning that accurately recognizes the hand-written characters on the OCR dataset will be demonstrated with Spark 2.0.0 as well.
Introduction
Deep learning which is currently a hot topic in the academia and industries tends to work better with deeper architectures and large networks. The application of deep learning in many computationally intensive problems is getting a lot of attention and a wide adoption. For example, computer vision, object recognition, image segmentation, and even machine learning classification.
Some practitioners also refer to Deep learning as Deep Neural Networks (DNN), whereas a DNN is an Artificial Neural Network (ANN) with multiple hidden layers of units between the input and output layers. Similar to shallow ANNs, DNNs can model complex non-linear relationships [1]. The DNN architectures for example for object detection and parsing, generates compositional models where the object is expressed as a layered composition of image primitives. The extra layers enable composition of features from lower layers, giving the potential of modeling complex data with fewer units than a similarly performing shallow network.
DNNs are typically designed as Feedforward Networks [4]. However, research has applied Recurrent Neural Networks very successfully, for other applications like language modeling. On the other hand, the Convolutional Deep Neural Networks (CNNs) are used in computer vision and automatic speech recognition where their success is well-documented and accepted [2].
Deep Learning via Multilayer Perceptrons
One of the most common types of DNN is the multilayer perceptron (MLP) that can be formally defined as follows:
"Deep feedforward networks, also often called feedforward neural networks, or multilayer perceptrons (MLPs), are the quintessential deep learning models" [1].
Further, according to the literature,
"These models are called feedforward because information flows through the function being evaluated from x, through the intermediate computations used to define f, and finally to the output y. There are no feedback connections in which outputs of the model are fed back into itself. When feedforward neural networks are extended to include feedback connections, they are called recurrent neural networks" [1].
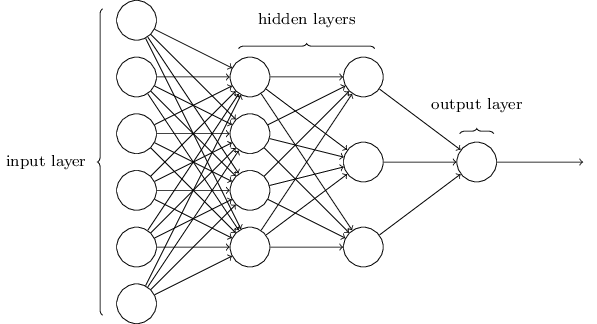
Figure 1: An Example of Multilayer Perceptron Architecture (figure courtesy of https://github.com/ledell/sldm4-h2o/blob/master/sldm4-deeplearning-h2o.Rmd)
Multilayer Perceptrons and Spark
Till date, there is no implementation of the incremental version of the neural network in
Spark. However, the Multilayer perceptron classifier (MLPC) is a classifier based on the feedforward artificial neural network in the current implementation of Spark ML API.
The MLPC employs backpropagation for learning the model. Technically, Spark used the logistic loss function for optimization and L-BFGS as an optimization routine. The number of nodes (say) N in the output layer corresponds to the number of classes.
MLPC also performs backpropagation for learning the model. On the other hand, Spark uses the logistic loss function for optimization and Limited-memory Broyden-Fletcher-Goldfarb-Shanno (LBFGS) as an optimization routine. Note that the L-BFGS is an optimization algorithm in the family of Quasi-Newton Method (QNM) that approximates the Broyden-Fletcher-Goldfarb-Shanno algorithm using a limited main memory [2].
To train a Spark ML based multilayer perceptron classifier, the following parameters need to be set:
- Layer
- Tolerance of iteration
- Block size of the learning
- Seed size
- Max iteration number
Note that a smaller value of convergence tolerance will lead to higher accuracy with the cost of more iterations. The default block size parameter is 128 and the maximum number of iteration is set to be 100 as a default value.
Moreover, adding just more hidden layers doesn't make it more accurate and productive. That can be done using two ways as follows [3]:
Adding more and more data since more data you supply to train the Deep Learning algorithm, better it becomes
Furthermore, setting the optimal values of these parameters are a matter of hyperparameter tuning, therefore, I suggest you set these values accordingly and carefully.
Layer Architecture in MLPC
As outlined in Figure 1, MLPC consists of multiple layers of nodes including the input layer, hidden layers (also called intermediate layers), and output layers. Each layer is fully connected to the next layer in the network. Where the input layer, intermediate layers, and output layer can be defined as follows:
The input layer consists of neurons that accept the input values. The output from these neurons is same as the input predictors. Nodes in the input layer represent the input data. All other nodes map inputs to outputs by a linear combination of the inputs with the node’s weights
wand biasband applying an activation function. This can be written in matrix form for MLPC withK+1layers as follows [4]:
Hidden layers are in between input and output layers. Typically, the number of hidden layers range from one to many. It is the central computation layer that has the functions that map the input to the output of a node. Nodes in the intermediate layers use the sigmoid (logistic) function, as follows [4]:

The output layer is the final layer of a neural network that returns the result back to the user environment. Based on the design of a neural network, it also signals the previous layers on how they have performed in learning the information and accordingly improved their functions. Nodes in the output layer use softmax function [4]:

The number of nodes N, in the output layer, corresponds to the number of classes.
Handwritten Character Recognition using MLPC: A Spark-based Solution
In this section, I will show an example of deep learning that accurately recognizes the hand-written characters on the OCR dataset. As mentioned earlier, I will be using Spark based MLPC for the demonstration. Spark version 2.0.0 and Java will be used for the purpose.
However, before diving into the demonstration lets explore the OCR dataset first to get some exploratory nature of the data.
Data Collection
When an OCR software first processes a document, it divides the paper or any object into a matrix such that each cell in the grid contains a single glyph (also known different graphical shapes), which is just an elaborate way of referring to a letter, symbol, or number or any contextual information from the paper or the object.
To demonstrate the OCR pipeline, let's assume that the document contains only alpha characters in English that matching glyphs to one of the 26 letters: A to Z. We will use the OCR letter dataset from the UCI Machine Learning Data Repository [5]. The dataset was denoted by W. Frey and D. J. Slate et al.
While exploring the dataset, I have found that the dataset contains 20,000 examples of 26 English alphabet capital letters as printed using 20 different randomly reshaped and distorted black and white fonts as glyph of different shapes. Therefore, predicting a character or an alphabet from 26 alphabets make this problem a multiclass classification problem having 26 classes.
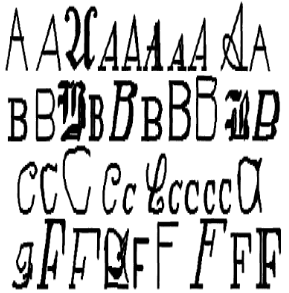
Figure 2: some of the printed glyphs [courtesy of the article titled Letter recognition using Holland-style adaptive classifiers, ML, V. 6, p. 161-182, by W. Frey and D.J. Slate (1991)].
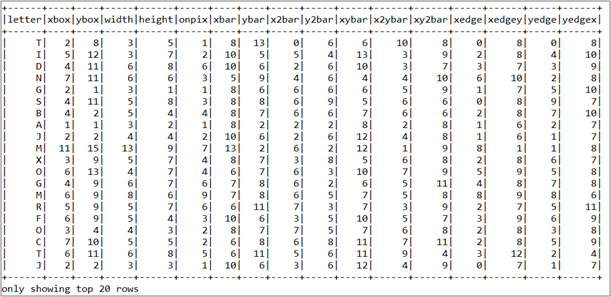
Figure 2 shows the images that I explained above. It was published by Frey and Slate et al., provides an example of some of the printed glyphs. Distorted in this way, therefore, the letters are computationally challenging for a computer to identify, yet are easily recognized by a human being. Figure 3 shows the statistical attributes of top 20 rows.
Exploration and Preparation of the Dataset
According to the documentation provided by Frey and Slate et al. [6] when the glyphs are scanned using an OCR reader to the computer, they are automatically converted into pixels. Consequently, the mentioned 16 statistical attributes are recorded to the computer too.
Note that the concentration of black pixels across the various areas of the box should provide a way to differentiate among 26 letters of the alphabet using an OCR or a machine learning algorithm to be trained.

Figure 3: The snapshot of the dataset shown as Data Frame
Recall that SVM, Naïve Bayesian-based classifier or any other classifier algorithms (along with their associated learners) requires all the features to be numeric. Moreover, each feature is scaled to a fairly small interval. Also, SVM works well on dense vectorised features and consequently will poorly perform against the sparse vectorised features.
In this case, every feature/variable is an integer. Therefore, we do not need to convert any values into numbers. On the other hand, some of the ranges for these integer variables appear fairly wide. In most of the practical cases, it might require that we need to normalize the data against all the features points. In short, we do need to convert the dataset to from current tab separated OCR data to libsvm format.
Interested readers should refer the following research article for getting in depth knowledge: Chih-Chung Chang and Chih-Jen Lin, LIBSVM: a library for support vector machines, ACM Transactions on Intelligent Systems and Technology, 2:27:1--27:27, 2011. The Software is available at [7].
Readers also can refer a public script provided on my GitHub repository at [14] that directly converts CSV to libsvm format. Just properly show the input and output file path and run the script, that's all. I’m assuming that readers have downloaded the data or have converted the OCR data to LIBSVM format using my GitHub script or using their own script. Nevertheless, I have uploaded the original and converted dataset along with source codes (including Maven friendly pom.xml file) that can be downloaded from here [8].
Classification Using Multilayer Perceptron With Spark ML
In this section, an example of deep learning technique using MLPC will be shown. The demo has 11 steps including data parsing, Spark session creation, model building, dummy tuning and model evaluation:
Step-1: Loading required packages and APIs
import org.apache.spark.ml.classification.MultilayerPerceptronClassificationModel;
import org.apache.spark.ml.classification.MultilayerPerceptronClassifier;
import org.apache.spark.ml.evaluation.MulticlassClassificationEvaluator;
import org.apache.spark.sql.Dataset;
import org.apache.spark.sql.Row;
import org.apache.spark.sql.SparkSession;
import com.example.SparkSession.UtilityForSparkSession;
Step-2: Creating a Spark session
Initiate the Spark session
SparkSession spark = UtilityForSparkSession.mySession();Where the UtilityForSparkSession class is as follows:
public class UtilityForSparkSession {
    public static SparkSession mySession() {
        SparkSession spark = SparkSession.builder().appName("MultilayerPerceptronClassifier").master("local[*]")
                .config("spark.sql.warehouse.dir", "E:/Exp/").getOrCreate();
        return spark;
    }
}
Here the Spark SQL warehouse is set to "E:/Exp/", but you should set your path accordingly.
Step-3: Loading and parsing the dataset
Load the input data in libsvm format and create Dataset of Rows as follows:
        String path = "input/Letterdata_libsvm.data";
        Dataset<Row> dataFrame = spark.read().format("libsvm").load(path);
Step-4: Preparing the training and testing set
Prepare the train and test set: training => 80%, test => 20% and seed => 12345L
        Dataset<Row>[] splits = dataFrame.randomSplit(new double[] { 0.8, 0.2 }, 12345L);
        Dataset<Row> train = splits[0];
        Dataset<Row> test = splits[1];
Step-5: Specify the layers for the neural network
Specify the layers for the neural network as follows: input layer => size 17 (features), two intermediate layers (i.e. hidden layer) of size 8 and 4 and output => size 26 (classes).
int[] layers = new int[] { 17, 8, 4, 26 };Step-6: Create the MultilayerPerceptronClassifier trainer and set its parameters
MultilayerPerceptronClassifier trainer = new MultilayerPerceptronClassifier()
                .setLayers(layers) // Sets the value of param [[layers]].                .
                .setTol(1E-4) //Set the convergence tolerance of iterations. Smaller value will lead to higher accuracy with the cost of more iterations. Default is 1E-4.
                .setBlockSize(128) // Sets the value of param [[blockSize]], where, the default is 128.
                .setSeed(12345L) // Set the seed for weights initialization if weights are not set
                .setMaxIter(100); // Set the maximum number of iterations. Default is 100.
Step-7: Train the Multilayer Perceptron Classification Model using the estimator
Train the Multilayer Perceptron Classification Model using the above estimator (i.e. trainer)
MultilayerPerceptronClassificationModel model = trainer.fit(train);Step-8: Compute the accuracy on the test set
        Dataset<Row> result = model.transform(test);
        Dataset<Row> predictionAndLabels = result.select("prediction", "label");
Step-9: Evaluate the model for prediction performance
MulticlassClassificationEvaluator evaluator1 = new MulticlassClassificationEvaluator().setMetricName("accuracy");
MulticlassClassificationEvaluator evaluator2 = new MulticlassClassificationEvaluator().setMetricName("weightedPrecision");
MulticlassClassificationEvaluator evaluator3 = new MulticlassClassificationEvaluator().setMetricName("weightedRecall");
MulticlassClassificationEvaluator evaluator4 = new MulticlassClassificationEvaluator().setMetricName("f1");
System.out.println("Accuracy = " + evaluator1.evaluate(predictionAndLabels));
System.out.println("Precision = " + evaluator2.evaluate(predictionAndLabels));
System.out.println("Recall = " + evaluator3.evaluate(predictionAndLabels));
System.out.println("F1 = " + evaluator4.evaluate(predictionAndLabels));
I got the following performance metrics:
Accuracy = 0.5482271262087776
Precision = 0.4433552232264217
Recall = 0.5482271262087777
F1 = 0.472812901870973
From the above output, we can say that the performance of the classifier is pretty low. One reason is that the Perceptron is very shallow here and the size of the dataset is smaller too; therefore, we should keep trying to make it deeper at least by increasing the size of the hidden layers. However, what should be the optimal size of the hidden layers is a matter of research and hyperparameter tuning as already stated.
I will not go for Cross-Validation type tuning but will go for say a dummy tuning by making the perceptron deeper and by changing the model training parameters in step-11 below.
Step-11: Dummy tuning
Let's try with deeper hidden layers. Say 16 x 12 as follows:
int[] layers = new int[] { 17, 16, 12, 26 };And by changing the model parameters: tolerance of iteration to 1E-6 from 1E-4 and Max iteration from 100 to 400 as follows:
MultilayerPerceptronClassifier trainer = new MultilayerPerceptronClassifier()
                .setLayers(layers)              .
                .setTol(1E-6)
                .setBlockSize(128)
                .setSeed(12345L)
                .setMaxIter(400);
Now repeat the steps 7, 8, 9 and observe the output. I got the following values after the dummy tuning:
Accuracy = 0.9647904785519464
Precision = 0.948855629857438
Recall = 0.9647904785519464
F1 = 0.9562406855901269
Now much better compared to the previous result, isn't?
Step-10: Stop the Spark session
spark.stop();
Conclusion
From the above output, it is clear that the prediction performance is pretty good in terms of accuracy, precision, recall and F1 measure. Please note due to the random nature of the data, you might get different prediction value.
We got the better result out of the dummy tuning, however, that does not mean that Deep learning using MLPC will solve every imaginable problem even in machine learning. But to do so, you should be sure you don't have more parameters than samples to train your model.
A rule of thumb is to have about one training sample for each trainable parameter in your neural network. Not enough data could be a show-stopper in using the deep neural network. Therefore, you need to train your MLPC with more and more data and apply hyperparameter tuning to properly setting the training parameters while training the MLPC.
Furthermore, readers are suggested to find more on machine learning algorithms with Spark MLlib at [4]. Moreover, a recent book titled “Large Scale Machine Learning with Spark” would be a good starting point from the technical as well as theoretical perspective to learn machine learning algorithms with latest Spark release (i.e., Spark 2.0.0) [2].
Source Code
The maven friendly pom.xml file, data file, and the associated source codes can be downloaded from my GitHub repository here [8].
Opinions expressed by DZone contributors are their own.


Comments