Configuring Graceful-Shutdown, Readiness and Liveness Probe in Spring Boot 2.3.0
Explore some of the new, Kubernetes-focused features recently released with Spring Boot version 2.3.0.
Join the DZone community and get the full member experience.
Join For FreeThe Spring Boot team has recently announced the release of version 2.3.0 release, which comes with lot of enhancements, upgrades and features (release notes).
Specifically, the Spring team announced early on that release 2.3 would be focused on Kubernetes. With that in mind, this article we will try to explore some of those features.
Background
As we already know, containers are independent units that package an application and its dependencies as one unit. Thus, the application runs quickly and reliably from one environment to another. This allows portability with only the requirement being that the compatible container runtime must be present on the environment. Containers as sort of operating system virtualization as that includes everything needed to run an application: executable binary, libraries, configuration files, settings and system libraries. When compared to server virtualization, containers do not contain separate operating system (image) for every virtual environment. They use the underlying operating system on the host machine.
These days containers are used almost everywhere, containers are being used to run small services to large scale application. One of the important aspects that we also need to consider that containers can be short lived. One of the use cases could be, in large companies with continuous integration/continuous delivery (CI/CD) environments. For example. One could spin up a container for every job it creates in its Jenkins application build system, tests the change, and then shuts down the container. That accounts for thousands of containers coming and going each day.
With such unprecedented usage of containers, there has been an increase in demand for container orchestration and management tools like Kubernetes and Docker Swarm. These tools ease our job to manage the containers with a lot of features including:
- Container grouping
- Self-healing
- Auto-scalability
- DNS management
- Load balancing
- Rolling update or rollback
- Resource monitoring and logging
Almost all the features revolve around the application (container) to provide status in terms of:
- Shutdown (graceful)
- Liveness
- Readiness
Let us look at each of them in detail and how they are implemented in starting Spring Boot 2.3.0.
Graceful Shutdown
In general, Graceful shutdown means that before shutting down the application, there should be timeout period given to allow the requests to complete which are still in progress. During this timeout period no new requests would be allowed. This will allow you to have consistency in you processing in terms of having No or Minimal unprocessed requests. Application shutdown could occur because of multiple reasons. This grace period will be honored in all cases of application shutdown, except cases like hardware failure all-together.
Spring boot 2.3.0.RELEASE brings in the feature of Graceful shutdown to the Spring framework itself. And it is supported by all four embedded web servers (Tomcat, Undertow, Netty and Jetty) for both reactive and Servlet-based web applications. It occurs as part of closing the application context and is performed in the earliest phase of stopping SmartLifecycle beans.
The exact way the application will stop new requests in the grace period, will depend on the server being used. As per official documentation Tomcat, Jetty and Reactor Netty will stop accepting requests at the network layer. Undertow will accept requests but respond immediately with a HTTP 503 (service unavailable) response.
Please note Graceful shutdown with Tomcat requires Tomcat 9.0.33 or later.
In Spring Boot 2.3.0 it is very easy to implement and can be managed by setting two properties in your application configuration.
- server.shutdown :There are two supported values for this property
- immediate: this is the default value and will cause the server to shut down immediately.
- graceful: this will enable the graceful shutdown and start respecting the timeout given in next property.
- spring.lifecycle.timeout-per-shutdown-phase : This takes the values in java.time.Duration format. which will be allowed before the application is shutdown.
For example:
# Enable gracefule shutdown
server.shutdown=graceful
# Allow grace timeout period for 20 seconds
spring.lifecycle.timeout-per-shutdown-phase=20s
# Force enable health probes. Would be enabled on kubernetes platform by default
management.health.probes.enabled=true
Now as we have graceful shutdown configured, there could be two possibilities:
- There are no inflight requests. In this case the application will proceed to shutdown without waiting for grace period to complete.
- If there are any requests in flight, then application will wait for the grace period and shutdown. If there are still requests pending even after grace period, the application will throw an exception and proceed to force shutdown with below logs.

Liveness
In terms of applications, liveness means that the state of the application is healthy or not. If liveness is broken that means that the application itself is broken and cannot recover. In such case, the manager(orchestration engine) can take a decision of what must be done with this application. For example in case of Kubernetes, If the liveness probe fails, the kubelet kills the Container, and the Container is subjected to its restart policy. If a Container does not provide a liveness probe, the default state is Success.
Spring Boot 2.3.0 has introduced org.springframework.boot.availability.LivenessState. The available states are
- CORRECT: the application is running, and its internal state is healthy.
- BROKEN: the application is running but the internal state is broken.
Readiness
The readiness state determines whether the application is ready to accept and serve requests. For any reasons if the application is not ready to serve requests, then it should declare itself as busy until its back to serving requests. If the Readiness state is unready, the manager (orchestration engine) should not route traffic to this instance. For example, in case of Kubernetes, If the readiness probe fails, the endpoints controller removes the Pod’s IP address from the endpoints of all Services that match the Pod. The default state of readiness before the initial delay is Failure. If a Container does not provide a readiness probe, the default state is Success.
Spring boot has introduced the readiness states with the help of ReadinessState. The available states which could be maintained are.
- ACCEPTING_TRAFFIC: when the application is ready to receive traffic. This is the default value.
- REFUSING_TRAFFIC: when s not willing to receive traffic.
Now as we understand the concepts, our programmer mind asked us two questions.
1. How Will I Update the State?
As Spring Boot application context publishes the events throughout the lifecycle of application. So, Spring boot has chosen the Spring application event model to change the availability states. Spring b=Boot also configures a bean of type ApplicationAvailabilityBean which is implementation of ApplicationAvailability interface. This bean listens to these events and maintains the current state. We can get the current state by using the reference of the same
xxxxxxxxxx
// Available as a component in the application context
ApplicationAvailability availability;
LivenessState livenessState = availability.getLivenessState();
ReadinessState readinessState = availability.getReadinessState();
We can use AvailabilityChangeEvent to update the state. Any application component can send such events to update the state of the application.
2. How Will the State Be Accessible?
The most common use case would be to deploy a web application which support the probes (most commonly HTTP). Spring boot Actuator is the only dependency required. As Spring Boot Actuator already exposes application health endpoint.
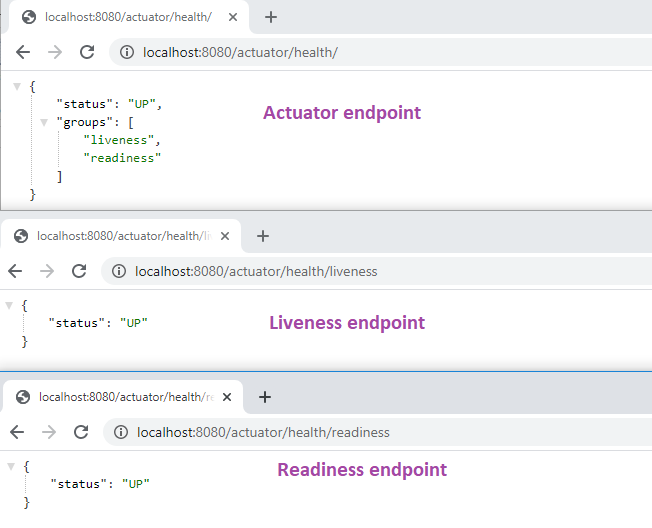
Starting Spring Boot 2.3.0 Actuator will also expose the availability status in Health indicator. These indicators will be shown on the global health endpoint ("/actuator/health"). These health endpoints will also be available as separate HTTP endpoints: "/actuator/health/liveness" and "/actuator/health/readiness".
These indicators are included in actuator/health endpoint by default when running of Kubernetes platform, on another platform these are not available. But you can always override this behavior by setting below property to true.
xxxxxxxxxx
# Force enable health probes. Enabled on Kubernetes platform by default
management.health.probes.enabled=true
Please note all the availability related components are part of org.springframework.boot.availability package.
Time to Code
Before we can code remember
- Use ApplicationAvailability to get the state of the application.
- Publish AvailabilityChangeEvent to update the state.
So, we can use the above to code our logic. For the purpose of demonstration, I shall be coding all of these in single RestController and would be invoking them using the HTTP GET endpoints. In an ideal scenario, these will be done by your beans which are responsible for managing different components of your application. For example, Caching, in case of failure of cache your caching beans can publish ReadinessState.REFUSING_TRAFFIC to stop the request reaching this application container.
Sample Code
The code below is only to demonstrate, how you can change the state based on your needs. This can not be used in production.
xxxxxxxxxx
package org.sk.ms.probes;
import org.slf4j.Logger;
import org.springframework.beans.factory.annotation.Autowired;
import org.springframework.boot.availability.AvailabilityChangeEvent;
import org.springframework.boot.availability.LivenessState;
import org.springframework.boot.availability.ReadinessState;
import org.springframework.context.ApplicationEventPublisher;
import org.springframework.stereotype.Component;
import org.springframework.web.bind.annotation.GetMapping;
import org.springframework.web.bind.annotation.RestController;
/**
* This is sample code to display how to use probes available in spring boot 2.3.0. Not to be used in production. This must be updated by {@link Component} beans for example caching or connection revalidators
*/
public class ExampleController {
private final Logger logger = org.slf4j.LoggerFactory.getLogger(ExampleController.class);
private ApplicationEventPublisher eventPublisher;
public ExampleController(ApplicationEventPublisher eventPublisher) {
this.eventPublisher = eventPublisher;
}
("/complete-normally")
public String completeNormally() throws Exception {
return "Hello from Controller";
}
("/i-will-sleep-for-30sec")
public String destroy() throws Exception {
logger.info("------------------ Sleeping for 30 sec");
Thread.sleep(30000);
return "sleep complete";
}
("/readiness/accepting")
public String markReadinesAcceptingTraffic() {
AvailabilityChangeEvent.publish(eventPublisher, this, ReadinessState.ACCEPTING_TRAFFIC);
return "Readiness marked as ACCEPTING_TRAFFIC";
}
("/readiness/refuse")
public String markReadinesRefusingTraffic() {
AvailabilityChangeEvent.publish(eventPublisher, this, ReadinessState.REFUSING_TRAFFIC);
return "Readiness marked as REFUSING_TRAFFIC";
}
("/liveness/correct")
public String markLivenessCorrect() {
AvailabilityChangeEvent.publish(eventPublisher, this, LivenessState.CORRECT);
return "Liveness marked as CORRECT";
}
("/liveness/broken")
public String markLivenessBroken() {
AvailabilityChangeEvent.publish(eventPublisher, this, LivenessState.BROKEN);
return "Liveness marked as BROKEN";
}
}
Test Scenarios
1. Check Available Endpoint
Check the initial values for available endpoint:

2. Graceful Period (No In-Flight Requests)
We have set the graceful period to 20 seconds. and there is no pending request. Observe the logs.

3. Graceful Period Expired with In-Flight Requests.
We have a grace period of 20 seconds. Let’s make a request which takes 30 seconds to complete and try to stop the application. In this case, the application will shut down with an error. Observe the logs, especially the timings.

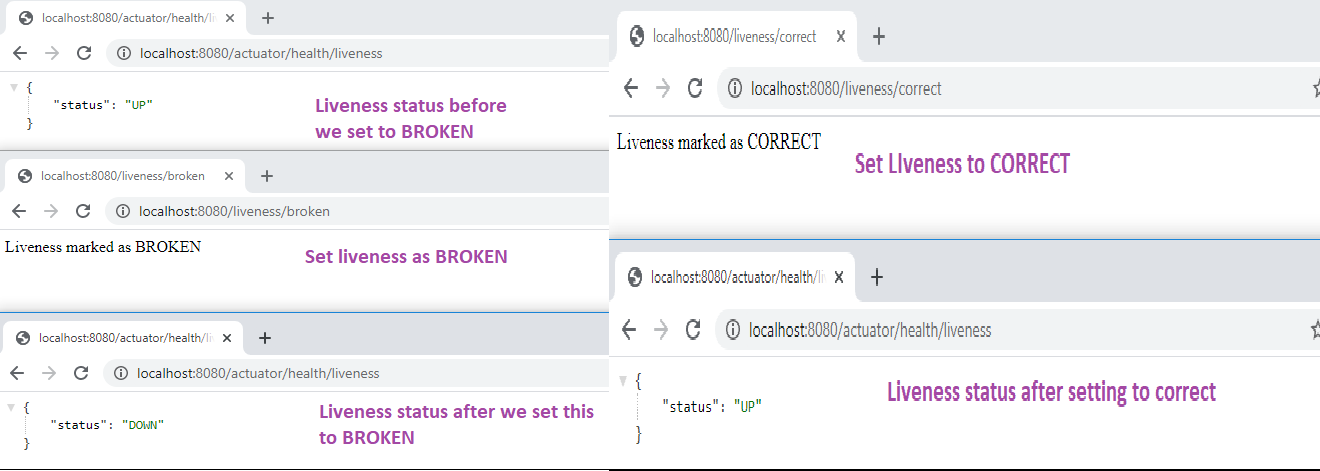
4. Update Liveness Status To BROKEN and Set It Back To CORRECT
This should be used when the application is started. By default, this is set by the Spring application context. But you can also use this to reflect the status. Once marked correct it will be reflected in health endpoint and the container manager will know about this instance. For example, your application is dependent on a cache and the same could not be refreshed. Once marked broken the application shall reflect the same status in health endpoint and container manager should take appropriate actions based on the configuration.

5. Mark Readiness as REFUSING_TRAFFIC and Back to ACCEPTING_TRAFFIC After Recovery
This should be set once your application is ready to serve requests. These can also be used when the application is attempting to recover from anything. For example, while doing the cache update.You should mark your application as REFUSING_TRAFFIC else you could server stale data. In this case the container manager should stop sending traffic to this instance. Please remember that the state should be marked back to ACCEPTING_TRAFFIC after recovery so that traffic can again be routed to this instance.

You can find the code at this GitHub location.
Please feel free to share your feedback. comments. I would be more than happy to help.
Opinions expressed by DZone contributors are their own.

Comments