ClickHouse Made Easy: Getting Started With a Few Clicks
Join the DZone community and get the full member experience.
Join For FreeThe Yandex ClickHouse is a fast, column-oriented DBMS for data analysis. This open-source database management system is fully fault-tolerant and linearly scalable. Instead of other NoSQL DBMS, the ClickHouse database provides SQL for data analysis in real-time.
If you do not know what a column-oriented database is, don't worry. The ClickHouse team provides a very nice overview of a column-oriented DBMS. Please spend a few minutes to read the overview part of the ClickHouse documentation.
In this blog post, I will walk you through the installation of a fresh copy of the ClickHouse database, load a few sample datasets into it, and query the loaded datasets. I strongly guess that this short post will help any developer to save several hours and give a straight foreword guideline to start with a new OLAP database. The post is based on the ClickHouse documentation. If you have any confusion, you can refer to the original documentation for further information.
Step 1
Step 2
clickhouse_db_vol
.
xxxxxxxxxx
mkdir $HOME/clickhouse_db_vol
Step 3
Download and start an instance of the ClickHouse DB. Use the following shell command in your favorite terminal.
xxxxxxxxxx
docker run -d -p 8123:8123 --name some-clickhouse-server --ulimit nofile=262144:262144 --volume=$HOME/clickhouse_db_vol:/var/lib/clickhouse yandex/clickhouse-server
The above command will download a Docker image from the Hub and start an instance of the ClickHouse DB. We also exposed the port 8123 so that we can use the ClickHouse REST interface to interact with it. Here, the first 8123 is the local OS port, and the second 8123 is the container port. You should have a similar output into the terminal after up and running the ClickHouse docker container as shown below.

Step 4
Now, when the ClickHouse database is up and running, we can create tables, import data, and do some data analysis ;-). To work with the database, ClickHouse provides a few interfaces and tools. For simplicity, we are going to use the HTTP interface and the ClickHouse native client.
Step 5
Start a native client instance on Docker. Execute the following shell command.
xxxxxxxxxx
docker run -it --rm --link some-clickhouse-server:clickhouse-server yandex/clickhouse-client --host clickhouse-server
A new client should be run and connect to the server through the port 9000.

So far so good. At this moment, we are almost ready to execute DDL and DML queries.
Step 6
Now, create a database. A database is a logical group of tables in ClickHouse DB. Execute the following SQL query into the ClickHouse native client terminal.
xxxxxxxxxx
CREATE DATABASE IF NOT EXISTS tutorial
Next, run the following DDL query.
xxxxxxxxxx
show databases
The above SQL query will display all the existing databases into the DB.
xxxxxxxxxx
SHOW DATABASES
┌─name─────┐
│ default │
│ system │
│ tutorial │
└──────────┘
4 rows in set. Elapsed: 0.006 sec.
Step 7
As we mentioned earlier, we are trying to keep things simple. So, create a table with three columns using the following query.
xxxxxxxxxx
CREATE TABLE test(a String, b UInt8, c FixedString(1)) ENGINE = Log'
Then, insert some data. Use the following DML statements for inserting data into the table 'TEST'.
xxxxxxxxxx
INSERT INTO tutorial.test (a,b,c) values ('user_1',1,'1');
INSERT INTO tutorial.test (a,b,c) values ('user_2',2,'5');
INSERT INTO tutorial.test (a,b,c) values ('user_3',3,'5');
INSERT INTO tutorial.test (a,b,c) values ('user_1',1,'5');
INSERT INTO tutorial.test (a,b,c) values ('user_4',4,'5');
INSERT INTO tutorial.test (a,b,c) values ('user_5',5,'5');
Step 8
Now, query the table, TEST. Execute the following query:
xxxxxxxxxx
Select count(*) from tutorial.test;
The above query should return the following output.
xxxxxxxxxx
SELECT count(*)
FROM tutorial.test
┌─count()─┐
│ 6 │
└─────────┘
1 rows in set. Elapsed: 0.017 sec.
You may wonder why I didn't execute the COMMIT statement above. This is because ClickHouse DB is not a transactional database and doesn't support any types of transactions.
Step 9
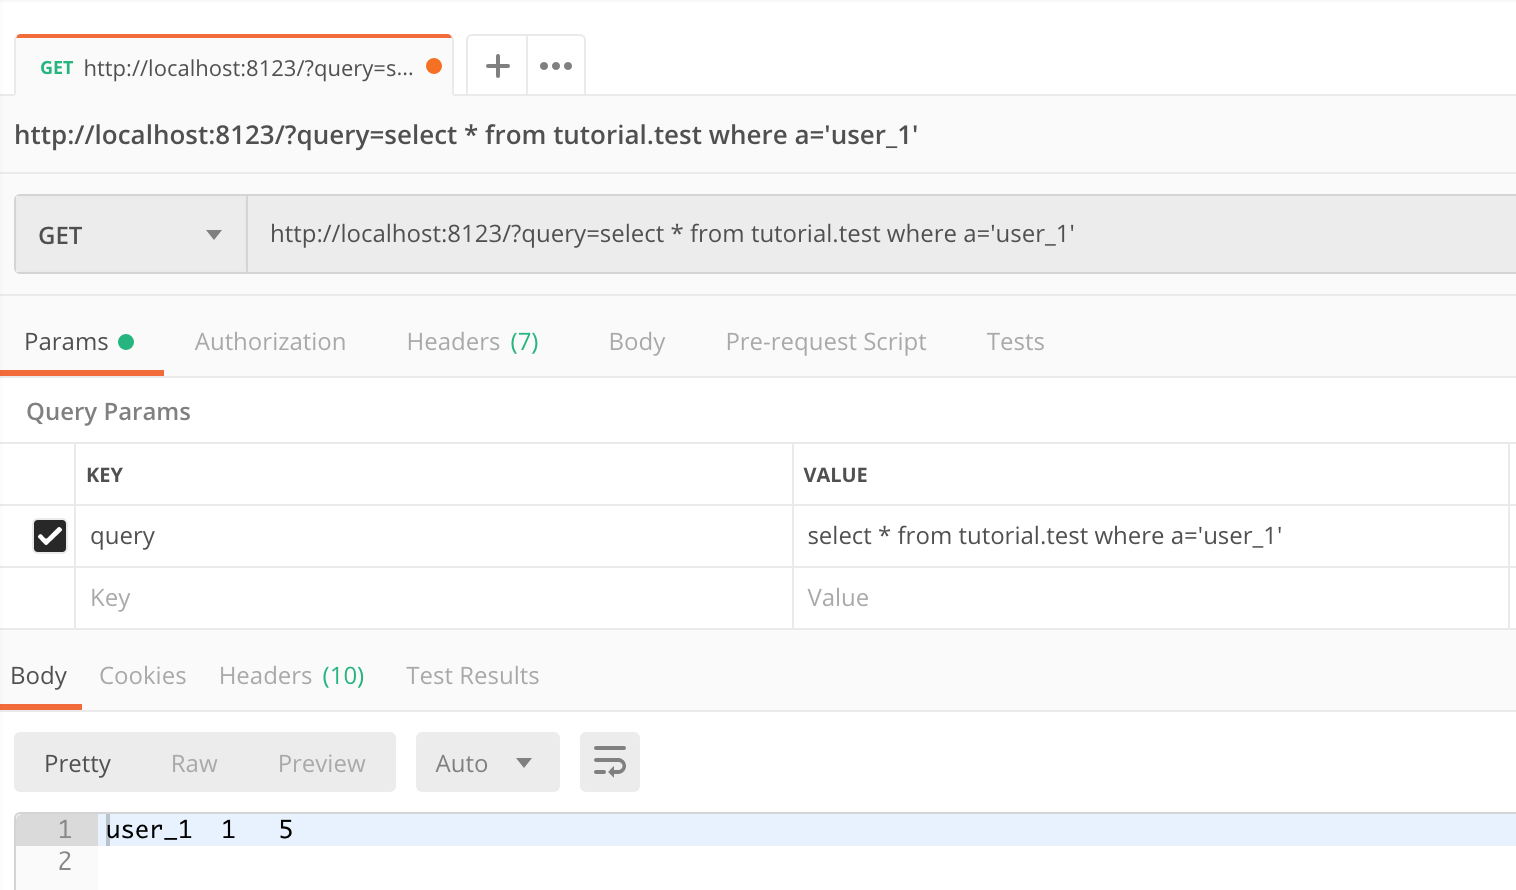
At these moments, you can also use any REST tools, such a Postman to interact with the ClickHouse DB. Use your favorite REST API testing tool and send the following HTTP request.
xxxxxxxxxx
http://localhost:8123/?query=select * from tutorial.test where a='user_1'
Here, we send an HTTP GET request with a SQL query, which should return output as shown below.

So far, everything is very simple. Let's do something complex. We are going to load some huge datasets into the database and run some analytical queries against the data.
Step 10
Download the sample dataset from the resource. The resource contains prepared partitions for direct loading into the ClickHouse DB. The dataset contains Airplane performance history at the USA airport. The size of the datasets are about 15 Gb and contains 183 millions of rows.
Step 11
Unarchive the file into the ClickHouse data directory that we created earlier.
xxxxxxxxxx
tar xvf ontime.tar -C $HOME/clickhouse_db_vol
Step 12
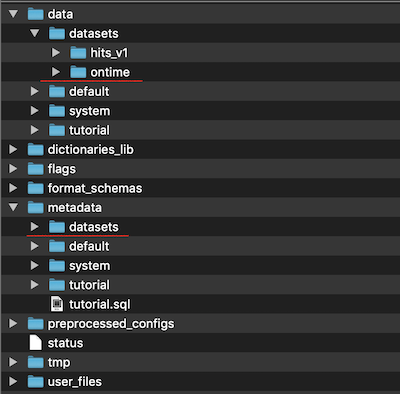
The unarchiving process will take a few minutes to complete. After completing the process, you should find a similar directory structure in your ClickHouse data directory.

Step 13
Here, "datasets" is the name of the database created into the ClickHouse. And "ontime" is the name of the table. Now, restart the Docker container and wait for a few minutes for ClickHouse to create the database and tables and load the data into the tables. Usually, it takes a couple of minutes.
Step 14
Execute the SQL statement, show database, to ensure that the database named "datasets" is already created.
xxxxxxxxxx
SHOW DATABASES
┌─name─────┐
│ datasets │
│ default │
│ system │
│ tutorial │
└──────────┘
4 rows in set. Elapsed: 0.005 sec.
Step 15
Now, we are ready to query the database. Execute the following query.
xxxxxxxxxx
SELECT DestCityName, uniqExact(OriginCityName) AS u
FROM datasets.ontime
WHERE Year >= 2000 and Year <= 2010
GROUP BY DestCityName
ORDER BY u DESC LIMIT 10;
The query will return the most popular destinations by the number of directly connected cities for various year ranges.
xxxxxxxxxx
┌─DestCityName──────────┬───u─┐
│ Atlanta, GA │ 193 │
│ Chicago, IL │ 167 │
│ Dallas/Fort Worth, TX │ 161 │
│ Minneapolis, MN │ 138 │
│ Cincinnati, OH │ 138 │
│ Detroit, MI │ 130 │
│ Houston, TX │ 129 │
│ Denver, CO │ 127 │
│ Salt Lake City, UT │ 119 │
│ New York, NY │ 115 │
└───────────────────────┴─────┘
10 rows in set. Elapsed: 7.373 sec. Processed 72.81 million rows, 3.37 GB (9.88 million rows/s., 457.24 MB/s.)
The SQL query takes 7.3 seconds to execute. Let's run a few more queries as shown below.
xxxxxxxxxx
SELECT Year, avg(DepDelay>10)*100
FROM datasets.ontime
GROUP BY Year
ORDER BY Year;
It returns a percentage of flights delayed for more than 10 minutes, by year.
Conclusion
In this short post, we described how to run the ClickHouse database into Docker and load some huge datasets to do some data analysis. From here, you can start loading sample datasets and keep exploring the ClickHouse database features.
Opinions expressed by DZone contributors are their own.

Comments