Building and Flashing ESP32 Applications With Eclipse
Learn how to build ESP32 applications with Eclipse.
Join the DZone community and get the full member experience.
Join For FreeThe new semester is approaching in a very fast way, and so is the new lecture and lab module 'Advanced Distributed Systems' at the Lucerne University. For that module, we are going to build a new 'Sumo' style robot with WLAN capabilities using the ESP32 chip. It will be a new robot PCB, and below is the current robot (based on NXP K22FX512) with the WLAN module connected to it:
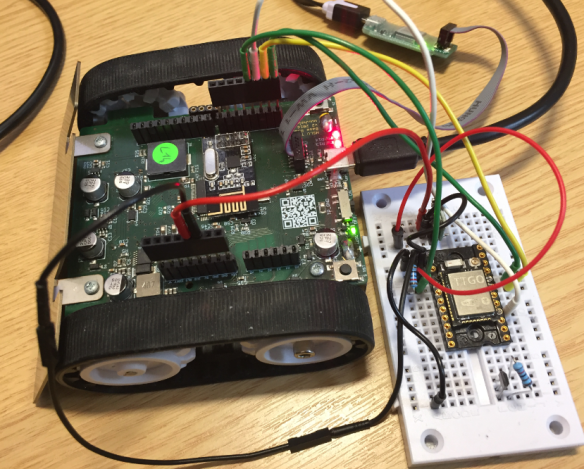
Zumo connected to TTGO ESP32 module
The new robot will have the NXP K22FN512 on it, the same device as on the tinyK22 board, with the extension of a Raspberry Pi. The wireless module used is the LILYGO TTGO Wi-Fi/Bluetooth module from http://www.lilygo.cn, which is about 45 percent smaller than typical ESP32 modules. That module includes the ESP32 PICO-D4 from Espressif in a nice and convenient package, including an antenna:

TTGO module on the DIY adapter
Because the new boards are not ready yet, I had to start software development with the NXP MCUXpresso IDE and SDK using the old platform. And, because the Wi-Fi module only needs UART Rx, Tx, and two control lines (reset and bootloader mode), the wiring is pretty simple. Programming the ESP32 firmware is done through the NXP Kinetis part using USB CDC and is working fine. That way, the Wi-Fi module can be programmed easily from the host using the standard Espressif tools or even with using the Arduino IDE. But that might be the subject of a different post. The TTGO Micro-32 module is available on AliExpress for less than $5.
The current Espressif documentation integrating with Eclipse is kind of broken and did not work for me (they are changing from make files to use CMake).
The good news is that I have found a way to easily integrate the IDF with Eclipse, which is documented below. Because I'm using the ESP32 in combination with the NXP Kinetis and SDK, it makes sense to have everything in the MCUXpresso IDE (I'm using the Version 11.0.0).
Doug Schaefer documented the steps how to use Eclipse with CMake in 2018 (see https://cdtdoug.ca/2018/07/02/cdt-for-esp32.html), but somehow, this does not work correctly in Eclipse 2019-06.
Preconditions
I assume a working IDF installation/setup. I'm using:
- Windows 10, 64bit
- NXP MCUXpresso IDE V11.0.0
- Python 2.7.16
- CMake V3.15.1 with ninja v1.9.0
- Git: 2.21.0.windows.1
- MenuConfig: v4.6.0.0
- Xtensa ESP32 toolchain: xtensa-esp32-elf-gcc8_2_0-esp32-2019r1-win32
- Espressif IDF v4.0-dev-1443-g39f090a4f
The IDF requires the following (with my own settings shown):
The following steps describe how to use the 'hello world' project with the Eclipse IDE.
- Create a folder where to place the project. Note that the path shall *not* include any spaces. Example:
c:\esp\projects\idf_hello_world - Copy the files from the IDF example projects into that folder, e.g. from:
C:\esp\esp-idf\examples\get-started\hello_world - Because we are going to use CMake, the make files (Makefile and main\component.mk) can be deleted.
- In the Eclipse IDE, create a new ‘Makefile Project with Existing Code:'
 Makefile Project with Existing Code
 - Give the project a name and point to the folder created:
 New Project
 - This creates the project:
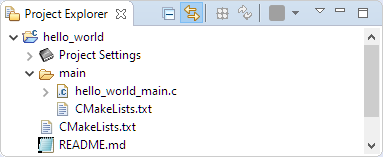 Project in Project Explorer
 - In the project properties, C/C++ Build uncheck 'Use default build command' and use the following instead:
 Builder Settings
python ${IDF_PATH}/tools/idf.py - Add a new build target and use build for the name:
 New Build Target
 - Add a new build target and use build for the name:
 Build build target
 - In the same way, it adds targets for clean and fullclean.
- UPDATE: To automatically parse the include path settings, use the
-v(verbose) command line: Verbose build target
 - For programming, add a new target 'flash' with the following arguments (update the COM port for your system):
--port COM78 --baud 115200 flash
 Flash Builder Settings
Now, I have all the needed targets I can double-click to build, clean, and flash the ESP32 application:
ESP32 IDF Project in Eclipse
The targets call the idf.py, as I would do it on the command line, and all the output is written to the Eclipse Console:
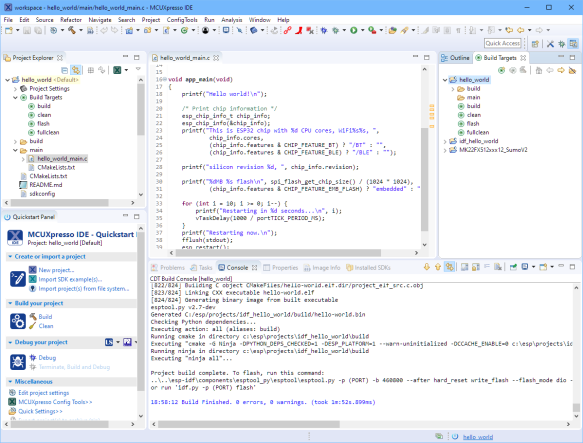
IDF Build With Eclipse and Console Output
In the same way, I can flash the application: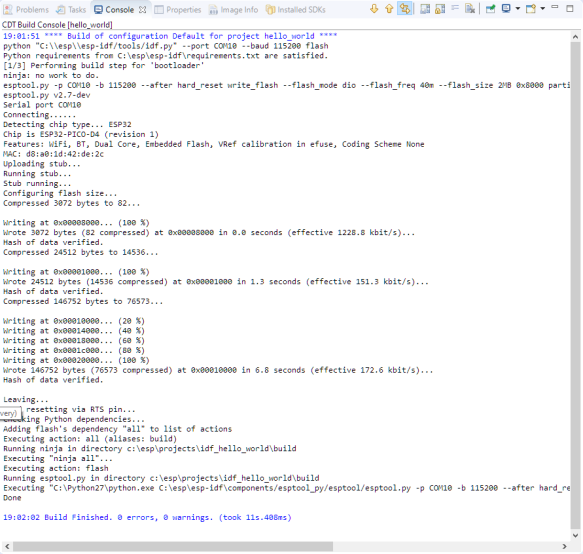
Programming ESP32 from Eclipse
The Eclipse built-in terminal can be used for the serial connection to the target. In my case, this is a USB CDC connection through the NXP Kinetis to the ESP32 module:
Serial connection to ESP32
With this, we have all the needed parts working. But there are a few things to tweak for a better experience, as explained in the next sections.
Unresolved Inclusion: The ‘Naive’ Way
UPDATE: There is a better way using a 'verbose' build (see above, added -v to the build command) and using 'Preprocessor Include Path' providers (see below). So you can skip this section and jump to the 'Using Providers' one.
Because we have set up the project without toolchain, the Eclipse IDE editor will report unresolved includes:
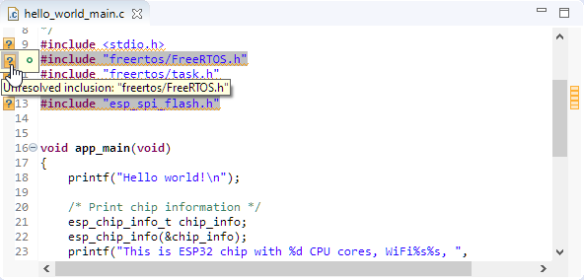
Unresolved Includes
This can be solved by adding entries to the Paths and Symbols project settings.
It makes sense to have a variable ESP32TOOLCHAIN pointing to the Xtensa ESP32 toolchain folder:
C:\esp\toolchain\xtensa-esp32-elfThen, I can add the following include paths:
${IDF_PATH}/components/freertos/include
${IDF_PATH}/components/spi_flash/include
${IDF_PATH}/components/esp_common/include
${ESP32TOOLCHAIN}/xtensa-esp32-elf/includeUsing Providers
There is a way to let Eclipse parsing the include paths from the compiler command line. For this, the build has to be done with the -v option:

verboseBuildTarget
Enable in the Providers tab of the Preprocessor Include Path the ' CDT GCC Build Output Parser ' and set the following compiler command line pattern:
xtensa-esp32-elf-(gcc|g\+\+|c\+\+|cc|cpp|clang)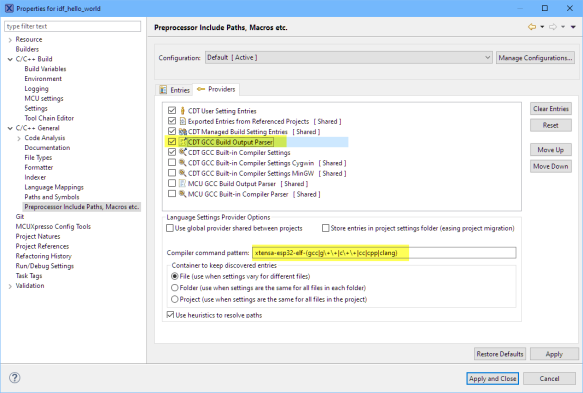
CDT GCC Build Output Parser
Enable as well the CDT GCC Built-in Compiler settings with the following specs:
xtensa-esp32-elf-gcc ${FLAGS} -std=c++11 -E -P -v -dD "${INPUTS}"
CDT GCC Build-in Compiler Settings
Now with a -v (verbose) build, the includes should show up resolved in the editor.
You might need to turn off heuristics (see " Fixing the Eclipse Index ") and to rebuild the Index for the project.
Summary
The Eclipse support for CMake and Espressif ESP32 did not work for me with Eclipse 2019.06. It can work initially, but after a workspace reloads, the projects report errors, plus the include paths are not resolved. So, I ended up with a simple and working solution using make file projects in Eclipse, which call the idf.py using CMake: so using CMake with make projects which are not using make. Serial connection to the ESP32 module is with the Eclipse built-in Terminal. What is not working within Eclipse is using the idf.py menuconfig, but maybe a reader has an idea how to enable this?
Post a comment if you have additional tips. If I find an even better way, I will update this article.
Happy ESPing!
Published at DZone with permission of Erich Styger, DZone MVB. See the original article here.
Opinions expressed by DZone contributors are their own.

Comments