AWS Lambda With MySQL (RDS) and API Gateway
Join the DZone community and get the full member experience.
Join For FreeI have been working on Lambda for some projects, and recently, I had to design and write an FAS service using Lambda functions and read/write data into RDS (MySQL). I'm sharing what I've learned here.
Before We Begin
Prerequisites
This tutorial assumes that you have some knowledge of basic Lambda operations and the AWS console, RDS, IAM, and Node.js.
To understand whether a serverless application is good for you or not, you need to understand the limitations of Lambda, what a cold start is, and how concurrency works in Lambda. The Lambda execution model is, of course, a different architecture than traditional web applications in Spring.
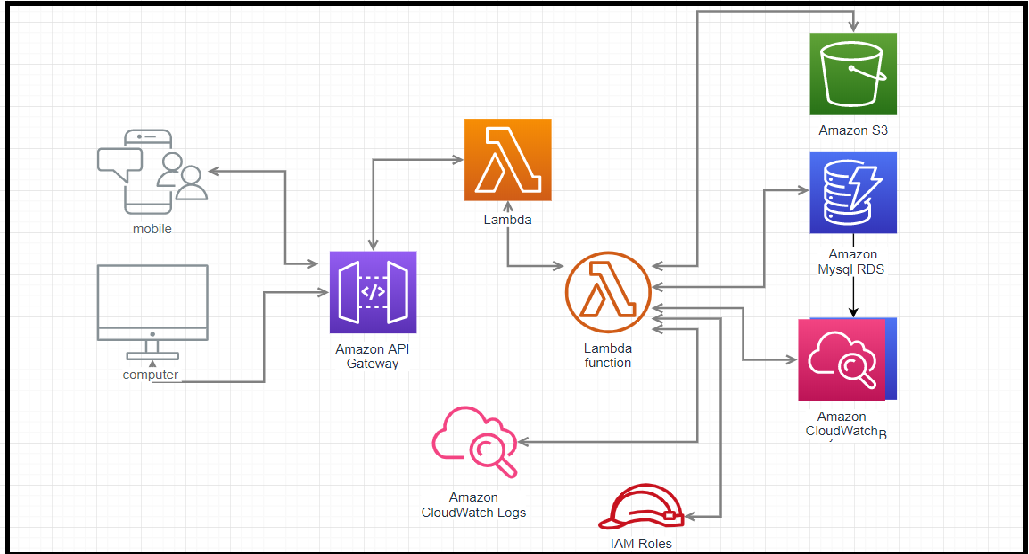
What Is a Cold Start?
When a user starts their first request, Lambda has a slight delay while it spins up a new container and loads our code and dependencies in memory. This is called a cold start. A cold start only happens if there is no idle container available or waiting to run our code. Once a connection is timed out, AWS kills the container, and future requests will again spin up a new container. The first request will always be a bit slower due to the cold start, but subsequent requests will hit the same instance quickly.
You may also enjoy: Querying RDS MySQL DB With NodeJS Lambda Function
We can use a Cloud Watch Timer/dummy request to keep lambdas warm.
Concurrency
Concurrent requests will trigger the creation of new AWS Lambda instances. For example, if you have five concurrent requests to the same Lambda function, AWS will create five containers to serve the requests. In short, when you first invoke a function, AWS Lambda creates an instance of the function and runs its handler method to process the event. If you invoke the function again while the first event is being processed, Lambda creates another instance.
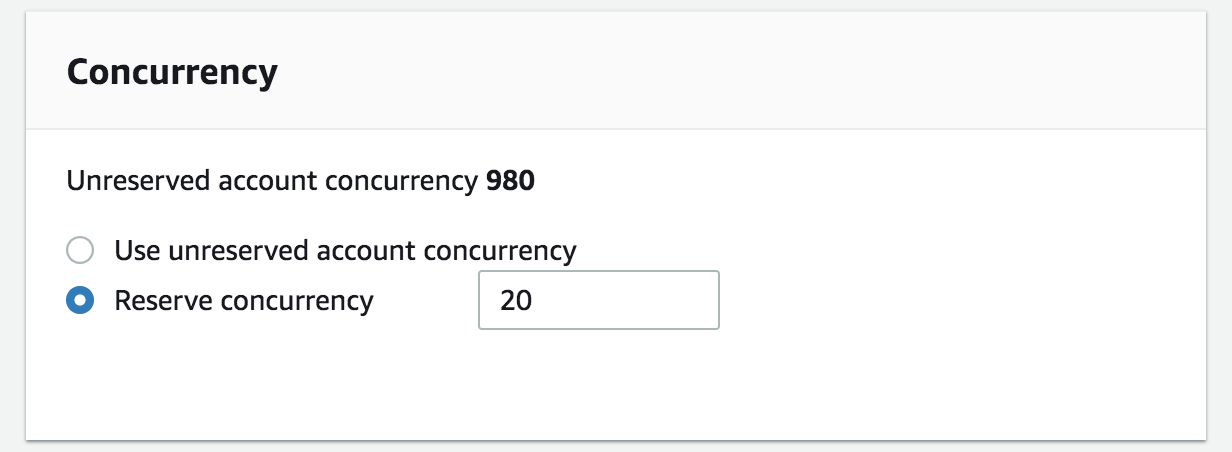
You can configure a function with reserved concurrency to guarantee that it can always reach a certain level of concurrency. This function can run with this maximum amount of concurrency without interrupting or waiting.
The Lambda currency limit is 1000 by default. Take note that one Lambda function that has scaled up can hit the performance of every other Lambda function in the same region.

Reserve concurrency doesn't start until 20 instances on the first Lambda call. Its reserve capacity for a function can scale up or down. As soon as the concurrent executions limit is reached, the next execution gets throttled.
Retry Behavior
Lambda functions will retry three times before they fail due to an uncaught application error. If you added context.succeed and did not handle exceptions properly, Lambda will not retry the function and instead, will assume that the function was successful. If you have added context.fail, Lambda will retry the function.
module.exports.handler(event, context, callback) {
try {
// Do you what you want to do.
return callback(null, 'Success')
} catch (err) {
// You probably still want to log it.
console.error(err)
// Return fail.
return callback(null, 'fail')
}
}
Common Invocation Errors
- Request – The request event is too large or isn't valid JSON, the function doesn't exist, or a parameter value is of the wrong type.
- Caller – The user or service doesn't have permission to invoke the function.
- Account – The maximum number of function instances are already running or requests are being made too quickly.
Debug Lambda
The following are two approaches to debug Lambda on a local machine:
1. Choose Test at the top right of your Lambda function to bring up a screen that allows you to configure a new test that can be run to verify success/failure and you can also add console.log for debugging.
2. Another most popular option is Cloudwatch for debugging on Aws console .When you review CloudWatch log files or metrics when you're troubleshooting errors, be aware that they are displayed or stored in the Region closest to the location where the function executed.
Lambda-local lets you test Amazon Lambda functions on your local machine, by providing a simplistic API and command-line tool.
xxxxxxxxxx
npm install -g lambda-local
You can use Lambda-local as a command line tool.
xxxxxxxxxx
# Simple usage lambda-local -l index.js -h handler -e examples/s3-put.js
# Input environment variables lambda-local -l index.js -h handler -e examples/s3-put.js -E '{"key":"value","key2":"value2"}'
You can find further information from the following link:
You can also use SAM Local to develop and test Lambda functions locally with Docker.
You can find further information on following link
Lambda Functions Versioning and Deployment
If you want to publish a new version of a function for QA testing without affecting the stable production version, then you can use Lambda version option. When you choose a new version, the system creates a new version of your Lambda function each time that you publish the function. We can publish multiple versions of a function. Each version can be invoked in parallel in a separate container. By default, the version would be $LATEST.
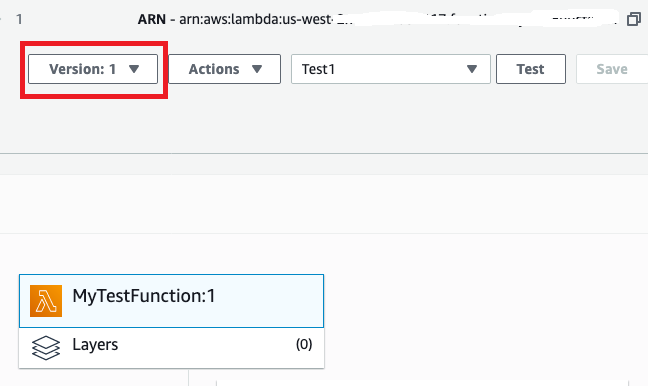
We can configure blue-green /canary deployment for continuous delivery:
- https://aws.amazon.com/quickstart/architecture/blue-green-deployment/
- https://aws.amazon.com/blogs/compute/implementing-canary-deployments-of-aws-lambda-functions-with-alias-traffic-shifting/
Configure RDS
The first step to start code is to provision an RDS instance using AWS Console. Then, try AWS Free Tier with Amazon RDS.
MySQL 750 hours of Amazon RDS Single-AZ db.t2.micro Instance usage running MySQL 20 GB of General Purpose (SSD) DB Storage and 20 GB of backup storage for your automated database backups and any user-initiated DB Snapshots
Write Your First Lambda Function
When you invoke a function, you can choose to invoke it synchronously or asynchronously. With synchronous invocation, you wait for the function to process the event and return a response. With asynchronous invocation, Lambda queues the event for processing and returns a response immediately. For asynchronous invocation, Lambda handles retries and can send failed events to a dead-letter queue.
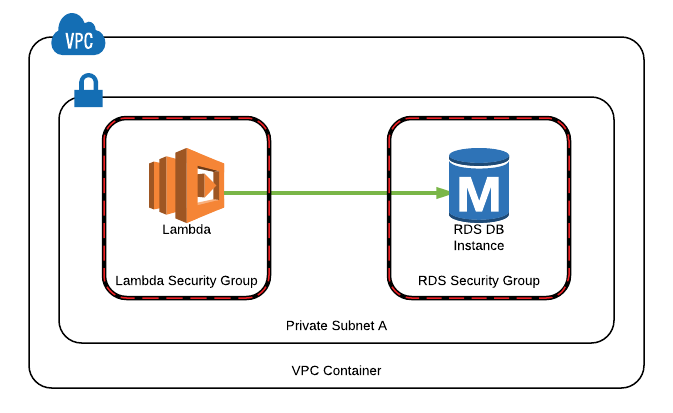
You need to create a role for Lambda. As a best practice, define policies that follow the principle of granting least privilege. In other words, the policies include only the permissions that users require to perform their tasks, for learning purpose adding broad role but you can narrow as per your requirements.
AmazonRDSFullAccess
xxxxxxxxxx
{
"Version":"2012-10-17",
"Statement":[
{
"Action":[
"rds:*",
"application-autoscaling:DeleteScalingPolicy",
"application-autoscaling:DeregisterScalableTarget",
"application-autoscaling:DescribeScalableTargets",
"application-autoscaling:DescribeScalingActivities",
"application-autoscaling:DescribeScalingPolicies",
"application-autoscaling:PutScalingPolicy",
"application-autoscaling:RegisterScalableTarget",
"cloudwatch:DescribeAlarms",
"cloudwatch:GetMetricStatistics",
"cloudwatch:PutMetricAlarm",
"cloudwatch:DeleteAlarms",
"ec2:DescribeAccountAttributes",
"ec2:DescribeAvailabilityZones",
"ec2:DescribeInternetGateways",
"ec2:DescribeSecurityGroups",
"ec2:DescribeSubnets",
"ec2:DescribeVpcAttribute",
"ec2:DescribeVpcs",
"sns:ListSubscriptions",
"sns:ListTopics",
"sns:Publish",
"logs:DescribeLogStreams",
"logs:GetLogEvents"
],
"Effect":"Allow",
"Resource":"*"
},
{
"Action":"pi:*",
"Effect":"Allow",
"Resource":"arn:aws:pi:*:*:metrics/rds/*"
},
{
"Action":"iam:CreateServiceLinkedRole",
"Effect":"Allow",
"Resource":"*",
"Condition":{
"StringLike":{
"iam:AWSServiceName":[
"rds.amazonaws.com",
"rds.application-autoscaling.amazonaws.com"
]
}
}
}
]
}
AmazonVPCFullAccess
xxxxxxxxxx
{
"Version":"2012-10-17",
"Statement":[
{
"Effect":"Allow",
"Action":[
"ec2:AcceptVpcPeeringConnection",
"ec2:AcceptVpcEndpointConnections",
"ec2:AllocateAddress",
"ec2:AssignIpv6Addresses",
"ec2:AssignPrivateIpAddresses",
"ec2:AssociateAddress",
"ec2:AssociateDhcpOptions",
"ec2:AssociateRouteTable",
"ec2:AssociateSubnetCidrBlock",
"ec2:AssociateVpcCidrBlock",
"ec2:AttachClassicLinkVpc",
"ec2:AttachInternetGateway",
"ec2:AttachNetworkInterface",
"ec2:AttachVpnGateway",
"ec2:AuthorizeSecurityGroupEgress",
"ec2:AuthorizeSecurityGroupIngress",
"ec2:CreateCustomerGateway",
"ec2:CreateDefaultSubnet",
"ec2:CreateDefaultVpc",
"ec2:CreateDhcpOptions",
"ec2:CreateEgressOnlyInternetGateway",
"ec2:CreateFlowLogs",
"ec2:CreateInternetGateway",
"ec2:CreateNatGateway",
"ec2:CreateNetworkAcl",
"ec2:CreateNetworkAcl",
"ec2:CreateNetworkAclEntry",
"ec2:CreateNetworkInterface",
"ec2:CreateNetworkInterfacePermission",
"ec2:CreateRoute",
"ec2:CreateRouteTable",
"ec2:CreateSecurityGroup",
"ec2:CreateSubnet",
"ec2:CreateTags",
"ec2:CreateVpc",
"ec2:CreateVpcEndpoint",
"ec2:CreateVpcEndpointConnectionNotification",
"ec2:CreateVpcEndpointServiceConfiguration",
"ec2:CreateVpcPeeringConnection",
"ec2:CreateVpnConnection",
"ec2:CreateVpnConnectionRoute",
"ec2:CreateVpnGateway",
"ec2:DeleteCustomerGateway",
"ec2:DeleteDhcpOptions",
"ec2:DeleteEgressOnlyInternetGateway",
"ec2:DeleteFlowLogs",
"ec2:DeleteInternetGateway",
"ec2:DeleteNatGateway",
"ec2:DeleteNetworkAcl",
"ec2:DeleteNetworkAclEntry",
"ec2:DeleteNetworkInterface",
"ec2:DeleteNetworkInterfacePermission",
"ec2:DeleteRoute",
"ec2:DeleteRouteTable",
"ec2:DeleteSecurityGroup",
"ec2:DeleteSubnet",
"ec2:DeleteTags",
"ec2:DeleteVpc",
"ec2:DeleteVpcEndpoints",
"ec2:DeleteVpcEndpointConnectionNotifications",
"ec2:DeleteVpcEndpointServiceConfigurations",
"ec2:DeleteVpcPeeringConnection",
"ec2:DeleteVpnConnection",
"ec2:DeleteVpnConnectionRoute",
"ec2:DeleteVpnGateway",
"ec2:DescribeAccountAttributes",
"ec2:DescribeAddresses",
"ec2:DescribeAvailabilityZones",
"ec2:DescribeClassicLinkInstances",
"ec2:DescribeCustomerGateways",
"ec2:DescribeDhcpOptions",
"ec2:DescribeEgressOnlyInternetGateways",
"ec2:DescribeFlowLogs",
"ec2:DescribeInstances",
"ec2:DescribeInternetGateways",
"ec2:DescribeKeyPairs",
"ec2:DescribeMovingAddresses",
"ec2:DescribeNatGateways",
"ec2:DescribeNetworkAcls",
"ec2:DescribeNetworkInterfaceAttribute",
"ec2:DescribeNetworkInterfacePermissions",
"ec2:DescribeNetworkInterfaces",
"ec2:DescribePrefixLists",
"ec2:DescribeRouteTables",
"ec2:DescribeSecurityGroupReferences",
"ec2:DescribeSecurityGroups",
"ec2:DescribeStaleSecurityGroups",
"ec2:DescribeSubnets",
"ec2:DescribeTags",
"ec2:DescribeVpcAttribute",
"ec2:DescribeVpcClassicLink",
"ec2:DescribeVpcClassicLinkDnsSupport",
"ec2:DescribeVpcEndpointConnectionNotifications",
"ec2:DescribeVpcEndpointConnections",
"ec2:DescribeVpcEndpoints",
"ec2:DescribeVpcEndpointServiceConfigurations",
"ec2:DescribeVpcEndpointServicePermissions",
"ec2:DescribeVpcEndpointServices",
"ec2:DescribeVpcPeeringConnections",
"ec2:DescribeVpcs",
"ec2:DescribeVpnConnections",
"ec2:DescribeVpnGateways",
"ec2:DetachClassicLinkVpc",
"ec2:DetachInternetGateway",
"ec2:DetachNetworkInterface",
"ec2:DetachVpnGateway",
"ec2:DisableVgwRoutePropagation",
"ec2:DisableVpcClassicLink",
"ec2:DisableVpcClassicLinkDnsSupport",
"ec2:DisassociateAddress",
"ec2:DisassociateRouteTable",
"ec2:DisassociateSubnetCidrBlock",
"ec2:DisassociateVpcCidrBlock",
"ec2:EnableVgwRoutePropagation",
"ec2:EnableVpcClassicLink",
"ec2:EnableVpcClassicLinkDnsSupport",
"ec2:ModifyNetworkInterfaceAttribute",
"ec2:ModifySubnetAttribute",
"ec2:ModifyVpcAttribute",
"ec2:ModifyVpcEndpoint",
"ec2:ModifyVpcEndpointConnectionNotification",
"ec2:ModifyVpcEndpointServiceConfiguration",
"ec2:ModifyVpcEndpointServicePermissions",
"ec2:ModifyVpcPeeringConnectionOptions",
"ec2:ModifyVpcTenancy",
"ec2:MoveAddressToVpc",
"ec2:RejectVpcEndpointConnections",
"ec2:RejectVpcPeeringConnection",
"ec2:ReleaseAddress",
"ec2:ReplaceNetworkAclAssociation",
"ec2:ReplaceNetworkAclEntry",
"ec2:ReplaceRoute",
"ec2:ReplaceRouteTableAssociation",
"ec2:ResetNetworkInterfaceAttribute",
"ec2:RestoreAddressToClassic",
"ec2:RevokeSecurityGroupEgress",
"ec2:RevokeSecurityGroupIngress",
"ec2:UnassignIpv6Addresses",
"ec2:UnassignPrivateIpAddresses",
"ec2:UpdateSecurityGroupRuleDescriptionsEgress",
"ec2:UpdateSecurityGroupRuleDescriptionsIngress"
],
"Resource":"*"
}
]
}
AWSLambdaVPCAccessExecutionRole
xxxxxxxxxx
{
"Version":"2012-10-17",
"Statement":[
{
"Effect":"Allow",
"Action":[
"logs:CreateLogGroup",
"logs:CreateLogStream",
"logs:PutLogEvents",
"ec2:CreateNetworkInterface",
"ec2:DescribeNetworkInterfaces",
"ec2:DeleteNetworkInterface"
],
"Resource":"*"
}
]
}

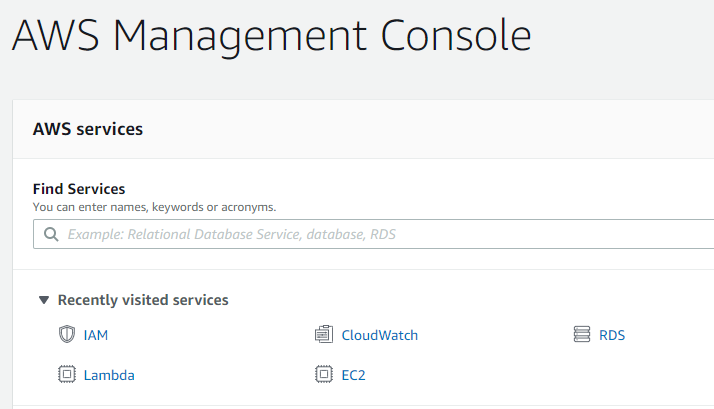
To create a Lambda function, go to AWS Console and select Lambda.
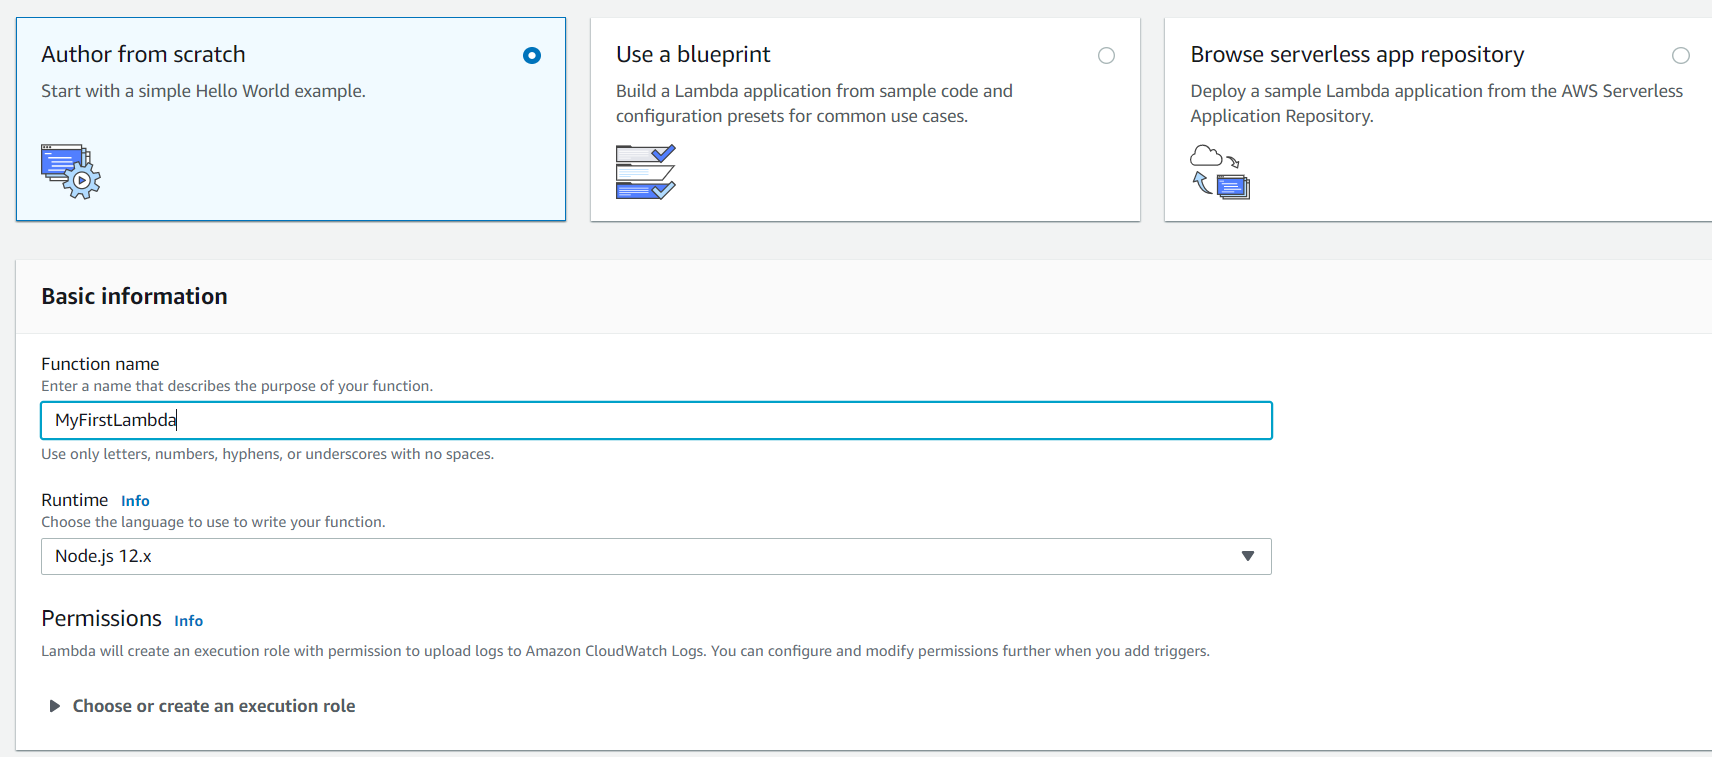
Click create function and choose Node.js 12.x. Then, choose existing role we created above.
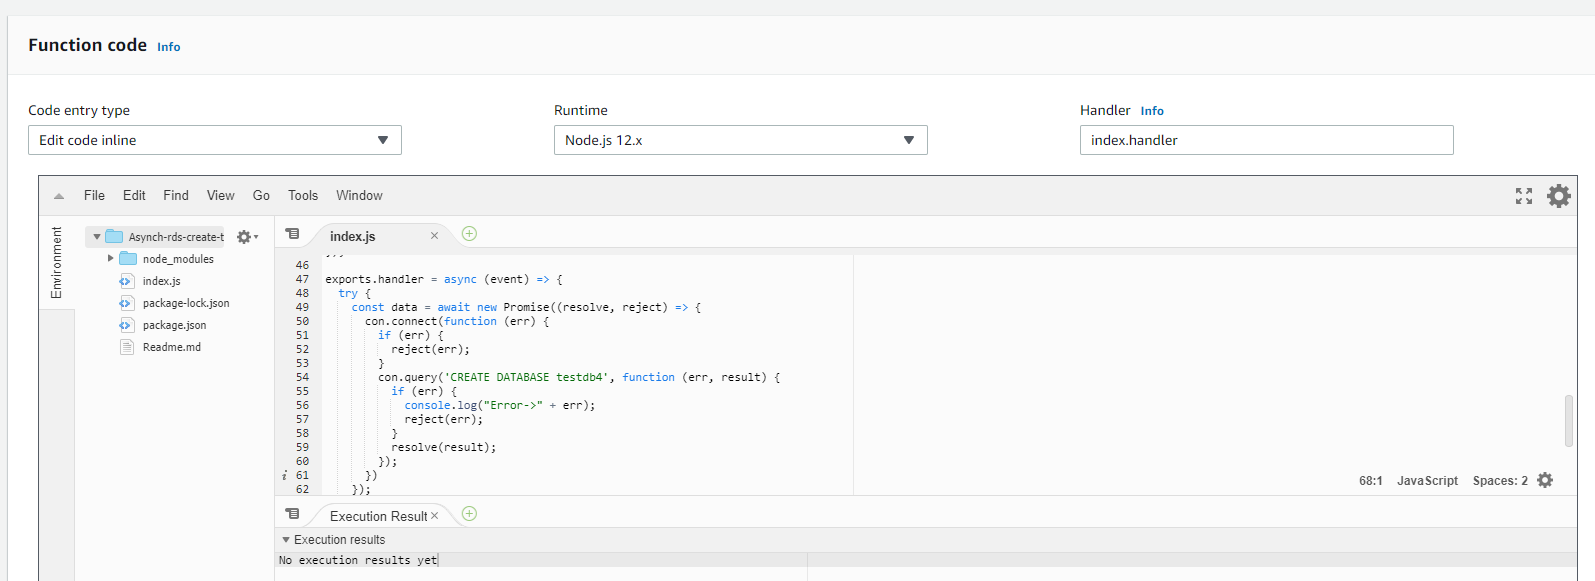
In order to support a MySQL dependency, we need to create code first on your local computer and then upload it to the Lambda console.
Create a folder and create package.json
xxxxxxxxxx
npm init

Once the file is created, you can find the following JSON in the folder.
xxxxxxxxxx
{
"name":"test",
"version":"1.0.0",
"description":"test",
"main":"index.js",
"scripts":{
"test":"echo \"Error: no test specified\" && exit 1"
},
"author":"Vaquar khan",
"license":"ISC"
}
You need to add MYSQL node dependency in project using following command
xxxxxxxxxx
npm install --save mysql

Now, add a handler into the app, create index.js (index.handler), and add Lambda logic.
In Lambda, first, we are going to create a connection object and then call our database.
xxxxxxxxxx
const mysql = require('mysql');
const connection = mysql.createConnection({
//following param coming from aws lambda env variable
host: process.env.RDS_LAMBDA_HOSTNAME,
user: process.env.RDS_LAMBDA_USERNAME,
password: process.env.RDS_LAMBDA_PASSWORD,
port: process.env.RDS_LAMBDA_PORT,
// calling direct inside code
connectionLimit: 10,
multipleStatements: true,
// Prevent nested sql statements
connectionLimit: 1000,
connectTimeout: 60 * 60 * 1000,
acquireTimeout: 60 * 60 * 1000,
timeout: 60 * 60 * 1000,
debug: true
});
Then, we need to call our Lambda handler.
xxxxxxxxxx
exports.handler = async (event) => {
try {
const data = await new Promise((resolve, reject) => {
connection.connect(function (err) {
if (err) {
reject(err);
}
connection.query('CREATE DATABASE testdb', function (err, result) {
if (err) {
console.log("Error->" + err);
reject(err);
}
resolve(result);
});
})
});
return {
statusCode: 200,
body: JSON.stringify(data)
}
} catch (err) {
return {
statusCode: 400,
body: err.message
}
}
};
Now, create a zip file and upload it.

After this, upload and click on index.js. For further changes, use inline editor.
Create a lambda env variable with its key-value pairs.
xxxxxxxxxx
RDS_LAMBDA_HOSTNAME
RDS_LAMBDA_USERNAME
RDS_LAMBDA_PASSWORD
RDS_LAMBDA_PORT

Now, configure Lambda with RDS and VPC, go to the Security group of the RDS instance. After selecting the default security group, click on it. On the EC2 page, scroll down to find inbound and outbound settings.
In inbound settings, click edit. You can change the IP here.
- 0.0.0.0/0 — this makes RDS open to the world and is not recommended.
- Configure VPC inside the Lambda function network to Lambda function work. First, go to the Lambda function, click on Network, and then select the VPC and copy the IP address. If no VPC is selected, select a VPC that's the as the DB function and copy the IP address. Add this IP in RDS inbound settings.

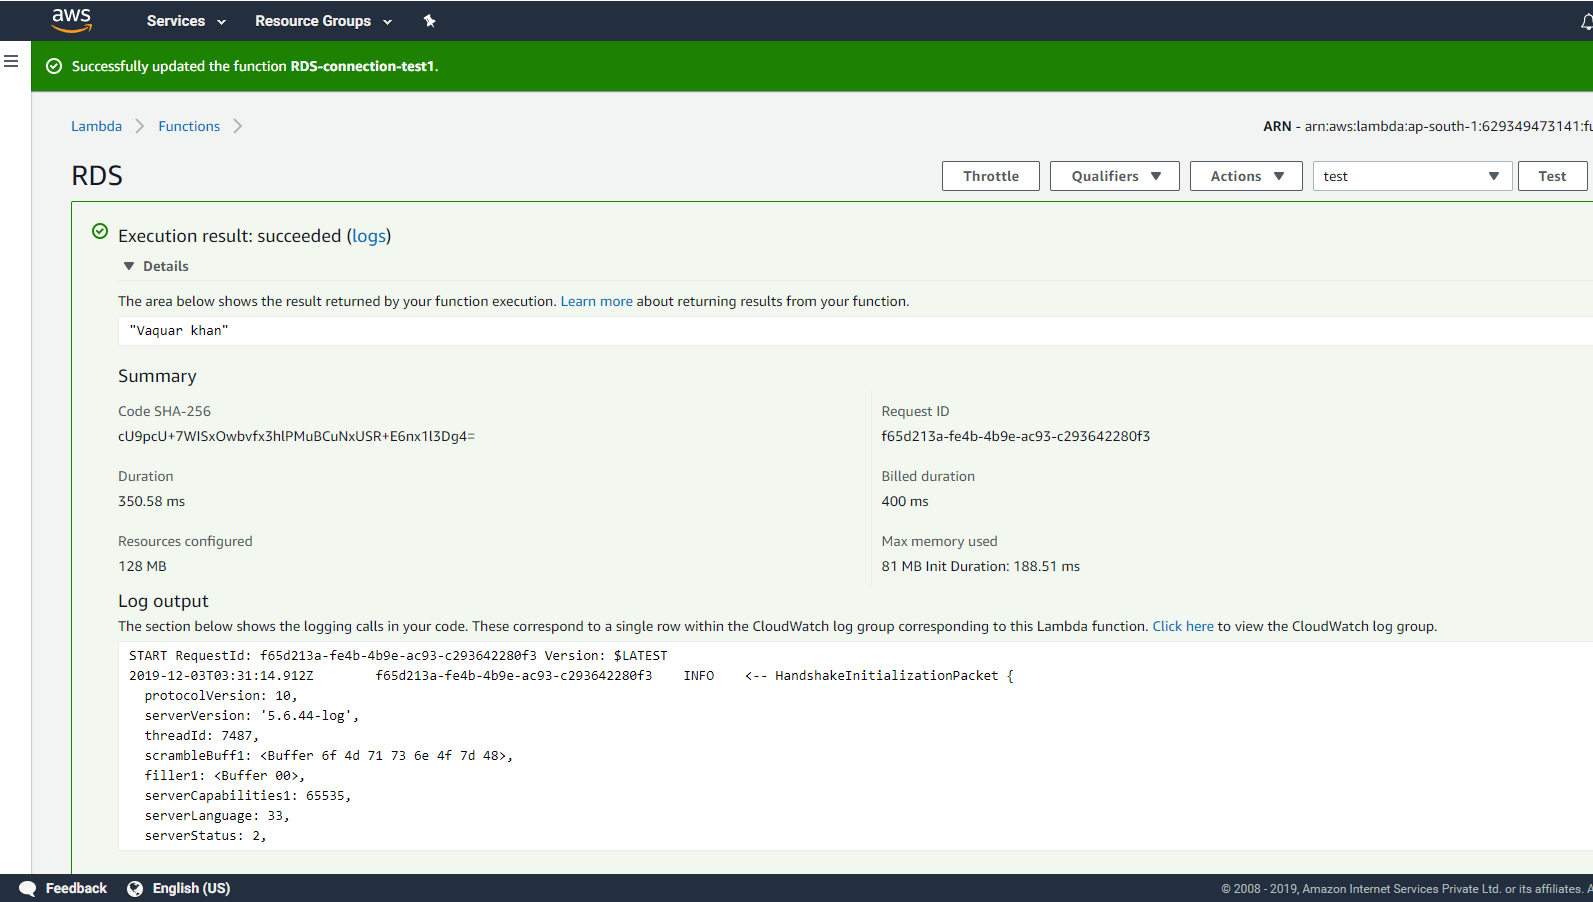
Save it and test your Lambda function.
Results
The following are a few Lambda handlers to understand how CRUD operations work in Lambda.
Create a database using lambda
xxxxxxxxxx
const mysql = require('mysql');
const connection = mysql.createConnection({
//following param coming from aws lambda env variable
host: process.env.RDS_LAMBDA_HOSTNAME,
user: process.env.RDS_LAMBDA_USERNAME,
password: process.env.RDS_LAMBDA_PASSWORD,
port: process.env.RDS_LAMBDA_PORT,
// calling direct inside code
connectionLimit: 10,
multipleStatements: true,
// Prevent nested sql statements
connectionLimit: 1000,
connectTimeout: 60 * 60 * 1000,
acquireTimeout: 60 * 60 * 1000,
timeout: 60 * 60 * 1000,
debug: true
}); exports.handler = async (event) => {
try {
const data = await new Promise((resolve, reject) => {
connection.connect(function (err) {
if (err) {
reject(err);
}
connection.query('CREATE DATABASE testdb',
function (err, result) {
if (err) {
console.log("Error->" + err);
reject(err);
} resolve(result);
});
})
});
return {
statusCode: 200,
body: JSON.stringify(data)
}
} catch (err) {
return {
statusCode: 400,
body: err.message
}
} };
Create a table using lambda
xxxxxxxxxx
exports.handler = async (event) => {
const sql = "CREATE TABLE MESSAGE (message VARCHAR(255))";
con.query(sql, function (err, result) {
if (err) throw err;
console.log("Table created");
});
return "Table Created"
};
const mysql = require('mysql');
const connection = mysql.createConnection({
//following param coming from aws lambda env variable
host: process.env.RDS_LAMBDA_HOSTNAME,
user: process.env.RDS_LAMBDA_USERNAME,
password: process.env.RDS_LAMBDA_PASSWORD,
port: process.env.RDS_LAMBDA_PORT,
// calling direct inside code
connectionLimit: 10,
multipleStatements: true,
// Prevent nested sql statements
connectionLimit: 1000,
connectTimeout: 60 * 60 * 1000,
acquireTimeout: 60 * 60 * 1000,
timeout: 60 * 60 * 1000,
debug: true
}); exports.handler = async (event) => {
try {
const data = await new Promise((resolve, reject) => {
connection.connect(function (err) {
if (err) {
reject(err);
}
connection.query('CREATE TABLE Employee (message VARCHAR(255))',
function (err, result) {
if (err) {
console.log("Error->" + err);
reject(err);
}
resolve(result);
});
})
});
return {
statusCode: 200,
body: JSON.stringify(data)
}
} catch (err) {
return {
statusCode: 400,
body: err.message
}
}
};
Insert records using lambda
xxxxxxxxxx
exports.handler = (event, context, callback) => {
// allows for using callbacks as finish/error-handlers
context.callbackWaitsForEmptyEventLoop = false;
const sql = "insert into testdb.Employee values(1,'Vaquar khan');";
con.query(sql, (err, res) => {
if (err) {
throw err
}
callback(null, '1 records inserted.');
})
};
Select records using lambda
xxxxxxxxxx
exports.handler = (event, context, callback) => {
// allows for using callbacks as finish/error-handlers
context.callbackWaitsForEmptyEventLoop = false;
const sql = "select * from testdb.Employee ";
con.query(sql, function (err, result) {
if (err) throw err;
callback(null, result)
});
};
Select records with criteria using lambda
xxxxxxxxxx
exports.handler = (event, context, callback) => {
// allows for using callbacks as finish/error-handlers
context.callbackWaitsForEmptyEventLoop = false;
const sql = "select * from testdb.Employee where emp_id = " + event.emp_id;
con.query(sql, function (err, result) {
if (err) throw err; callback(null, result)
});
};
Final Project
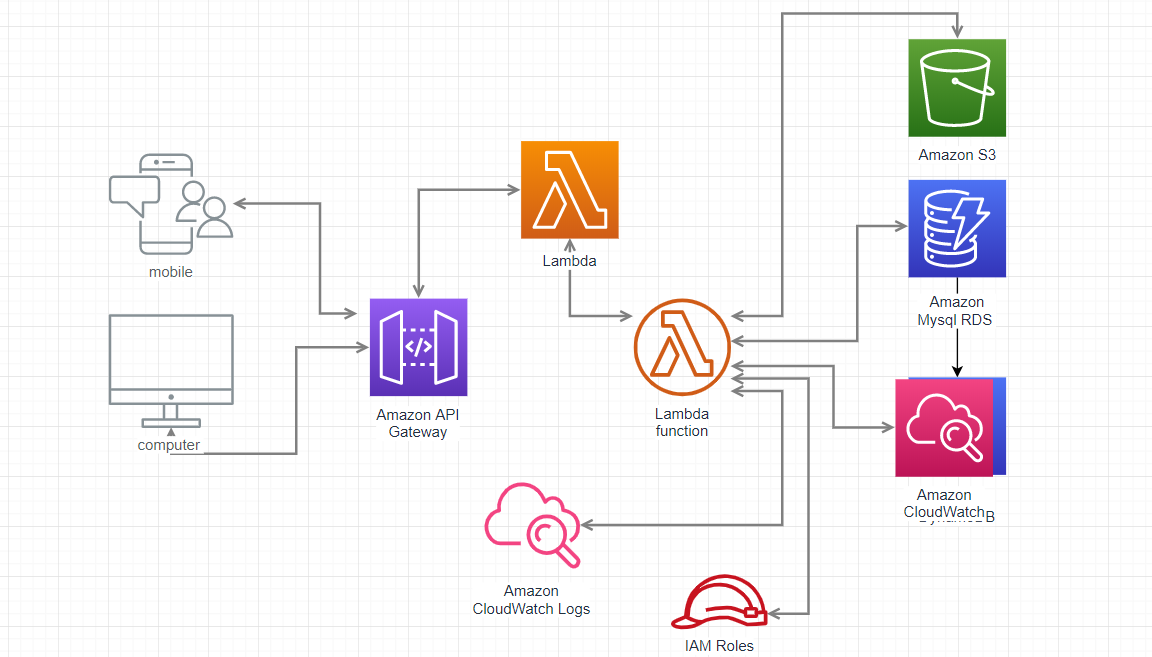
Now, we're down to the actual meat-and-potatoes of what we're trying to do:
Create a Table
xxxxxxxxxx
use testdb;
CREATE TABLE `Employee` (
`emp_id` int(11) unsigned NOT NULL AUTO_INCREMENT,
`emp_name` varchar(100) DEFAULT NULL, PRIMARY KEY (`emp_id`) ) ENGINE=InnoDB DEFAULT CHARSET=latin1;
insert into Employee values(1,'Vaquar khan');
insert into Employee values(2,'Zidan khan');
Create a Lambda
xxxxxxxxxx
const mysql = require('mysql');
const con = mysql.createConnection({
host: process.env.LAMBDA_HOSTNAME,
user: process.env.LAMBDA_USERNAME,
password: process.env.LAMBDA_PASSWORD,
port: process.env.LAMBDA_PORT,
connectionLimit: 10,
multipleStatements: true,
// Prevent nested sql statements
connectionLimit: 1000,
connectTimeout: 60 * 60 * 1000,
acquireTimeout: 60 * 60 * 1000,
timeout: 60 * 60 * 1000,
debug: true,
database:'testdb'
});
exports.handler = (event, context, callback) => {
console.log('inside lambda...'+event.emp_id)
// allows for using callbacks as finish/error-handlers
context.callbackWaitsForEmptyEventLoop = false;
const sql = "select * from Employee where emp_id = " + event.emp_id;
con.query(sql, function (err, result) {
if (err) throw err;
callback(null, result)
});
};
Create a Test Event
xxxxxxxxxx
{ "emp_id":1, "emp_name":"xyz" }
Create an API Gateway
The number of APIs per account limit is 600 regional APIs, 600 private APIs, and 120 edge APIs. Now, you can create and import regional and private APIs at a rate of one request every three seconds and deploy APIs at a rate of one request every five seconds.
Note, when you deploy an API to API Gateway, throttling is enabled by default in the stage configurations.
For the time being, in this tutorial, we are not implementing security on the API gateway, but it's mandatory to add security on gateway.
The following mechanisms can be used for authentication and authorization of the API gateway:
- Resource policies let you create resource-based policies to allow or deny access to your APIs and methods from specified source IP addresses or VPC endpoints. For more information, see Control Access to an API with Amazon API Gateway Resource Policies.
- Standard AWS IAM roles and policies offer flexible and robust access controls that can be applied to an entire API or individual methods. IAM roles and policies can be used for controlling who can create and manage your APIs as well as who can invoke them. For more information, see Control Access to an API with IAM Permissions.
- IAM tags can be used together with IAM policies to control access. For more information, see Using Tags to Control Access to API Gateway Resources.
- Endpoint Policies for Interface VPC Endpoints allow you to attach IAM resource policies to interface VPC endpoints to improve the security of your private APIs. For more information, see Use VPC Endpoint Policies for Private APIs in API Gateway.
- Lambda authorizers are Lambda functions that control access to REST API methods using bearer token authentication as well as information described by headers, paths, query strings, stage variables, or context variables request parameters. Lambda authorizers are used to control who can invoke REST API methods. For more information, see Use API Gateway Lambda Authorizers.
- Amazon Cognito user pools let you create customizable authentication and authorization solutions for your REST APIs. Amazon Cognito user pools are used to control who can invoke REST API methods. For more information, see Control Access to a REST API Using Amazon Cognito User Pools as Authorizer
- Secure key for API
- https://docs.aws.amazon.com/apigateway/latest/developerguide/limits.html
Create a Resource
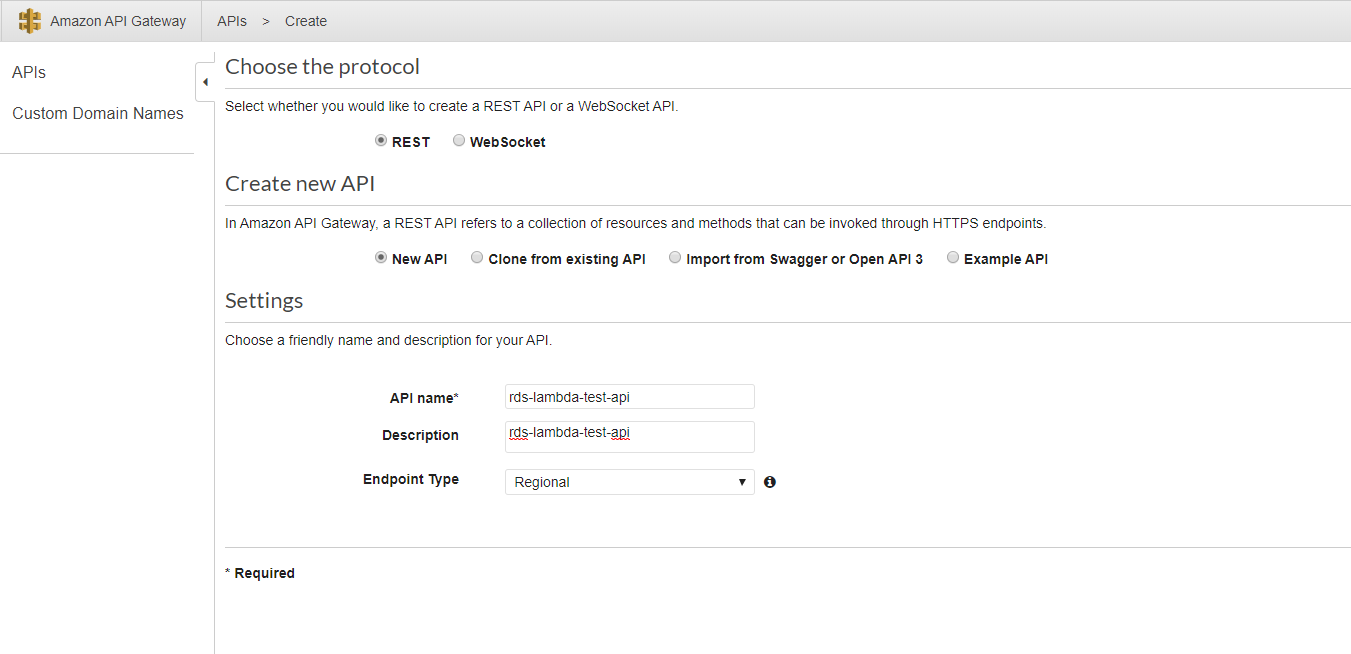
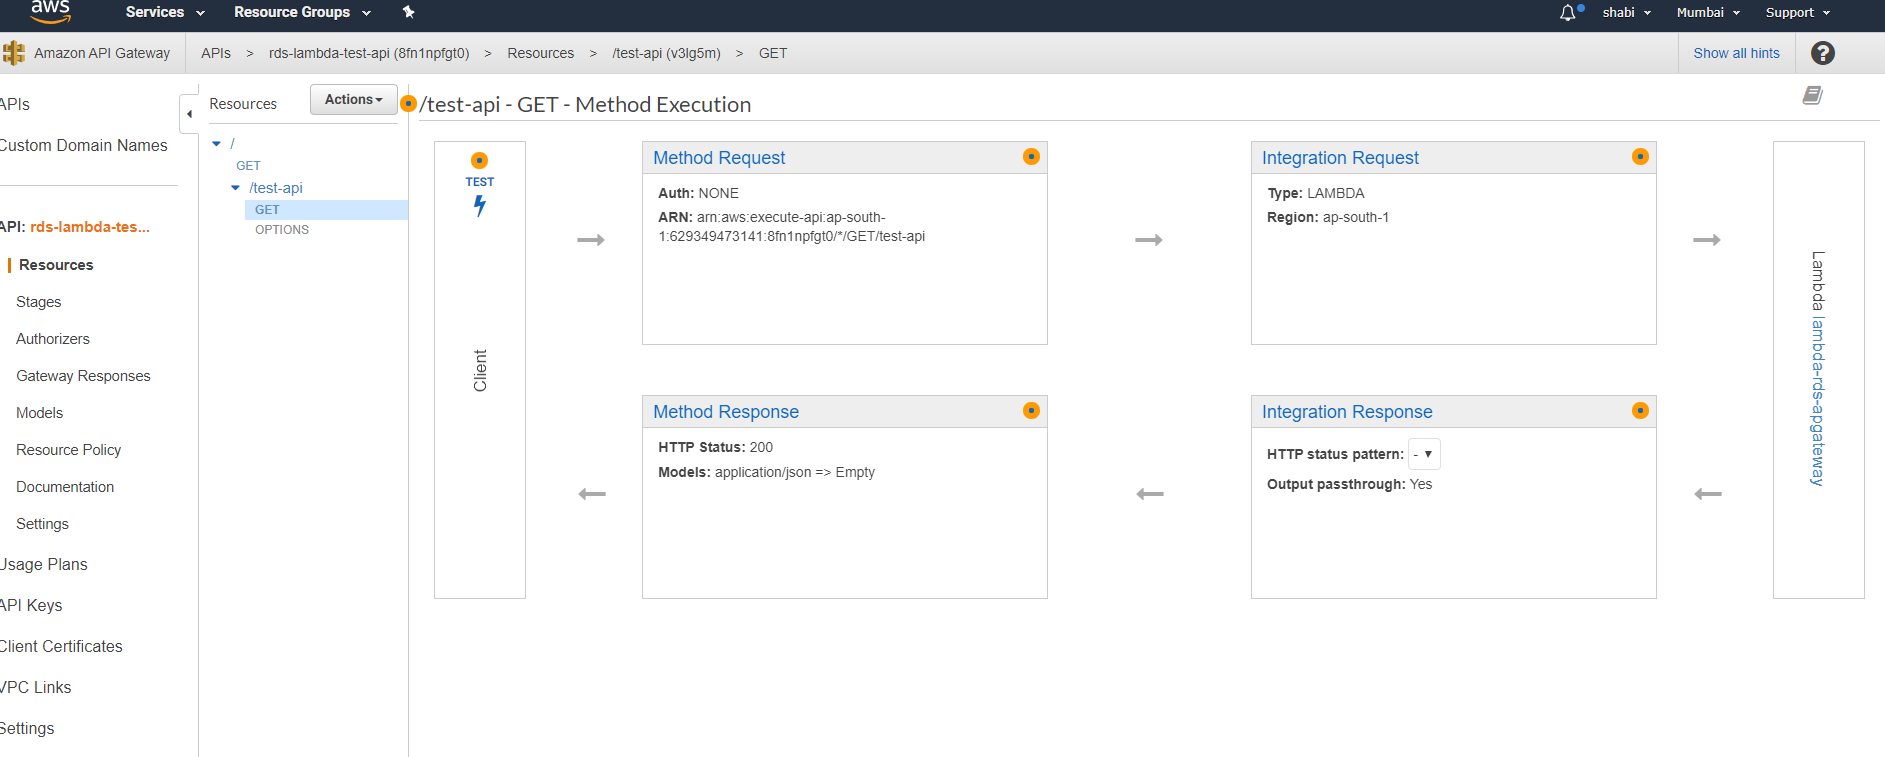
Create Method add GET

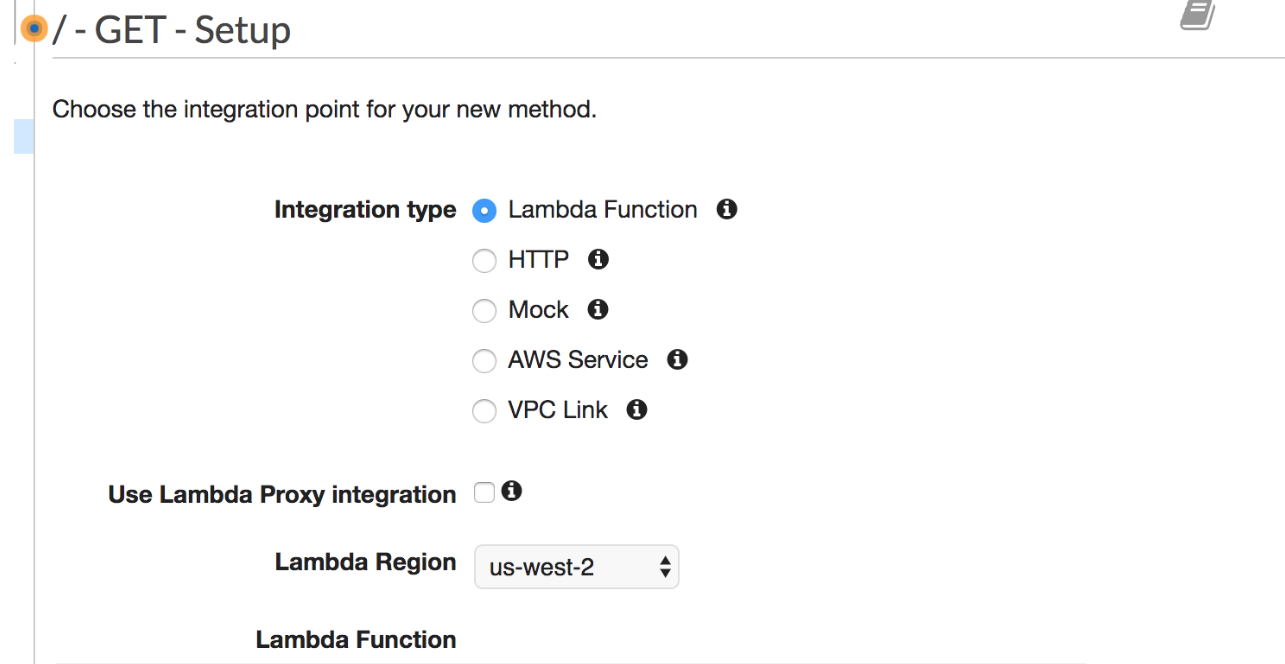
![]() Deploy an API
Deploy an API
Create a new stage and deploy the API. After successfully deploying, you can see the URL.
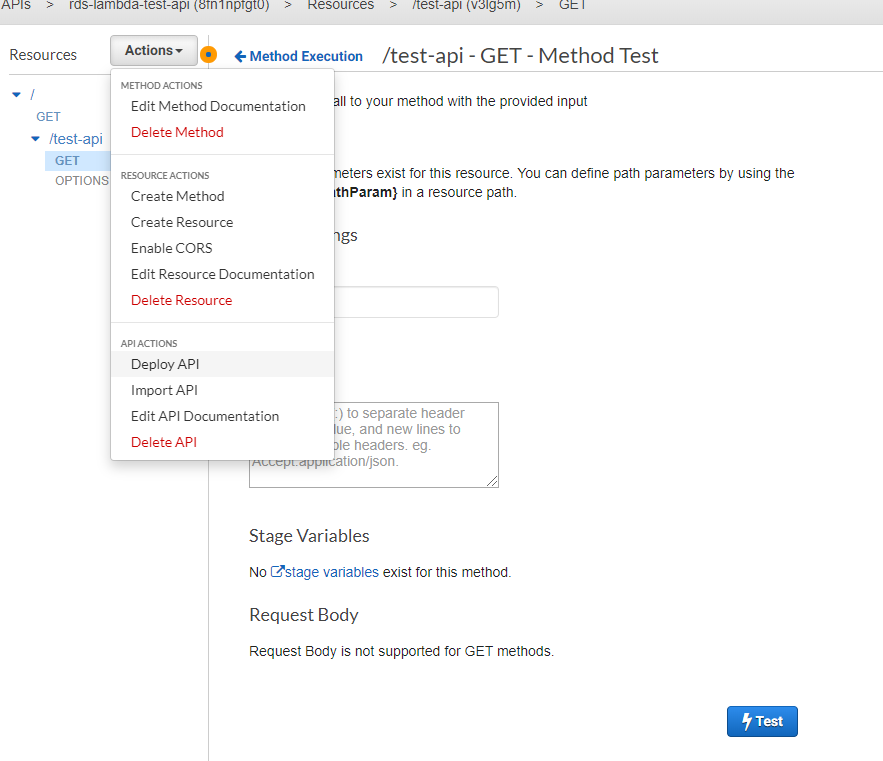
Test Lambda with API gateway
Download Postman or use the Postman Chrome extension to call the API.

Summary
In this post, we discussed how to create applications quickly to run in AWS Lambda, which provides low cost, zero maintenance compute, and automatically scales. We also discussed the limitations of Lambda and how to design simple micro-service using AWS API gateway, and RDS. In the next post, we will try to cover AWS Cognito for Authentication/Authorization and how to sync Cognito data into an RDS table.
Further Reading
A Simple API Using AWS RDS, Lambda, and API Gateway
Published at DZone with permission of Vaquar Khan. See the original article here.
Opinions expressed by DZone contributors are their own.

 Deploy an API
Comments