Authorizing the MuleSoft API Using AWS Cognito User Pool and Mule JWT Validation Policy
This article describes in-depth the process of using AWS Cognito and a Mule JWS validation policty to authorize the MuleSoft API.
Join the DZone community and get the full member experience.
Join For FreeWhat is AWS Cognito?
Amazon Cognito is a simple user identity and data synchronization service that helps you securely manage and synchronize app data for your users across their mobile devices. You can create unique identities for your users through a number of public login providers (Amazon, Facebook, and Google) and also support unauthenticated guests. You can save app data locally on users’ devices allowing your applications to work even when the devices are offline. With Amazon Cognito, you can save any kind of data in AWS Cloud, such as app preferences or game state, without writing any backend code or managing any infrastructure. This means you can focus on creating great app experiences instead of having to worry about building and managing a backend solution to handle identity management, network state, storage, and sync.
Amazon Cognito User Pools is a standards-based Identity Provider and supports identity and access management standards, such as OAuth 2.0, SAML 2.0, and OpenID Connect.
In addition to using the Amazon Cognito-specific user APIs to authenticate users, Amazon Cognito user pools also support the OAuth 2.0 authorization framework for authenticating users.
You may also enjoy: An Introduction to AWS Cognito — Pros, Cons, and Use Cases
Authorization Code Grant
The authorization code grant is the preferred method for authorizing end users. Instead of directly providing user pool tokens to an end-user upon authentication, an authorization code is provided. This code is then sent to a custom application that can exchange it for the desired tokens. Because the tokens are never exposed directly to an end-user, they are less likely to become compromised.
Implicit Grant
Only use the implicit grant when there’s a specific reason that the authorization code grant can’t be used. In an implicit grant, user pool tokens are exposed directly to the end-user. As a result, the ID and access tokens have more potential to become compromised before they expire. On the other hand, if your setup doesn’t contain any server-side logic, you may want to use the implicit grant to prevent refresh tokens from being exposed to the client, as the implicit grant does not generate refresh tokens.
Client Credentials
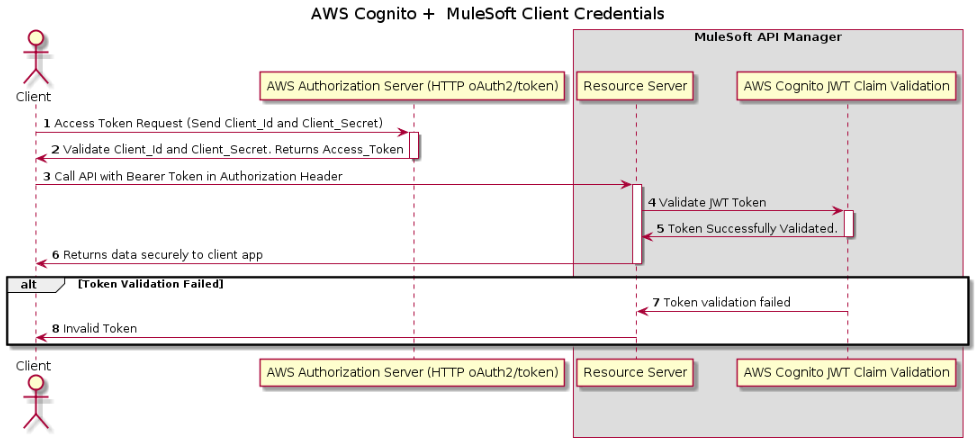
The client credentials grant is much more straightforward than the previous two grant types. While the previous grants are intended to obtain tokens for end users, the client credentials grant is typically intended to provide credentials to an application in order to authorize machine-to-machine requests. Note that, to use the client credentials grant, the corresponding user pool app client must have an associated app client secret.
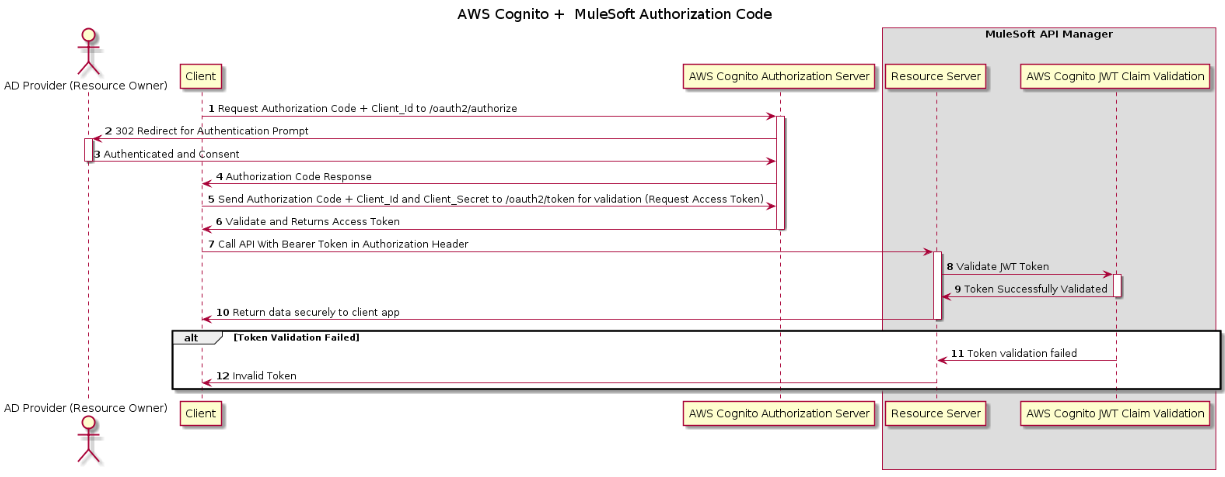
Integrating Anypoint Manager With AWS Cognito Authorization Code Flow
Integrating Anypoint Manager With AWS Cognito Client Credentials Flow
MuleSoft JWT Validation Policy
JSON Web Token (JWT) is a URL-secure method of representing claims to be transferred between two parties. The claims in a JWT are encoded as a JSON object that is used as the payload of a JSON Web Signature (JWS), or as a JSON web encryption (JWE) structure in plain text. This enables the claims to be digitally signed and integrity protected with a message authentication code (MAC). Because the token is signed, you can trust the information and its source.
The JWT Validation policy validates the signature of the token and asserts the values of the claims of all incoming requests by using a JWT with JWS format. The policy does not validate JWT that uses JWE.
Validating Claims
Claim validations enable you to choose the conditions under which a token received in the policy is rejected. The following registered claim validations are provided by default:
- aud: The Audience validation specifies that a token must be rejected if it does not contain at least one of the values defined.
- exp: The Expiration validation specifies that a token must be rejected if its date is past the validation date.
- nbf: The Not before validation specifies that the token must be rejected if the validation time is before the time the token has.
In addition to these provided claims, you can also specify other claims to use in your validations. For all claims, Registered or Custom, you must provide the following details:
- The name of the claim you want to validate.
For example, for the issuer of the token. - The value used to test.
You can provide a simple literal value if you only need to verify it, or you can provide a DataWeave expression for more complex comparisons.
You can define each claim validation as mandatory or non-mandatory. If a claim is defined as mandatory and is not present in the incoming JWT, the policy rejects this token. If a claim is defined as non-mandatory and is not present in the incoming JWT, the policy does not reject the token for that specific validation.
For both cases, if a claim is present, the policy validates the token value. If the validation fails, the JWT will be rejected.
Element |
Description |
Example |
JWT Origin |
Specifies from where in the request the JWT will be extracted: * Bearer Authentication Header * Custom Expression If you set it to Bearer Authentication Header, the JWT will be expected as Bearer. If you set this field to Custom Expression, a DataWeave Expression returning the token must be provided. |
|
Token Expression |
If you set the JWT Origin to Custom Expression, type the DataWeave expression returning the JWT here. |
#[attributes.headers['jwt']] This expression searches the JWT in the header named ‘jwt’. |
JWT Signing Method |
Specify the signing method expected in the incoming JWT. The policy rejects the token if the JWT has a different signing method. |
RSA, HMAC, None |
JWT Signing Key Length |
Specify the length of the key (in the case of the HMAC algorithm) or the algorithm (in the case of RSA) used for the signing method. Ignore this field if you selected none as JWT Signing Method. |
|
JWT Key Origin |
Specifies where to obtain the key for the Signature validation. You can provide the key in the policy selecting the Text option or obtain it from a JWKS. Ignore this field if you selected none as JWT Signing Method. |
|
JWT Key |
This field appears if you selected Text as JWT Key Origin. Use this field to provide the key used to check the signature of the token. Ignore this field if you selected none as JWT Signing Method. |
A 32, 48 or 64 characters long shared secret in case HMAC was the selected JWT Signing Method or the PEM Public Key without the header nor the footer in case of selecting RSA. |
JWKS URL |
This field appears if you selected the JWKS method as JWT Key Origin. Ignore this field if you selected none as JWT Signing Method. |
The URL to the JWKS server. |
JWKS Caching Time To Live |
The URL to the JWKS server that contains the public keys for the signature validation. Ignore this field if you selected none as JWT Signing Method. |
This field input is the amount of time, in minutes, during which the policy considers the JWKS valid. |
Skip Client ID Validation |
If you check this field, the policy does not verify that the client ID extracted from the JWT matches a valid client application of the API. |
By default, the value will be extracted using the expression #[vars.claimSet.client_id] |
Client ID Expression |
If Skip Client Id Validation is not set, the client ID needs to be extracted from the token. |
|
Validate Audience Claim |
Indicates that the policy should check for the validity of the audience claim. You can set this "Mandatory" if you select Audience Claim Mandatory. |
|
Validate Expiration Claim |
Indicates that the policy should check for the validity of the expiration claim. You can set this claim as "Mandatory" by selecting Expiration Claim Mandatory. |
|
Validate Not Before Claim |
Indicates that the policy should check for the validity of the Not Before claim. You can set this claim as "Mandatory" by selecting Not Before Claim Mandatory |
|
Validate Custom Claim |
Enables the usage of custom validations in the policy. The JWT will be valid only if all DataWeave expressions are fulfilled. |
The policy provides a claimSet variable that contains all the claims present in the incoming JWT. For example: foo : #[vars.claimSet.foo == 'fooValue'] |
Configuring AWS Cognito User Pool
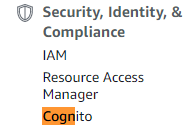
Go to the AWS Console and search for AWS Cognito under Security, Identity, & Compliance.
Click on Manage User Pools and then click Create a user pool.

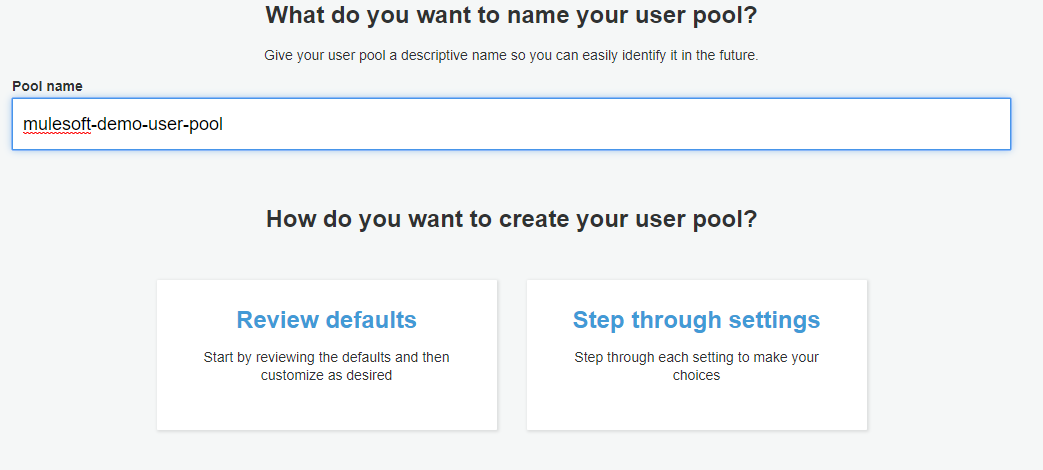
Provide the Pool name (i.e. mulesoft-demo-user-pool). Click on Review defaults. Then select Create pool.
Navigate to General Settings > App clients and select Add an app client.
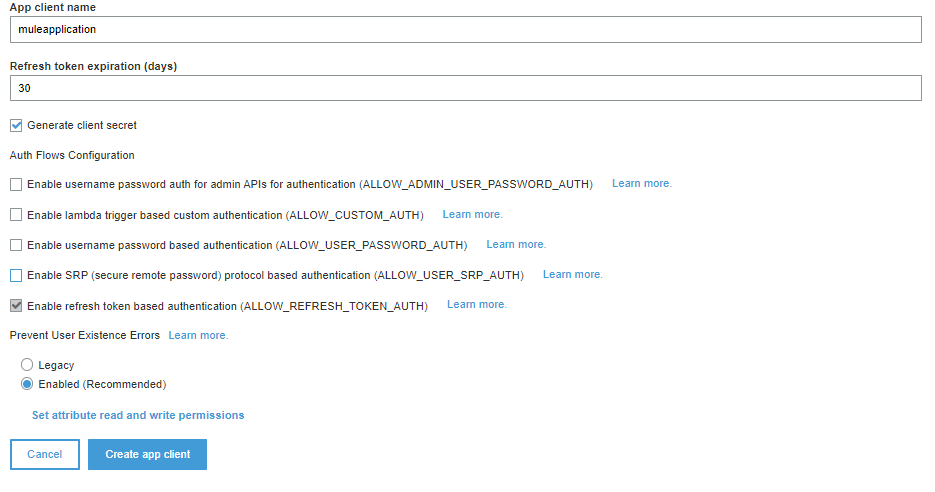
Enter an App client name and select Generate client secret checkbox. Then Create app client. Note down the App client id and App client secret values displayed in next page.

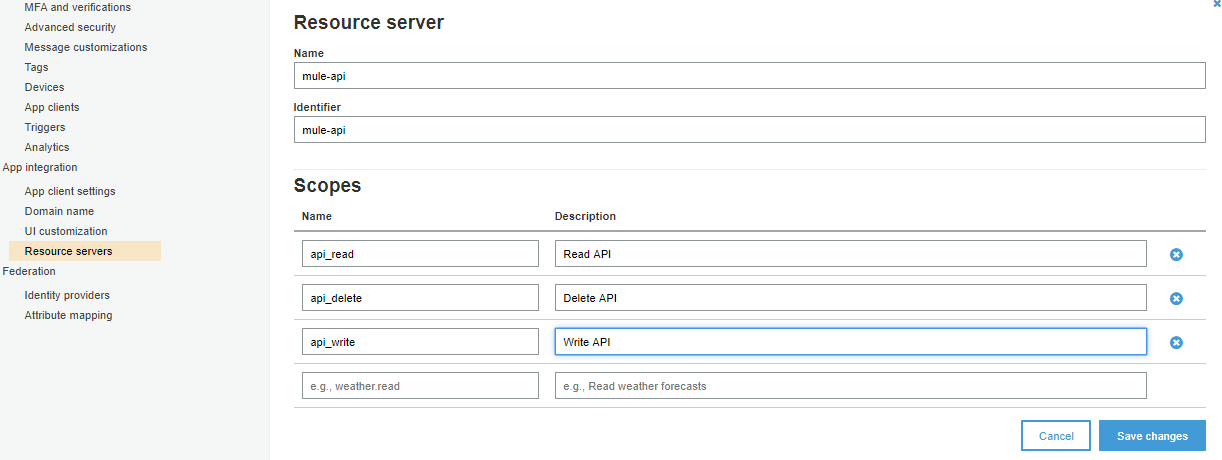
Navigate to Resource Servers and Add a resource server. Provide the Name, Identifier, and Scopes. Click Save changes.
Navigate to App client settings and checked Cognito User Pool. Allowed OAuth flows as Client credentials. Checked on Allowed custom scopes. Click Save changes.
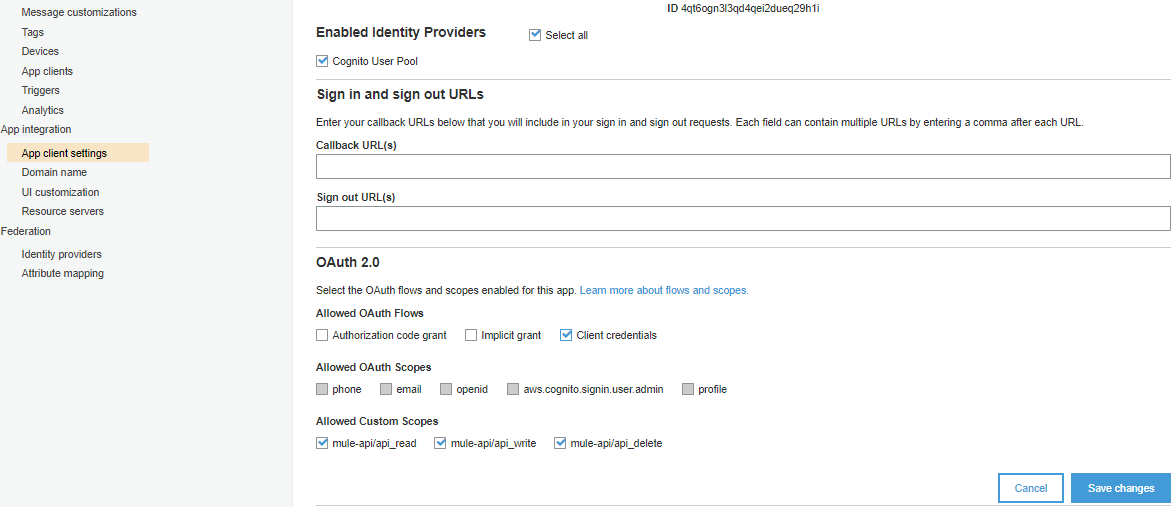
Now, we have successfully set up an OAuth2 agent in Cognito for Client Credentials.
Generating Access Token
For generating access tokens we required the client ID and client secret. We can find client secret and client ID under App clients.

The token URL will be https://api-mule-dev.auth.us-east-1.amazoncognito.com/oauth2/token for this user pool. We have defined the domain name above which is our URL for this user pool.
Go To Postman, and Under Authorization tab select Basic auth and provide client_id as username and client_secret as password.
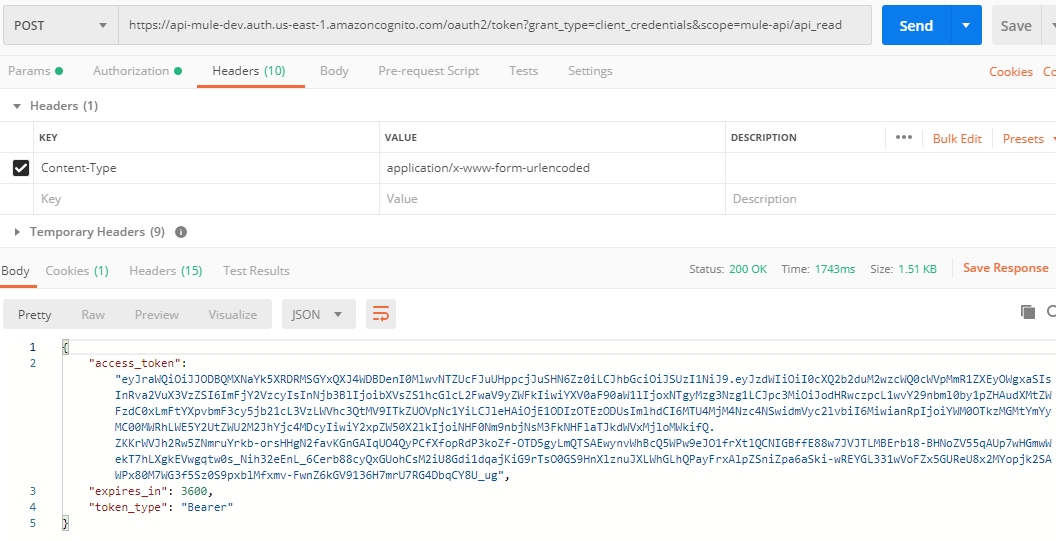
The URL will be https://api-mule-dev.auth.us-east-1.amazoncognito.com/oauth2/token?grant_type=client_credentials&scope=mule-api/api_read and Set Content-Type in header as application/x-www-form-urlencoded.
Once we post a request, we will get an access token in response with the expiry.
Setting Up JWT Policy With MuleSoft API Manager
In order to apply the JWT Validation policy, your API needs to be registered with API Manager.
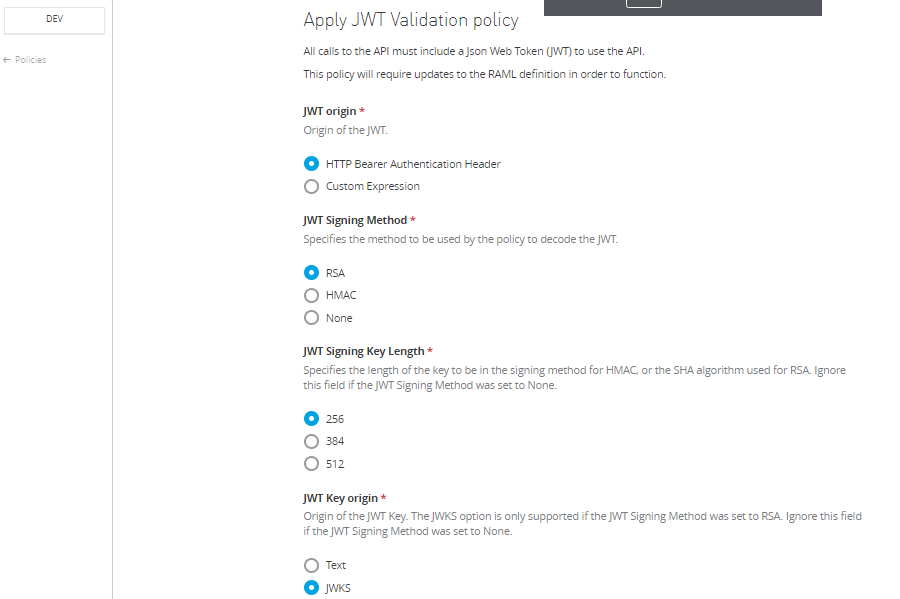
Under policies of API Manager, select JWT Validation policy and use below value to validate the JWT Claim generated by AWS Cognito.
JWT origin |
HTTP Bearer Authentication Header |
JWT Signing Method |
RSA |
JWT Signing Key Length |
256 |
JWT Key Origin |
JWKS |
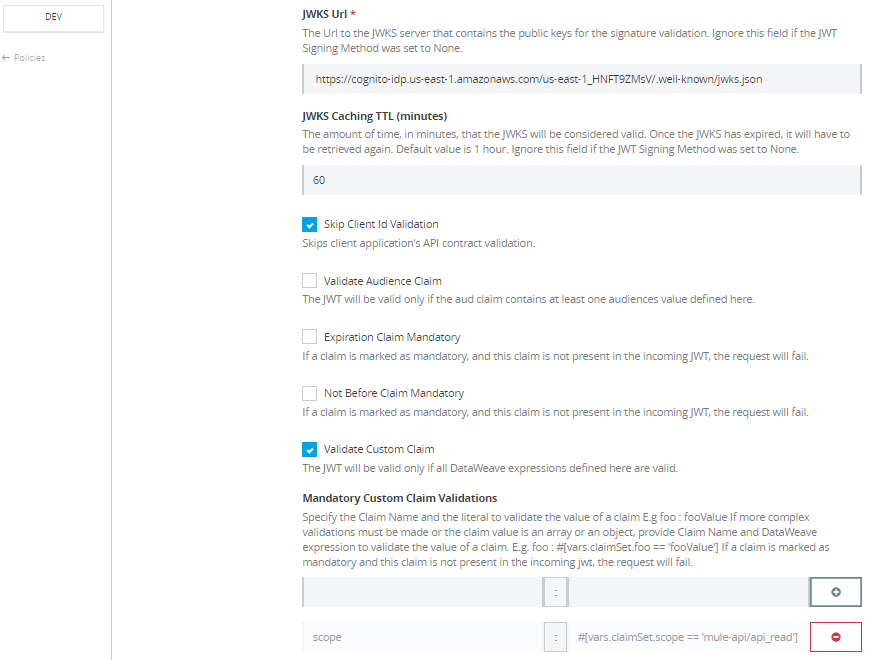
JWKS Url |
https://cognito-idp.{region}.amazonaws.com/{userPoolId}/.well-known/jwks.json In our case url will be https://cognito-idp.us-east-1.amazonaws.com/us-east-1_HNFT9ZMsV/.well-known/jwks.json region and userPoolId can obtained from General settings of AWS Cognito User Pool created below. Read |
JWKS Caching TTL (Minutes) |
60 |
Skip Client Id Validation |
True |
Validate Custom Claim |
True Mandatory Custom Claim Validations scope: #[vars.claimSet.scope == 'mule-api/api_read '] |
-
Client_IdandClient_Secretcan be obtained from AWS Cognito. -
UserPoolIdcan be obtained from AWS Cognito under General settings (i.e. this is required in JWKS Url). - Custom Claim can be enabled to validate scope, client_id etc.
- We can apply configuration to specific resources and methods to restrict access of API’s at resource and method level.
- You can apply multiple JWT validation policies if you want to restrict access to API's at resource and method level (e.g. You can define defined write scope for POST methods and read scope for GET methods).
Testing API
To test the API, you need to generate Access Token as shown above in this article. This access token needs to be sent with the actual request in the Authorization header.
Authorization Bearer <<Access_Token>>

Now, you know how AWS Cognito can be used to authorize the MuleSoft API.
Opinions expressed by DZone contributors are their own.

Comments