5 Ways to Load Test Popular Chat Plugins With JMeter
Load testing chat plugins is just as important as load testing your whole website or web application. Let's take a look at how to accomplish this using JMeter.
Join the DZone community and get the full member experience.
Join For FreeIn this article, we will explore ways to load test chats that are based on the most common IM protocols that are used. Since working with most of Apache JMeter™’s necessary elements is already described in the BlazeMeter blog, we will focus on test scenarios like sending and receiving messages in different thread groups and the measuring time of these transactions.
Most modern web chats use WebSockets to transport messages. You might also encounter chats that use Long Polling Requests and even hybrids of these two technologies. In mobile development, XMPP is used too. Besides, recently, the MQTT protocol began to be used to develop chat rooms. We will present the analysis in the order of which the protocols are listed.
For our work we will need:
- JMeter 3+
- JMeter Plugins
- bzm - Parallel Controller (can be installed using JMeter plugins)
- Sampler/plugin for working with the required protocol
Web Sockets — Duplex Streaming Connection
WebSockets is an advanced technology that allows you to create an interactive connection between a client (browser) and a server, for messaging in real time. Web sockets, unlike HTTP, allow you to work with a bidirectional data stream, which makes this technology very suitable for chat development.
As an example, we will use a demo chat from socket.io. To work with WebSockets, we will use the JMeter WebSocket Samplers plugin by Peter Doornbosch. JMeter also has the JMeter WebSocket Sampler plugin by Maciej Zaleski, but the first seems to be more convenient to me because it separates elements according to their functionality and it is currently supported (the last commit was in 2018, and another was committed 2 years ago). There are articles devoted to each of them in the BlazeMeter blog - here and here.
Let us now turn to the development of the scenario. The first sketch looks like this:
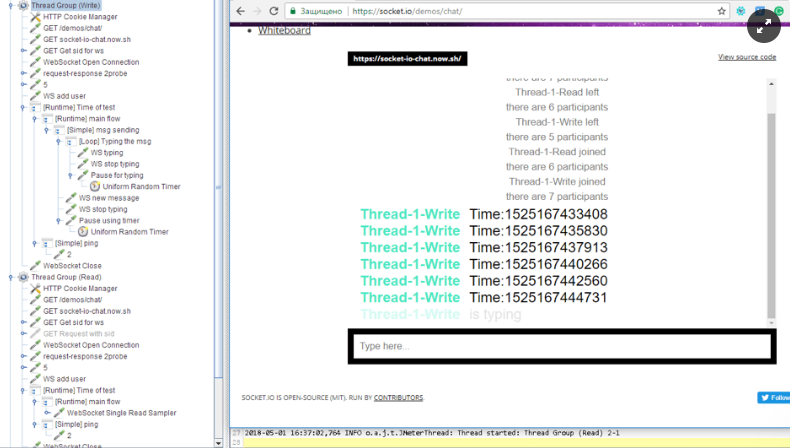
- We have two thread groups: one for writing messages and another for reading. Both open the main page, and then start working with the WebSocket connection.
- The test time is regulated by “[Runtime Controller] Time of test”. The value of this controller in the Read Thread Group should be a few seconds longer than the Write Thread Group because we need some time to read all the sent messages.
- Every 20 seconds we send the message ‘2’ (with the “[Runtime Controller] main flow”). It is a ping message that informs the server that the connection should be open. Without the ping the connection will be closed by the server.
- The message you send about the new user's login does not always receive a message that confirms the login in this sampler. This is because this is a streaming connection and if another message arrives earlier than the confirmation, this is what the sampler will display, and the confirmation will be displayed in the next response.
- Part of the WebSocket Close calls will be marked as unsuccessful due to the reason that I wrote above. The sampler expects an response that confirms the closure, but it gets a message that says ‘You have a new incoming message :)’. Do not worry about these errors.
- If we test only the work of the WebSocket connection, that is enough. This is because the connection can transfer messages and we can create a load for server. However, we will not get any useful metrics about the WS connection, like message delivery time or response time of server to the message.
If you are interested in the time of transporting a message between clients, we can use the JSR223 Assertion and the JSR223 Sampler for that.
As you can see in the screenshot above, the message contains a certain number. We set it using the ${__time()} JMeter function that returns the epoch time in milliseconds:
42["new message","Time:${__time()}"]Now we need to extract this message and calculate the time between sending and receiving. To extract the message we use the Regular Expression Extractor.

After that, we can use a JSR223 Assertion to check if this time is fit to the requirements or a JSR223 PostProcessor to save the result. First, consider the JSR223 Assertion.
The code for the JSR223 Assertion:
def failureMessage = "";
String sendingTime = vars.get("sendingTime")
if (sendingTime.equals("nil")==false)
{
long dif = System.currentTimeMillis() - Long.parseLong(sendingTime);
 if(dif>100)
 {
  failureMessage += "Time between sending and receiving too much big: " + dif + "\r\n";
  AssertionResult.setFailureMessage(failureMessage);
                              AssertionResult.setFailure(true);
 }
}
The first condition is necessary to discard all messages that don’t measure time. After that, it calculates the difference between the current time and the sending time. If the difference is bigger than required, the Read sampler is marked as unsuccessful.
The JSR223 Post Processor will be used to calculate the average time of the messages and their number.
We also need a way to transfer objects between post processors and threads. BeanShell has bsh.shared for that, but Groovy doesn’t have anything similar. Therefore we will use the class SharedHashMap. As a result, in each thread, we will have the opportunity to get the SharedHashMap object. To use it you need to put .jar in the /lib folder.
The code for JSR223 Sampler from the Set Up Thread Group:
sharedHashMap = SharedHashMap.GetInstance()
sharedHashMap.put('Counter', new java.util.concurrent.atomic.AtomicInteger(0))
sharedHashMap.put('AvgTime', new java.util.concurrent.atomic.AtomicLong(0))
We created two objects (one for message counting and one for sum collecting) and put them to HashMap before the threads start to read and write.
The code for the JSR223 Post Processor:
String sendingTime = vars.get("sendingTime")
if (sendingTime.equals("nil")==false)
{
 long a =  Long.parseLong(sendingTime)
 sharedHashMap = SharedHashMap.GetInstance()
               counter = sharedHashMap.get('Counter')
               avgTime = sharedHashMap.get('AvgTime')
               counter.incrementAndGet()
               avgTime.set(avgTime.get() + (System.currentTimeMillis() - a))
}
At first, we get access to our counters. After that, we increment the value for the first and set the value for the second.
The code for JSR223 Sampler from the Set Up Thread Group:
sharedHashMap = SharedHashMap.GetInstance()
counter = sharedHashMap.get('Counter')
avgTime = sharedHashMap.get('AvgTime')

//output to the console
System.out.println("Num of messages: " + counter.get())
System.out.println("Avg time in milliseconds: " + avgTime.get())

//output to the log
log.info("Num of messages: " + counter.get())
/og.info("Avg time in milliseconds: " + (avgTime.get()/counter.get()))

//output to the sampler
SampleResult.setResponseData( "Num of messages: " + counter.get() + "\r\nAvg time in milliseconds: " + (avgTime.get()/counter.get()) , "UTF-8");
After the Thread groups finish writing and reading, we calculate the average value and execute the output to where it suits us.
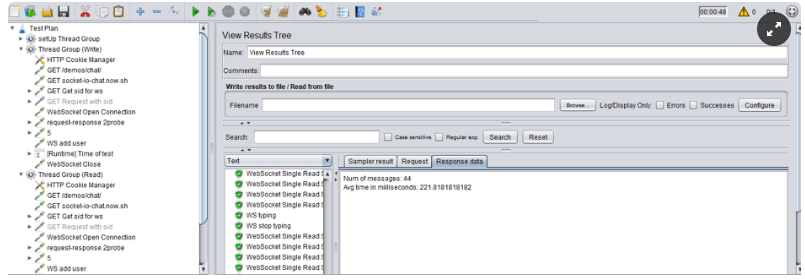
If we implement a use case, for instance, watching a video, then while working with WebSockets we may need to perform other actions. To do this, you can use a Parallel Controller.
You can download the example from here.
That is all for this item. We will follow the same structure in the next sections.
Long Polling
Long polling is a technology that allows you to get information about new events by using "long requests." Personally, I think it is behind the times. The server receives the request, but doesn’t send a response to the client immediately, but rather only when there is an event. In our case, this is when a new incoming message arrives, or the specified waiting time expires.
This technology is less suitable for web chats than the previous one, but it is still used because older browsers like IE 8 and Opera 12 do not support WebSockets. Sometimes the use of long polling can also be caused by the server implementation features.
Let’s start.
Our example is dhedegaard.dk. We do not need plugins to implement the behavior of a long polling request. Instead, we can use the HTTP Request Sampler for that.
The first version of the script looks like this:
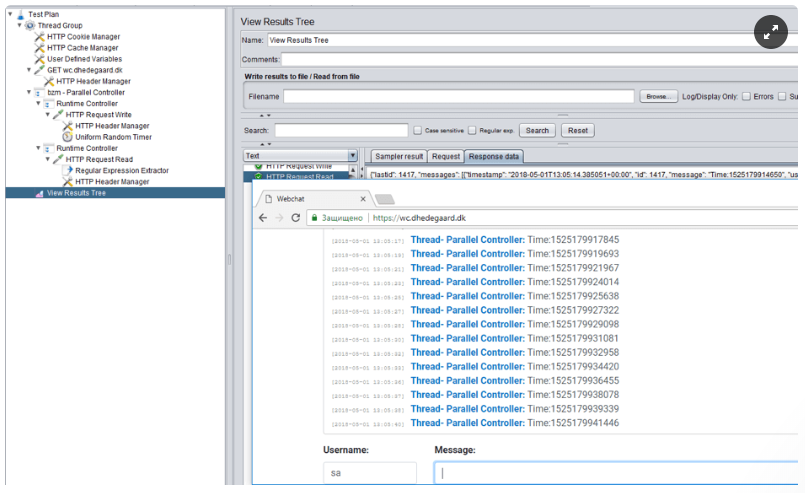
It does not differ much from the previous example. We just replaced several samplers for working with a WebSocket to HTTP Request Samplers, and now we have one thread group because we use the parallel controller to separate read and write samples. Besides, we set a 30 seconds Response Timeout, to make the HTTP request more like a long polling.
Note: In the previous example using the parallel controller did not make sense because two WebSocket connections would be created in any case.
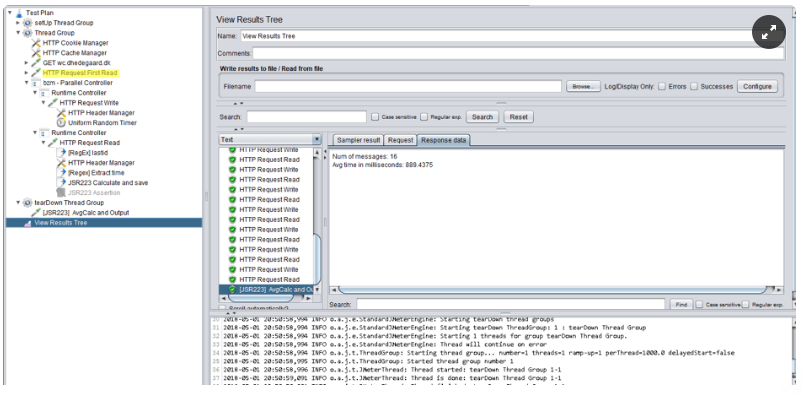
To calculate the time, we can use the same structure as in the previous example, but the Long-Polling Request can contain several messages and we need to process each of them. Therefore, we need to modify our extractor, assertion and Post Processor calculation.
For RegEx we set -1 match number to get all matches.

For the Assertion and Post Processor we add a loop to process each match.
The code for the JSR223 Assertion:
Integer n = Integer.valueOf(vars.get("sendingTime_matchNr"))
for(Integer i = 1; i <= n; i++)
{
     String sendingTime = vars.get("sendingTime_"+String.valueOf(i)+"_g1")
     long a =  Long.parseLong(sendingTime);
sharedHashMap = SharedHashMap.GetInstance()
     counter = sharedHashMap.get('Counter')
     avgTime = sharedHashMap.get('AvgTime')
     counter.incrementAndGet()
     avgTime.set(avgTime.get() + (System.currentTimeMillis() - a))
}
The code for the JSR223 Post Processor:
def failureMessage = "";
Integer n = Integer.valueOf(vars.get("sendingTime_matchNr"))
for(Integer i = 1; i <= n; i++)
{
     String sendingTime = vars.get("sendingTime_"+String.valueOf(i)+"_g1")
long dif = System.currentTimeMillis() - Long.parseLong(sendingTime)
 if(dif>1000)
 {
  failureMessage += "Time between sending and receiving too much big: " + dif + "\r\n";
  AssertionResult.setFailureMessage(failureMessage);
           AssertionResult.setFailure(true);
 }
}
We also take out the first request to read from the loop, so that the received message history does not affect the calculations.
HTTP + WebSockets
A hybrid variant, which consists of the two technologies described above, is also possible.
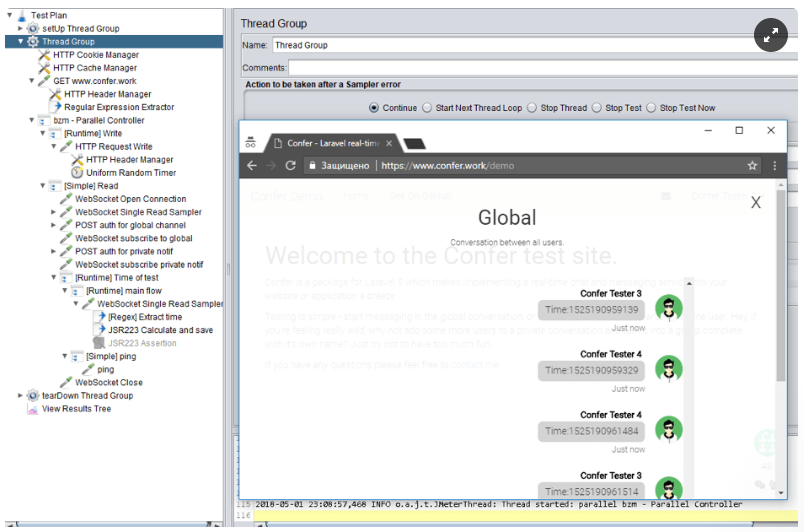
Now our tested system is a chat, which was developed using the Laravel framework - confer.work/demo. Messages are sent using HTTP requests, but are received using WebSocket.
For this example, we just need to take the necessary parts from the examples above: reading from the first example and writing from the second.
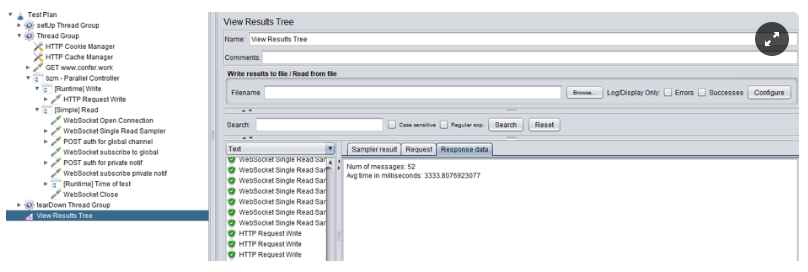
We can take counter implementation from WebSocket chapter without changes. As a result, we have the slowest message exchanging time of the 3 examples. This is because HTTP has the biggest latency.
XMPP — Security
In mobile and desktop applications you can often find cases of using XMPP to transfer messages. XMPP is an application profile XML for streaming XML data close to real time between any two or more network-aware entities. The Protocol may eventually allow Internet users to send instant messages to anyone else on the Internet, regardless of differences between operating systems and browsers. It has many extensions, which allow you to develop a full-fledged chat application.
To work with XMPP, you need an XMPP Protocol Support plugin that you can install through the plugin manager. As a demo, you can deploy Spark + Openfire, which is used in this article and in this one as well, to demonstrate the work of the plugin.
The development of a detailed scenario for XMPP is also analyzed in a separate article. Therefore, we will skip this protocol.
MQTT — A Window to the Future
Recently, chat applications that use the MQTT protocol as an alternative to XMPP have started to appear. If this is a web application, then usually on top of MQTT, the WebSocket is also used and then you need the section above. But if this is a mobile application, then you can use the MQTT Protocol directly.
For the demonstration, we took the first application from the Android play market on the ‘mqtt chat’ request. This is an ordinary client that can connect to any message broker and the specified topic. Therefore, our task is simply to create a load for the message broker.
As a message broker, we will use hive-mq. To work with MQTT, this plugin is required. The plugin manager does not have it, but this is the only plugin that worked correctly for me, so you need to download it and put it to /lib/ext folder of JMeter. The article about working with it is also here.
The structure of the script is incredibly simple and looks like this:
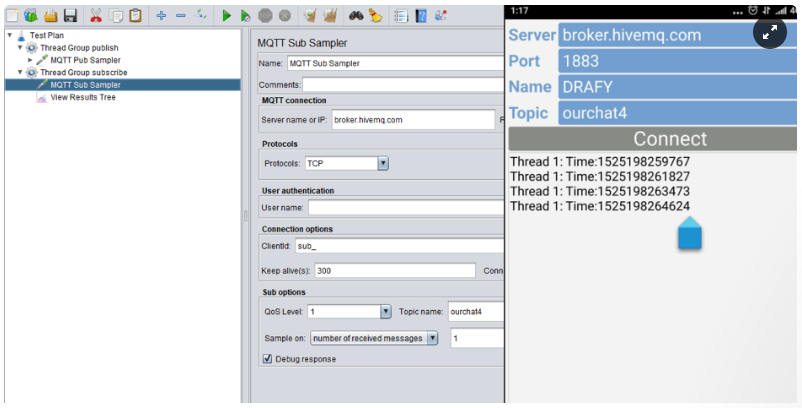
- We use the same structure we used in the first example. We have one thread for reading and another for writing. We have only 2 samplers because we connect to the broker directly without any additional steps.
- We set the ‘Sample on numbers of received’ messages option to 1, to not distort the results of the message transfer. We also set the ‘Debug response’ checkbox to display the received message.
- The test time is regulated by using the loop count option in the Thread Groups. The number of cycles will be equal to the number of sent messages and should be equal to the number of received messages.

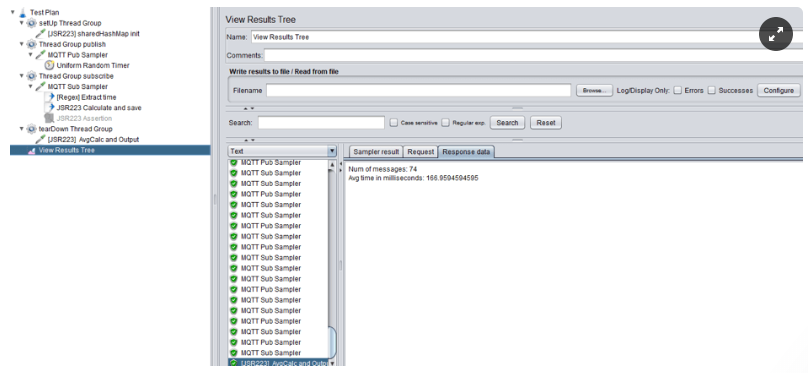
To calculate the time we can take part of the script from the first example. As a result, we have the fastest time of message transfer. This is probably because MQTT was developed for communication of the Internet of Things, where the delivery time is very important. So, the latency is lower.
That's all! We have examined the main protocols for chat applications developing and developed demo scripts for load testing of the main chat functionality. If you have interesting cases or protocols that were not considered above, please describe them in the comments.
Learn more advanced JMeter from our free JMeter academy.
Running Your Load Test With BlazeMeter
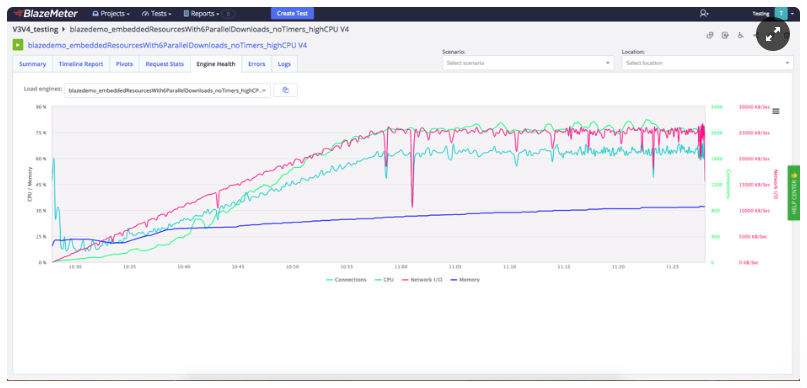
After configuring your script, it’s smooth sailing from here. All you have have to do to scale your tests is upload your JMX file to BlazeMeter, configure the load and places to run the script from, and run it!
Then, you will get insightful reports that you can analyze in real-time. Or, you can gather results and look at them over time. Results can be shared with colleagues or managers, as can your tests.
Published at DZone with permission of Roman Aladev. See the original article here.
Opinions expressed by DZone contributors are their own.

Comments