he Rancher server is built on Kubernetes and runs as an application on any certified Kubernetes cluster, and, of course, Rancher is 100% open source with no license keys. Providing the primary controller for managing downstream clusters, the Rancher server also provides access to your downstream clusters in a standardized web UI and API. Rancher is primarily deployed on two types of clusters, RKE and K3s. RKE is mainly used in more traditional data centers and cloud deployments, and K3s are primarily used in more edge and developer laptop deployments.
RKE (Rancher Kubernetes Engine)
RKE is a CNCF-certified Kubernetes distribution that runs entirely within Docker containers. It solves the common frustration of installation complexity with Kubernetes by removing most host dependencies and presenting a stable path for deployment, upgrades, and rollbacks. As long as you can run a supported Docker version, you can deploy and run Kubernetes with RKE.
K3s (5 less than k8s)
K3s is a lightweight certified Kubernetes distribution. All duplicate, redundant, and legacy code is removed and baked into a single binary that is less than 40MB and contains everything needed to run a Kubernetes cluster. This includes etcd, traefik, and all Kubernetes components. It is designed to run resource-constrained, remote locations, or inside IoT appliances. K3s have also been built to support ARM64 and ARMv7 nodes fully, so they can even be ran on a Raspberry Pi.
Creating a RKE Cluster
Requirements
Three Linux nodes with the following minimum specs:
- 2 vCPUs
- 8GB of RAM
- 20GB of SSD storage
Installing Docker
You can either follow the Docker installation instructions or use Rancher's install scripts to install Docker.
Commands:
curl https://releases.rancher.com/install-docker/20.10.sh |sudo bash.
Installing the RKE Binary
From your workstation or management server, download the current latest RKE release.
Commands:
cd /tmp

wget https://github.com/rancher/rke/releases/download/v1.2.8/rke_linux-amd64

chmod +x rke_linux-amd64

sudo mv rke_linux-amd64 /usr/local/bin
Installing the Kubectl Binary
From your workstation or management server, download the current latest kubectl release.
Commands:
cd /tmp

curl -LO https://dl.k8s.io/release/$(curl -L -s https://dl.k8s.io/release/stable.txt)/bin/linux/amd64/kubectl

chmod +x kubectl

sudo mv kubectl /usr/local/bin/kubectl
Creating the Cluster Config Configuration
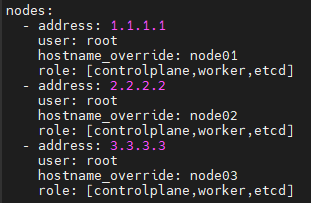
RKE uses a cluster.yml file to define the nodes in the cluster and what roles each node should have. With three different roles that a node can have, the first is the etcd plane, the database for Kubernetes, and this role should be deployed in a HA configuration with an odd number of nodes and the default size of three nodes.
A five-member etcd cluster is the largest recommended size due to write performance suffering at scale. The second role being the control plane, which hosts the Kubernetes controllers and other related management services, should be deployed in a HA configuration with a minimum of two nodes.
Note: The control plane doesn't scale horizontally very well and scales more vertically.
The final role is the worker plane, which hosts your applications and related services. Nodes can support multiple roles, and in the default Rancher configuration, we'll be building a three-node cluster with all nodes running all roles.
Example cluster.yml file:

For more examples, check out the Rancher documentation.
Creating the Cluster
After creating the cluster.yml, we need to run the command rke to build the cluster using the following steps:
- Create an SSH tunnel to each node for Docker CLI access.
- Generate SSL certificates for all the different Kubernetes components.
- Create the etcd plane and config all the etcd-related services.
- Create the control plane, which includes kube-apiserver, kube-controller-manager, and kube-scheduler.
- Create the worker plane and join all the nodes to the cluster.
Once these steps are done, RKE will create the file cluster.rkestate; this file contains credentials and the current state of the cluster. RKE will also create the file kube_config_cluster.yml; this file is used by kubectl to access the cluster. To make access more manageable, we'll want to copy this file to kubectl's config directory.
Commands:
mkdir -p ~/.kube/

cp kube_config_cluster.yml ~/.kube/config

Verify access:

kubectl get nodes
Creating a K3s Cluster in Single-Node Mode
Requirements
One Linux node with the following minimum specs:
- 2 vCPUs
- 4GB of RAM
- 10GB of SSD storage
Installing K3s
While SSH into the K3s node, we'll run the following commands:
sudo  su -

curl -sfL https://get.k3s.io | sh –

Verify access:

k3s kubectl get node
Installing Rancher on a RKE or K3s Cluster
Requirements
- Kubectl access to the cluster
- Helm installed on the workstation or management server
Note: For K3s clusters, update the command "kubectl" to "k3s kubectl".
Installing the Helm Binary
From your workstation or management server, download the latest helm release.
Commands:
sudo su –

curl https://raw.githubusercontent.com/helm/helm/master/scripts/get-helm-3 | bash
Configuring Helm
Using the command helm repo add, we'll add the Rancher charts to helm:
helm repo add rancher-latest https://releases.rancher.com/server-charts/latest

helm repo add jetstack https://charts.jetstack.io
Installing Cert-Manager
Cert-manager will manage the SSL certificates for Rancher:
kubectl apply --validate=false -f https://github.com/jetstack/cert-manager/releases/download/v1.0.4/cert-manager.crds.yaml

kubectl create namespace cert-manager

helm install cert-manager jetstack/cert-manager --namespace cert-manager --version v1.0.4
Please see the cert-manager's documentation for more details.
Installing Rancher
We're now going to install Rancher using the default settings and following commands:
kubectl create namespace cattle-system

helm install rancher rancher-latest/rancher --namespace cattle-system --set hostname=rancher.example.com
Configuring DNS for a Single Node
In single-node mode, DNS is optional, and the node IP/Hostname can be used in place of the Rancher URL.
Configuring the Front-End Load Balancer for HA
To provide a HA setup for Rancher, we'll want to create a Layer-4 (TCP mode) or Layer-7 (HTTP mode) load balancer for ports 80 and 443 sitting in front of and forwards traffic to all nodes in the cluster. The DNS record for the Rancher URL should be pointed at the load balancer.
For more details, please see Rancher's documentation.
Building a Downstream Cluster
Downstream clusters in Rancher are RKE/RKE2/K3s clusters that Rancher manages for you. They can also be clusters that are built outside Rancher then imported. In this example, we'll be making a standard three-node with all nodes running all roles.
Requirements
Three Linux nodes with the following minimum specs:
- 2 vCPUs
- 4GB of RAM
- 20GB of SSD storage
Installing Docker on All Nodes
You can either follow these Docker installation instructions or use Rancher's install scripts .
Example:
curl https://releases.rancher.com/install-docker/20.10.sh |sudo bash
Creating the Cluster in the Rancher UI
- From the Clusters page, click Add Cluster.
- Choose Custom.
- Enter a Cluster Name.
Note: This can be changed at a later date.
- Click Next.
- From Node Role, choose the roles that you want to be filled by a cluster node. You must provision at least one node for each role: etcd, worker, and control plane. In this example, we'll select all three roles.
- Copy the command displayed on-screen to your clipboard.
Adding the Nodes to the Cluster
We'll want to run the previous command on each node. Then once all three nodes have joined successfully, the cluster should be in an active state.


