This Refcard is a reference for development and production deployment of the components shown in Figure 1. It includes the components available in the basic Hadoop distribution and the enhancements that Cloudera released.
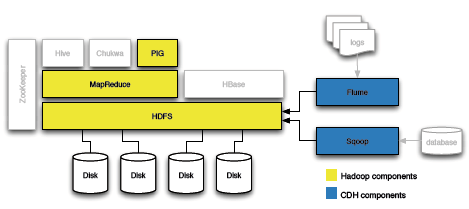
Figure 1 - Hadoop Components

Whether the user intends to run Hadoop in non-distributed or distributed modes, it’s best to install every required component in every machine in the computational network. Any computer may assume any role thereafter.
A non-trivial, basic Hadoop installation includes at least these components:
- Hadoop Common: the basic infrastructure necessary for running all components and applications
- HDFS: the Hadoop Distributed File System
- MapReduce: the framework for large data set distributed processing
- Pig: an optional, high-level language for parallel computation and data flow
Enterprise users often chose CDH because of:
- Flume: a distributed service for efficient large data transfers in real-time
- Sqoop: a tool for importing relational databases into Hadoop clusters
Apache Hadoop Development Deployment
The steps in this section must be repeated for every node in a Hadoop cluster. Downloads, installation, and configuration could be automated with shell scripts. All these steps are performed as the service user hadoop, defined in the prerequisites section.
http://hadoop.apache.org/common/releases.html has the latest version of the common tools. This guide used version 0.20.2.
- Download Hadoop from a mirror and unpack it in the /home/hadoop work directory.
- Set the JAVA_HOME environment variable.
- Set the run-time environment:
| Listing 4 - Set the Hadoop Runtime Environment |
version=0.20.2 # change if needed
identity=”hadoop-dev”
runtimeEnv=”runtime/conf/hadoop-env.sh”
ln -s hadoop-”$version” runtime
ln -s runtime/logs .
export HADOOP_HOME=”$HOME”
cp “$runtimeEnv” “$runtimeEnv”.org
echo “export \
HADOOP_SLAVES=$HADOOP_HOME/slaves” \
>> “$runtimeEnv”
mkdir “$HADOOP_HOME”/slaves
echo \
“export HADOOP_IDENT_STRING=$identity” >> \
“$runtimeEnv”
echo \
“export JAVA_HOME=$JAVA_HOME” \
>>”$runtimeEnv”
export \
PATH=$PATH:”$HADOOP_HOME”/runtime/bin
unset version; unset identity; unset runtimeEnv
|
Configuration
Pseudo-distributed operation (each daemon runs in a separate Java process) requires updates to core-site.xml, hdfs-site.xml, and the mapred-site.xml. These files configure the master, the file system, and the MapReduce framework and live in the runtime/conf directory.
| Listing 5 - Pseudo-Distributed Operation Config |
<!-- core-site.xml -->
<configuration>
 <property>
        <name>fs.default.name</name>
        <value>hdfs://localhost:9000</value>
 </property>
</configuration>

<!-- hdfs-site.xml -->
<configuration>
 <property>
        <name>dfs.replication</name>
        <value>1</value>
 </property>
</configuration>
<!-- mapred-site.xml -->
<configuration>

 <property>
        <name>mapred.job.tracker</name>
        <value>localhost:9001</value>
 </property>
</configuration>
|
These files are documented in the Apache Hadoop Clustering reference, http://is.gd/E32L4s — some parameters are discussed in this Refcard’s production deployment section.
Test the Hadoop Installation
Hadoop requires a formatted HDFS cluster to do its work:
hadoop namenode -format
The HDFS volume lives on top of the standard file system. The format command will show this upon successful completion:
/tmp/dfs/name has been successfully formatted.
Start the Hadoop processes and perform these operations to validate the installation:
- Use the contents of runtime/conf as known input
- Use Hadoop for finding all text matches in the input
- Check the output directory to ensure it works
| Listing 6 - Testing the Hadoop Installation |
start-all.sh ; sleep 5
hadoop fs -put runtime/conf input
hadoop jar runtime/hadoop-*-examples.jar\
grep input output ‘dfs[a-z.]+’
|

You may ignore any warnings or errors about a missing slaves file.
- View the output files in the HDFS volume and stop the Hadoop daemons to complete testing the install
| Listing 7 - Job Completion and Daemon Termination |
hadoop fs -cat output/*
stop-all.sh
|
That’s it! Apache Hadoop is installed in your system and ready for development.
CDH Development Deployment
CDH removes a lot of grueling work from the Hadoop installation process by offering ready-to-go packages for mainstream Linux server distributions. Compare the instructions in Listing 8 against the previous section. CDH simplifies installation and configuration for huge time savings.
| Listing 8 - Installing CDH |
ver=”0.20”
command=”/usr/bin/aptitude”
if [ ! -e “$command” ];
then command=”/usr/bin/yum”; fi
“$command” install\
hadoop-”$ver”-conf-pseudo
unset command ; unset ver
|
Leveraging some or all of the extra components in Hadoop or CDH is another good reason for using it over the Apache version. Install Flume or Pig with the instructions in Listing 9.
| Listing 9 - Adding Optional Components |
apt-get install hadoop-pig
apt-get install flume
apt-get install swoop
|
Test the CDH Installation
The CDH daemons are ready to be executed as services. There is no need to create a service account for executing them. They can be started or stopped as any other Linux service, as shown in Listing 10.
| Listing 10 - Starting the CDH Daemons |
for s in /etc/init.d/hadoop* ; do \
“$s” start; done
|
CDH will create an HDFS partition when its daemons start. It’s another convenience it offers over regular Hadoop. Listing 11 shows how to validate the installation by:
- Listing the HDFS module
- Moving files to the HDFS volume
- Running an example job
- Validating the output
| Listing 11 - Testing the CDH Installation |
hadoop fs -ls /
# run a job:
pushd /usr/lib/hadoop
hadoop fs -put /etc/hadoop/conf input
hadoop fs -ls input
hadoop jar hadoop-*-examples.jar \
grep input output ‘dfs[a-z.]+’
# Validate it ran OK:
hadoop fs -cat output/*
|
The daemons will continue to run until the server stops. All the Hadoop services are available.
Monitoring the Local Installation
Use a browser to check the NameNode or the JobTracker state through their web UI and web services interfaces. All daemons expose their data over HTTP. The users can chose to monitor a node or daemon interactively using the web UI, like in Figure 2. Developers, monitoring tools, and system administrators can use the same ports for tracking the system performance and state using web service calls.
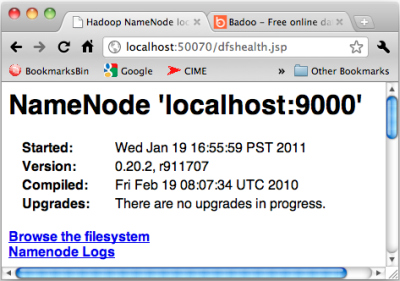
Figure 2 - NameNode status web UI
The web interface can be used for monitoring the JobTracker, which dispatches tasks to specific nodes in a cluster, the DataNodes, or the NameNode, which manages directory namespaces and file nodes in the file system.

