YOLOv10: SOTA Real-Time Object Detection
Going through the test process of YOLOv10, introduced by Tsinghua University on May 23, offers a significant improvement over YOLOv9.
Join the DZone community and get the full member experience.
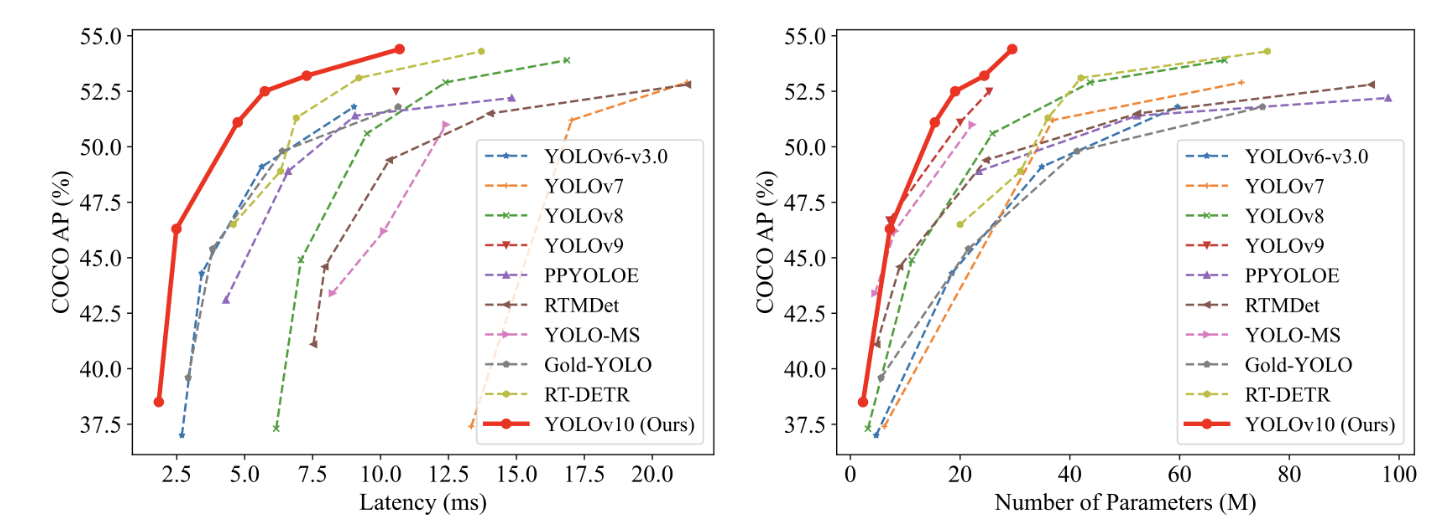
Join For FreeYOLOv10 (You Only Look Once v10), introduced by Tsinghua University on May 23, offers a significant improvement over YOLOv9. It achieves a 46% reduction in latency and uses 25% fewer parameters, all while delivering the same level of performance.

2. YOLOv10 Visual Object Detection: Overview
2.1 What Is YOLO?
YOLO (You Only Look Once) is an object detection algorithm based on deep neural networks, designed to identify and locate multiple objects in images or videos in real time. YOLO is renowned for its fast processing speed and high accuracy, making it ideal for applications that require rapid object detection, such as real-time video analysis, autonomous driving, and smart healthcare.
Before YOLO, the dominant algorithm was R-CNN, a "two-stage" approach: first, generating anchor boxes and then predicting the objects within those boxes. YOLO revolutionized this by allowing "one-stage" direct, end-to-end output of objects and their locations.
- One-stage algorithms: These models perform direct regression tasks to output object probabilities and their coordinates. Examples include SSD, YOLO, and MTCNN.
- Two-stage algorithms: These first generate multiple anchor boxes and then use convolutional neural networks to output the probability and coordinates of objects within those boxes. Examples include the R-CNN series.
2.2 YOLO's Network Structure
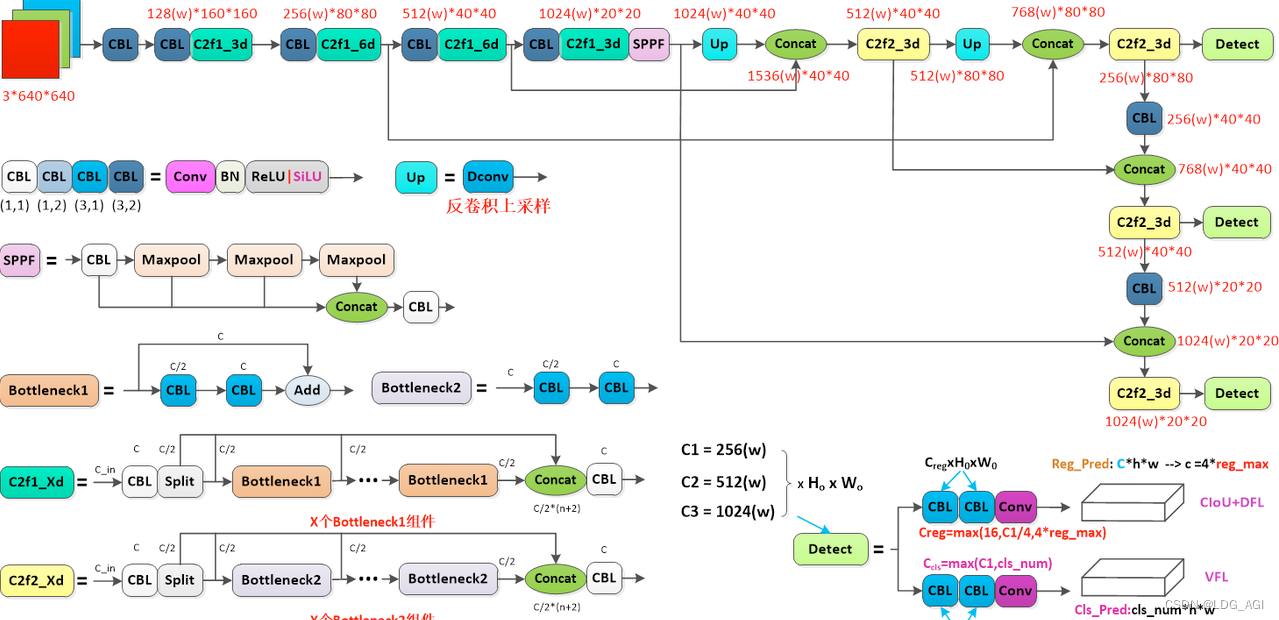
YOLOv10 is an enhancement of YOLOv8. Let's take a brief look at the network structure of YOLOv8:

3. YOLOv10 Visual Object Detection: Training and Inference
3.1 Installing YOLOv10
3.1.1 Clone the Repository
Start by cloning the YOLOv10 repository from GitHub:
git clone https://github.com/THU-MIG/yolov10.git3.1.2 Create a Conda Environment
Next, create a new Conda environment specifically for YOLOv10 and activate it:
conda create -n yolov10 python=3.10
conda activate yolov10
3.1.3 Download and Compile Dependencies
To install the required dependencies, it's recommended to use the Tencent pip mirror for faster downloads:
pip install -r requirements.txt -i https://mirrors.cloud.tencent.com/pypi/simple
pip install -e . -i https://mirrors.cloud.tencent.com/pypi/simple
3.2 Model Inference With YOLOv10
3.2.1 Model Download
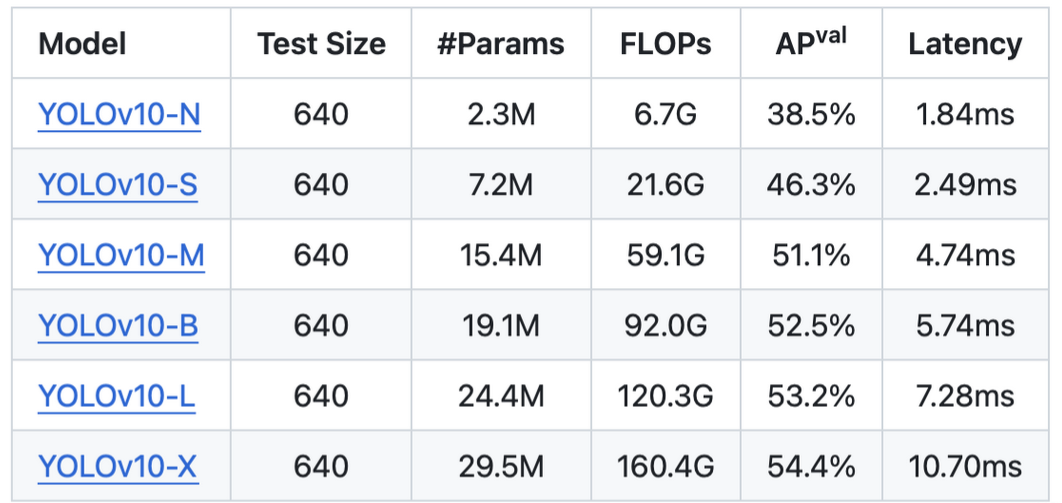
To get started with YOLOv10, you can download the pre-trained models:
- YOLOv10-N
- YOLOv10-S
- YOLOv10-M
- YOLOv10-B
- YOLOv10-L
- YOLOv10-X
3.2.2 WebUI Inference
To perform inference using the WebUI, follow these steps:
-
Navigate to the root directory of the YOLOv10 project. Run the following command to start the application:
Shellpython app.py
-
Once the server starts successfully, you will see a message indicating that the application is running and ready for use.
3.2.3 Command Line Inference
For command line inference, you can use the Yolo command within your Conda environment. Here's how to set up and execute it:
Activate the YOLOv10 Conda environment: Ensure you have activated the environment you created earlier for YOLOv10.
conda activate yolov10Run inference using the command line: Use the yolo predict command to perform predictions. You need to specify the model, device, and source image path as follows:
yolo predict model=yolov10n.pt device=2 source=/aigc_dev/yolov10/ultralytics/assetsmodel: Specifies the path to the downloaded model file (e.g., yolov10n.pt).device: Specifies which GPU to use (e.g., device=2 for GPU #2).source: Specifies the path to the images you want to detect objects in.
Default paths and results:
- By default, the images to be detected should be placed in the yolov10/ultralytics/assets directory.
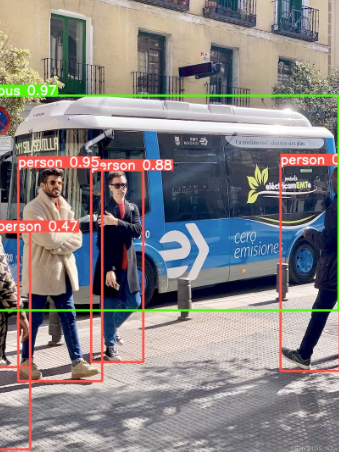
- After detection, the results will be saved in a directory named yolov10/runs/detect/predictxx, where xx represents a unique identifier for each run.
Benchmark on CoCo dataset.


3.3 Training the YOLOv10 Model
In addition to inference, YOLOv10 also supports training on custom datasets. Here's how you can train the model using the command line:
To initiate training with YOLOv10, use the following command:
yolo detect train data=coco.yaml model=yolov10s.yaml epochs=100 batch=128 imgsz=640 device=2Here's a breakdown of the command options:
detect train: This specifies that you want to perform training for object detection.data=coco.yaml: Specifies the dataset configuration file. The default dataset (COCO) is downloaded and stored in the../datasets/cocodirectory.model=yolov10s.yaml: Specifies the configuration file for the model you want to train.epochs=100: Sets the number of training iterations (epochs).batch=128: Specifies the batch size for training, i.e., the number of images processed in each training step.imgsz=640: Indicates the image size to which all input images will be resized during training.device=2: Specifies which GPU to use for training (e.g.,device=2for GPU #2).
Example Explanation
Assuming you have set up the YOLOv10 environment and dataset properly, running the above command will start the training process on the specified GPU. The model will be trained for 100 epochs with a batch size of 128, and the input images will be resized to 640x640 pixels.
Steps To Train YOLOv10
Prepare Your Dataset
- Ensure your dataset is properly formatted and described in the coco.yaml file (or your own custom dataset configuration file).
- The dataset configuration file includes paths to your training and validation data, as well as the number of classes.
Configure the Model
- The model configuration file (e.g., yolov10s.yaml) contains settings specific to the YOLOv10 variant you are training, including the architecture and initial weights.
Run the Training Command
- Use the command provided above to start the training process. Adjust parameters like epochs, batch, imgsz, and device based on your hardware capabilities and training requirements.
Monitor and Evaluate
- During training, monitor the progress through logs or a visual tool if available.
- After training, evaluate the model performance on a validation set to ensure it meets your expectations.
A demo case of using Yolo10 for real-time online object detection:
import cv2
from ultralytics import YOLOv10
model = YOLOv10("yolov10s.pt")
cap = cv2.VideoCapture(0)
while True:
        ret, frame = cap.read()
        if not ret:
                break
        results = model.predict(frame)
        for result in results:
                boxes = result.boxes
                for box in boxes:
                        x1,y1,x2,y2 = map(int, box.xyxy[0])
                        cls = int(box.cls[0])
                        conf = float(box.conf[0])
                        cv2.rectangle(frame, (x1, y1), (x2, y2), (255, 0, 0), 2)
                        cv2.putText(frame, f'{model.names[cls]} {conf:.2f}', (x1, y1 - 10), cv2.FONT_HERSHEY_SIMPLEX, 0.5, (255, 0, 0), 2)
        cv2.imshow('YOLOv10', frame)
        if cv2.waitKey(1) & 0xFF == ord('q'):
                break

cap.release()
cv2.destroyAllWindows()
You can build your workstation to run/train an AI system. To save money, you can also find cheap components like GPUs online.
Opinions expressed by DZone contributors are their own.

Comments