Develop XR With Oracle, Ep 7: Teleport Live 3D Objects From Ray-Bans to Magic Leap, Quest, Vision Pro, and 3D Printers
Share live 3D objects captured with Ray-Bans with XR (AR, VR, or MR) and/or 3D printers with a similar experience as what exists today for 2D pictures/printers.
Join the DZone community and get the full member experience.
Join For FreeThe objective behind the solution described in this blog was to be able to share live 3D objects captured by one person, using “normal-looking” glasses, with another person who can then view them in XR (AR, VR, or MR) and/or 3D print them and do so with a similar experience as to what exists today for 2D pictures and 2D printers.
About This Project
While Meta Ray-Ban glasses are not XR headsets (they are smart glasses), they are currently the most unobtrusive, aesthetically “normal” looking glasses on the market that can be used to capture video (which can then be turned into 3D objects via an intermediary service) as they are indistinguishable from regular Ray-Ban Headliner and Wayfarer glasses aside from the small camera lenses that are mere millimeters in size. See the side-by-side comparison below.

Ray-Ban Wayfarer glasses
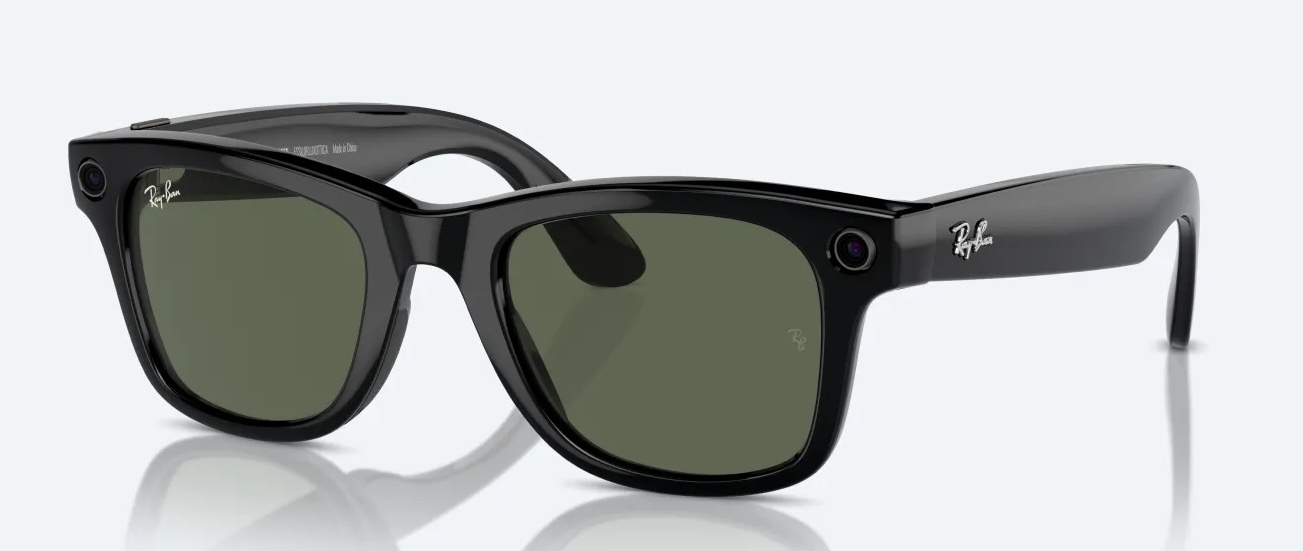
Meta Ray-Ban Wayfarer glasses
The Oracle database plays a central role in the solution as it provides an optimized location for all types of data storage (including 3D objects and point clouds), various inbound and outbound API calls, and AI and spatial operations. Details can be found here.
I will start by saying that this process will of course be more streamlined in the future as better hardware and software tech and APIs become available; however, the need for workflow logic, interaction with and exposure of APIs, and central storage will remain a consistent requirement of an optimal architecture for the functionality.
It is possible to run both Java and JavaScript from within the Oracle database, load and use libraries for those languages, expose these programs as API endpoints, and make calls out from them. It is also possible to simply issue direct HTTP, REST, etc., commands from PL/SQL using the UTL_HTTP.BEGIN_REQUEST call or, for Oracle AI cloud services (or any Oracle cloud services), by using the DBMS_CLOUD.send_request call. This offers a powerful and flexible architecture where the following four combinations are possible.
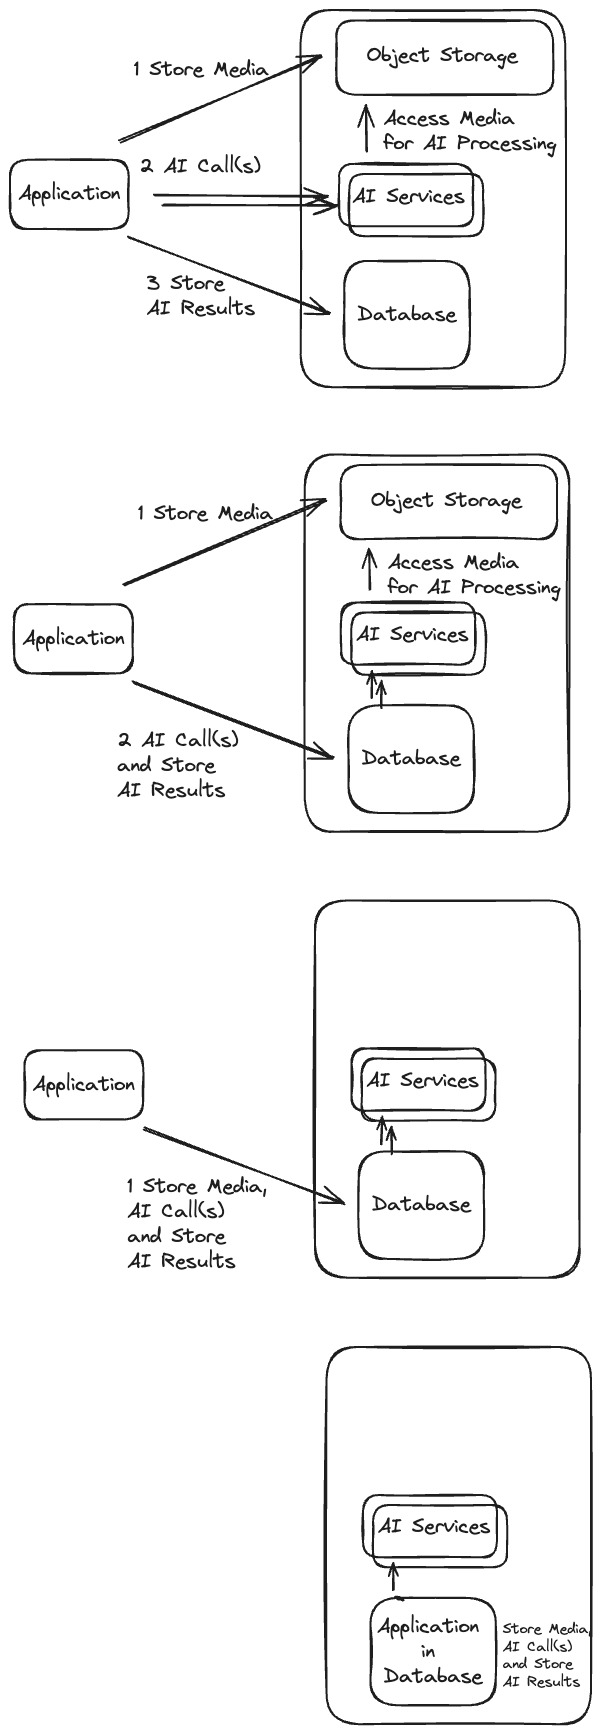
This being the case, there are several ways to go about the solution described here; for example, by issuing requests directly from the database or an intermediary external application (such as microservices deployed in a Kubernetes cluster) as shown in the previous diagrams.
Flow
The flow is as follows:
- The user takes a video with Ray-Bans.
- The video is automatically sent to Instagram (or Cloud Storage).
- The Oracle database calls Instagram to get the video and saves it in the database (or object storage, etc.).
- The Oracle database sends video to the photogrammetry/AI service and retrieves the 3D model/capture generated by it.
- Optionally, further spatial and AI operations are automatically conducted on the 3D model by the Oracle database.
- Optionally, further manual modifications are made to the 3D model and a manual workflow step may be added (for example, to gate 3D printing).
From here the 3D capture/model can be 3D printed or viewed and interacted with via an XR (VR, AR, MR) headset - or both can be done in parallel.
3D Printing
- The Oracle database sends the 3D model (.obj file) to PrusaSlicer, which generates and returns G-code from it.
- The G-code print job is then sent to 3D printer via OctoPrint API server.
XR Viewing and Interaction
- The 3D model is exposed as REST (ORDS) endpoint.
- The XR headset (Magic Leap 2, Vision Pro, Quest, etc.) receives the 3D model from Oracle database and renders it for viewing and interaction at runtime.
In diagram form, the flow looks roughly like this: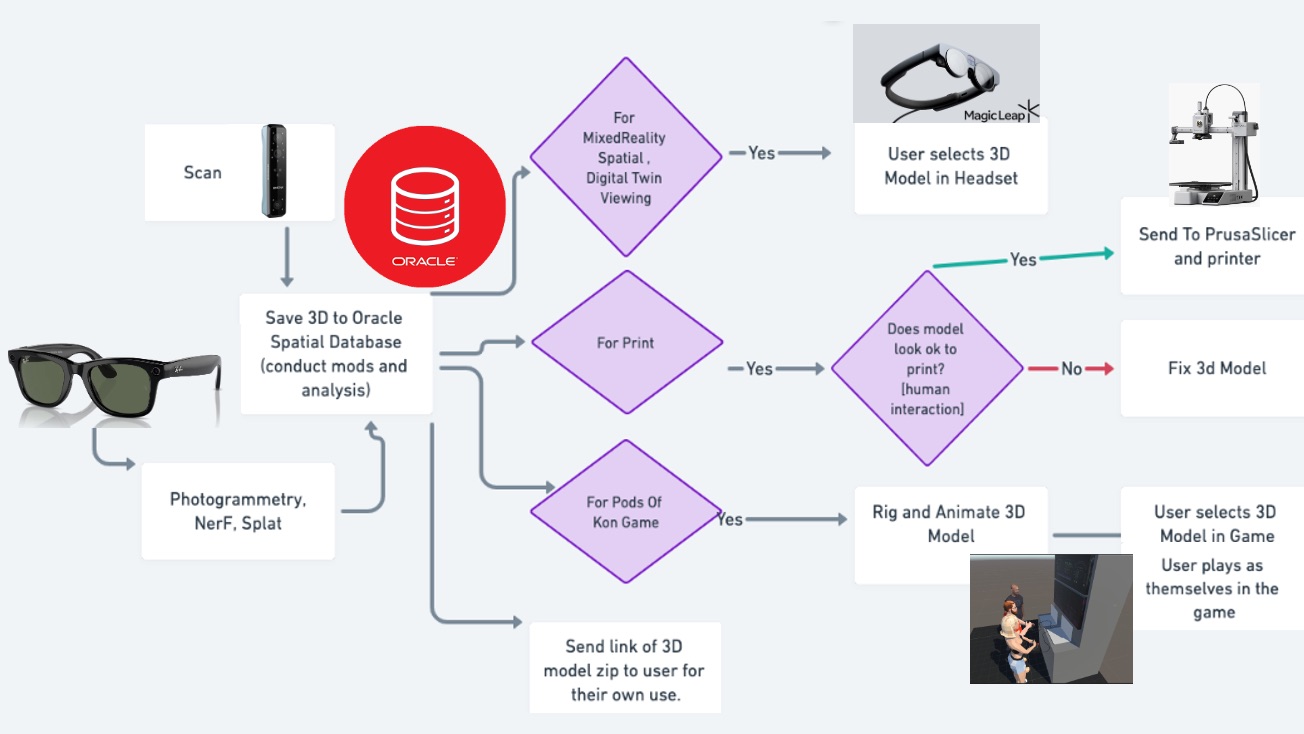
Now let’s elaborate on each step.
Step 1: The User Takes a Video With Ray-Bans
As mentioned earlier, I did not pick Meta Ray-Bans due to their XR functionality. Numerous other glasses have actual XR functionality well beyond Ray-Bans, full-on XR headsets with an increasingly better ability to do 3D scans of various types, and 3D scanners devoted to extremely accurate, high-resolution scans. I picked Ray-Bans because they are the glasses that are, in short, the most “normal” looking (without thick lenses or bridges that sit far from the face or extra extensions, etc.).
Meta Ray-Bans have a “hey Meta” command that works like Alexa or Siri, though fairly limited at this point, as it can not refer to location services, can send but not read messages, etc. It’s not hard to see how it is possible to use Vision AI, etc. with them. However, built-in functionality does not exist currently, and more importantly, there is no API to access any functionality (there are access hacks out there but this blog will stick to legit, supported approaches), so it is limited for developers at this point. It can play music and, most importantly, take pictures and videos — that is the functionality I am using here.
Streaming must be set up on the Meta View app and the Instagram account being streamed to must be a business account. However, both of these are simple configuration steps that can be found in the documentation and do not require additional cost.
Step 2: Video Is Automatically Sent to Instagram (Or Cloud Storage)
Ray-Ban video recording is limited to one-minute clips, but that is enough for any modern photogrammetry/AI engine to generate a 3D model of small to medium objects. Video taken with the glasses can be stored in cloud services such as iCloud and Google. However, it is not automatically synced until the glasses are placed in the glass case. This is why I opted for storage in Instagram reels, which, not surprisingly, is supported by the Meta Ray-Bans such that videos can be automatically streamed and saved there as they are taken. Setup steps to stream can be found here.
3. Oracle Database Calls Instagram (App) to Get the Video
Here, the Oracle database itself listens/polls for new Instagram reels/videos, using the Instagram Graph API. This requires creating a Meta/Instagram application, etc., and here are the steps involved in doing so.
- Register as a Meta developer.
- Create an app and submit it for approval. This takes approximately 5 days if everything has been completed correctly for eligibility.
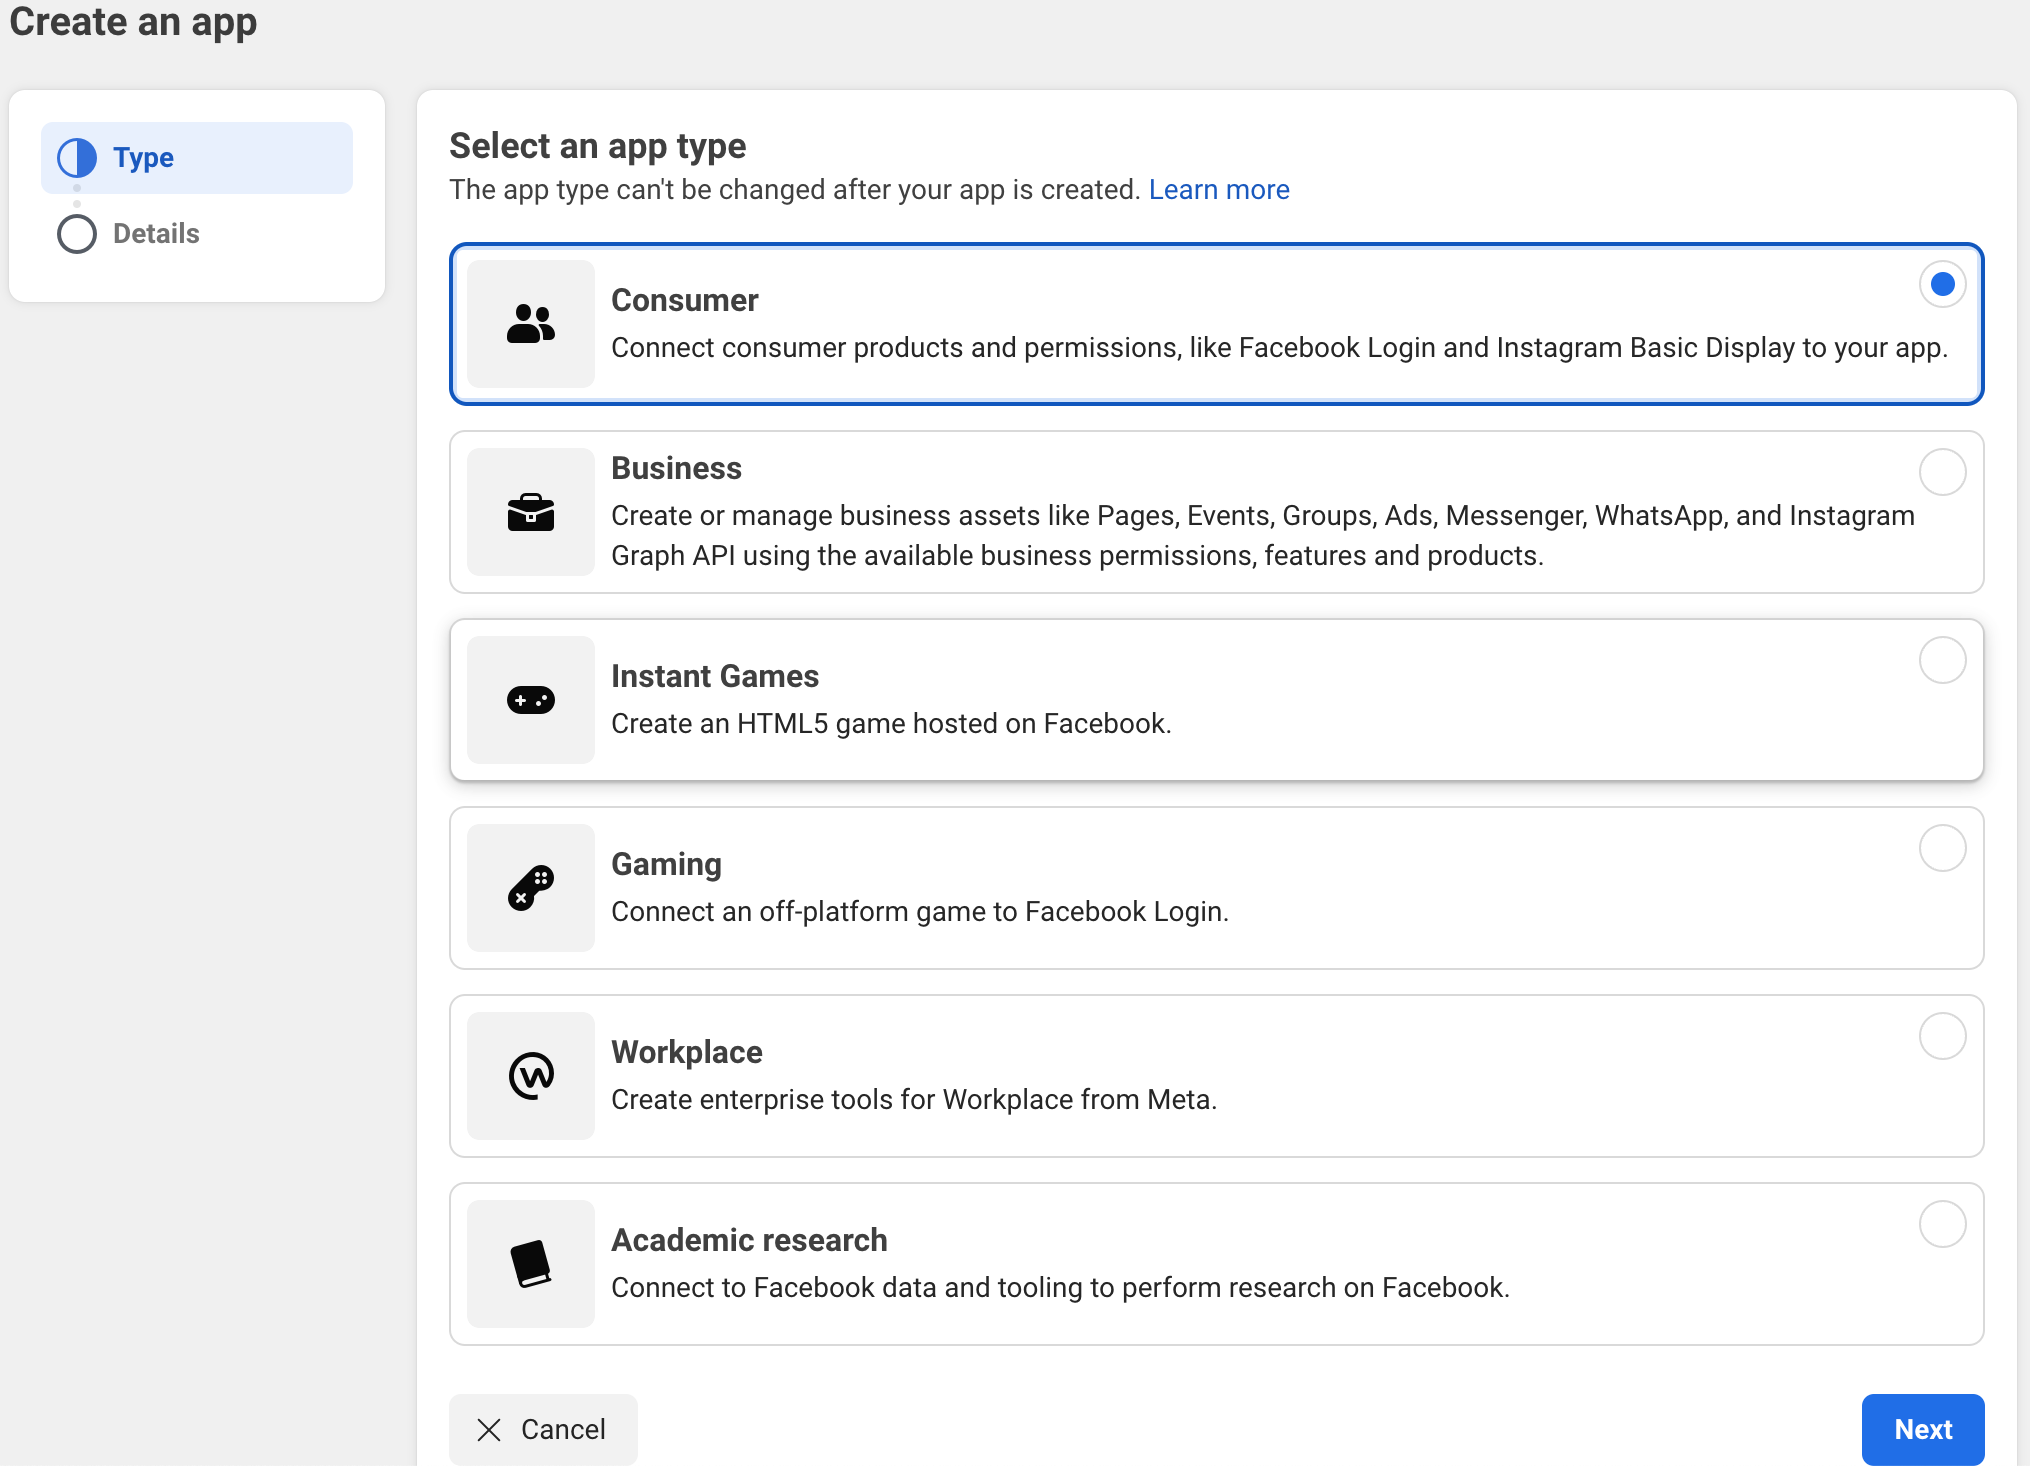
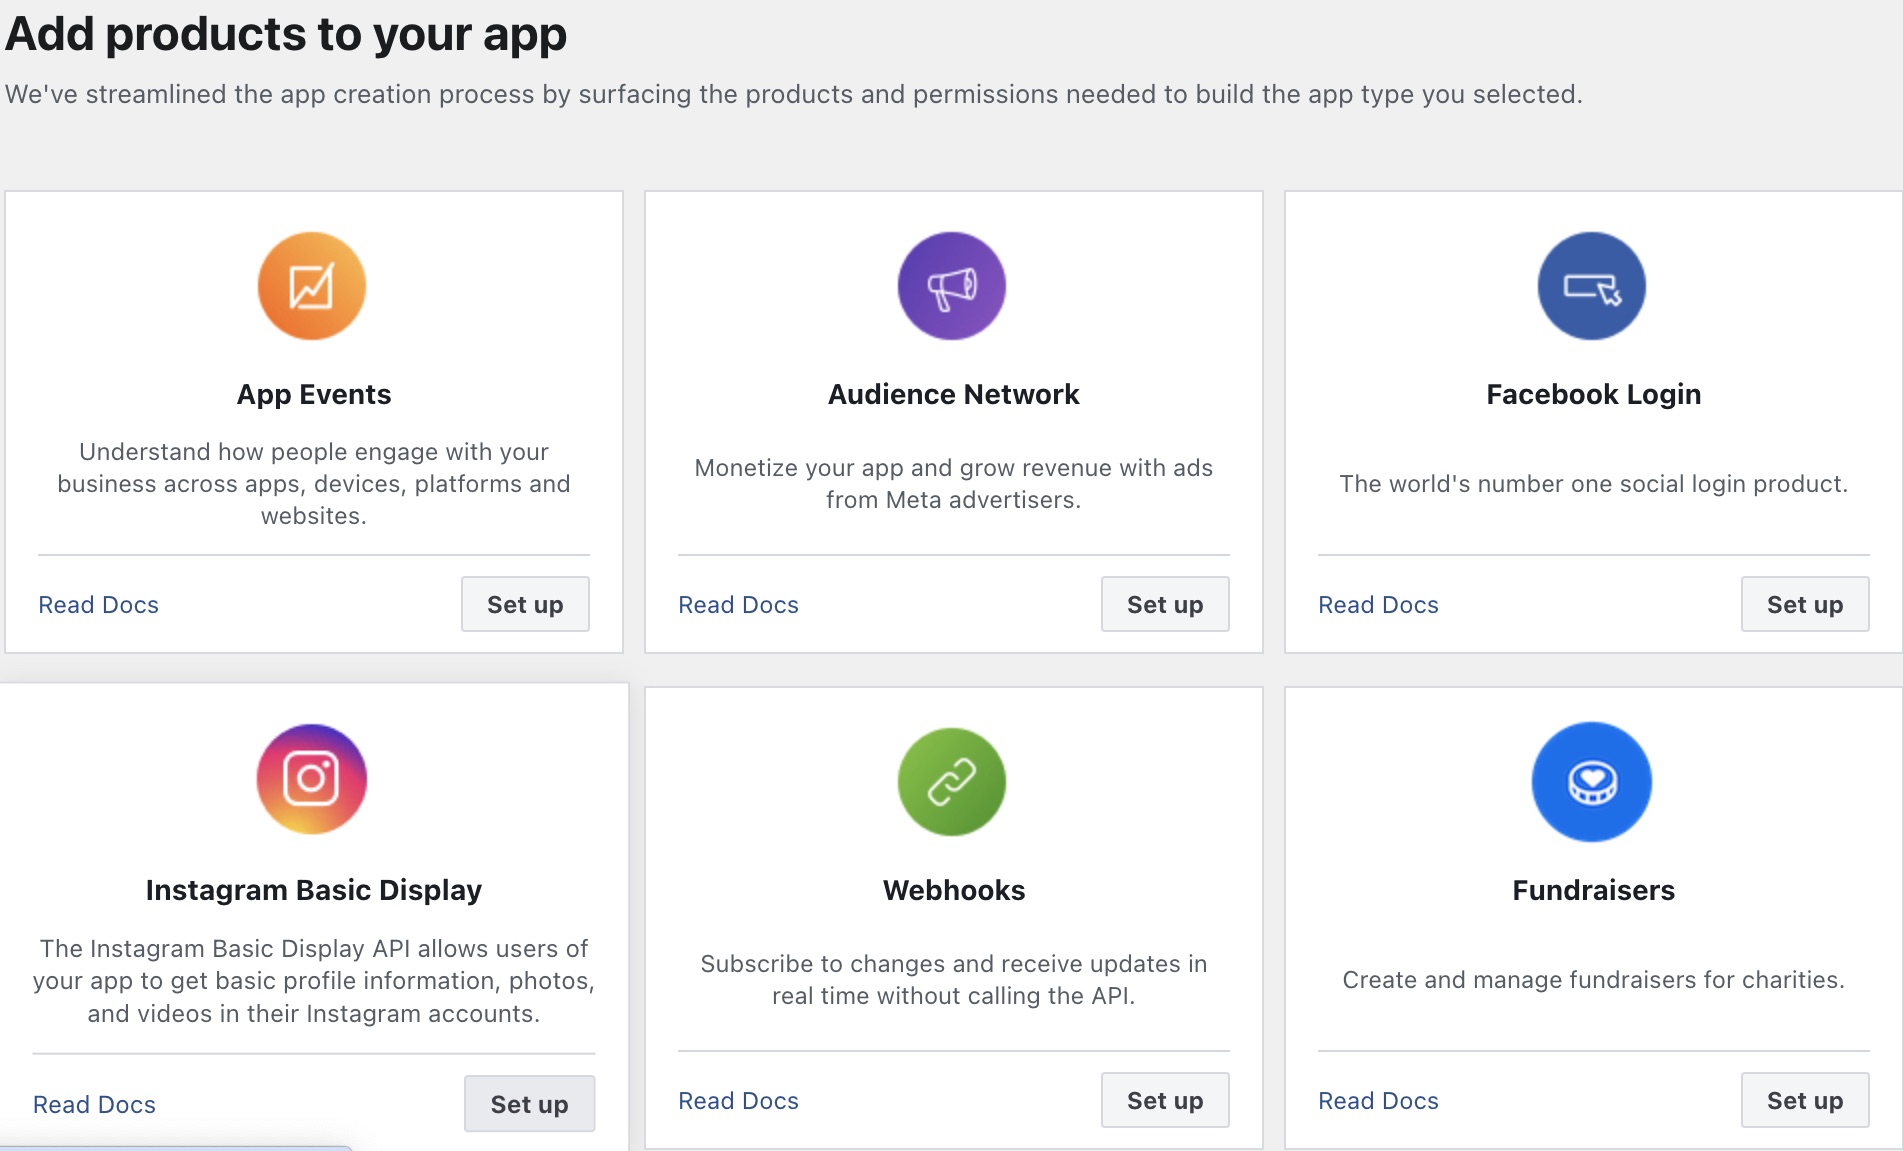
- This process, in particular for the Instagram Basic Display app type we are creating, is described on this Getting Started page. However, I will provide a few additional screenshots here to elaborate a bit as certain new items around app types, privileges, and app approval processes are missing from the doc. First, it is necessary to select a Consumer app type and then the Instagram Basic Display product.
![Select a Consumer app type]()
![Select Instagram Basic Display to set up]()
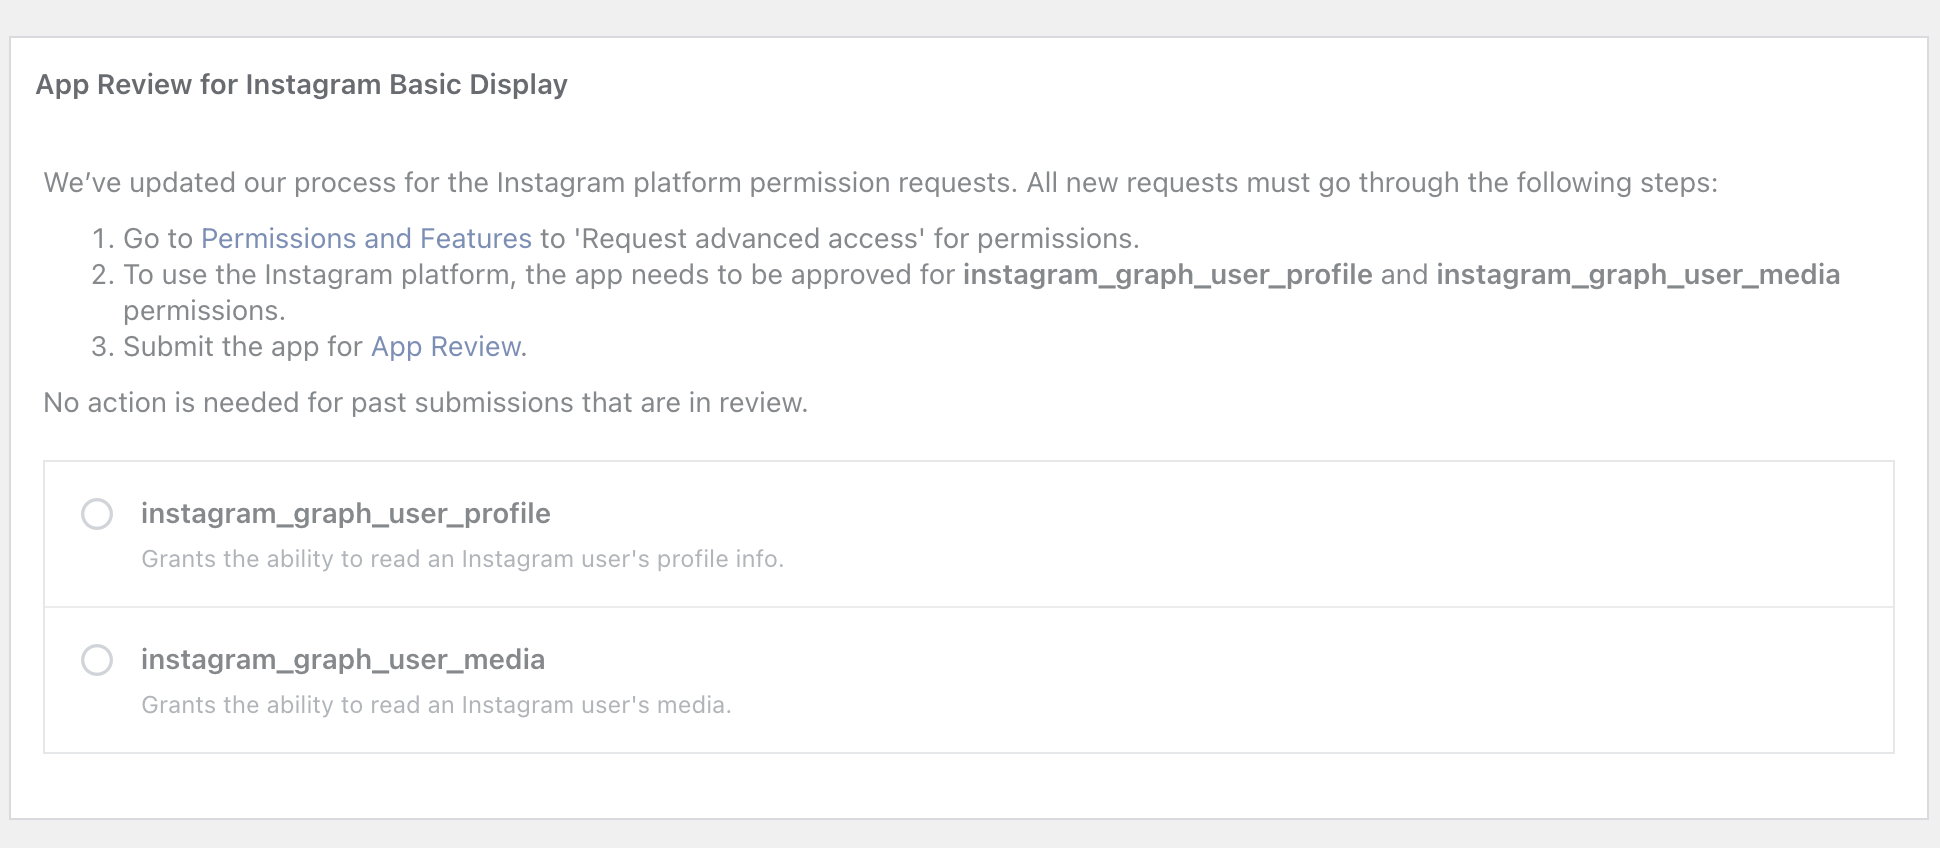
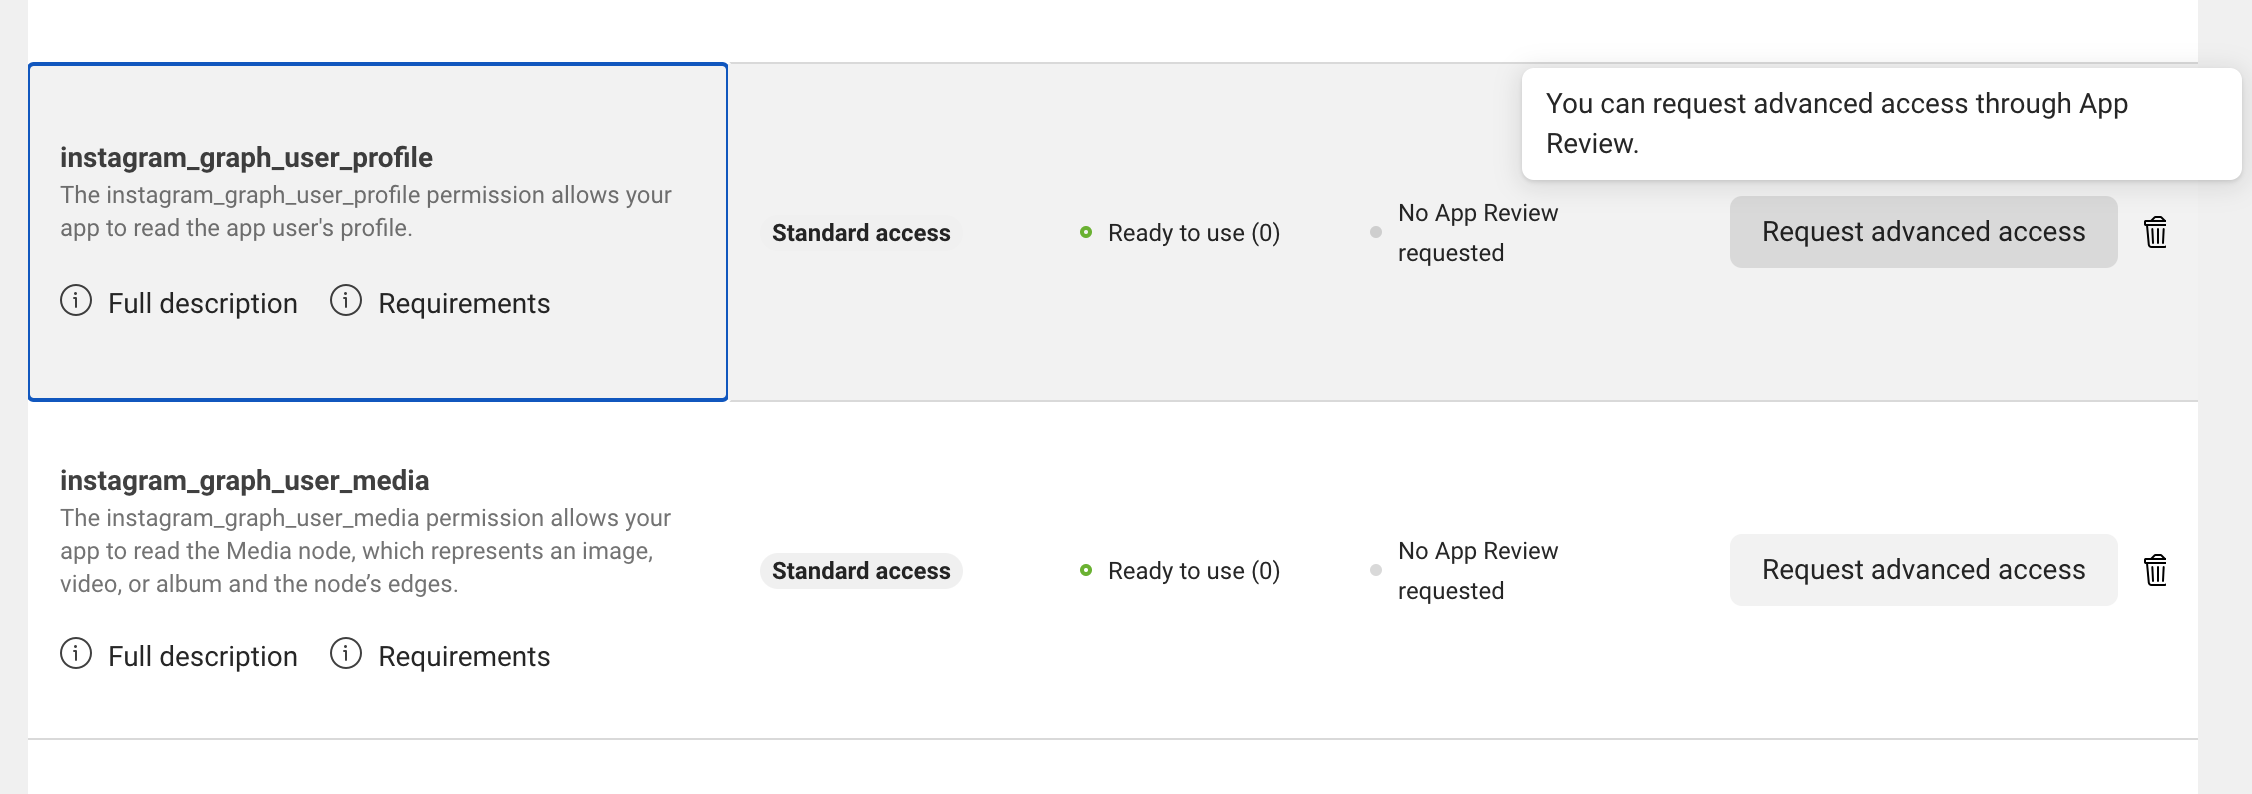
Then the app is submitted for approval for the instagram_graph_user_profile and instagram_graph_user_media:![instagram_graph_user_profile and instagram_graph_user_media approval submission]()
![Request advanced access]()
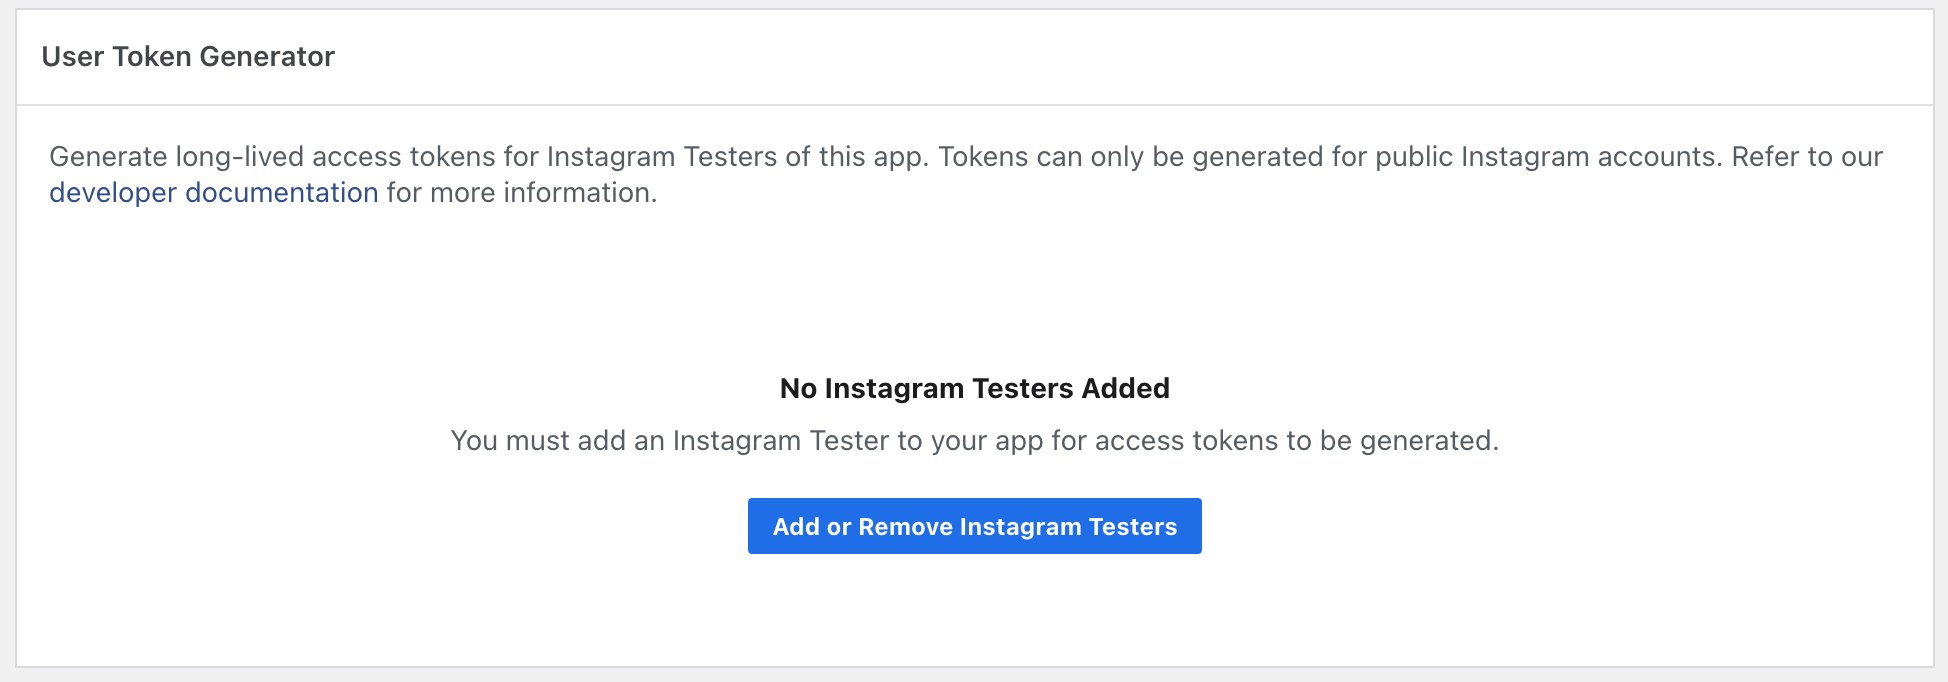
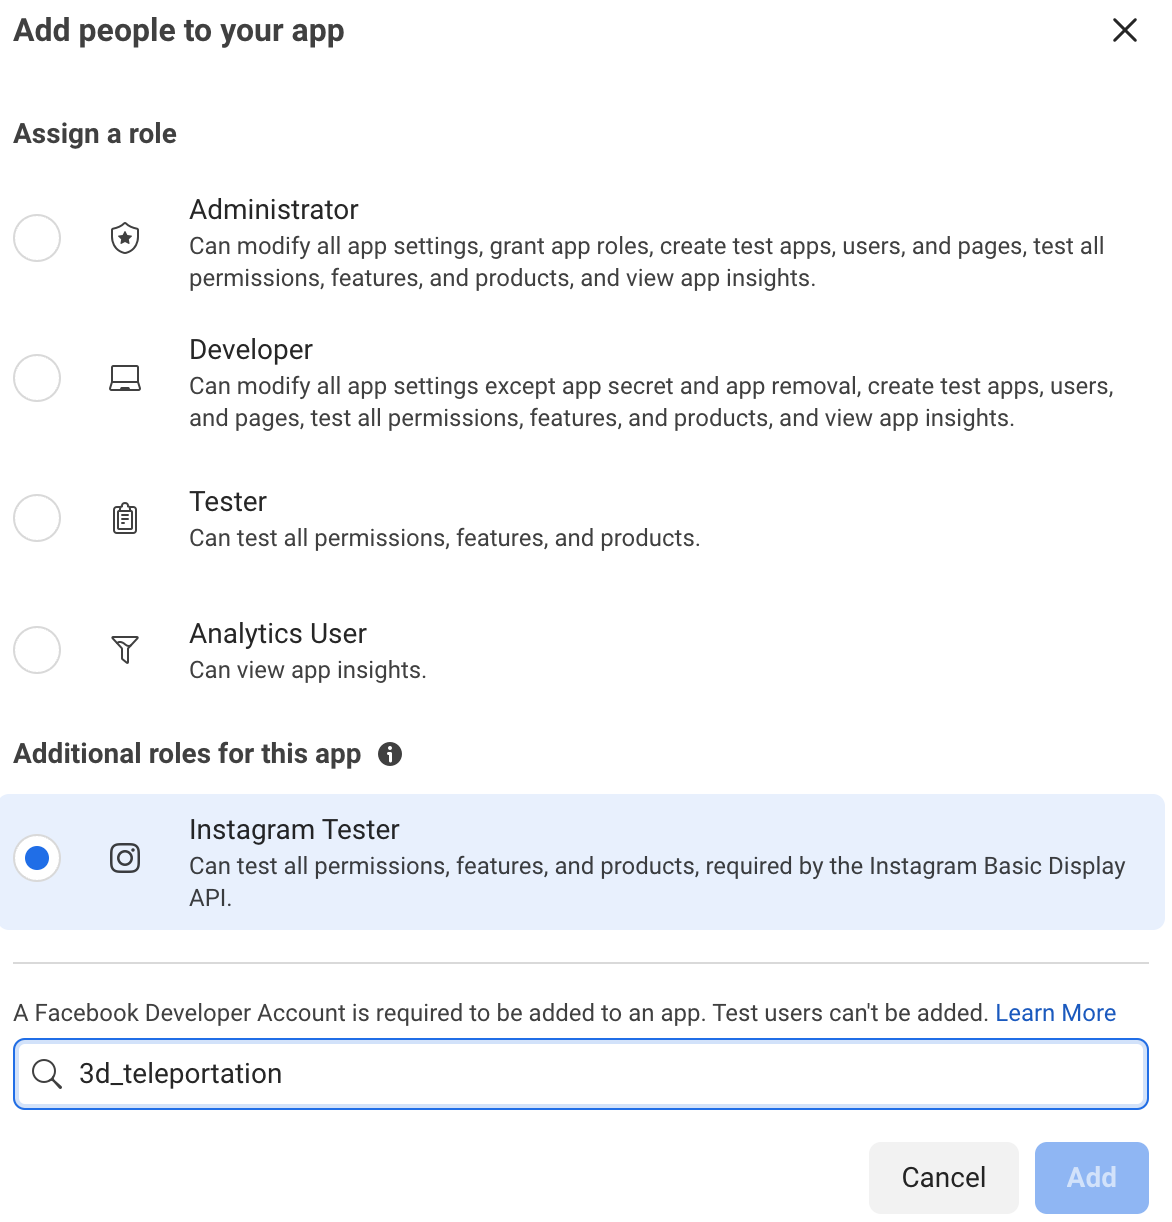
Finally, testers are added/invited for access tokens to be generated.![Add or remove Instagram testers]()
![Add Instagram Tester]()
- Once the application is set up and access token(s) acquired, a list of the information about the media from the account is obtained by issuing a request in the following format:
https://graph.instagram.com/{{IG_USER_ID}}/media?fields=id,caption,media_url,media_type,timestamp,children{media_url}&limit=10&access_token={{IG_LONG_LIVED_ACCESS_TOKEN}} - Finally, the media desired is filtered out from that JSON returned (i.e., any new videos posted), and the
media_urlcan be used to get the actual media.
As stated before, the video can be retrieved from the URL using PL/SQL, JavaScript, or Java from within the Oracle database itself, or via an intermediary service called from the database. It can then be saved in the database, object storage, or other storage and sent to the photogrammetry/AI service.
An example of doing this with JavaScript from inside the database can be found in my blog How To Call Cohere and Hugging Face AI From Within an Oracle Database Using JavaScript and an example using PL/SQL is presented here:
CREATE TABLE file_storage (
    id NUMBER PRIMARY KEY,
    filename VARCHAR2(255),
    file_content BLOB
);

DECLARE
    l_http_request  UTL_HTTP.req;
    l_http_response UTL_HTTP.resp;
    l_blob          BLOB;
    l_buffer        RAW(32767);
    l_amount        BINARY_INTEGER := 32767;
    l_pos           INTEGER := 1;
    l_url           VARCHAR2(1000) := 'https://somesite.com/somefile.obj';
BEGIN
    INSERT INTO file_storage (id, filename, file_content) VALUES (1, 'file.obj', EMPTY_BLOB())
    RETURNING file_content INTO l_blob;
    -- Open HTTP request to download file
    l_http_request := UTL_HTTP.begin_request(l_url);
    UTL_HTTP.set_header(l_http_request, 'User-Agent', 'Mozilla/4.0');
    l_http_response := UTL_HTTP.get_response(l_http_request);
    -- Download the file and write it to the BLOB
    LOOP
        BEGIN
            UTL_HTTP.read_raw(l_http_response, l_buffer, l_amount);
            DBMS_LOB.writeappend(l_blob, l_amount, l_buffer);
            l_pos := l_pos + l_amount;
        EXCEPTION
            WHEN UTL_HTTP.end_of_body THEN
                EXIT;
        END;
    END LOOP;
    UTL_HTTP.end_response(l_http_response);
    COMMIT;
    DBMS_OUTPUT.put_line('File downloaded and saved.');
EXCEPTION
    WHEN UTL_HTTP.end_of_body THEN
        UTL_HTTP.end_response(l_http_response);
    WHEN OTHERS THEN
        UTL_HTTP.end_response(l_http_response);
        RAISE;
END;
This same technique can be used for any call out from the database and storing of any file/content. Therefore, these snippets can be referred back to for saving any file including the .obj file(s) generated in the next step.
Step 4: Oracle Database Sends Video to the Photogrammetry/AI Service and Retrieves the 3D Model/Capture Generated by It
There are a few photogrammetry/AI (and Nerf, Splat, etc.) services available. I have chosen to use Luma Labs again because it has an API available for direct HTTPS calls, and examples are also given for over 20 programming languages and platforms. The reference for it can be found here. I will keep things short by giving the succinct curl command for each call in the flow, but the same can be done using PL/SQL, JavaScript, etc. from the database as described earlier.
Once a Luma Labs account is created and luma-api-key created, the process of converting the video to a 3D .obj file is as follows:
- Create/initiate a capture.
curl --location 'https://webapp.engineeringlumalabs.com/api/v2/capture' \
--header 'Authorization: luma-api-key={key}' \
--data-urlencode 'title=hand'

# example response
# {
#   "signedUrls": {
#     "source": "https://storage.googleapis.com/..."
#   },
#   "capture": {
#     "title": "hand",
#     "type": "reconstruction",
#     "location": null,
#     "privacy": "private",
#     "date": "2024-03-26T15:54:08.268Z",
#     "username": "paulparkinson",
#     "status": "uploading",
#     "slug": "pods-of-kon-66"
#   }
# }- This call will return a
signedUrls.sourceURL that is then used to upload the video. Also note the generatedslugvalue returned which will be used to trigger 3D processing, check status processing status, etc.
curl --location --request PUT 'https://storage.googleapis.com/...' \
--header 'Content-Type: text/plain' \
--data 'hand.mov'- Once the video file is uploaded, the processing is triggered by issuing a
POSTrequest to theslugretrieved in step 1.
curl --location -g --request POST 'https://webapp.engineeringlumalabs.com/api/v2/capture/{slug}' \
--header 'Authorization: luma-api-key={key}'- If the process is triggered successfully, a value of
truewill be returned and the following can be issued to check the status of the capture by calling the capture endpoint.
curl --location -g 'https://webapp.engineeringlumalabs.com/api/v2/capture/{slug}' \
--header 'Authorization: luma-api-key={key}'- Once the status returned is equal to
complete, the 3D capture zip file (which contains the .obj file as well as the .mtl material mapping file and .png texture files) is downloaded and saved by calling the download endpoint. The approaches mentioned earlier can be used to do this and save the file(s).
Step 5: Optionally, Further Spatial and AI Operations Are Automatically Conducted on the 3D Model by the Oracle Database
It is also possible to break down the .obj file and store its various vertices, vertice texture/material mappings, etc. in a table as a point cloud for analysis and manipulation. Here is a simple example of that:
create or replace procedure gen_table_from_obj(id number) as
ord MDSYS.SDO_ORDINATE_ARRAY;
f UTL_FILE.FILE_TYPE;
s VARCHAR2(2000);
i number;
begin

  ord :=  MDSYS.SDO_ORDINATE_ARRAY();
  ord.extend(3);
  f := UTL_FILE.FOPEN('ADMIN_DIR','OBJFROMPHOTOAI.obj', 'R');
  i := 1;
  while true loop
    UTL_FILE.GET_LINE(f, s);
    if(s = '') then
      exit;
    end if;
    if(REGEXP_SUBSTR(s, '[^ ]*', 1, 1) = 'v') then
      ord(1) := TO_NUMBER(REGEXP_SUBSTR(s, '[^ ]*', 1, 3));
      ord(2) := TO_NUMBER(REGEXP_SUBSTR(s, '[^ ]*', 1, 5));
      ord(3) := TO_NUMBER(REGEXP_SUBSTR(s, '[^ ]*', 1, 7));
      insert into INP_OBJFROMPHOTOAI_TABLE(val_d1, val_d2, val_d3) values (ord(1), ord(2), ord(3));
    end if;
    i := i+1;
  end loop;
end;
/
The Oracle database has had a spatial component for decades now, and recent versions have added several operations for different analyses of point clouds, mesh creation, .obj export, etc. These are described in this video. One operation that has existed for a number of releases is the pc_simplify function shown below. This is often referred to as "decimate" or other terms by various 3D modeling tools and provides the ability to reduce the number of polygons in a mesh, thus reducing overall size. This is handy for a number of reasons, such as when different clients will use the 3D model: for example, a phone with limited bandwidth or need for high-poly meshes.
 procedure pc_simplify(
    pc_table                  varchar2,
    pc_column                 varchar2,
    id_column                 varchar2,
    id                        varchar2,
    result_table_name         varchar2,
    tol                       number,
    query_geom                mdsys.sdo_geometry default null,
    pc_intensity_column       varchar2 default null)
DETERMINISTIC PARALLEL_ENABLE;
Step 6: Optionally, Further Manual Modifications Can Also Be Made to the 3D Model, and a Manual Approval Can Be Inserted as Part of the Workflow
The 3D model can be loaded from the database, and edited in 3D modeling tools like Blender or 3D printing tools such as BambuLabs numerous others.
Due to the many steps involved in this overall process, the solution is also a good fit for a workflow engine such as the one that exists as part of the Oracle database. In this case, a manual review/approval can be inserted as part of the workflow to prevent sending or printing undesired models.
From here the 3D capture/model can be 3D printed or viewed and interacted with via an XR (VR, AR, MR) headset - or both can be done in parallel.
3D Printing
Step 1: Oracle Database Sends the 3D Model (.Obj File) to PrusaSlicer Which Generates and Returns G-Code From It
PrusaSlicer is an extremely robust and successful open-source project/application that takes 3D models (.stl, .obj, .amf) and converts them into G-code instructions for FFF printers or PNG layers for mSLA 3D printers.
It supports every conceivable printer and format; however, does not provide an API, only a CLI. There are a few ways to work/hack around this for automation. One, shown here, is to implement a [Spring Boot] microservice that takes the .obj file and executes the PrusaSlicer CLI (which must be accessible to the microservice of course), returning the G-code.
@RestController
public class SlicerController {

    @PostMapping(value = "/slice", consumes = MediaType.MULTIPART_FORM_DATA_VALUE)
    public byte[] sliceStlFile(@RequestParam("file") MultipartFile file,
                               @RequestParam("config") String configPath) throws IOException, InterruptedException {
        Path tempDir = Paths.get(System.getProperty("java.io.tmpdir"));
        Path stlFilePath = Files.createTempFile(tempDir, "stl", ".stl");
        file.transferTo(stlFilePath.toFile());
        Path gcodePath = Files.createTempFile(tempDir, "output", ".gcode");
        // Execute PrusaSlicer CLI command
        String command = String.format("PrusaSlicer --slice --load %s --output %s %s",
                configPath, gcodePath.toString(), stlFilePath.toString());
        Process prusaSlicerProcess = Runtime.getRuntime().exec(command);
        prusaSlicerProcess.waitFor();
        // Return G-code
        byte[] gcodeBytes = FileUtils.readFileToByteArray(gcodePath.toFile());
        Files.delete(stlFilePath);
        Files.delete(gcodePath);
        return gcodeBytes;
    }
}
Once the G-Code for the .obj file has been returned, it can be passed to the OctoPrint API server for printing.
Step 2: G-Code Print Job Is Then Sent to 3D Printer via Octoprint API Server
OctoPrint is an application for 3D printers that offers a web interface for printer control. It can be installed on essentially any computer (in the case of my setup, a minimal Raspberry Pi) that is connected to the printer. This can even be done over Wi-Fi, cloud, etc. depending on the printer and setup. However, we will keep it to this basic setup.
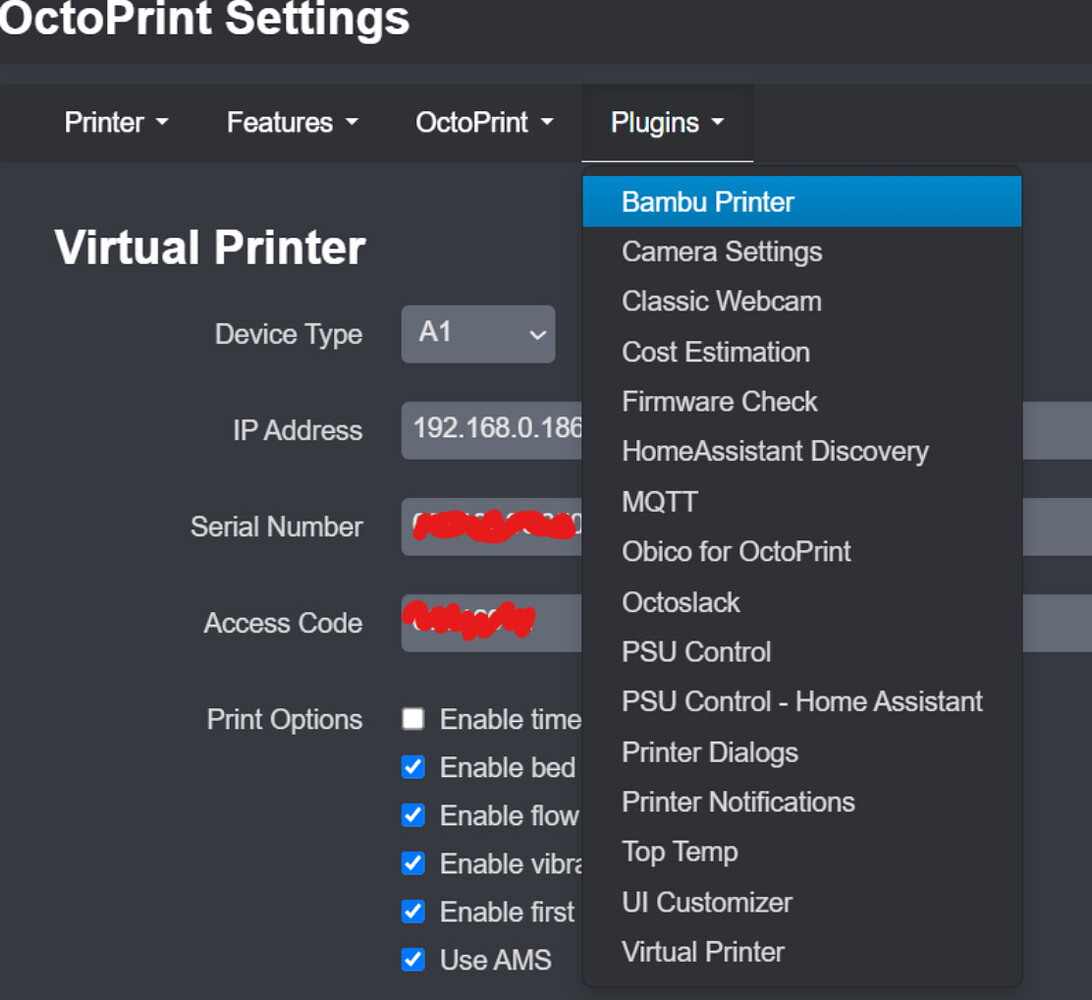
Again, printers have different applications to provide this functionality, but OctoPrint provides a REST API, which allows for programmatic control, including uploading and printing G-code files.
- First, an API key must be obtained from OctoPrint’s web interface under Settings > API.
- Then, the G-code file is uploaded and immediately printed by using a call of this format/content:
curl -k -X POST "http://octopi.local/api/files/local" \
    -H "X-Api-Key: API_KEY" \
    -F "file=@/path/to/file.gcode" \
    -F "select=true" \
    -F "print=true"
XR Viewing and Interaction
Step 1: 3D Model Is Exposed as a REST (ORDS) Endpoint
Any data stored in the Oracle Database can be exposed as a REST endpoint. To expose the .obj file for download by the XR headset, we can REST-enable the table created earlier using the following:
CREATE OR REPLACE PROCEDURE download_file(p_id IN NUMBER) IS
  l_blob BLOB;
BEGIN
  SELECT file_content INTO l_blob
  FROM file_storage
  WHERE id = p_id;

  -- Use ORDS to deliver the BLOB to the client
  ORDS.enable_download(l_blob);
EXCEPTION
  WHEN NO_DATA_FOUND THEN
    HTP.p('File not found.');
  WHEN OTHERS THEN
    HTP.p('Error retrieving file.');
END download_file;
This makes the file (i.e., the .obj, etc. files) accessible via a simple GET call.
curl -X GET "http://thedbserver/ords/theschema/file/file/{id}" -o "3Dmodelwithobjandtextures.zip"
Here, we are exposing and downloading the file by id. The XR headset keeps track of the 3D models it has received and polls for the next id each time.
From here, the 3D model can be viewed on computers, phones, etc. as-is. However, it is obviously more interactive to view in an actual XR headset, which is what I will describe next.
Step 2: XR Headset (Magic Leap 2, Vision Pro, Quest, etc.) Receives the 3D Model From the Oracle Database and Renders It For Viewing and Interaction at Runtime
The process for receiving and rendering 3D in Unity as I am showing here (and likewise for UnReal) is the same regardless of the headset used. Interaction with 3D objects (via e.g., hand tracking, eye gaze, voice, etc.) has also been standardized with OpenXR and WebXR which Magic Leap, Meta, and others are compliant with. However, Apple (similar to the case of phone, etc. development) has its own development SDK, ecosystem, etc., and regardless, interaction is not the crux of this blog, so I will only cover the important aspects of the 3D object for viewing.
There are a couple of assets on the Unity asset store for doing this conveniently. What is shown below is greatly simplified, but explains the general approach.
First, the 3D model is downloaded using a script like this:
using System.Collections;
using UnityEngine;
using UnityEngine.Networking;
using System.IO;

public class DownloadAndSave3DMOdel : MonoBehaviour
{
    private string ordsFileUrl = "http://thedbserver/ords/theschema/file/file/{id}";
    private string filePathForTextures;

    void Start()
    {
        filePath = Path.Combine(Application.persistentDataPath, "3Dmodelwithobjandtextures.zip");
        StartCoroutine(DownloadFile(ordsFileUrl));
    }

    IEnumerator DownloadFile(string url)
    {
        using (UnityWebRequest webRequest = UnityWebRequest.Get(url))
        {
            yield return webRequest.SendWebRequest();
            if (webRequest.isNetworkError || webRequest.isHttpError)
            {
                Debug.LogError("Error: " + webRequest.error);
            }
            else
            {
            	//Unpack the zip here and process each file for the case where it isObjFile, isMtlFile, or isTextureFile;
                //The texture/png files are written to a file like this
                if (isTextureFile) File.WriteAllBytes(filePathForTextures, webRequest.downloadHandler.data);
				//Whereas the .obj and .mtl files are converted to a stream like this
                else if (isObjFile){
                	var memoryStream = new MemoryStream(Encoding.UTF8.GetBytes(webRequest.downloadHandler.text));
					processObjFile(memoryStream);
                }
                else if (isMtlFile){
                	var memoryStream = new MemoryStream(Encoding.UTF8.GetBytes(webRequest.downloadHandler.text));
                    processMtlFile(memoryStream);
                }
            }
        }
    }
}
As shown, the the texture/.png files in the zip are saved and the .obj and .mtl files are converted to MemoryStreams for processing/creating the Unity GameObject's MeshRenderer, etc.
This parsing is similar to how we created a point cloud table from the .obj in the earlier optional step where we parse the lines of the .obj file; however, a bit more complicated as we also parse the .mtl file (spec explaining these formats can be found here) and apply the textures to create the end resultant 3D model that is rendered for viewing at runtime. This entails this basic logic which will create the GameObject that can then be placed in the headset wearer's FOV or part of a library menu, etc. to interact with.
// Create the Unity GameObject that will be the main result/holder of our 3D object
		var gameObject = new GameObject(_name);
// add a MeshRenderer and MeshFilter to it
		var meshRenderer = gameObject.AddComponent<MeshRenderer>();
		var meshFilter = gameObject.AddComponent<MeshFilter>();
// Create a Unity Vector object for each of the "v"/Vertices, "vn"/Normals, and "vt"/UVs values parsed from each of the lines in the .obj file
    new Vector3(x, y, z);

// Create a Unity Mesh and add all of the Vertices, Normals, and UVs to it.
	var mesh = new Mesh();
	mesh.SetVertices(vertices);
	mesh.SetNormals(normals);
	mesh.SetUVs(0, uvs);

// Similarly parse the .mtl file to create the array of Unity Materials.
	var material = new Material();
	material.SetTexture(...);
	material.SetColor(...);
	//collect materials into materialArray

// Add the mesh and/with materials
   meshRenderer.sharedMaterials = materialArray;
   meshFilter.sharedMesh = mesh;
Conclusion
As you can see, there are many steps to the process; however, hopefully, you have found it interesting to see how it is possible — and will only become easier — to share 3D objects the way we share 2D pictures today. Please let me know if you have any thoughts or questions whatsoever and thank you very much for reading!
Source Code
The source code for the project can be found here.
Video
Opinions expressed by DZone contributors are their own.

Comments