XMPP Load Testing - Advanced Scenarios
Learn about advanced load testing scenarios with JMeter and XMPP, a communication services protocol which can be used for services like HipChat or Slack.
Join the DZone community and get the full member experience.
Join For FreeXMPP is a communication services protocol, which can be used for services like HipChat or Slack. Last time, we covered all the XMPP elements in Apache JMeter™ and learned how to configure them for load testing an XMPP server. In this part, we will modify the same test script to work with multiple users and we will expand the part responsible for user's communication. You can download the script from this link (demo 3 and two CSV files).
Since you already know how to configure XMPP elements, we will not go deeply into detailed descriptions. Rather, we will specifically focus on the scenario of the script. Let's get started.
Step 1 - Adding Multiple Users
First of all, we will modify the script to work with multiple users.
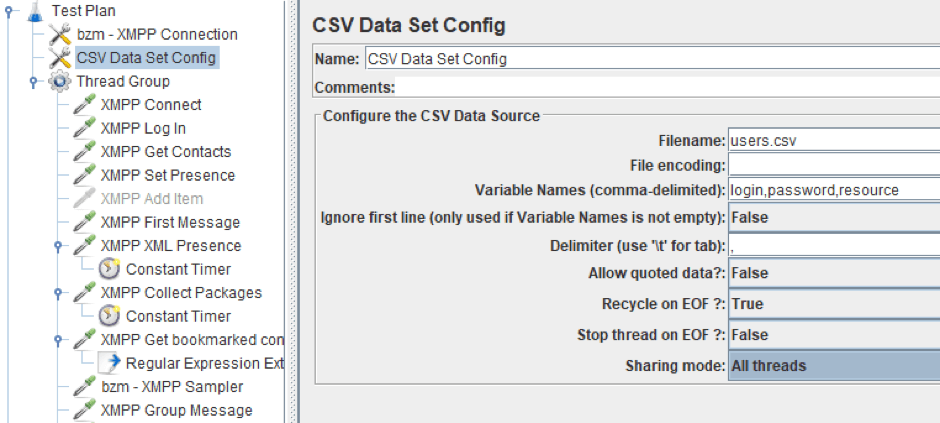
We will need a file containing various user accounts for that. They can be either newly registered or already used. In our example, it will be a CSV file with three columns: login - password - resource. This is necessary so each user is logged in under a separate account.
Add the CSV Data Set Config to the test plan to connect the file. Right Click on Test Plan -> Add -> Config Element -> CSV Data Set Config.
The configuration of this element is shown in the screenshot below. Make sure to also change the fixed data to variables in the Log in XMPP sampler, which is responsible for logging in.
Last time, we showed how to choose the main user through the XMPP Connection Config element. Now we need to choose a new user that this main user will communicate with. You cannot use the roster to select a random contact, because only existing users are there. (Reminder: Rosters are storages for user's contacts or subscriptions).
Step 2, Option 1 - Communicating With a User Who Isn't in the Roster
To communicate with a user who isn't in the Roster, we need to first check which contacts are already there to avoid sending a request to an existing contact. We will be using the same CSV file, but this time we will not be using the CSV Data Set Config, but rather a BeanShell PostProcessor. The PostProcessor will be added to the XMPP Get Contacts Sampler that is responsible for getting contacts from the roster, named "Get Contacts." Read this article to read how to work with BeanShell PostProcessor.
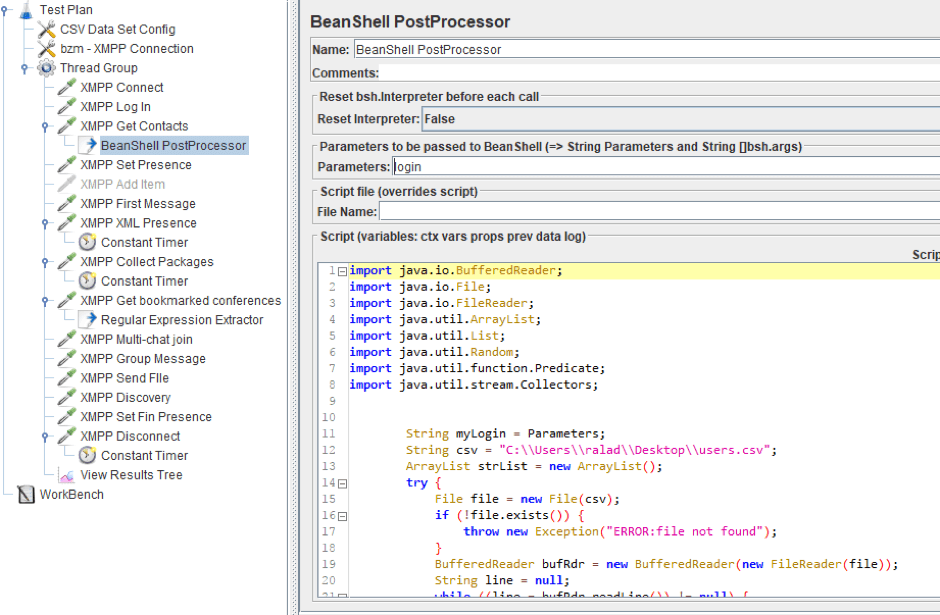
Using the BeanShell PostProcessor, we will select a random user contact from the CSV file and check if it is already in the roster. We will also send the current user login to the BeanShell PostProcessor, to remove it from the general list. This is for avoiding the situation where the user tries to communicate with itself.
Let's look quickly go through the code:
- The CSV File opens up and all the strings from it are read.
- The string with the authorized user's address is deleted and a random address for communication is selected.
- The "Get Contacts" Sampler response is received and the random user's address is searched for in it. If the address is found, it will be indicated by a flag. The flag is a variable that takes the 'TRUE' value if the address is contained in the roster, otherwise - 'FALSE'.
If the user isn't in the roster, you can communicate with it.
Step 2, Option 2 - Communicating With a User After Adding It to the Roster
We can also communicate with a new user after adding it to our roster. To do that, let's proceed to the sampler, which is responsible for adding user contacts to the roster. Adding can only be done when the address isn't in the roster. That's why in the previous step we created a flag indicating that the user contact is present in the roster.
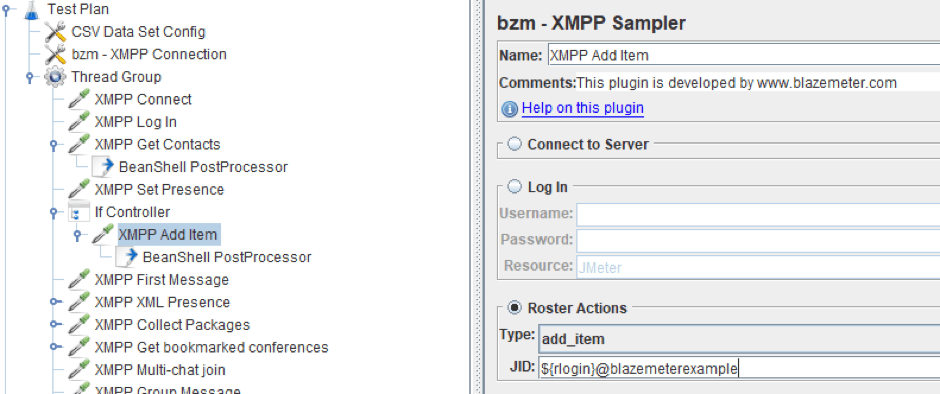
Let's add an If Controller to handle this case. Right Click on Thread Group -> Add -> Logic Controller -> If Controller. The If Controller is located before the XMPP sampler named "Add Item", and the sampler will be nested as a child element under the controller.
When adding a user contact, you will need to change the flag. This will also be helpful if you need to delete the contact from the roster. For this purpose, we will also use BeanShell PostProcessor, like in the previous step. The structure of the script after these actions is shown in the screenshot below.

As you can see, the presence of the address in the roster is checked in the condition, and one more condition is added: $ {__ Random (0,100)} <65. This condition is necessary for a more correct emulation of user behavior, since not every contact should be added to the roster. ${__ Random (0.100)} is a JMeter function that returns a random value from the interval. If the received value is higher than 65, the contact will not be added, even if it is not present in the roster. We can still communicate with this contact.
In the BeanShell PostProcessor, the flag is changed if a contact is added in the following way:
Remember to change the static data in the sampler to the values of the variables, as in the screenshot below.
Let's proceed to the part responsible for communication. We will not be studying the modification of this part in detail since we have already covered similar things. Rather, we will focus on new elements:
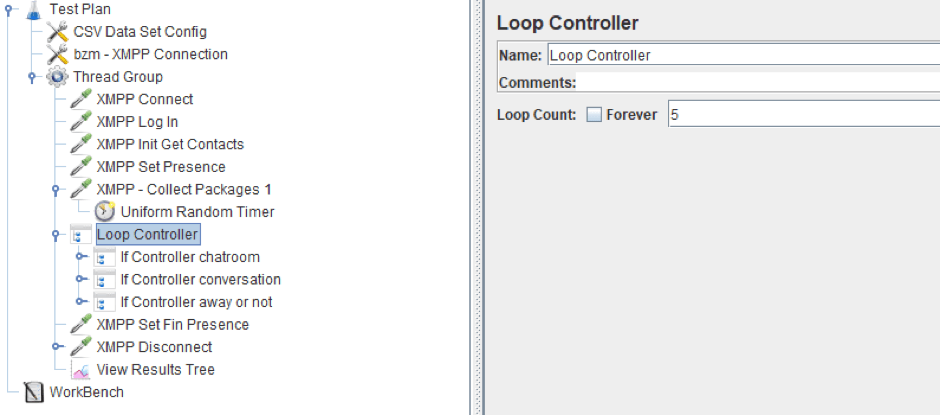
As you can see above, the Loop Controller is added to the script. The Loop Controller is responsible for the cyclic execution of the elements nested in it, as many times as specified. This is necessary for extending the list of actions performed by the user in one thread. After all, the user does not send only one message nor does he/she immediately close the client.
Inside the Loop Controller, there are three If Controller elements. Each of them is responsible for a certain type of activity:
- "If Controller chatroom" is responsible for communication during online conferences.
- "If Controller conversation" is responsible for communication between users.
- "If Controller away or not" is responsible for setting the status 'away' and pending time.
Each of these controllers has a condition for random execution, as was shown above with the example of adding to the roster.
Let's study these three scenario parts in more detail.
Online Conferences Communication
The part with the If Controller chatroom consists of the following elements: Getting a list of conferences, joining one of them and communicating during the conference for a while.
To implement the part with communication during the conference, another Loop Controller and two samplers have been used: one sampler for sending the message, the second one for receiving the packets. The structure of this part is shown in the screenshot below.
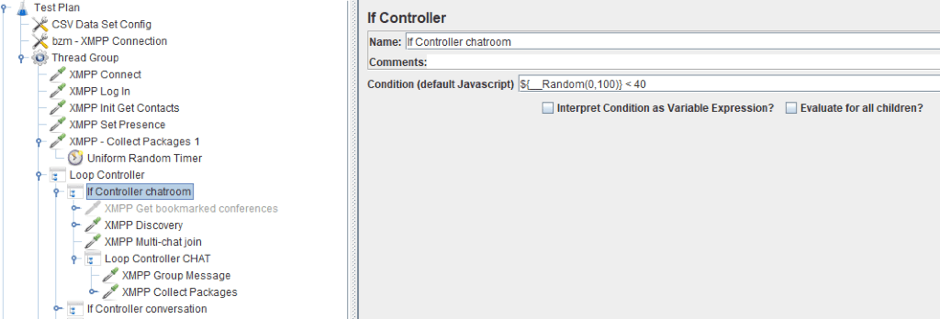
The most interesting point, as you can see in this part, is getting a list of available conferences. We get conferences, not bookmarks, as we did before, and we do it by using the XMPP Sampler with the Service Discovery group. Through this element, we can get a list of ALL available conferences on the server. By using Get Bookmarks we can get only those conferences that are added to the bookmarks on the server.
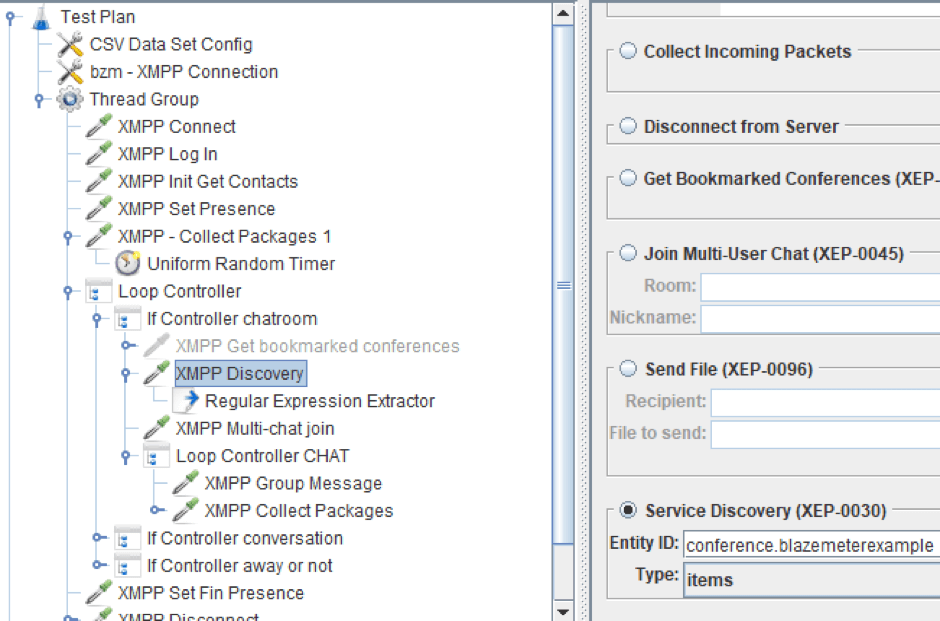
In the previous part of the article, this element was used simply to provide information about the entity by its address. Now we will extract all the items from the specified entity by using the Entity ID field, where there is a domain for hosting all the conferences on this server. As a result, we will get a list of all the conferences and will extract the address of one of them with the help of Regular Expression Extractor.
Conversations Communication
The next part is one to one conversations, which is in the If Controller Conversation. The structure of this part is shown below.
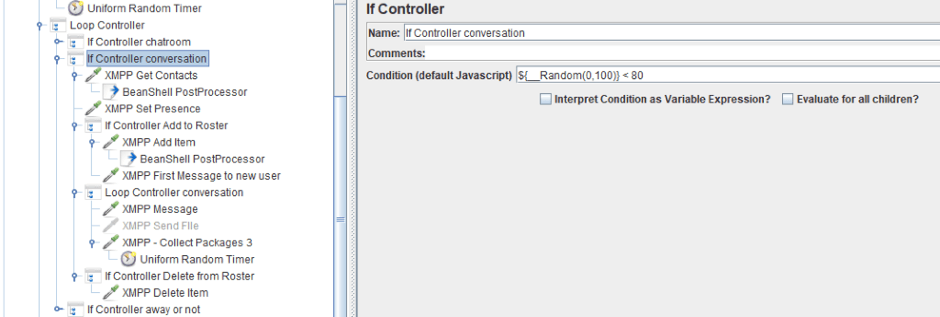
First of all, choose a random contact. If it is not in the roster, add it. This implementation was studied above. After that, the communication with the selected user occurs within the cycle as well, like in the previous part. At the end, the contact of the user is deleted from the roster if it was listed there.
Setting "Away or Not" Status
The last new part in the script is the If Controller "away or not," which has the following structure:

If the user satisfies the requirement, it will set the status "Away." Then, it will stay idle for a while and at the end will start receiving packages. The idle period is implemented by using the Test Action sampler.
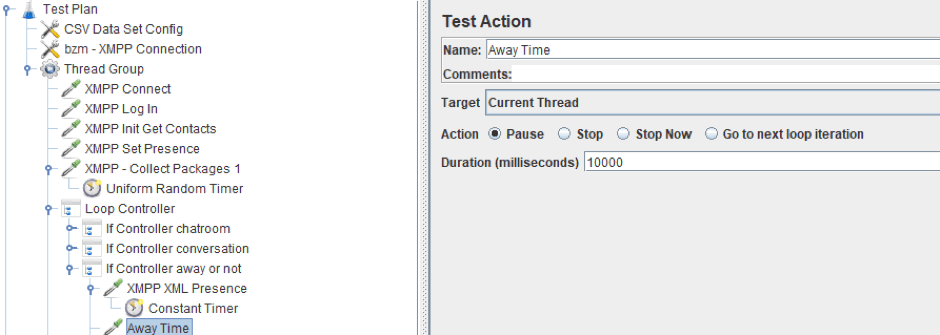
Click here for more information about the settings of this sampler.
With this, we have completed the creation of the Thread Group responsible for simulating the work of active users. Make sure to set the pending time values according to the user behavior. For example, the time from adding a contact to logging in cannot exceed 100 milliseconds, so the most probable value will be 7-13 seconds, etc.
Idle Users
Apart from active users, there is a majority who are just staying idle in the network. Therefore, you will surely need to check the behavior of the server with a large number of inactive users. Let's create a new Thread Group and make a script for these users. It goes as follows:
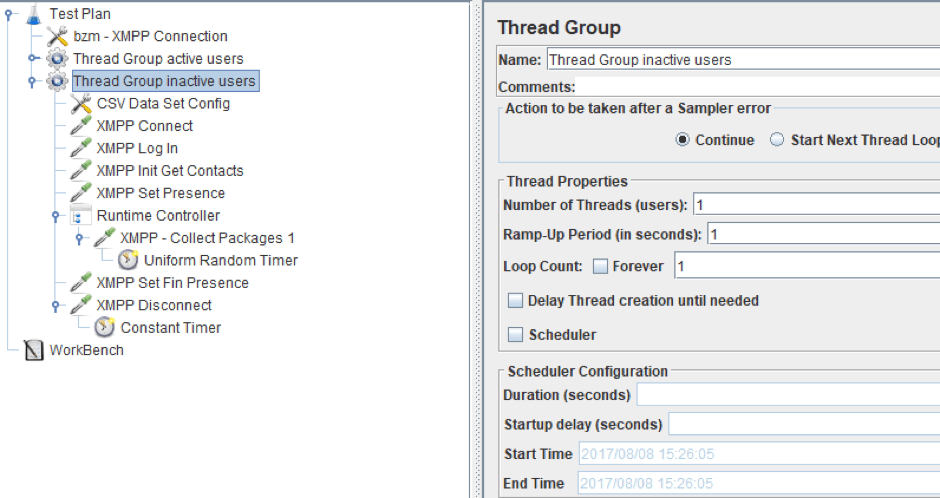
The user connects, gets a list of contacts and sets the initial status. Then, within the time specified in the Runtime Controller, it receives packets at different intervals. In the end, it sets the final status and turns off. It does not perform any other actions.
One of the most significant changes in the current script is that another CSV Data Set Config was added. This CSV file has different users than the first one, because the users here are idle.
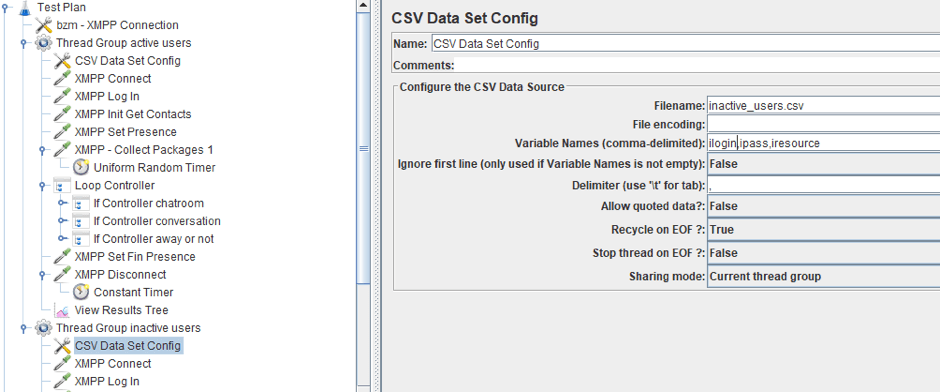
As can be seen in the screenshot above, we have created another Data Set and moved each of them to the corresponding thread group. Each of them now has Sharing Mode "Current thread group."
This has been done so that users from different Thread groups are stored in different files and not used by other groups. This Sharing Mode setting indicates that the connected file is visible only for the Thread group where the CSV Data Set Config is located.
Let's run the script.
Firstly, let's check how the inactive users in the thread group are working. Disable the group of active users and run the script.
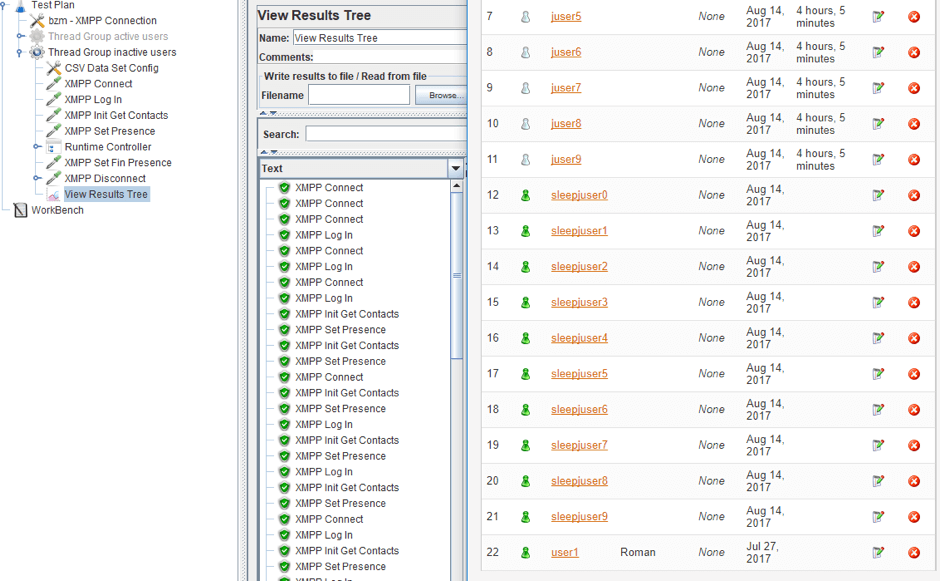
In the screenshot above, you can see that ten users are displayed on the admin panel as connected to the server (green users). The last user is the user who is connected through the Spark client.
Now let's run the full script with active users as well.
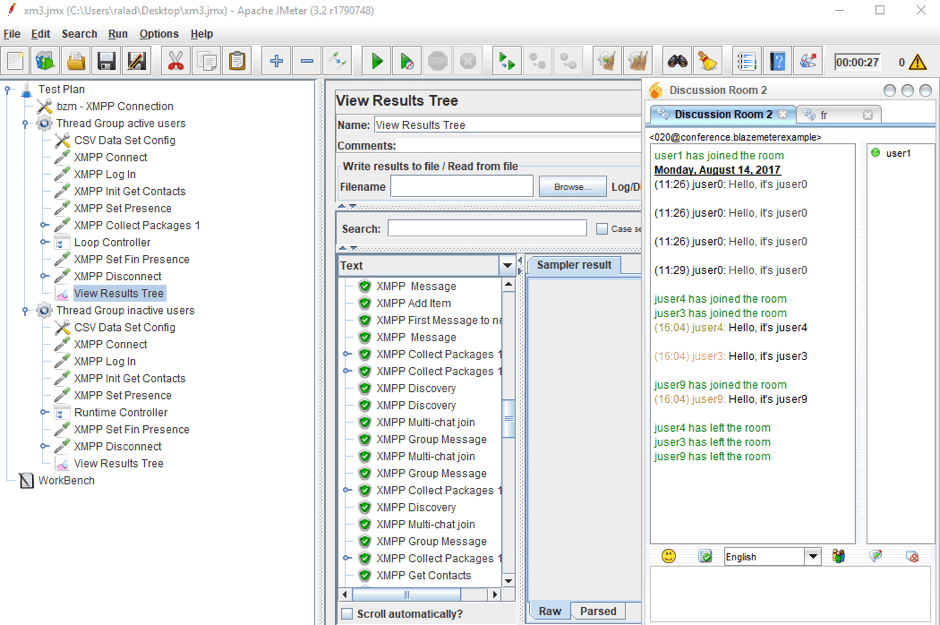
As you can see, the script was executed without errors. You can also observe some of the messages the users sent in the conference, which we connected to through the Spark client. So we can conclude that the script works correctly.
That's it! We've completed advanced XMPP scenarios - great job!
Here's a quick summary of what we did:
- Modified the script to make it more similar to the user's behavior.
- Expanded the part responsible for communication.
- Added additional elements.
- Added a new Thread group responsible for inactive users.
If you have any questions or comments, feel free to send them to us.
To learn more JMeter, check out our free JMeter academy.
Published at DZone with permission of , DZone MVB. See the original article here.
Opinions expressed by DZone contributors are their own.

Comments