Using SQS With Celery
Using SQS and Celery together, you can process a million requests automatically by scaling back-end processors and perform database maintenance with zero downtime.
Join the DZone community and get the full member experience.
Join For FreeTen months ago, when I joined PCH/Media, I was assigned an initiative to increase scalability and maintainability of the existing Python Django services, specifically using task queues. Task queues manage background work, which are long-running jobs that drastically reduce the performance of an HTTP request-response cycle.
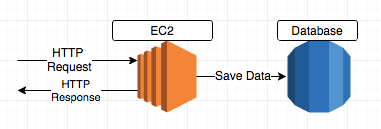
In the existing systems, we were saving data to the database as part of the HTTP request-response cycle, which can be time-consuming. Apart from reducing the performance of the HTTP response, if we wanted to schedule a database maintenance, it required us to shut down the service — potentially losing critical data, which, from a compliance standpoint, was unacceptable.
Existing system:

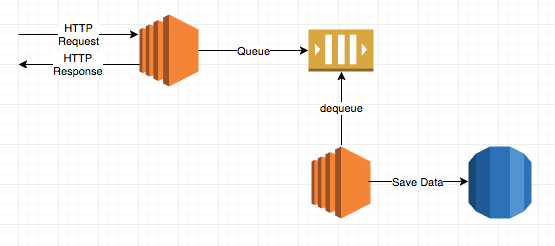
By implementing task queues, we would be able to decouple components, scale processing as needed and perform database maintenance with no service downtime.
Proposed system:

Celery and SQS
My first task was to decide on a task queue and a message transport system.
I reviewed several task queues including Celery, RQ, Huey, etc. Celery’s support for multiple message brokers, its extensive documentation, and an extremely active user community got me hooked on to it when compared to RQ and Huey.
Our infrastructure is entirely on Amazon Web Services, making the choice of message transport very straight-forward with SQS. Celery supports SQS as one of its message brokers, thus making Celery and SQS my obvious choice.
| Celery | RQ | Huey | |
| Lightweight | Depends on what functionality we need | Yes | Yes |
| Supports SQS as Message Broker | Yes | No | No |
| Documentation | Elaborate | Limited | Limited |
| UserCommunity | Very active | Moderately active | Inactive |
| Configurability | Extremely configuratble | Limited | Minimal |
I noted during implementation that although Celery has extensive documentation, it can be overwhelming for beginners. Despite the fact that they did an extraordinary job explaining how to set up Celery, I had to overcome multitudinous challenges using SQS as a message broker. It is one of their experimental transport implementations and I often ran into undocumented features and limitations. I could not find a lot of help using Google, either.
I pushed through many obstacles, which resulted in an implementation that works precisely as intended, and of which I am very proud. This article describes how to use Celery and SQS together, and I hope that my experience can be of assistance to other developers.
Configuration
Below are the full step-by-step instructions of how to get Celery up and running on Amazon Linux.
Installing Dependencies
Celery can be installed using pip. Celery needs the boto library to communicate with Amazon SQS (note: not boto3) which also can be installed using pip.
$pip install celery
$pip install boto
Configuring Celery in Linux
Create user and group celery” using the command below for celery workers to run:
adduser celeryInstall Celeryd init script from here. Copy the Celeryd init.d script to:
/etc/init.d/celeryModify permissions as shown below:
chmod 755 /etc/init.d/celeryCreate a celeryd config script like below:
# Name of nodes to start
CELERYD_NODES="name_of_node(s)"
# Absolute or relative path to the 'celery' command:
CELERY_BIN="/usr/local/bin/celery"
# Fully qualified app instance to use
CELERY_APP="name_of_your_service"
# Where to chdir at start (path to your service).
CELERYD_CHDIR="/var/webapps/name_of_your_service"
# Extra arguments to celeryd
CELERYD_OPTS="--time-limit=300 --concurrency=8"
# Name of the celery config module.
CELERY_CONFIG_MODULE="celeryconfig"
# %n will be replaced with the node name.
CELERYD_LOG_FILE="/var/log/celery/%n.log"
CELERYD_PID_FILE="/var/run/celery/%n.pid"
# Workers should run as an unprivileged user.
CELERYD_USER="celery"
CELERYD_GROUP="celery"
# Name of the projects settings module.
export DJANGO_SETTINGS_MODULE="name_of_your_service.settings"
Copy the config file that you created above to:
/etc/default/celeryModify permissions as shown below:
chmod 644 /etc/default/celerydCreate a directory celery at /var/run/ and /var/log/ and modify permissions as shown below:
mkdir /var/run/celery
mkdir /var/log/celery
chmod 755 /var/run/celery
chmod 755 /var/log/celery
chown celery:celery /var/run/celery
chown celery:celery /var/log/celery
After Celery has been successfully set up, navigate to the /etc/init.d directory and check the status of celery using the command below:
cd /etc/init.d
sudo service celeryd status
If it is not already running, start celery using the command below:
sudo celeryd startIf there are any issues starting Celery, verbose messages can be seen using the command below:
sudo celeryd dryrunCelery can be stopped using the command below:
sudo celeryd stopConfiguring Celery in Django
Add the below Celery settings to settings.py to configure SQS with Celery in Django:
# CELERY SETTINGS
BROKER_URL = “sqs://aws_access_key_id:aws_secret_access_key@”
# It is not a good practice to embed AWS credentials here.
# More information on this below.
BROKER_TRANSPORT_OPTIONS = {
    ‘region’: ‘us-east-1’,
    ‘polling_interval’: 60,
    # Number of seconds to sleep between unsuccessful polls,
    # default value is 30 seconds
}
CELERY_DEFAULT_QUEUE = ‘name_of_the_default_queue_that_you_created_in_AWS’
CELERY_ACCEPT_CONTENT = [‘application/json’]
CELERY_TASK_SERIALIZER = ‘json’
CELERY_RESULT_SERIALIZER = ‘json’
CELERY_CONTENT_ENCODING = ‘utf-8’
CELERY_ENABLE_REMOTE_CONTROL = False
CELERY_SEND_EVENTS = False
# Reason why we need the above is explained in Configuration Gotchas section.
SQS_QUEUE_NAME = ‘name_of_the_default_queue_that_you_created_in_AWS’
TASK_APPS = (
   'name_of_the_module_containing_the_celery_task_definition',
)
Using Celery to Create Tasks
Next, create an instance of celery which will be used as an entry point for creating tasks, managing workers, etc. and it must be possible for other modules to import it.
In your Django project, create a file called celery_tasks.py in the root directory containing the following:
from __future__ import absolute_import
from django.conf import settings
from celery import Celery
import os

# set the default Django settings module for the 'celery' program.
os.environ.setdefault('DJANGO_SETTINGS_MODULE', "name_of_your_service.settings")
# argument to Celery is name of the current module
app = Celery('name_of_your_service')
# Loads configuration from a configuration object
app.config_from_object('django.conf:settings')
app.autodiscover_tasks(lambda: settings.TASK_APPS)
Defining a Celery Task
Celery comes with decorators that make creating tasks painless.
Your first celery task might look like:
from name_of_your_service.celery_tasks import app

@app.task()
def my_task(fill_me_in):
    do_something_here
Writing to the Task Queue
Celery makes it easy to write to the task queue, thereby delaying the task until a worker can take it from the queue. There are a bunch of options for creating a new task, the example below uses delay, which is a great shortcut.
def some_block():
    my_task.delay()
Configuration Gotchas
These are a couple of the gotchas to look out for.
SQS Credentials
We can set the login credentials using the environment variables or within an IAM role, in case of which, the broker URL above can be set to just sqs://.
It is secure to create an IAM role for an EC2 instance to be able to access tasks from SQS instead of storing our AWS credentials on the box or passing them through an API call from our code which is usually checked into a code repository.
PID Boxes
In the configuration above, we specified two variables that are difficult to find in the documentation: CELERY_ENABLE_REMOTE_CONTROL and CELERY_SEND_EVENTS.
Celery uses a broadcast messaging system called pidbox to support fanout. Fanout is an exchange type that can be used to broadcast all messages to all queues. It creates one pidbox queue per node which can vary based on the scale of your application, which, in SQS, means that a new queue will be created for each node in AWS, something we do not want. We can safely disable this to reduce the clutter created by a number of pidboxes by adding the following two variables to our settings.py file:
CELERY_ENABLE_REMOTE_CONTROL = False
CELERY_SEND_EVENTS = False
CloudWatch Monitoring
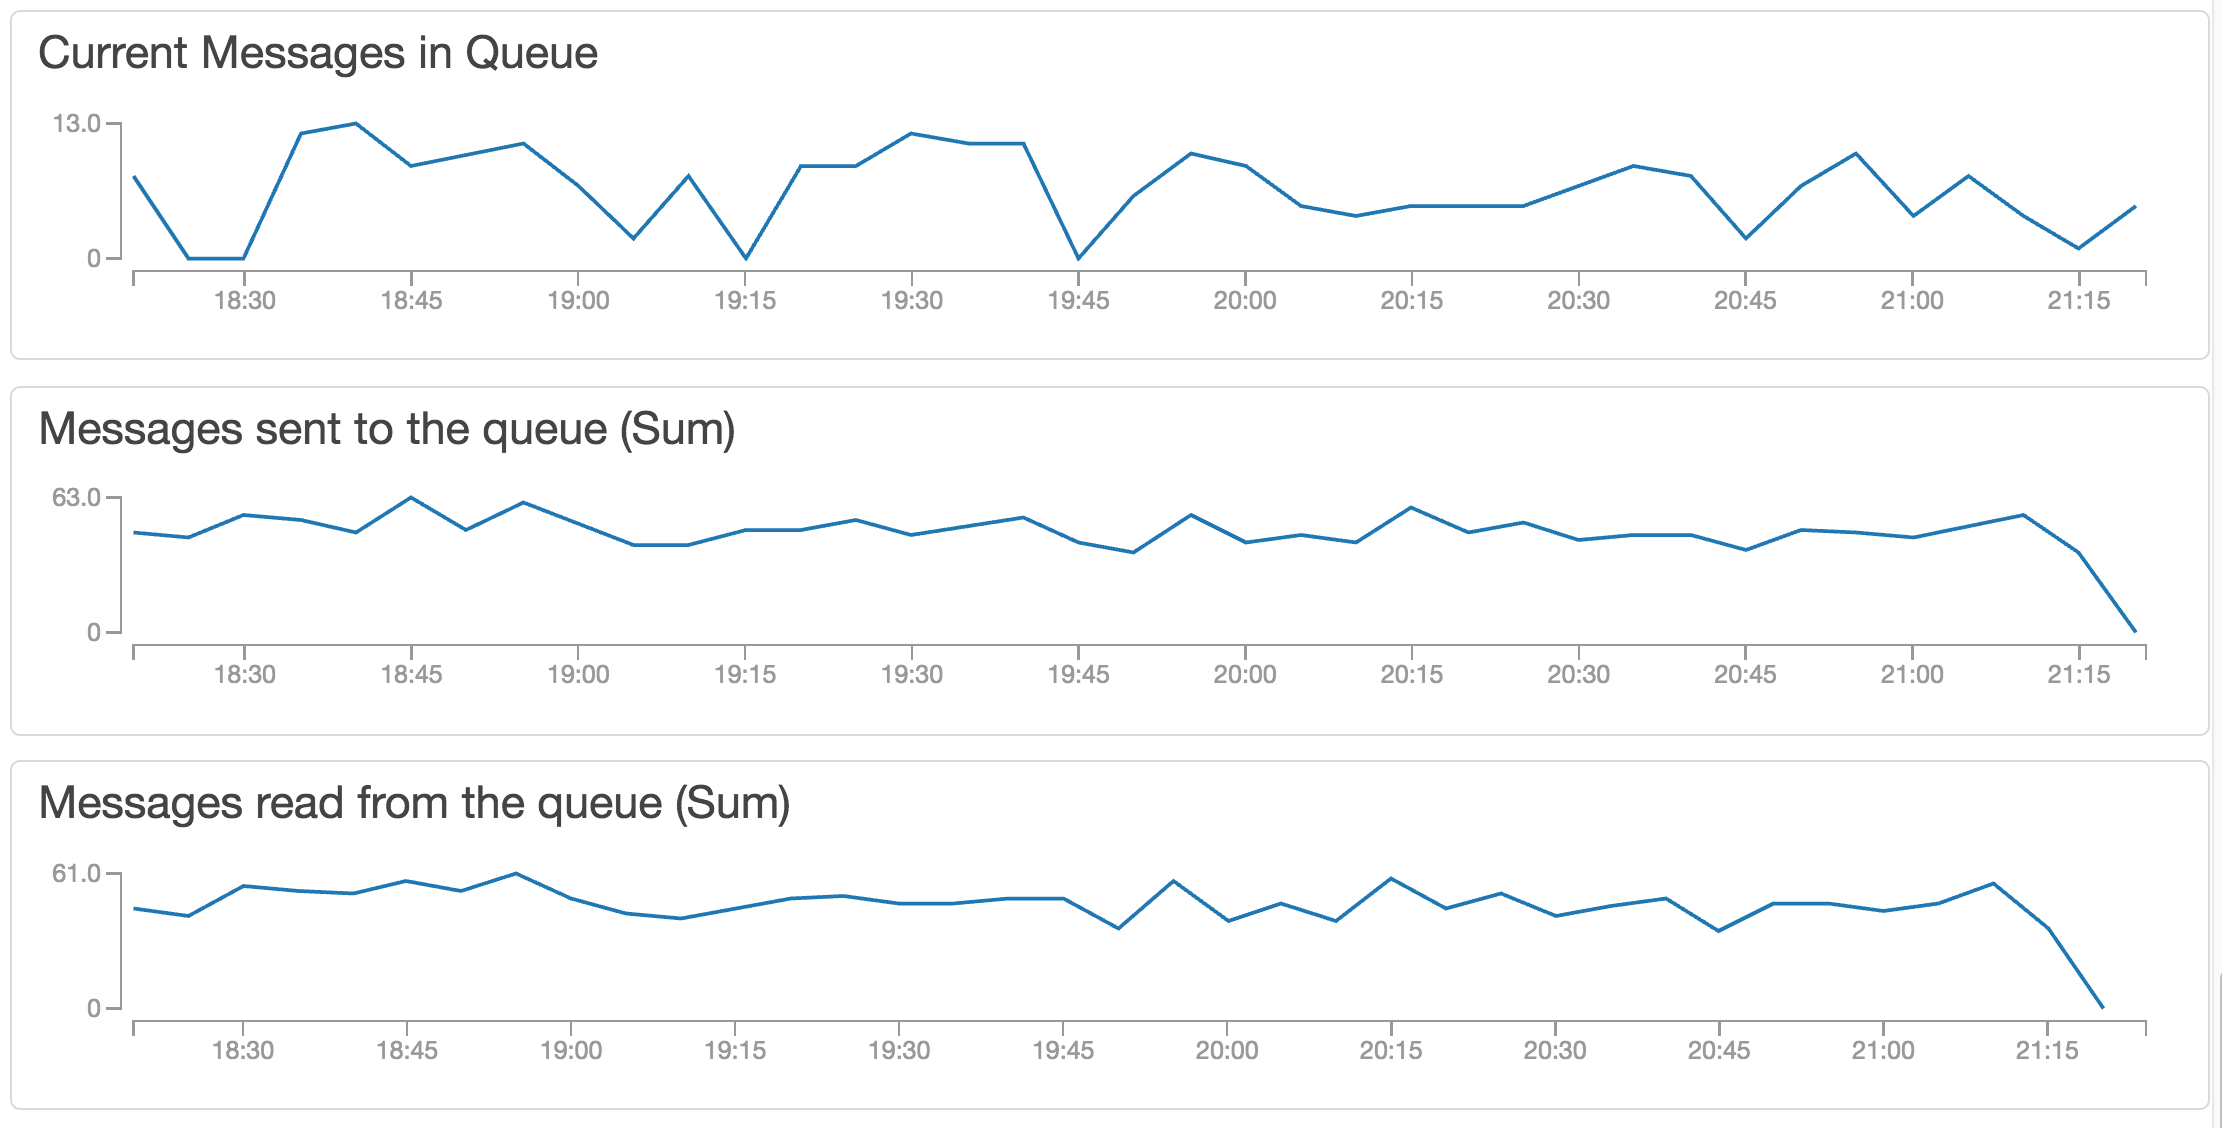
One of the advantages of using SQS is that we could monitor our queues using CloudWatch. CloudWatch has several metrics that we can track to ensure that messages are being written to and read from the queue in a timely manner. An elaborate list of CloudWatch metrics for SQS can be found here.
A few useful metrics that we can monitor using CloudWatch include:
Approximate number of messages visible: The number of messages that are available for retrieval from the queue.
Number of messages sent: The number of messages that have been added to the queue.
Number of messages received: The number of messages that have been returned from the queue.

The above-mentioned metrics allow us to monitor the performance of our queue and we can set up alarms in CloudWatch to alert us for any unusual behavior.
After overcoming these obstacles, including configuration kinks as the major challenge, our queuing paradigm has worked amazingly well. We’ve been able to use queues that hold more than a million requests to be processed by automatically scaling back-end processors, and have been able to perform database maintenance with zero downtime.
Opinions expressed by DZone contributors are their own.

Comments