Using Docker for Python Flask Development
In this tutorial, we learn how to set up a Docker container to act as the development environment for Python Flask-based web development.
Join the DZone community and get the full member experience.
Join For FreeDocker is a computer program that helps in performing OS-level virtualization. This process is known as “Containerization”. Containers are the software packages that are run by Docker. These containers are isolated from each other each container bundle its own applications, tools and libraries.
Flask is web framework that is written in Python. It is called micro-framework because it generally doesn’t require particular tools or libraries.
Creating a Basic Flask App
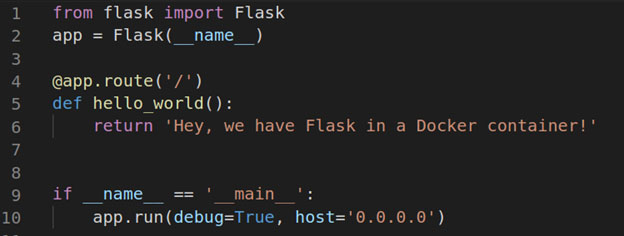
You can learn the basics of Flask here. This contains the complete documentation and the step-by-step guide to the development. Here I have created a basic app with Flask.

I have saved this file with the name app.py.
Now, I must include Flask in the requirements.txt file so that I can use it to install Flask anywhere I want with the same version on which I am creating my application. Our requirements.txt must look like this.

This shows that I have install the 1.0.2 version of Flask.
Creating a Docker File
Now, we need to create a file that will give commands to Docker when we want to deploy our application. We will use a Linux operating system for Python as it makes it clear which version of Python we are installing. Also, Python comes pre-installed on Linux.
So, we create a file named Dockerfile. This file doesn’t contain any extension and looks like this. Let’s understand the meaning of each command.
FROM - This command is used to specify the name and version of the operating system. Here we have asked Docker to install the latest version of Ubuntu. We can set the version of the operating system like this:
FROM ubuntu:16.04.RUN - This is used to give commands to our newly created operating system. Here, I am asking my operating system to update itself and then install the python-pip, python-dev, and build-essential packages
COPY - We copy all the files from the first parameter (
.) to the destination parameter (/app).WORKDIR - It is used to set the working directory for our app. All the instructions after this command will execute within this directory only.
ENTRYPOINT - This command is used to configure the container to run as an executable. Note: If you set multiple instructions here, only the last instruction will be executed.
Though not included in the code above, there is one more command we could use, called MAINTAINER. It is used to set the author for the image. It is generally helpful when are pushing our app to Docker Hub.
Here in the Docker file, we run the following command:pip install -r requirements.txt
This command is used to read the requirements.txt file and install all the packages one by one.
Building the Docker Image
Once we have created the Docker file, we need to verify if it builds correctly. But before that, we need to install Docker to our system.
Run the following command to install Docker onto your Linux system:
sudo apt install docker.io
Once Docker is installed, let’s verify that it builds correctly.
Run this command on your system:docker build -t flask-tutorial:latest
This command assigns a name flask-tutorial and a tag latest to your container.
After the build is complete, we can run the container by using the following command:docker run -d -p 5000:5000 flask-tutorial
This assigns port 5000 to our container and runs it.
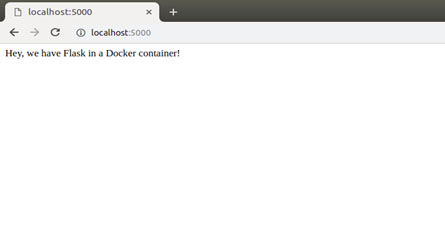
Now open the browser and check if your app worked.

And yes, it worked!
Opinions expressed by DZone contributors are their own.

Comments