How to Query Your AWS S3 Bucket With Presto SQL
In this tutorial, the reader will learn how to query an S3-based data lake with Presto, the open-source SQL query engine.
Join the DZone community and get the full member experience.
Join For FreeAs more structured, semi-structured, and unstructured data get stored in AWS S3, it gets harder to use that data to help with critical business needs.
The problem lies within the ability to run a successful, cost-efficient query. Running a query across different data types, as a combination of semi/un or structured on the cloud, becomes expensive. And the price jumps when you need to construct, manage and integrate various types of information to obtain results.
A solution to that is to use Presto, the open-source SQL query engine for the data lake. It enables ad hoc/interactive queries on your data through SQL.
In this tutorial, we’ll show you how to use query your AWS S3 bucket with Presto. We'll use Ahana Cloud Community Edition, a managed service for Presto that makes it easier to set up and deploy. That's a free-forever version of their paid offering.
Prerequisites
In order to do this lab, you'll need an AWS account and must have access to:
- Amazon CloudFormation
- Amazon EKS
- Amazon IAM
You'll also need to sign up for Ahana Cloud Community Edition (this is free).
Getting Started
There are two key components in Ahana Cloud:
- Ahana SaaS Console: allows users to create and manage multiple Presto clusters. It runs in Ahana's AWS account and enables users to create, deploy, resize, stop, restart, and terminate one or more Presto clusters.
- Ahana Compute Plane: allows users to provision an AWS Virtual Private Cloud (VPC) and AWS Elastic Kubernetes Service. It runs in users' AWS-provided accounts and is how you create your Presto cluster.
These resources are provisioned on the AWS EKS cluster in the user’s account. Ahana can also provision a Hive Metastore catalog on demand with every cluster that can be pre-attached to the cluster when it becomes active.
Ahana provides an instance of Apache Superset as a BI/dashboarding sandbox that you can use to query your Presto clusters. All of these resources (Presto, Ahana-managed Hive Metastores, Apache Superset) run in containers on the Amazon EKS cluster in the user’s AWS account.

Create an Ahana Account
To create an Ahana account:
- Register for an Ahana account (you can sign up for our free-forever Community Edition or a 2-week free trial of our Enterprise Edition. More details on the differences here).
- Verify your Ahana account
Set up the Ahana Compute Plane
The Ahana Compute Plane requires several AWS services: Amazon Elastic Kubernetes Service, AWS S3, and AWS IAM, Cloud Formation. To provision these resources, the AWS role that Ahana assumes must have policies that allow Ahana to orchestrate and deploy the needed resources in your AWS account.
Ahana AWS IAM Policies
The Ahana Provisioning Role uses these AWS IAM policies to define only the permissions required to allow Ahana to orchestrate and deploy the needed resources in your AWS account. More detailed information on Ahana IAM policy can be found in the Ahana docs.
Let’s look at how to provision your Ahana Compute Plane in your AWS account using CloudFormation templates to grant Ahana cross-account access by creating a new AWS IAM role using the Ahana account ID and custom external ID.
Create a New AWS IAM Role
- Log into the Ahana SaaS Console
![Ahana SaaS Console]()
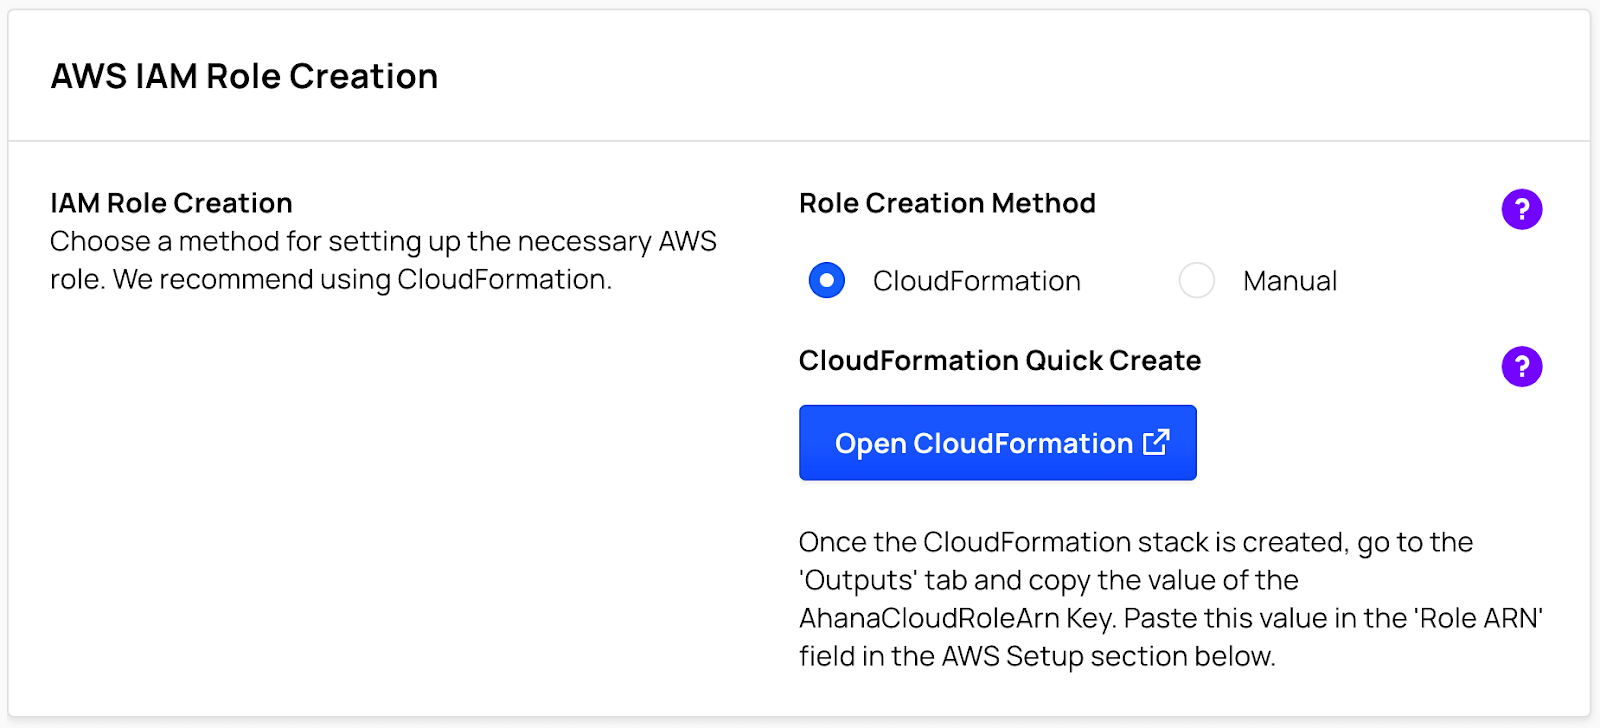
- Select CloudFormation.
- Select Open CloudFormation.
- Log in to the AWS console. The Quick create stack page displays.
![Quick Create Stack]() Select I acknowledge that AWS CloudFormation might create IAM resources with custom names.
Select I acknowledge that AWS CloudFormation might create IAM resources with custom names.Select Create stack.
Provide Ahana With the AWS IAM Role ARN
In AWS CloudFormation, select Stacks, then select the stack that you created.
Select Outputs
![Output]() Copy the complete Value. Your value will look something like this:
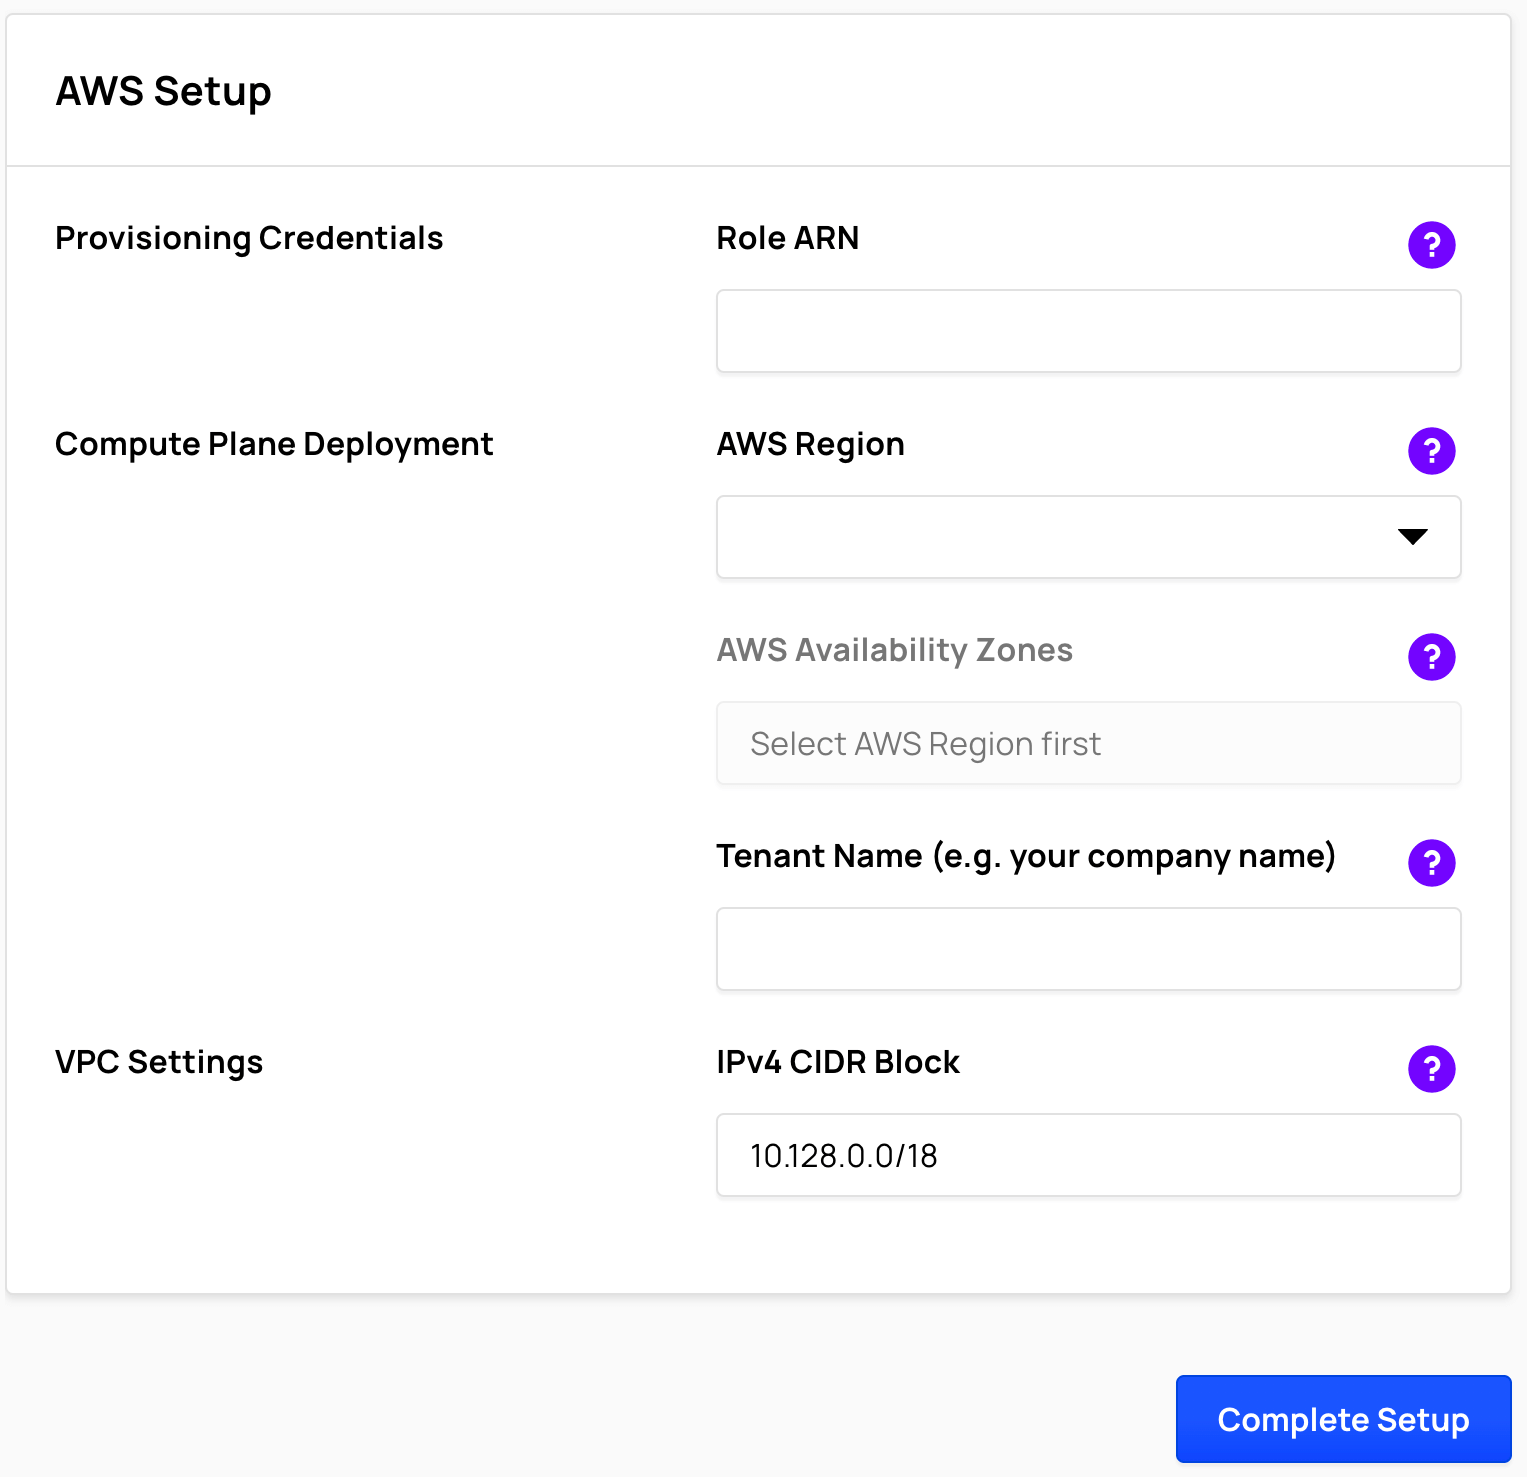
Copy the complete Value. Your value will look something like this: arn:aws:iam::123456789012:role/ahana-cloud-provisioning-role(note: don’t use this one, use your own).- In Ahana, enter the copied value in Role ARN.

Complete the Compute Plane Setup
- In Ahana, select the AWS Region where you want to provision the Compute Plane. Only one Compute Plane may be created in an AWS Region for each Ahana account.
![select the AWS Region where you want to provision the Compute Plane]()
- Choose 2 or 3 AWS Availability Zones in the selected AWS Region. The Compute Plane uses Amazon EKS (Kubernetes), which is created by default across availability zones for high availability.
- Enter a Tenant Name that will be used to provide access to resources created in your Compute Plane.
- To create the Ahana Compute Plane, select Complete Setup, then select Confirm.
![select Complete Setup, then select Confirm]()
It takes between 20 and 40 minutes to provision the Compute Plane, depending on the AWS region.
When complete, you'll receive an email, and the Ahana SaaS Console will update this:
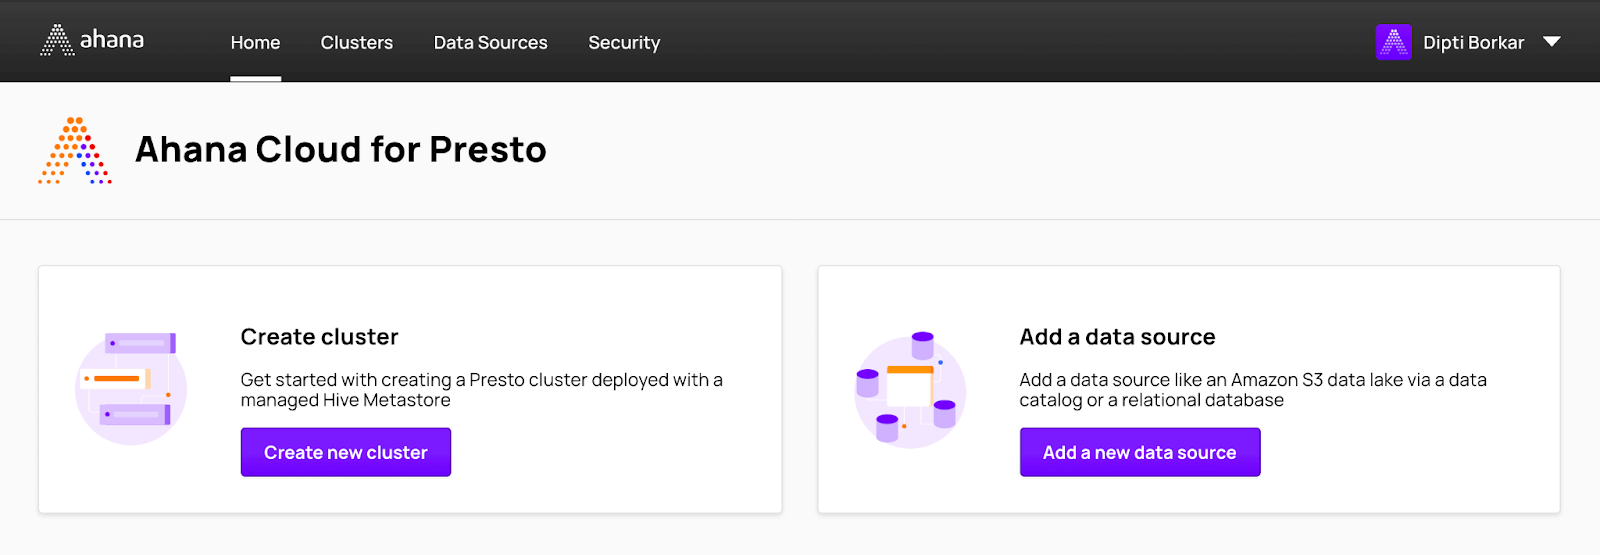
Now that you have created an Ahana account and set up an Ahana Compute Plane, the next step is to create a Presto cluster.
Create Presto Cluster
In the Ahana SaaS Console, select Clusters, then select Create Cluster.

The Create a Cluster page is displayed.
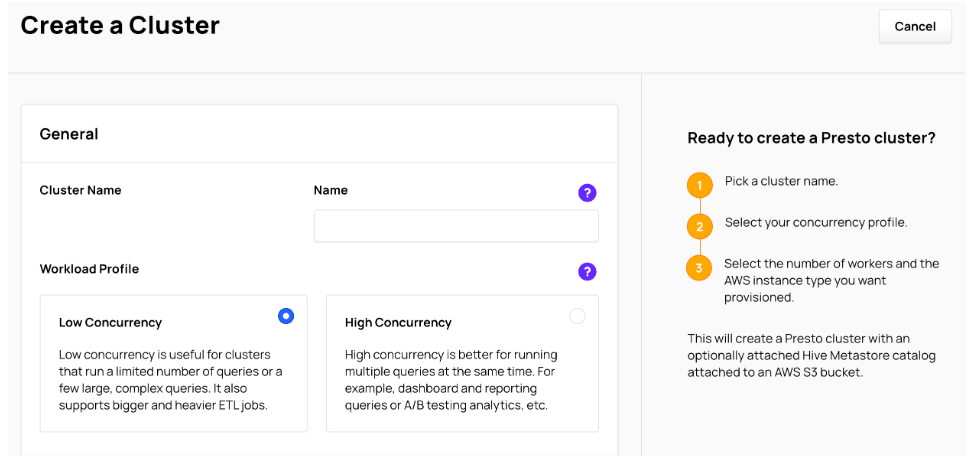
1. Enter a Cluster Name
The Cluster Name:
- Must be unique across your Ahana Compute Plane
- Must begin and end with a letter or number
- Must be a maximum length of 63 characters.
Ahana recommends entering a descriptive name to help identify the cluster.
The cluster name is used as part of the cluster endpoints. For example, a cluster name telemetry would be used to form the Presto endpoint https://telemetry.tenant.cp.ahana.cloud and the JDBC endpoint jdbc:presto://telemetry.tenant.cp.ahana.cloud:443.
2. Select the Workload Profile
Concurrent queries are the number of queries executing at the same time in a cluster. Ahana has identified workloads based on the number of concurrent queries and curated a set of tuned session properties for each workload profile.
Select the Workload Profile based on the number of concurrent queries expected to run on the cluster.
- Low Concurrency is useful for clusters that run a limited number of queries or a few large, complex queries. Low concurrency also supports bigger and heavier ETL jobs.
- High Concurrency is better for running multiple queries at the same time, such as dashboard and reporting queries or A/B testing analytics.
Cluster Settings
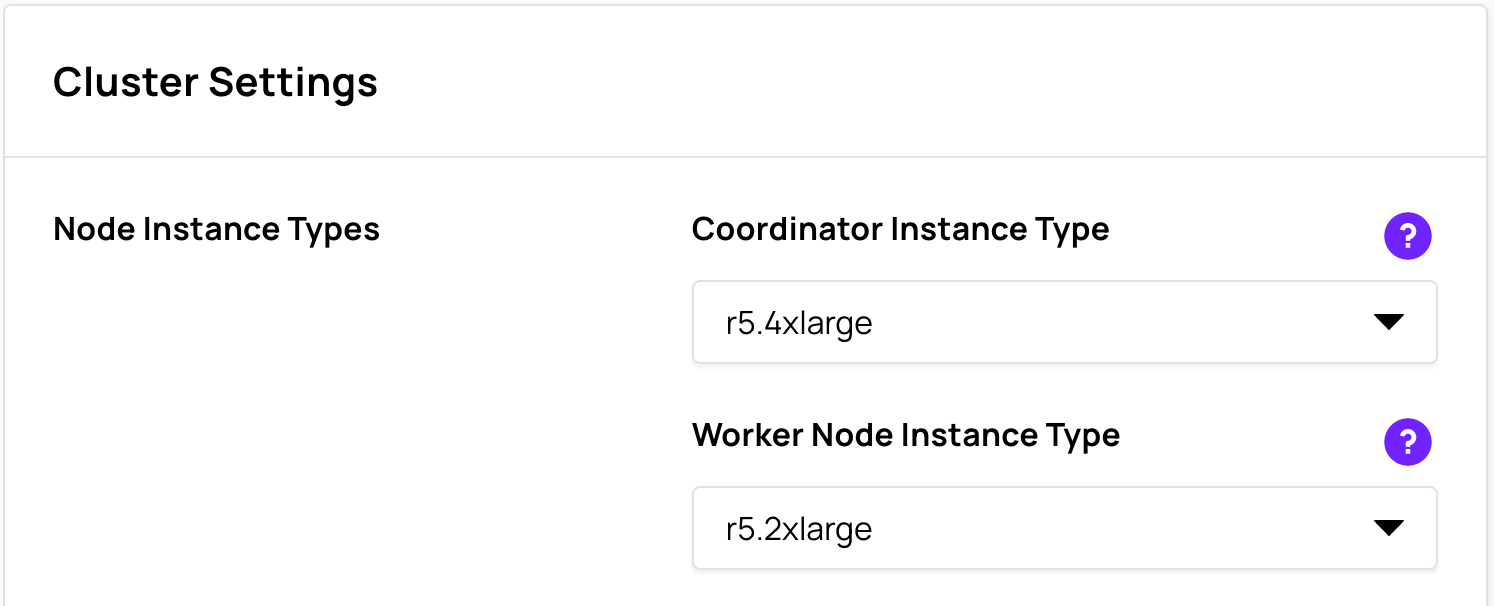
Select the Node Instance Types
Select the AWS EC2 instance type to be provisioned for the Coordinator Instance Type. Because Presto has only one coordinator node, it is important to have an instance that can support the workload. The recommended Coordinator Instance Type is r5.4xlarge.
Select the AWS EC2 instance type to be provisioned for the Worker Node Instance Type. The recommended Worker Node Instance Type is r5.2xlarge.
Configure Cluster Scaling
There are two types of scaling strategies available:
- Static: A Static scaling strategy means that the number of worker nodes is constant while the cluster is being used. See Configure Static Scaling.
- Scale-Out only (CPU): A Scale-Out only (CPU) scaling strategy means that the number of worker nodes begins at a minimum and increases to a maximum based on the worker nodes' average CPU utilization. See Configure Scale Out only (CPU) Scaling.
Configure Static Scaling
In Scaling Strategy, select Static.

Enter the Default Worker Node Count for the number of worker nodes in the Presto cluster. Choose a number between 1 and 100.
Optionally, select Scale to a single worker node when idle to scale the cluster to a single worker node when the cluster is idle for a user-specified amount of time.
If Scale to a single worker node when idle is enabled, the cluster idle time limit can be set in the Time window before scaling to a single worker node. The default value is 30 minutes.
Configure Scale Out only (CPU) Scaling
In Scaling Strategy, select Scale Out only (CPU).
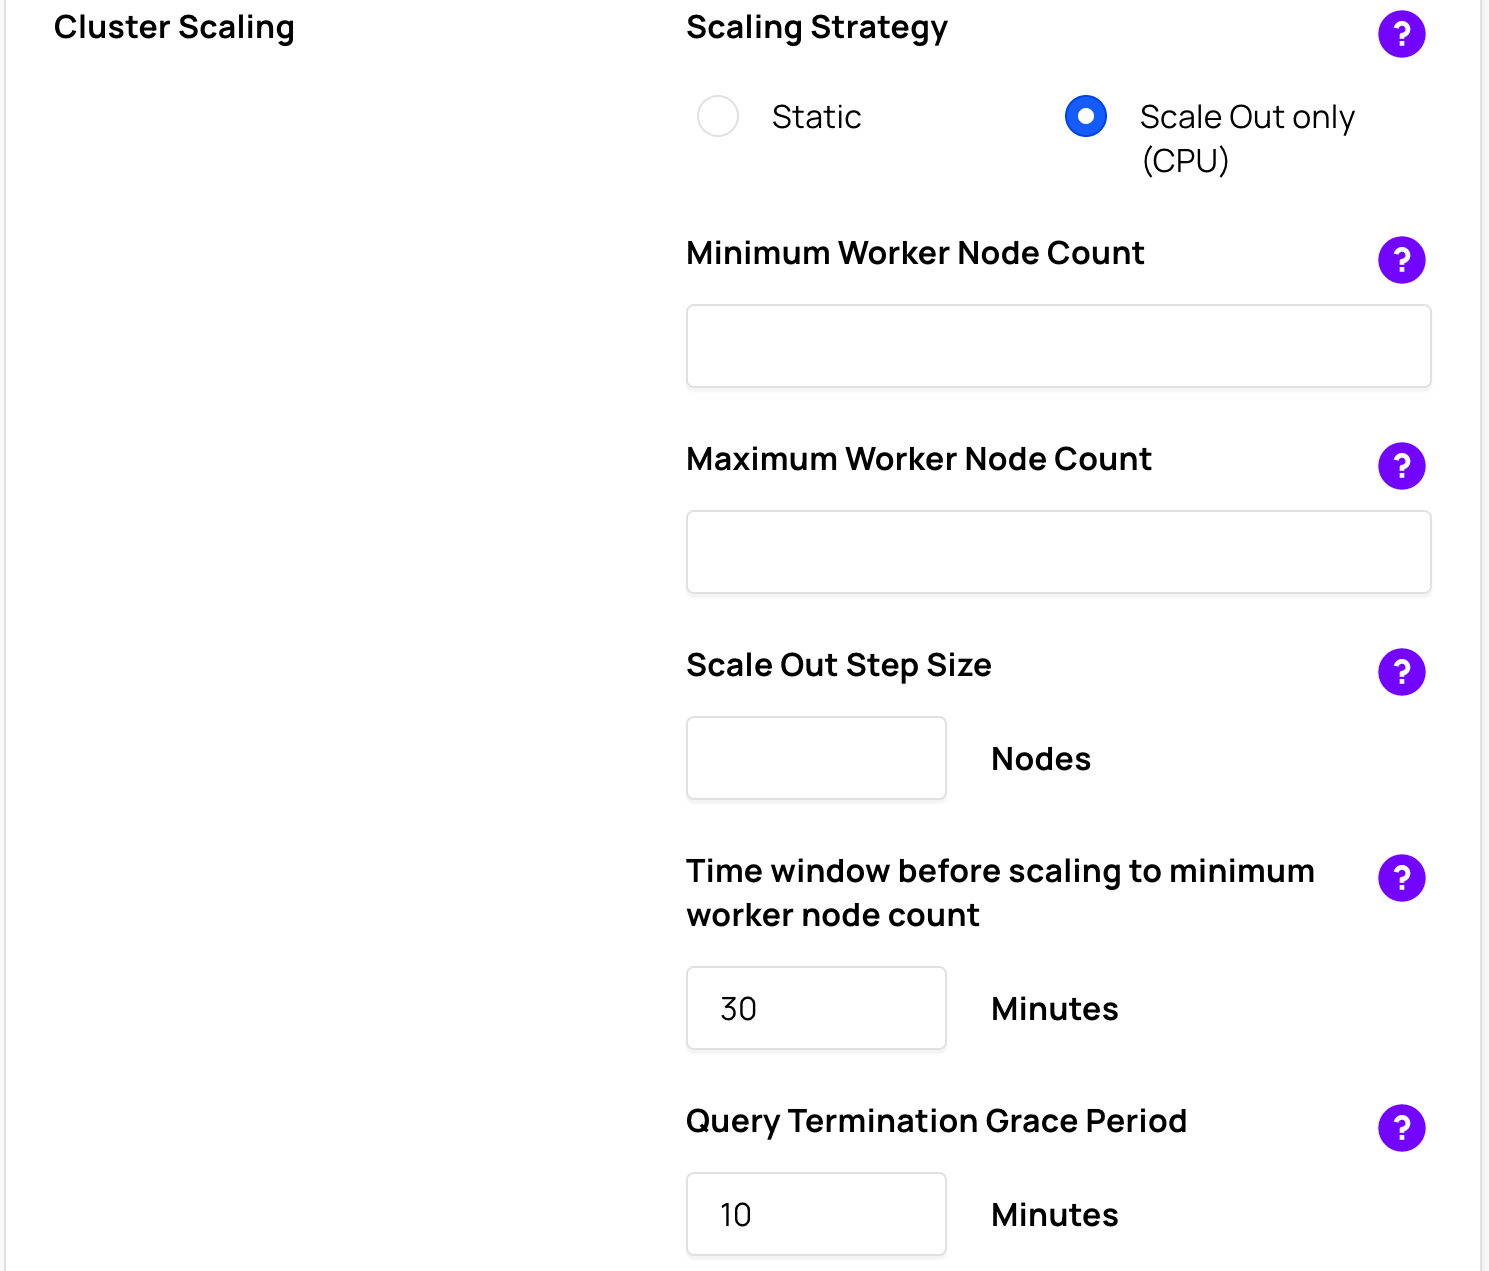
Enter the:
- Minimum Worker Node Count
- Maximum Worker Node Count
- Scale-Out Step Size
The Presto cluster starts with the number of worker nodes in Minimum Worker Node Count, and if the average CPU utilization of the worker nodes goes above 75% for a period of 15 minutes, new worker nodes are added to the Scale-Out Step Size amount up to the Maximum Worker Node Count. See: When does autoscaling occur?
Optionally, set the Time window before scaling to minimum worker node count. The default value is 30 minutes.
Enter the Query Termination Grace Period
Optionally, set the Query Termination Grace Period value.
Reducing Presto workers on a cluster gracefully shuts down worker nodes so that any running queries do not fail due to the scale in. The Query Termination Grace Period is the maximum time window that is allowed for existing query tasks to complete on Presto workers before forcefully terminating those workers. The default is 10 minutes. The range is between 1 minute and 120 minutes.
Caching

Configure Data Lake Caching
NOTE
If the selected Worker Node Instance Type is a type d instance — for example, c5d.xlarge — then both Enable Data IO Cache and Enable Intermediate Result Set Cache are automatically enabled and use the instance storage instead of AWS EBS SSD volumes.
Select Enable Data IO Cache to configure a local AWS EBS SSD drive for each worker node. The volume size of the configured AWS EBS SSD is three times the size of the memory of the selected Worker Node Instance Type for the Presto cluster.
Select Enable Intermediate Result Set Cache to cache partially computed results set on the worker node's local AWS EBS SSD. This prevents duplicated computation on multiple queries for improved query performance and decreased CPU usage. The volume size of the AWS EBS SSD for the intermediate result set cache is two times the size of the memory of the selected Worker Node Instance Type for the Presto cluster.
Presto Users
Each Presto cluster must have at least one Presto user. Select the Selected checkbox for a Presto user to add that user to the cluster.
Select Create Presto User to create a new Presto user. After you create a Presto user, you can add it to your cluster.
You can also add or remove Presto users after the cluster is created.
Create the Cluster
![]()
Once you click the create cluster, it could take about 10 to 20 minutes to create the cluster.
Once the cluster is created, you can view them on the Ahana SaaS console under Active Clusters.

Now the cluster has been created, go ahead and create an S3 bucket to store data.
Query Execution
Download the Presto CLI Executable JAR
- Navigate to the Presto CLI build artifact page for your Presto version (or higher). The Presto CLI build artifacts are hosted here with a distinct directory for each Presto version. For example, if you wanted the 0.274 Presto version, you would navigate here.
- Download the executable JAR. This file is called presto-cli-{version}-executable.jar.
Rename and Make Executable
The CLI is a self-executing JAR file.
- For convenience, rename your executable JAR to presto.
- Make the JAR executable with chmod +x presto.
You will need a Java Runtime Environment (JRE) on your local machine to run the CLI. Make sure you have at least Java 8 or higher installed on your local machine.
Connect to Your Presto Cluster
Using your Presto cluster endpoint and username, you can connect the Presto CLI to your cluster with the following command:
./presto --server https://reportingcluster.my-domain.cp.ahana.cloud --user Admin --password- You will be prompted for your password.
- A successful connection with show you a Presto command line prompt:
presto>
Creating an S3 Bucket
- Log in to your AWS account and select the S3 service in the Amazon Console.
- Click on Create Bucket
- Choose a name that is unique. S3 is a global service, so try to include a unique identifier so that you don’t choose a bucket that has already been created.
- Scroll to the bottom and click Create Bucket
- Click on your newly created bucket.
Setting up Query Locations
Run the presto-cli and use glue as catalog:
|
Create a schema using S3 location.
|
Database and Table Creation
Create a table named part in the glue.demo schema
presto:demo> select * from glue.demo.part limit 10;
partkey |                   name                   |      mfgr      |  brand
---------+------------------------------------------+----------------+---------
       1 | goldenrod lavender spring chocolate lace | Manufacturer#1 | Brand#13
       2 | blush thistle blue yellow saddle         | Manufacturer#1 | Brand#13
       3 | spring green yellow purple cornsilk      | Manufacturer#4 | Brand#42
       4 | cornflower chocolate smoke green pink    | Manufacturer#3 | Brand#34
       5 | forest brown coral puff cream            | Manufacturer#3 | Brand#32
       6 | bisque cornflower lawn forest magenta    | Manufacturer#2 | Brand#24
       7 | moccasin green thistle khaki floral      | Manufacturer#1 | Brand#11
       8 | misty lace thistle snow royal            | Manufacturer#4 | Brand#44
       9 | thistle dim navajo dark gainsboro        | Manufacturer#4 | Brand#43
      10 | linen pink saddle puff powder            | Manufacturer#5 | Brand#54
Summary
In this tutorial, you have learned how to query AWS S3 buckets with SQL. We started with creating Presto Cluster with Ahana Cloud, configuring Presto CLI with the cluster endpoint, and then creating an S3 bucket, databases, and tables and running SQL query to access AWS S3 data.
Opinions expressed by DZone contributors are their own.

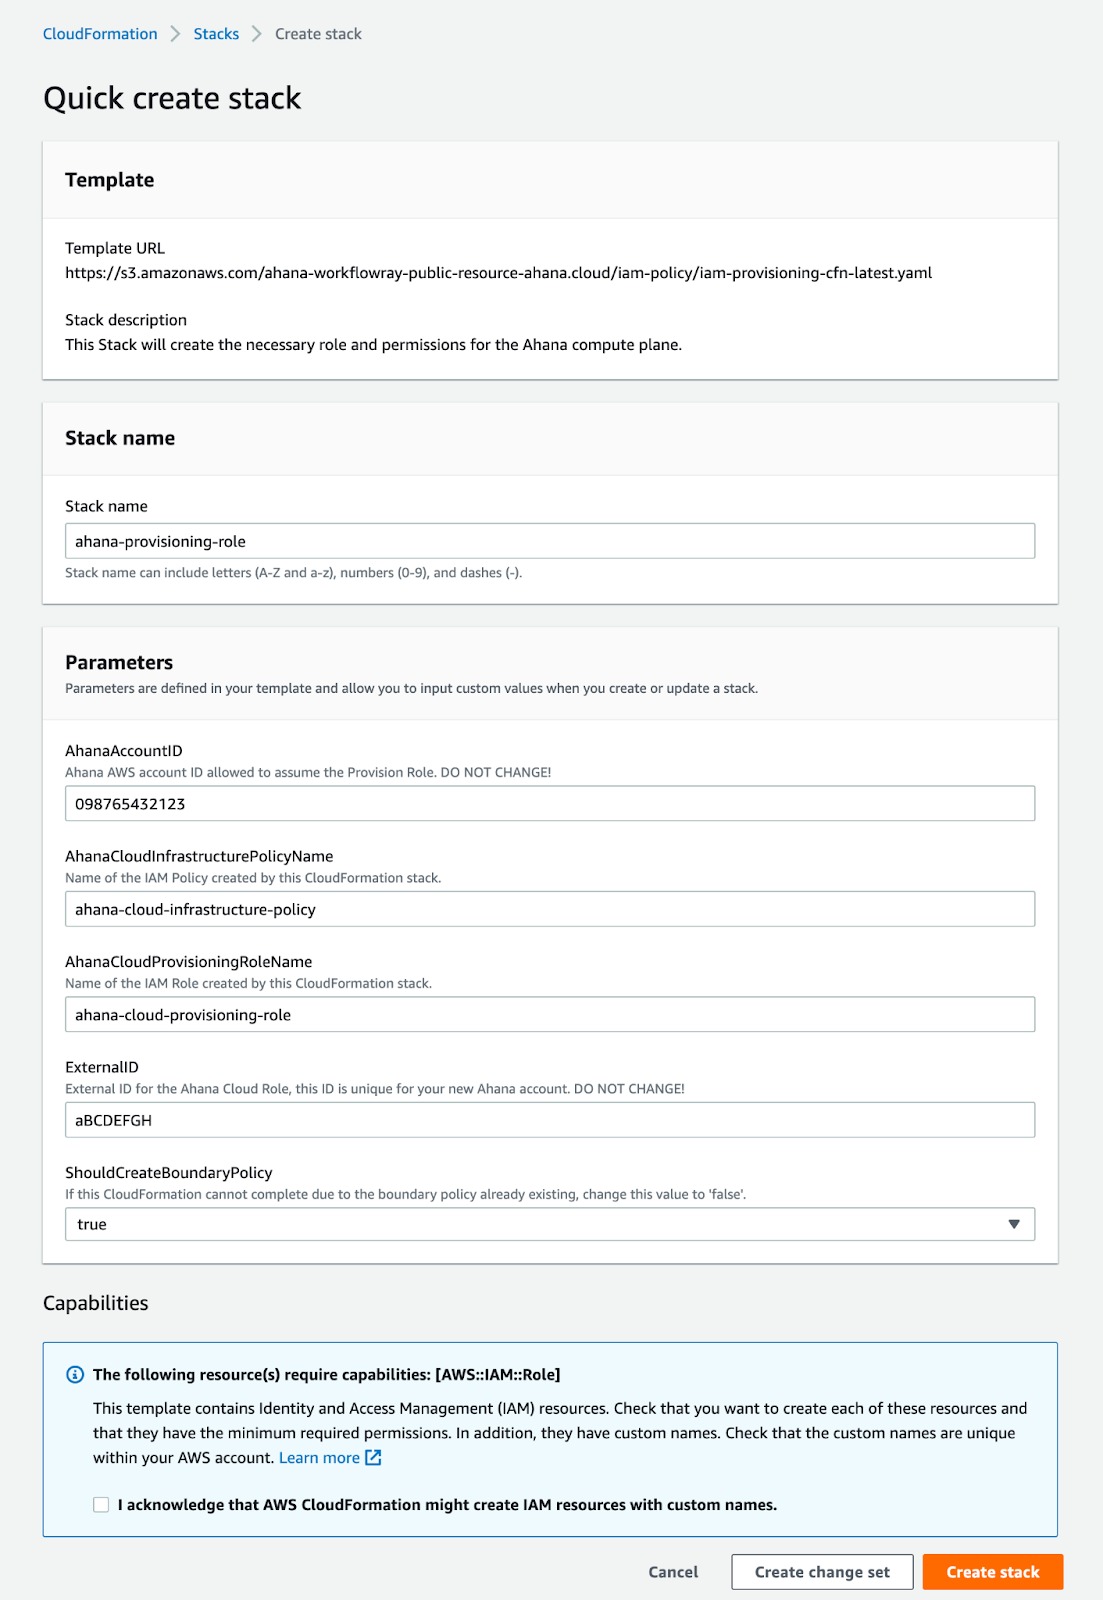 Select I acknowledge that AWS CloudFormation might create IAM resources with custom names.
 Copy the complete Value. Your value will look something like this:

Comments