The Power of @ngrx/signalstore: A Deep Dive Into Task Management
In this tutorial, dive into the dynamic world of Angular state management, supercharged by Signal Store, introduced in NgRx 17.
Join the DZone community and get the full member experience.
Join For FreeThe domain of Angular state management has received a huge boost with the introduction of Signal Store, a lightweight and versatile solution introduced in NgRx 17. Signal Store stands out for its simplicity, performance optimization, and extensibility, making it a compelling choice for modern Angular applications.
In the next steps, we'll harness the power of Signal Store to build a sleek Task Manager app. Let's embark on this journey to elevate your Angular application development. Ready to start building? Let's go!
A Glimpse Into Signal Store’s Core Structure
Signal Store revolves around four fundamental components that form the backbone of its state management capabilities:
1. State
At the heart of Signal Store lies the concept of signals, which represent the application's state in real-time. Signals are observable values that automatically update whenever the underlying state changes.
2. Methods
Signal Store provides methods that act upon the state, enabling you to manipulate and update it directly. These methods offer a convenient way to interact with the state and perform actions without relying on observable streams or external state managers.
3. Selectors
Selectors are functions that derive calculated values from the state. They provide a concise and maintainable approach to accessing specific parts of the state without directly exposing it to components. Selectors help encapsulate complex state logic and improve the maintainability of applications.
4. Hooks
Hooks are functions that are triggered at critical lifecycle events, such as component initialization and destruction. They allow you to perform actions based on these events, enabling data loading, state updates, and other relevant tasks during component transitions.
Creating a Signal Store and Defining Its State
To embark on your Signal Store journey, you'll need to install the @ngrx/signals package using npm:
But first, you have to install the Angular CLI and create an Angular base app with:
npm install -g @angular/cli@latestng new <name of your project>npm install @ngrx/signalsCreating a state (distinct from a store) is the subsequent step:
import { signalState } from '@ngrx/signals';

 const state = signalState({ /* State goes here */ });
Manipulating the state becomes an elegant affair using the patchState method:
updateStateMethod() {

   patchState(this.state, (state) => ({ someProp: state.someProp + 1 }));

}
The patchState method is a fundamental tool for updating the state. It allows you to modify the state in a shallow manner, ensuring that only the specified properties are updated. This approach enhances performance by minimizing the number of state changes.
First Steps for the Task Manager App
First, create your interface for a Task and place it in a task.ts file:
export interface Task {

   id: string;

   value: string;

   completed: boolean;

}
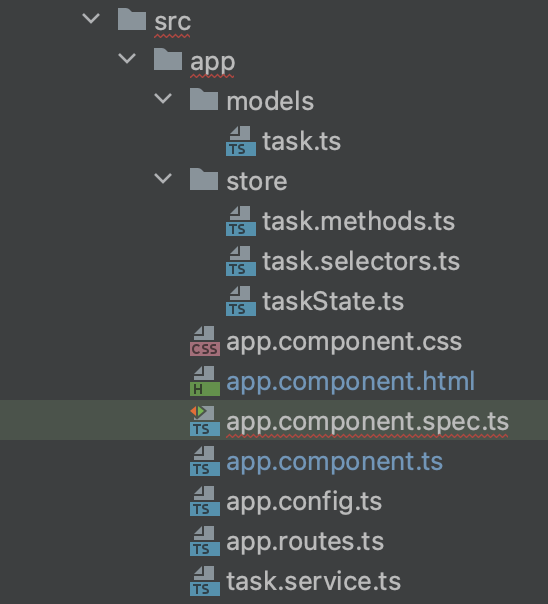
The final structure of the app is:

And our TaskService in taskService.ts looks like this:
@Injectable({

 providedIn: 'root'

})

export class TaskService {


 private taskList: Task[] = [

   { id: '1', value: 'Complete task A', completed: false },

   { id: '2', value: 'Read a book', completed: true },

   { id: '3', value: 'Learn Angular', completed: false },

 ];


 constructor() { }


 getTasks() : Observable<Task[]> {

   return of(this.taskList);

 }


   getTasksAsPromise() {

   return lastValueFrom(this.getTasks());

 }


 getTask(id: string): Observable<Task | undefined> {

   const task = this.taskList.find(t => t.id === id);

   return of(task);

 }


 addTask(value: string): Observable<Task> {

   const newTask: Task = {

     id: (this.taskList.length + 1).toString(), // Generating a simple incremental ID

     value,

     completed: false

   };


   this.taskList = [...this.taskList, newTask];


   return of(newTask);

 }


 updateTask(updatedTask: Task): Observable<Task> {

   const index = this.taskList.findIndex(task => task.id === updatedTask.id);

   if (index !== -1) {

     this.taskList[index] = updatedTask;

   }


   return of(updatedTask);

 }


 deleteTask(task: Task): Observable<Task> {

   this.taskList = this.taskList.filter(t => t.id !== task.id);

   return of(task);

 }

}
Crafting a Signal Store for the Task Manager App
The creation of a store is a breeze with the signalStore method:
Create the signalStore and place it in the taskstate.ts file:
import { signalStore, withHooks, withState } from '@ngrx/signals';


export const TaskStore = signalStore(

  { providedIn: 'root' },

  withState({ /* state goes here */ }),

);
Taking store extensibility to new heights, developers can add methods directly to the store. Methods act upon the state, enabling you to manipulate and update it directly.
export interface TaskState {

   tasks: Task[];

   loading: boolean;

}


export const initialState: TaskState = {

   tasks: [];

   loading: false;

}


export const TaskStore = signalStore(

  { providedIn: 'root' },

  withState(initialState),

  withMethods((store, taskService = inject(TaskService)) => ({

    loadAllTasks() {

      // Use TaskService and then

      patchState(store, { tasks });

    },

  }))

);
This method loadAllTasks is now available directly through the store itself. So in the component, we could do it in ngOnInit():
@Component({

  // ...

  providers: [TaskStore],

})

export class AppComponent implements OnInit {

  readonly store = inject(TaskStore);


  ngOnInit() {

     this.store.loadAllTasks();

  }

}
Harmony With Hooks
The Signal Store introduces its own hooks, simplifying component code. By passing implemented methods into the hooks, developers can call them effortlessly:
export const TaskStore = signalStore(

  { providedIn: 'root' },

  withState(initialState),

  withMethods(/* ... */),

  withHooks({

    onInit({ loadAllTasks }) {

      loadAllTasks();

    },

    onDestroy() {

      console.log('on destroy');

    },

  })

);
This results in cleaner components, exemplified in the following snippet:
@Component({

  providers: [TaskStore],

})

export class AppComponent implements OnInit {

  readonly store = inject(TaskStore);


   // ngOnInit is NOT needed to load the Tasks !!!!

}
RxJS and Promises in Methods
Flexibility takes center stage as @ngrx/signals seamlessly accommodates both RxJS and Promises:
import { rxMethod } from '@ngrx/signals/rxjs-interop';

export const TaskStore = signalStore(

  { providedIn: 'root' },

  withState({ /* state goes here */ }),

  withMethods((store, taskService = inject(TaskService)) => ({

    loadAllTasks: rxMethod<void>(

      pipe(

        switchMap(() => {

          patchState(store, { loading: true });


          return taskService.getTasks().pipe(

            tapResponse({

              next: (tasks) => patchState(store, { tasks }),

              error: console.error,

              finalize: () => patchState(store, { loading: false }),

            })

          );

        })

      )

    ),

  }))

);
This snippet showcases the library's flexibility in handling asynchronous operations with RxJS.
What I find incredibly flexible is that you can use RxJS or Promises to call your data. In the above example, you can see that we are using an RxJS in our methods. The tapResponse method helps us to use the response and manipulate the state with patchState again.
But you can also use promises. The caller of the method (the hooks in this case) do not care.
async loadAllTasksByPromise() {

   patchState(store, { loading: true });


   const tasks = await taskService.getTasksAsPromise();


   patchState(store, { tasks, loading: false });

},
Reading the Data With Finesse
Experience, the Signal Store introduces the withComputed() method. Similar to selectors, this method allows developers to compose and calculate values based on state properties:
export const TaskStore = signalStore(

  { providedIn: 'root' },

  withState(initialState),

  withComputed(({ tasks }) => ({

        completedCount: computed(() => tasks().filter((x) => x.completed).length),

        pendingCount: computed(() => tasks().filter((x) => !x.completed).length),

        percentageCompleted: computed(() => {

        const completed = tasks().filter((x) => x.completed).length;

        const total = tasks().length;


        if (total === 0) {

            return 0;

        }


        return (completed / total) * 100;

    }),

  })),

  withMethods(/* ... */),

  withHooks(/* ... */)

);
In the component, these selectors can be effortlessly used:
@Component({

  providers: [TaskStore],

  templates: `

    <div>

      {{ store.completedCount() }} / {{ store.pendingCount() }}

      {{ store.percentageCompleted() }}

    </div> `

})

export class AppComponent implements OnInit {

  readonly store = inject(TaskStore);

}
Modularizing for Elegance
To elevate the elegance, selectors, and methods can be neatly tucked into separate files. We use in these files the signalStoreFeature method. With this, we can extract the methods and selectors to make the store even more beautiful. This method again has withComputed, withHooks, and withMethods for itself, so you can build your own features and hang them into the store.
// task.selectors.ts:
export function withTasksSelectors() {

   return signalStoreFeature(

       {state: type<TaskState>()},

       withComputed(({tasks}) => ({

           completedCount: computed(() => tasks().filter((x) => x.completed).length),

           pendingCount: computed(() => tasks().filter((x) => !x.completed).length),

           percentageCompleted: computed(() => {

               const completed = tasks().filter((x) => x.completed).length;

               const total = tasks().length;


               if (total === 0) {

                   return 0;

               }

               return (completed / total) * 100;

           }),

       })),

   );

}
// task.methods.ts:
export function withTasksMethods() {

 return signalStoreFeature(

   { state: type<TaskState>() },

   withMethods((store, taskService = inject(TaskService)) => ({

     loadAllTasks: rxMethod<void>(

       pipe(

         switchMap(() => {

           patchState(store, { loading: true });


           return taskService.getTasks().pipe(

             tapResponse({

               next: (tasks) => patchState(store, { tasks }),

               error: console.error,

               finalize: () => patchState(store, { loading: false }),

             })

           );

         })

       )

     ),

     async loadAllTasksByPromise() {

       patchState(store, { loading: true });


       const tasks = await taskService.getTasksAsPromise();


       patchState(store, { tasks, loading: false });

     },

     addTask: rxMethod<string>(

       pipe(

         switchMap((value) => {

           patchState(store, { loading: true });


           return taskService.addTask(value).pipe(

             tapResponse({

               next: (task) =>

                 patchState(store, { tasks: [...store.tasks(), task] }),

               error: console.error,

               finalize: () => patchState(store, { loading: false }),

             })

           );

         })

       )

     ),

     moveToCompleted: rxMethod<Task>(

       pipe(

         switchMap((task) => {

           patchState(store, { loading: true });


           const toSend = { ...task, completed: !task.completed };


           return taskService.updateTask(toSend).pipe(

             tapResponse({

               next: (updatedTask) => {

                 const allTasks = [...store.tasks()];

                 const index = allTasks.findIndex((x) => x.id === task.id);


                 allTasks[index] = updatedTask;


                 patchState(store, {

                     tasks: allTasks,

                 });

               },

               error: console.error,

               finalize: () => patchState(store, { loading: false }),

             })

           );

         })

       )

     ),


     deleteTask: rxMethod<Task>(

       pipe(

         switchMap((task) => {

           patchState(store, { loading: true });


           return taskService.deleteTask(task).pipe(

             tapResponse({

               next: () => {

                 patchState(store, {

                   tasks: [...store.tasks().filter((x) => x.id !== task.id)],

                 });

               },

               error: console.error,

               finalize: () => patchState(store, { loading: false }),

             })

           );

         })

       )

     ),

   }))

 );

}
This modular organization allows for a clean separation of concerns, making the store definition concise and easy to maintain.
Streamlining the Store Definition
With selectors and methods elegantly tucked away in their dedicated files, the store definition now takes on a streamlined form:
// task.store.ts:
export const TaskStore = signalStore(

 { providedIn: 'root' },

 withState(initialState),

 withTasksSelectors(),

 withTasksMethods(),

 withHooks({

   onInit({ loadAllTasksByPromise: loadAllTasksByPromise }) {

     console.log('on init');

     loadAllTasksByPromise();

   },

   onDestroy() {

     console.log('on destroy');

   },

 })

);
This modular approach not only enhances the readability of the store definition but also facilitates easy maintenance and future extensions.
Our AppComponent then can get the Store injected and use the methods from the store, the selectors, and using the hooks indirectly.
@Component({
  selector: 'app-root',
  standalone: true,
  imports: [CommonModule, RouterOutlet, ReactiveFormsModule],
  templateUrl: './app.component.html',
  styleUrl: './app.component.css',
  providers: [TaskStore],
  changeDetection: ChangeDetectionStrategy.OnPush,
})
export class AppComponent {
  readonly store = inject(TaskStore);

  private readonly formbuilder = inject(FormBuilder);

  form = this.formbuilder.group({
    taskValue: ['', Validators.required],
    completed: [false],
  });

  addTask() {
    this.store.addTask(this.form.value.taskValue);
    this.form.reset();
  }

}
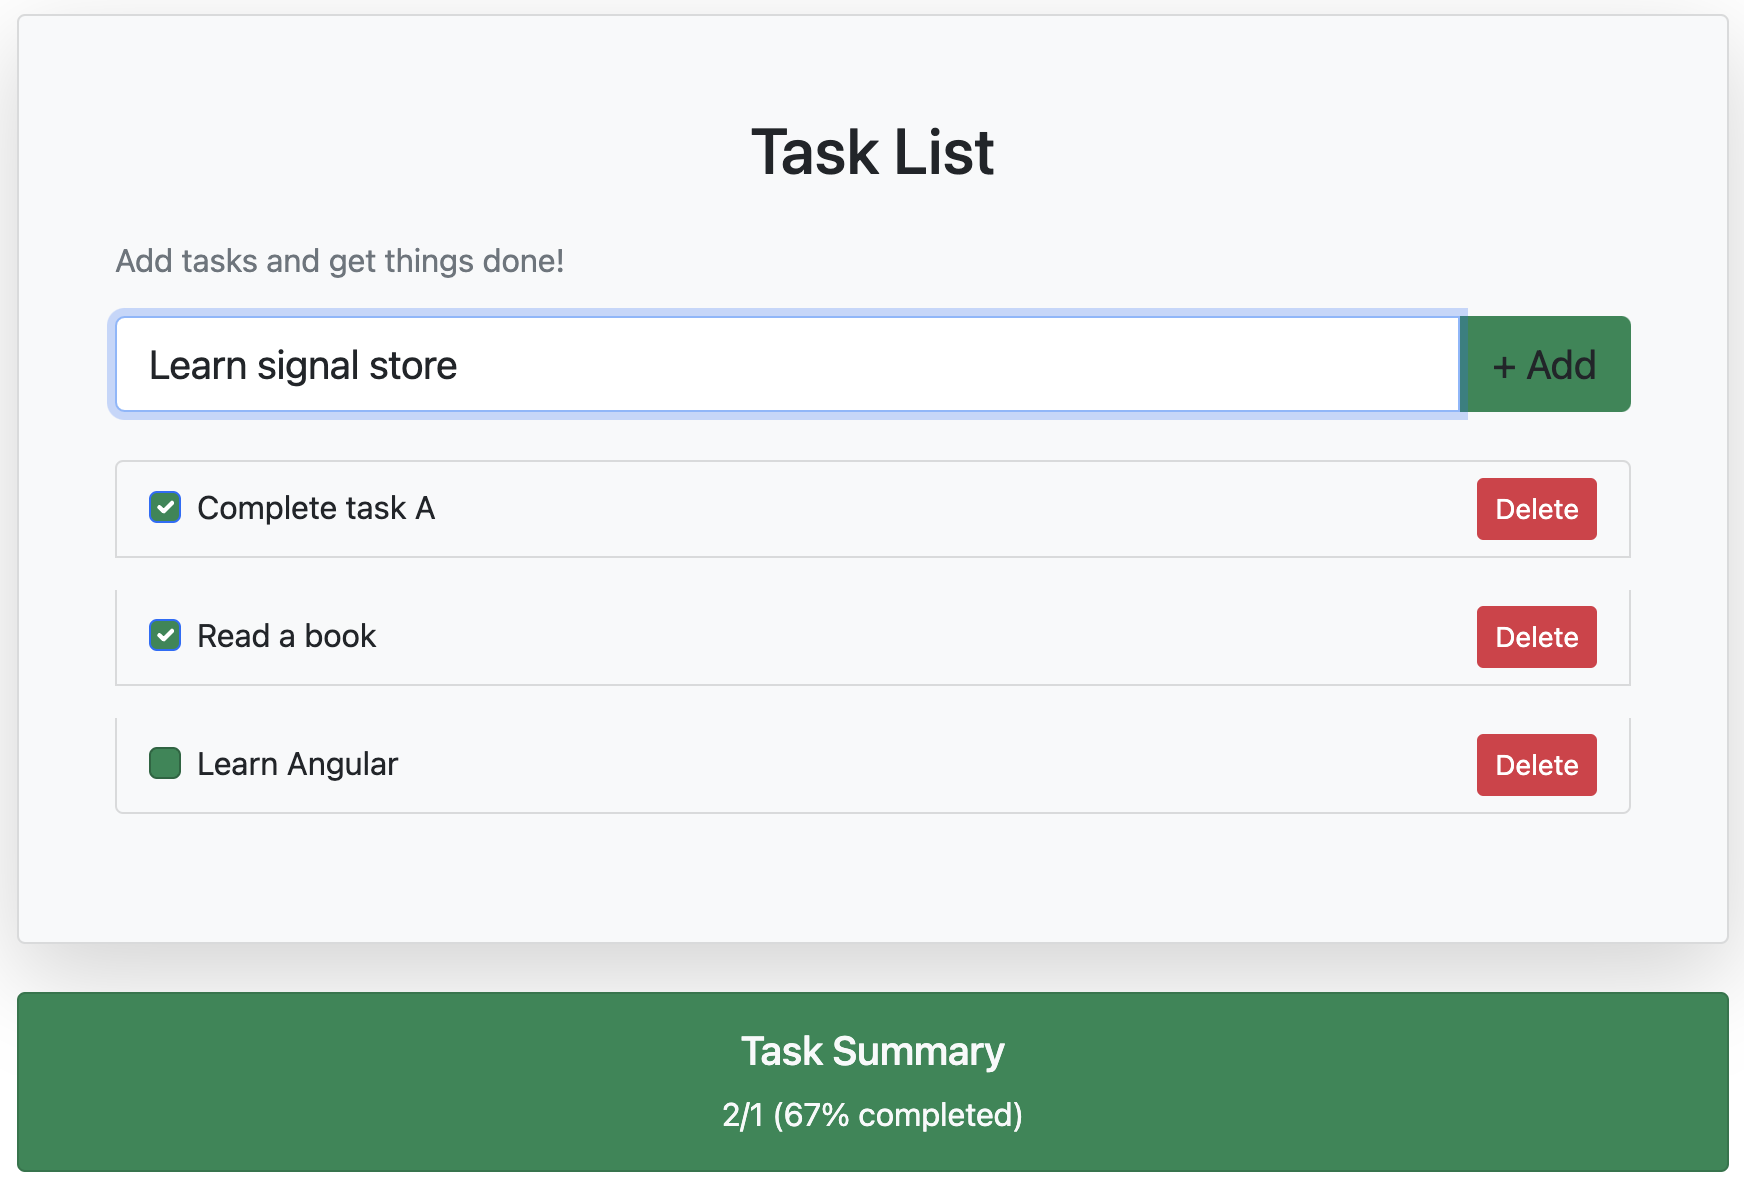
The final app:

In Closing
In this deep dive into the @ngrx/signals library, we've unveiled a powerful tool for Angular state management. From its lightweight architecture to its seamless integration of RxJS and Promises, the library offers a delightful development experience.
As you embark on your Angular projects, consider the elegance and simplicity that @ngrx/signals brings to the table. Whether you're starting a new endeavor or contemplating an upgrade, this library promises to be a valuable companion, offering a blend of simplicity, flexibility, and power in the dynamic world of Angular development.
You can find the final code here.
Happy coding!
Opinions expressed by DZone contributors are their own.

Comments