The Definitive Guide to TDD in React: Writing Tests That Guarantee Success
Learn how to build robust React components using Test-Driven Development (TDD). This step-by-step guide ensures your code is reliable and maintainable.
Join the DZone community and get the full member experience.
Join For FreeImagine coding with a safety net that catches errors before they happen. That's the power of TDD. In this article, we'll dive into how it can revolutionize your development workflow. In Test Driven Development (TDD), a developer writes test cases first before actually writing code to implement the functionality. There are several practical benefits to developing code with the TDD approach such as:
- Higher quality code: Thinking about tests upfront forces you to consider requirements and design more carefully.
- Rapid feedback: You get instant validation, reducing the time spent debugging.
- Comprehensive test coverage: TDD ensures that your entire codebase is thoroughly tested.
- Refactoring confidence: With a strong test suite, you can confidently improve your code without fear of breaking things.
- Living documentation: Your tests serve as examples of how the code is meant to be used.
TDD has three main phases: Red, Green, and Refactor. The red phase means writing a test case and watching it fail. The green phase means writing minimum code to pass the test case. The refactor phase means improving the code with refactoring for better structure, readability, and maintainability without changing the functionality while ensuring test cases still pass. We will build a Login Page in React, and cover all these phases in detail. The full code for the project is available here, but I highly encourage you to follow along as TDD is as much about the process as it's about the end product.
Prerequisites
Here are some prerequisites to follow along in this article.
- Understanding of JavaScript and React
- NodeJS and NPM installed
- Code Editor of your choice
Initiate a New React App
- Ensure NodeJS and npm are installed with
node -vandnpm -v

- Create a new react app with
npx create-react-app tddreact - Go to the app folder and start the app with
cd tddreactand thennpm start - Once the app compiles fully, navigate to the localhost. You should see the app loaded.
Adding Test Cases
As mentioned earlier, in Test-Driven Development (TDD) you start by writing your initial test cases first.
- Create
__tests__folder undersrcfolder and a filenameLogin.test.js - Time to add your first test case, it is basic in nature ensuring the Login component is present.
// src/__tests__/Login.test.js
import React from 'react';
import { render, fireEvent } from '@testing-library/react';
import '@testing-library/jest-dom/extend-expect';
import Login from '../components/Login';


test('renders Login component', () => {
  render(<Login />);
});- Running the test case with
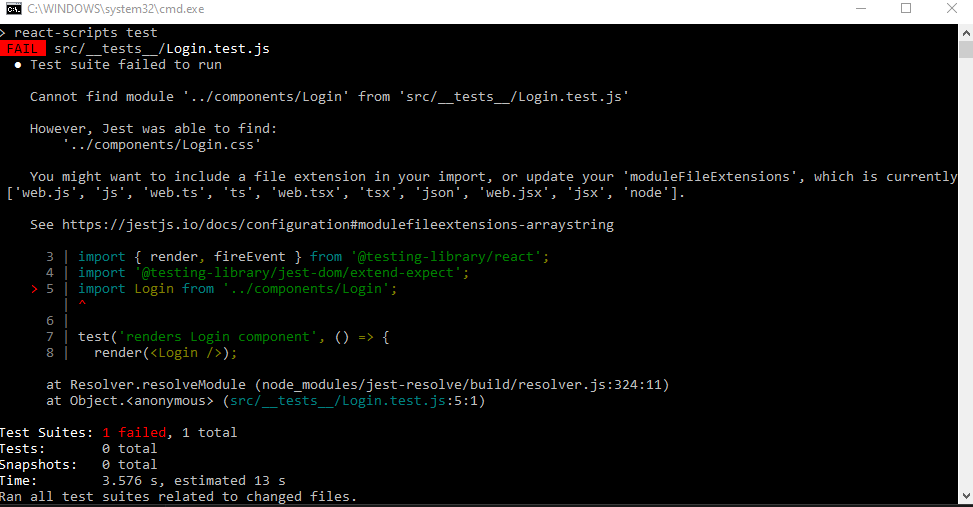
npm test, you should encounter failure like the one below. This is the Red Phase we talked about earlier.

- Now it's time to add the Login component and initiate the Green Phase.
- Create a new file under
src/componentsdirectory and name itLogin.js, and add the below code to it.
// src/components/Login.js
import React from 'react';

const Login = () => {
    return (
        <>
            <p>Hello World!</p>
        </>
    )
}

export default Login;
- The test case should pass now, and you have successfully implemented one cycle of the Red to Green phase.

Adding Our Inputs
On our login page, users should have the ability to enter a username and password and hit a button to log in.
- Add test cases in which username and password fields should be present on our page.
test('renders username input field', () => {
  const { getByLabelText } = render(<Login />);
  expect(getByLabelText(/username/i)).toBeInTheDocument();
});


test('renders password input field', () => {
  const { getByLabelText } = render(<Login />);
  expect(getByLabelText(/password/i)).toBeInTheDocument();
});

test('renders login button', () => {
  const { getByRole } = render(<Login />);
  expect(getByRole('button', { name: /login/i })).toBeInTheDocument();
});
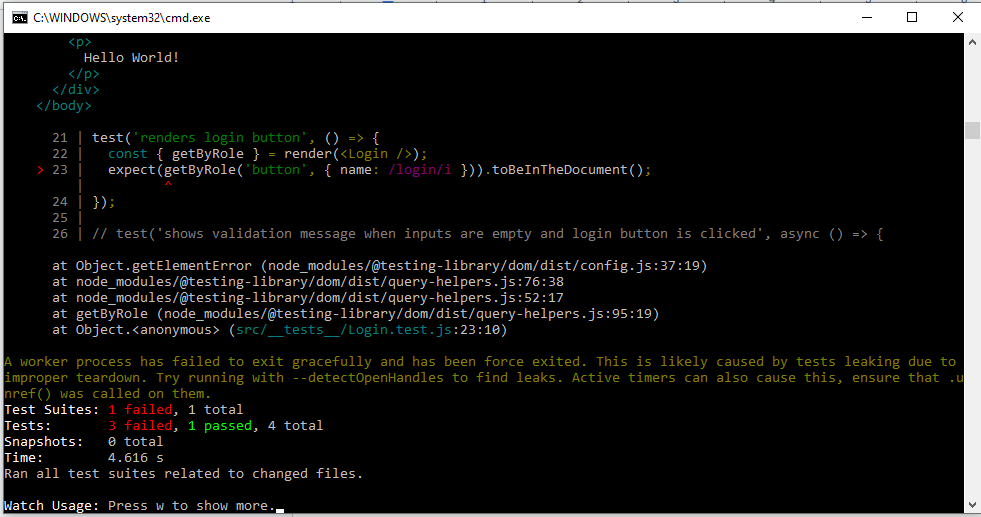
- You should start to see some test cases failing again.

- Update the return method of the Login component code as per below, which should make the failing test cases pass.
// src/components/Login.js
	return (
        <>
            <div>
                <form>
                    <div>
                        <label htmlFor="username">Username</label>
                        <input
                            type="text"
                            id="username"
                        />
                    </div>
                    <div>
                        <label htmlFor="password">Password</label>
                        <input
                            type="password"
                            id="password"
                        />
                    </div>
                    <button type="submit">Login</button>
                </form>
            </div>
        </>
    )
Adding Login Logic
Now you can add actual login logic.
- For simplicity, when the user has not entered the username and password fields and hits the login button, an error message should be displayed. When the user has entered both the username and password fields and hits the login button, no error message should be displayed; instead, a welcome message, such as "Welcome John Doe." should appear. These requirements can be captured by adding the following tests to the test file:
test('shows validation message when inputs are empty and login button is clicked', async () => {
  const { getByRole, getByText } = render(<Login />)

  fireEvent.click(getByRole('button', { name: /login/i }));

  expect(getByText(/please fill in all fields/i)).toBeInTheDocument();
});


test('does not show validation message when inputs are filled and login button is clicked', () => {
  const handleLogin = jest.fn();
  const { getByLabelText, getByRole, queryByText }  = render(<Login onLogin={handleLogin} />);

  fireEvent.change(getByLabelText(/username/i), { target: { value: 'user' } });
  fireEvent.change(getByLabelText(/password/i), { target: { value: 'password' } });
  fireEvent.click(getByRole('button', { name: /login/i }));

  expect(queryByText(/welcome john doe/i)).toBeInTheDocument();
})
- This should have caused test case failures, verify them using
npm testif tests are not running already. Let's implement this feature in the component and pass the test case. Update the Login component code to add missing features as shown below.
// src/components/Login.js
import React, { useState } from 'react';

const Login = () => {
    const [username, setUsername] = useState('');
    const [password, setPassword] = useState('');
    const [error, setError] = useState('');
    const [isLoggedIn, setIsLoggedIn] = useState(false);

    const handleSubmit = (e) => {
        e.preventDefault();
        if (!username || !password) {
            setError('Please fill in all fields');
            setIsLoggedIn(false);
        } else {
            setError('');
            setIsLoggedIn(true);
        }
    };


    return (
        <div>
            {!isLoggedIn && (
                <div>
                    <h1>Login</h1>
                    <form onSubmit={handleSubmit}>
                        <div>
                            <label htmlFor="username">Username</label>
                            <input
                                type="text"
                                id="username"
                                value={username}
                                onChange={(e) => setUsername(e.target.value)}
                            />
                        </div>
                        <div>
                            <label htmlFor="password">Password</label>
                            <input
                                type="password"
                                id="password"
                                value={password}
                                onChange={(e) => setPassword(e.target.value)}
                            />
                        </div>
                        <button type="submit">Login</button>
                    </form>
                    {error && <p>{error}</p>}
                </div>
            )}
            {isLoggedIn && <h1>Welcome John Doe</h1>}
        </div>
    );
};

export default Login;- For most practical scenarios, the Login component should notify the parent component that the user has logged in. Let’s add a test case to cover the feature. After adding this test case, verify your terminal for the failing test case.
test('notifies parent component after successful login', () => {
  const handleLogin = jest.fn();
  const { getByLabelText, getByText } = render(<Login onLogin={handleLogin} />);

  fireEvent.change(getByLabelText(/username/i), { target: { value: 'testuser' } });
  fireEvent.change(getByLabelText(/password/i), { target: { value: 'password' } });
  fireEvent.click(getByText(/login/i));

  expect(handleLogin).toHaveBeenCalledWith('testuser');
  expect(getByText(/welcome john doe/i)).toBeInTheDocument();
});
- Let's implement this feature in the Login component. Update the Login component to receive
onLoginfunction and updatehandleSubmitas per below.
const Login = ({ onLogin }) => {
    /* rest of the Login component code */
    const handleSubmit = (e) => {
        e.preventDefault();
        if (!username || !password) {
            setError('Please fill in all fields');
            setIsLoggedIn(false);
        } else {
            setError('');
            setIsLoggedIn(true);
            onLogin(username);
        }
    };
     /* rest of the Login component code */
}- Congratulations, the Login component is implemented and all the tests should pass as well.

Integrating Login Components to the App
- create-react-app adds boilerplate code to the
App.jsfile. Let's delete everything fromApp.jsfile before you start integrating our Login component. If you seeApp.test.jsfile, delete that as well. - As again, let's add our test cases for the App component first. Add a new file under
__test__director namedApp.test.js
// App.test.js
import React from 'react';
import { render, screen, fireEvent } from '@testing-library/react';
import App from '../App';

// Mock the Login component
jest.mock('../components/Login', () => (props) => (
  <div>
    <button onClick={props.onLogin}>Mock Login</button>
  </div>
));

describe('App component', () => {
  test('renders the App component', () => {
    render(<App ></App>);
    expect(screen.getByText('Mock Login')).toBeInTheDocument();
  });

  test('sets isLoggedIn to true when Login button is clicked', () => {
    render(<App ></App>);
    const loginButton = screen.getByText('Mock Login');
    fireEvent.click(loginButton);
    expect(screen.getByText('You are logged in.')).toBeInTheDocument();
  });
});- Key Insights you can derive from these test cases:
- The app component holds the Login component and on successful login, a variable like
isLoggedInis needed to indicate the state of the login feature. - Once the user is successfully logged in - you need to use this variable and conditionally display the text
You are logged in. - You are mocking the Login component - this is important as you don’t want the App component’s unit test cases to be testing Login component as well. You already covered the Login component’s test cases earlier.
- The app component holds the Login component and on successful login, a variable like
- Implement the App component with the features described. Add the below code to
App.jsfile.
import React, { useState } from 'react';
import logo from './logo.svg';
import './App.css';
import Login from './components/Login';

function App() {
  const [isLoggedIn, setIsLoggedIn] = useState(false);

  const onLogin = () => {
    setIsLoggedIn(true);
  }

  return (
    <div className="App">
      <Login onLogin={onLogin} />
      {isLoggedIn && <p>You are logged in.</p>}
    </div>
  );
}

export default App;- All the test cases should pass again now, start the application with
npm start. You should see the below page at the localhost.

Enhancing Our App
- Now you have reached a crucial juncture in the TDD process — the Refactor Phase. The Login page’s look and feel is very bare-bone. Let’s enhance it by adding styles and updating the render method of the Login component.
- Create a new file name
Login.cssalongsideLogin.jsfile and add the below style to it.
/* src/components/Login.css */
.login-container {
    display: flex;
    justify-content: center;
    align-items: center;
    height: 100vh;
    background-color: #f0f4f8;
}

.login-form {
    background: #ffffff;
    padding: 20px;
    border-radius: 10px;
    box-shadow: 0 0 10px rgba(0, 0, 0, 0.1);
    width: 300px;
    text-align: center;
}

.login-form h1 {
    margin-bottom: 20px;
}

.login-form label {
    display: block;
    text-align: left;
    margin-bottom: 8px;
    font-weight: bold;
}

.login-form input {
    width: 100%;
    padding: 10px;
    margin-bottom: 20px;
    border: 1px solid #ccc;
    border-radius: 5px;
    box-sizing: border-box;
}

.login-form input:focus {
    border-color: #007bff;
    outline: none;
    box-shadow: 0 0 5px rgba(0, 123, 255, 0.5);
}

.login-form button {
    width: 100%;
    padding: 10px;
    background-color: #007bff;
    border: none;
    color: #fff;
    font-size: 16px;
    cursor: pointer;
    border-radius: 5px;
}

.login-form button:hover {
    background-color: #0056b3;
}

.login-form .error {
    color: red;
    margin-bottom: 20px;
}- Update the render method of the Login component to use styles. Also, import the style file at the top of it. Below is the updated Login component.
// src/components/Login.js
import React, { useState } from 'react';
import './Login.css';

const Login = ({ onLogin }) => {
    const [username, setUsername] = useState('');
    const [password, setPassword] = useState('');
    const [error, setError] = useState('');
    const [isLoggedIn, setIsLoggedIn] = useState(false);

    const handleSubmit = (e) => {
        e.preventDefault();
        if (!username || !password) {
            setError('Please fill in all fields');
            setIsLoggedIn(false);
        } else {
            setError('');
            setIsLoggedIn(true);
            onLogin(username);
        }
    };

    return (
        <div className="login-container">
            {!isLoggedIn && (
                <div className="login-form">
                    <h1>Login</h1>
                    <form onSubmit={handleSubmit}>
                        <div>
                            <label htmlFor="username">Username</label>
                            <input
                                type="text"
                                id="username"
                                value={username}
                                onChange={(e) => setUsername(e.target.value)}
                            />
                        </div>
                        <div>
                            <label htmlFor="password">Password</label>
                            <input
                                type="password"
                                id="password"
                                value={password}
                                onChange={(e) => setPassword(e.target.value)}
                            />
                        </div>
                        <button type="submit">Login</button>
                    </form>
                    {error && <p className="error">{error}</p>}
                </div>
            )}
            {isLoggedIn && <h1>Welcome John Doe</h1>}
        </div>
    );
};

export default Login;- Ensure all test cases still pass with the output of the
npm test. - Start the app again with
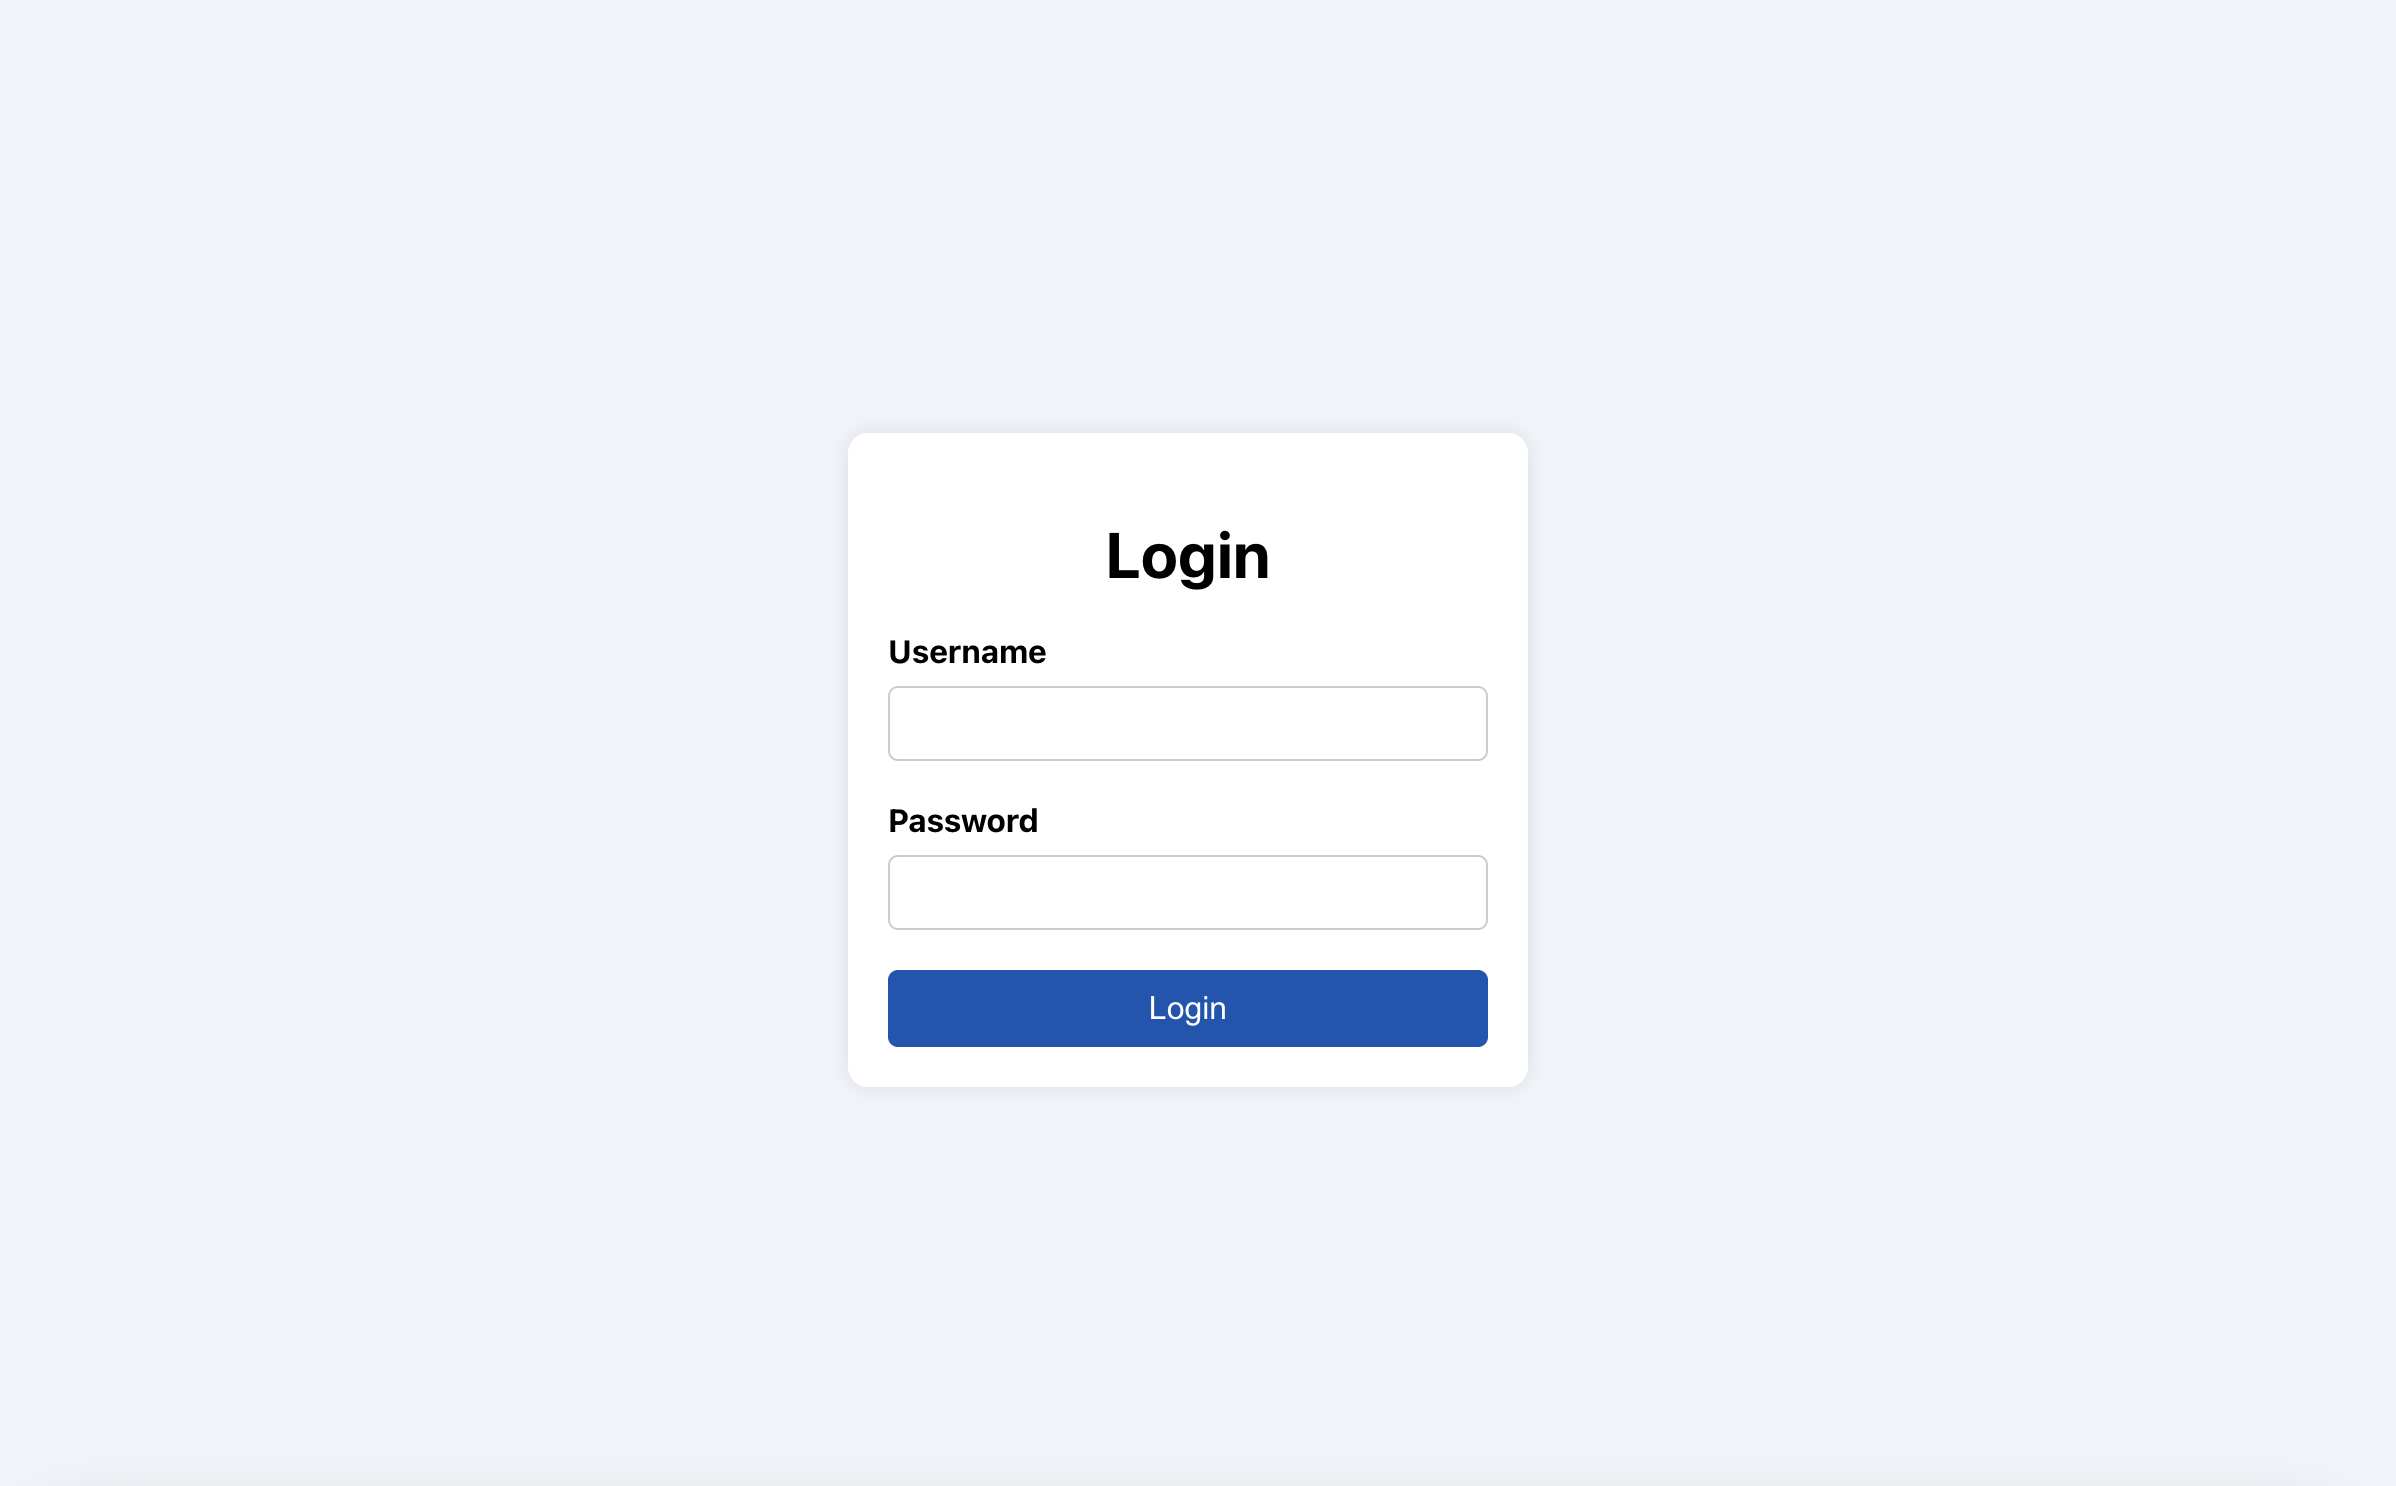
npm start— now our app should look like the below:

Future Enhancements
We have reached the objective for this article but your journey doesn’t need to stop here. I suggest doing further enhancements to the project and continue practicing TDD. Below are a few sample enhancements you can pursue:
- Advanced validation: Implement more robust validation rules for username and password fields, such as password strength checks or email format validation.
- Code coverage analysis: Integrate a code coverage tool (like Istanbul) into the testing workflow. This will provide insights into the percentage of code covered by unit tests, and help identify untested code lines and features.
- Continuous Integration (CI): Set up a CI pipeline (using tools like Jenkins or GitHub Actions) to automatically run tests and generate code coverage reports whenever changes are pushed to the repository.
Conclusion
In this guide, we've walked through building a React Login page using Test-Driven Development (TDD) step by step. By starting with tests and following the red-green-refactor cycle, we created a solid, well-tested component. TDD might take some getting used to, but the benefits in terms of quality and maintainability are substantial. Embracing TDD will equip you to tackle complex projects with greater confidence.
Opinions expressed by DZone contributors are their own.

Comments