The Beginner's Guide to Test RESTful APIs and Web Services
What are RESTful APIs?
Join the DZone community and get the full member experience.
Join For FreeREST API and RESTful Web Services Explained
REST API stands for Representational State Transfer Application Programming Interface. Some questions that might come up when you’re first starting to understand REST API are, "What is being represented exactly," "What is a state," and "What is being transferred?" So in this article, let’s look at all the words of REST API individually and learn what they all mean.
The word "representational" means there is a transfer of representations of resources, and the resources can be pretty much anything that can be named on the Internet like a list of users or a list of photos, comments, posts, articles, pages, videos, books, profiles, etc. To understand how exactly we get a representation of resources, you need to look at how everyone interacts with web pages, the client-server model, and the HTTP. Here’s the HTTP protocol: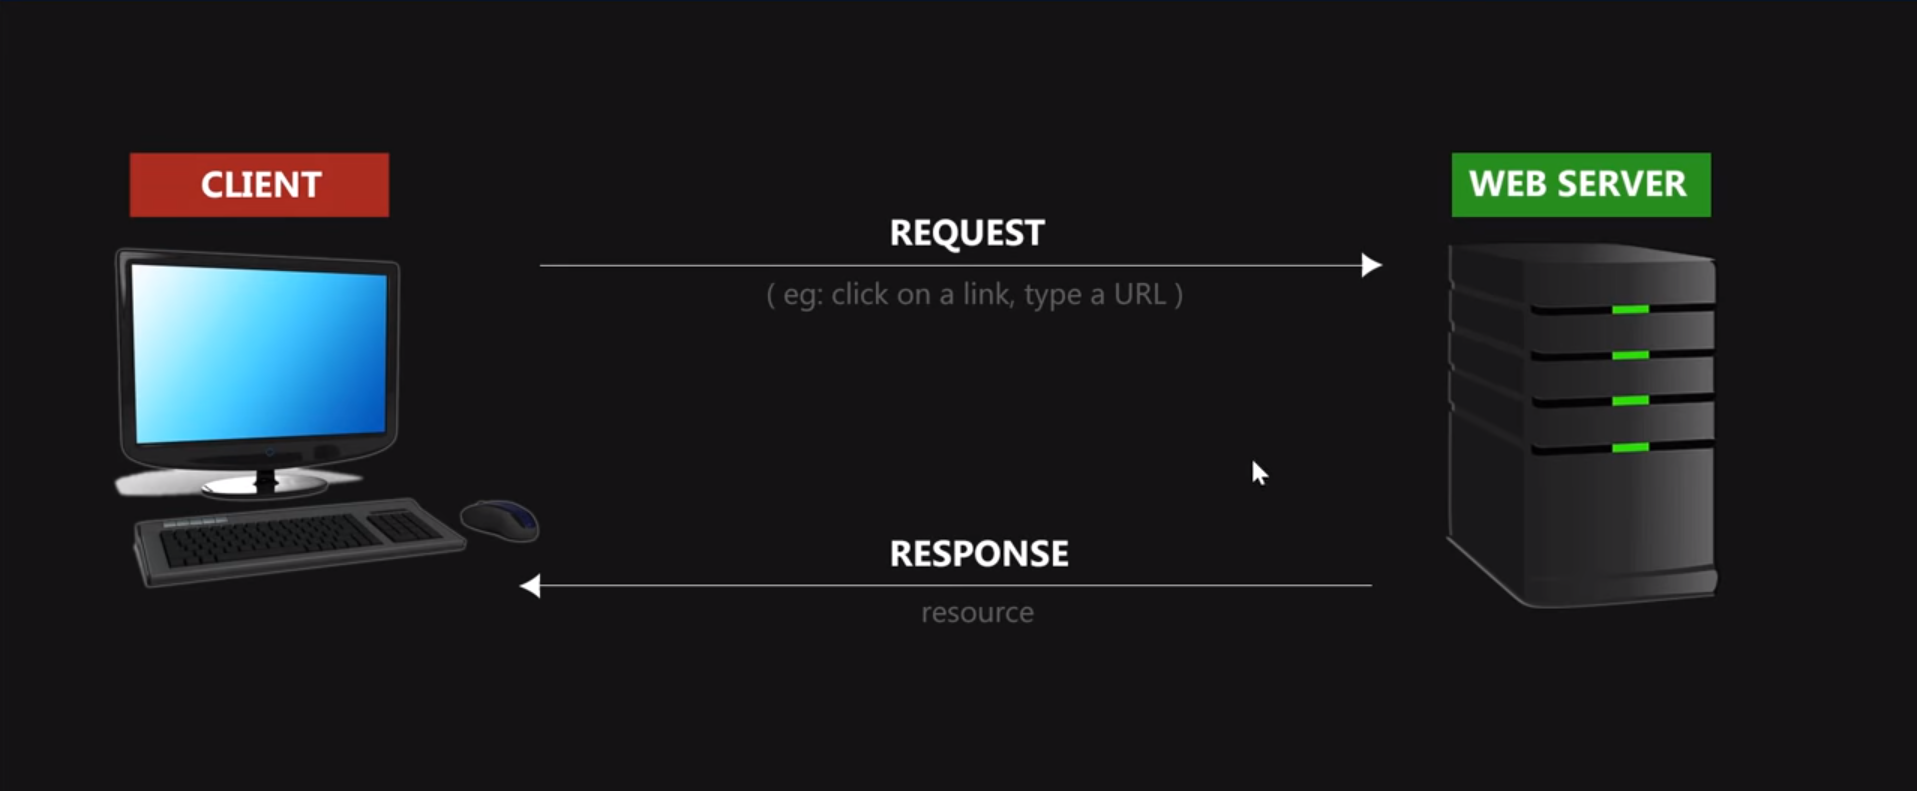
Everytime you type a URL in a browser, you’re sending a request to the web server and the web server responds with a resource. What’s important to understand here is, everytime you type a URL in a browser or click on a webpage link, you’re sending a request for a specific resource or resources from a web server. And the web server responds and delivers the request your resource to your browser as in a formal web page or whatever format that the resource is in. The second important point to understand is that the web server doesn’t actually deliver the resources. It doesn’t send you the database that it has, but rather a representation of that resource in a format that is readable. For example, HTML or an image. Think of actual resources, physical things located on a web server database or stored a web server hard drive, and representations of those resources as copies in either readable format for human beings like HTML or image or easy-to-work-with formats for programmers like JSON and XML. It’s also helpful to think of the whole web as a bunch of resources. We always request the resource when clicking on a link or type in a URL, no wonder that URL stands for Uniform Resource Locator.
So what’s about the word "state?" Take a look at an example: whenever I click a link, the application state changes and I am presented with another resource, which is a page with all the other content of that resource. And as I click through all these different pages, the application state keep changing from one state to the next. When the resource gets transferred from the web server, we send a request for the resource and we get a representation back and whatever formats the resources presented. This is what is meant by the word "transfer." However, it can also refer to the transfer of the application state when we click on the next link and get transferred to another page.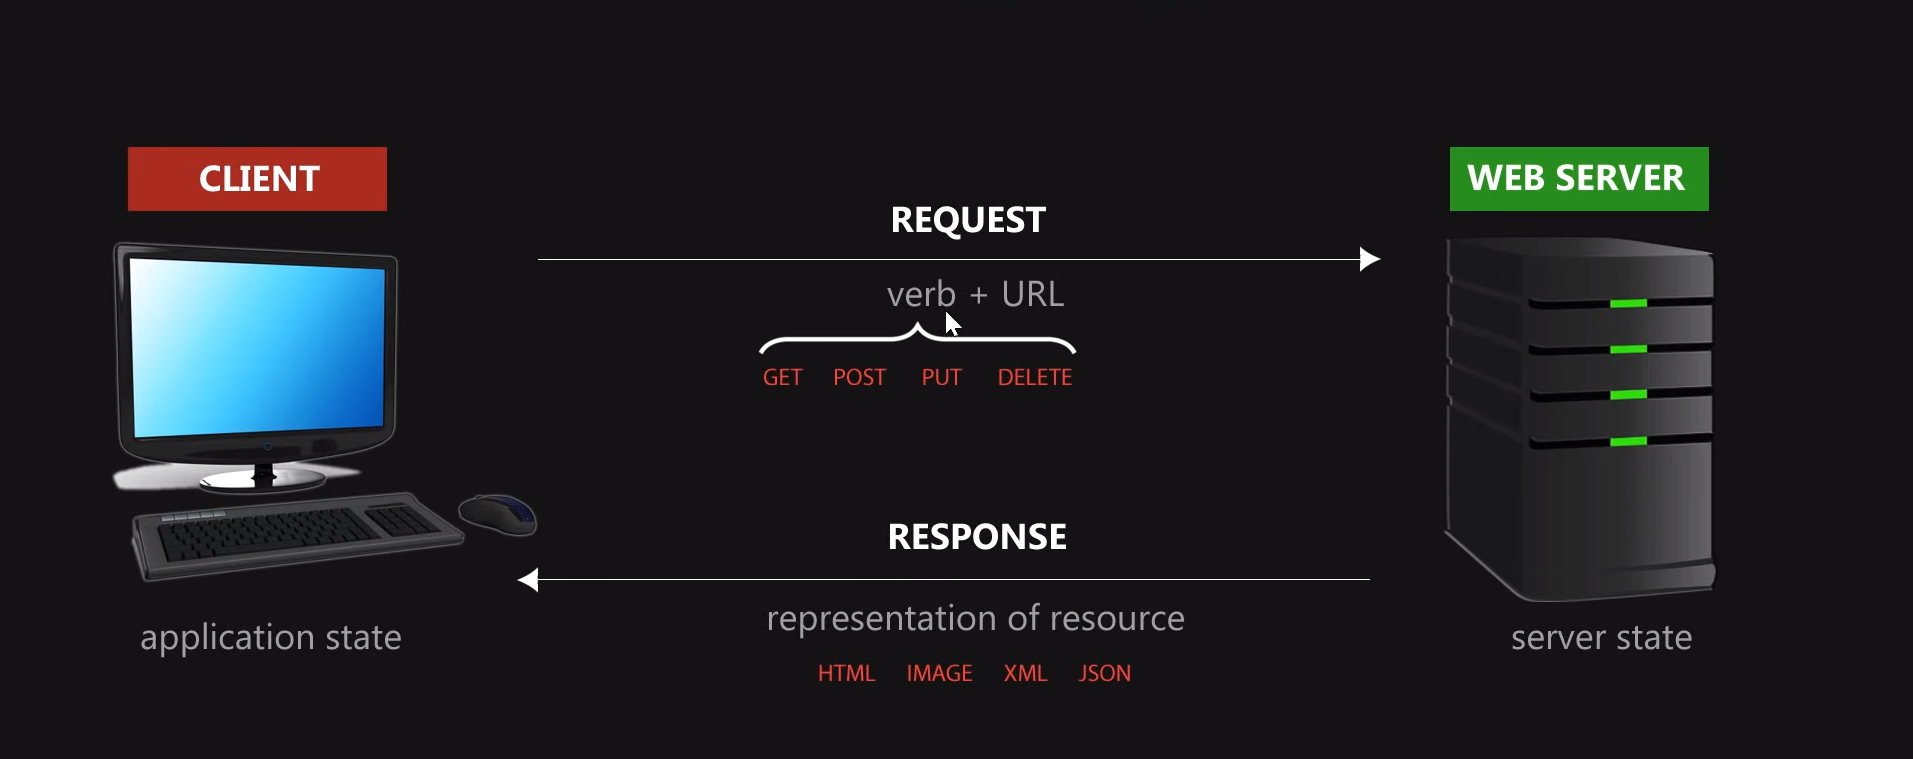
Implementing REST API and RESTful Web Services Testing Using Katalon Studio
Installing and Setting up Katalon Studio
Please refer to the guide for all the basic steps, from downloading to activating the build Installing and Setting up Katalon Studio.
Creating a New Project and Setting up API Automation Test
Step 1: Create a new project
Go to File -> New -> Project and enter a project name and its location to start a new project.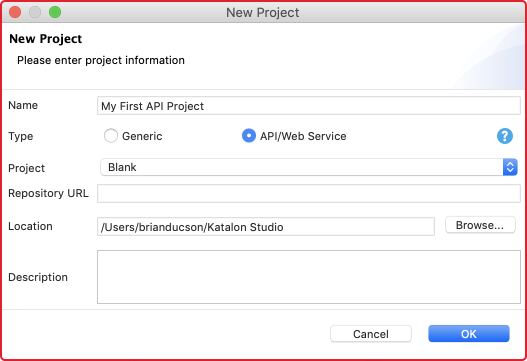
Once the project is confirmed to be created, we will see a folder structure in the Test Explorer This folder system is responsible to keep all the test resources and is also the place where we start our first API test.
Step 2: Create the first API testBefore creating our first API test, let’s have a look at the format we use to set up a testing project.
Object Repository
- Object Repository is a place which stores all the Web service endpoints along with all information of Request method, URL, Header, Content, and Authentication.
- Web service test objects in Object Repository are integrated by a folder system for better management.
Test Cases
- Test Cases stores all test scenarios and is grouped by a folder system. Each test case includes a few steps illustrating a test scenario.
- We can execute a test case individually with a specified execution profile.
Test Suites
- Test Suites is the place where all test suites are stored. A test suite is a collection of test cases verifying a specific target.
- Test cases at the test suite level can be executed with a data-driven approach.
- Test reports are also generated at the test suite level
Test Suite Collection
- Test Suite Collection is a collection of Test Suites verifying a larger target.
- Test Suite at Test Suite Collection level has specific Test environments specified.
- Set-up API testing project
 Step 3: Create a new RESTful endpoint at Object Repository
Object Repository -> New -> Web Service Request
 Katalon Studio stores Web service endpoint for testing at Object Repository, which is similar to Test Object in UI Test. At the Create New Web Service Request dialog, you can either choose to create a RESTful or a SOAP request.
Request type is a required field. You need to specify it exactly at this step. In contrast, URL is not required. You can set this value later in the next step.
Click OK, then we are ready to input more details to the first RESTful test.
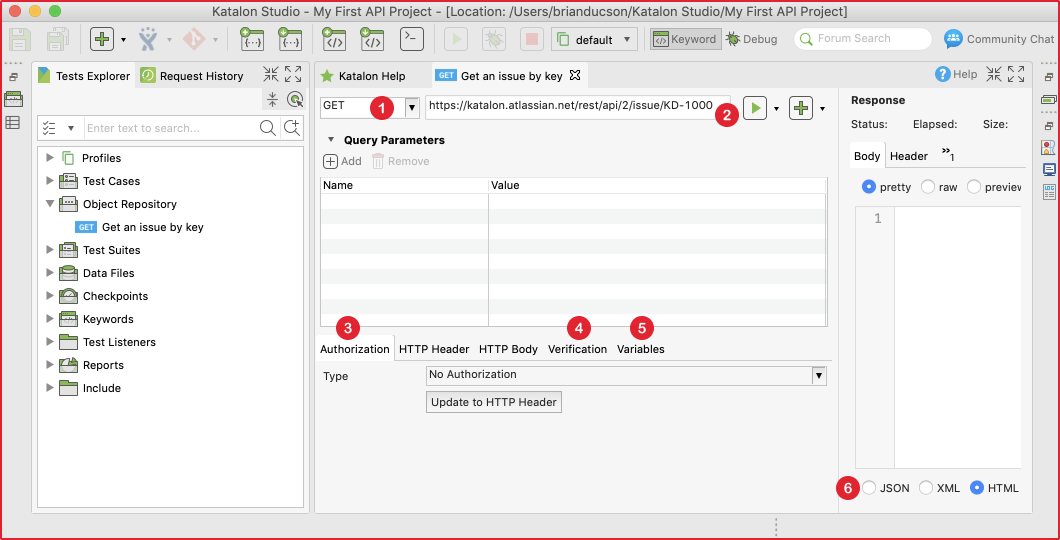 There are some important concepts needed to specify when testing a RESTful request:
(1) Request method
We can choose one of these following methods for your first request test: GET, POST, PUT, DELETE. The method needs to match with the URL to have a valid request. For instance, let’s assume that our first test is a public API from Jira Cloud version. We should use the GET method to receive information on an existing ticket using its ID.
(2) Request URL
Along with the request method, request URL is used to tell the web server which API is utilized under test. Any mismatch between method and URL will lead to invalid request exception at runtime or wrong data response.
(3) Authorization
Authorization is an essential part of an API. It is used to get the correct data under permission (unless the data is public). Katalon Studio supports common authentication methods:
The basic method requires username and password. Don’t forget to click Update to HTTP Header so that the authentication can be applied to HTTP Header.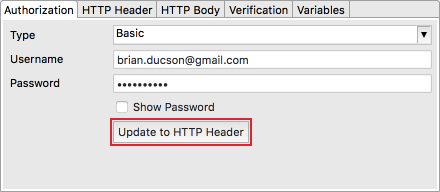
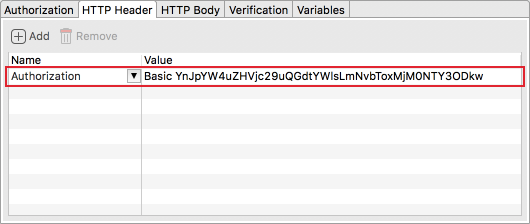
(4) Verification
Verification is the place where you define the assertion to ensure the response will contain the expected information.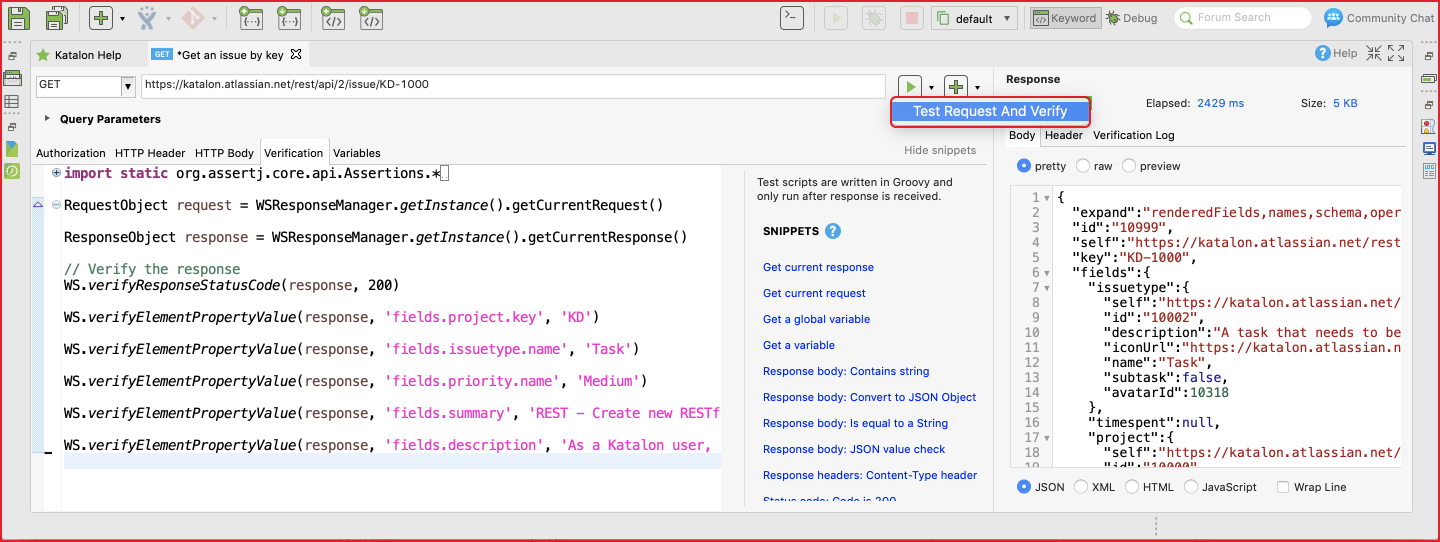
The verification tab of a request is similar to the Script tab of a test case. In other words, you can write custom scripts with built-in keywords or Groovy/Java scripts to verify the response data. Besides built-in keywords, Katalon Studio also supports built-in snippets, which help you to generate assertions with a single click. It is useful for testers who might find it difficult to deal with parsing and to assert with JSON data format.
The right panel of the request is the response displayed in nice format automatically and the result of verification at Verification Log. To include verification script when sending the request, you need to choose the Test Request and Verify option from the execution button.
The Verification script helps you have quick feedback of the request status rather than an actual test. You can add more assertions to the test case level in the next step.
(5) Variables
Variables make API testing more robust and dynamic with the data-driven approach. In Katalon Studio, every part of the request can be parameterized. In other words, dynamic data can be used for: URL, Authentication, HTTP Header, and HTTP Body to maximize the capability of data-driven testing. Following setup works the same with the above example: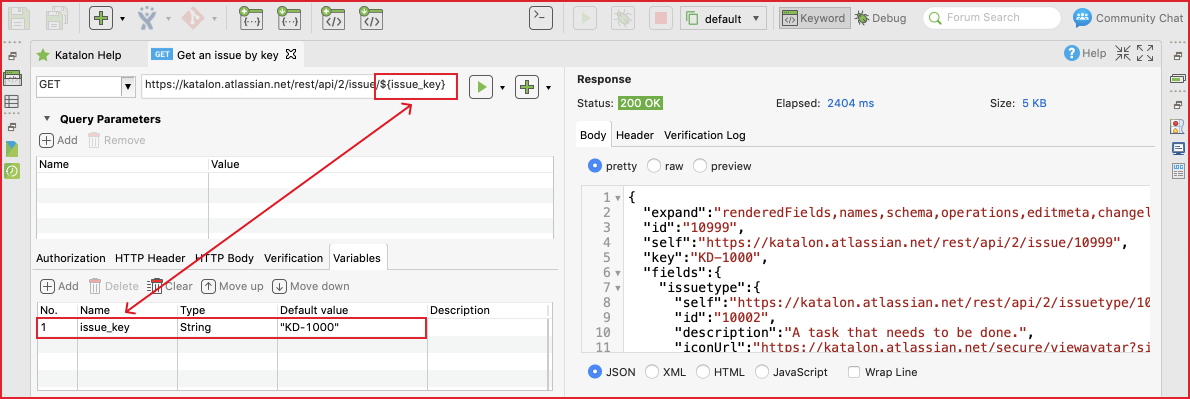
(6) Formatter
The response will be automatically displayed in a neat format: JSON, XML, HTML, and JavaScript. It is helpful for a quick view of the response status.
Step 4: Create a new test case with an existing request
While the request at Object Repository is helpful for fast testing, we can add the request verification at the test case level for better managing and reporting.
Step 5: Add an existing request to a test case
A request can be inserted into a test case with Web service built-in keywords. There are many keywords can be used to send the request, to verify the response, and to make the request as part of a bigger testing flow.
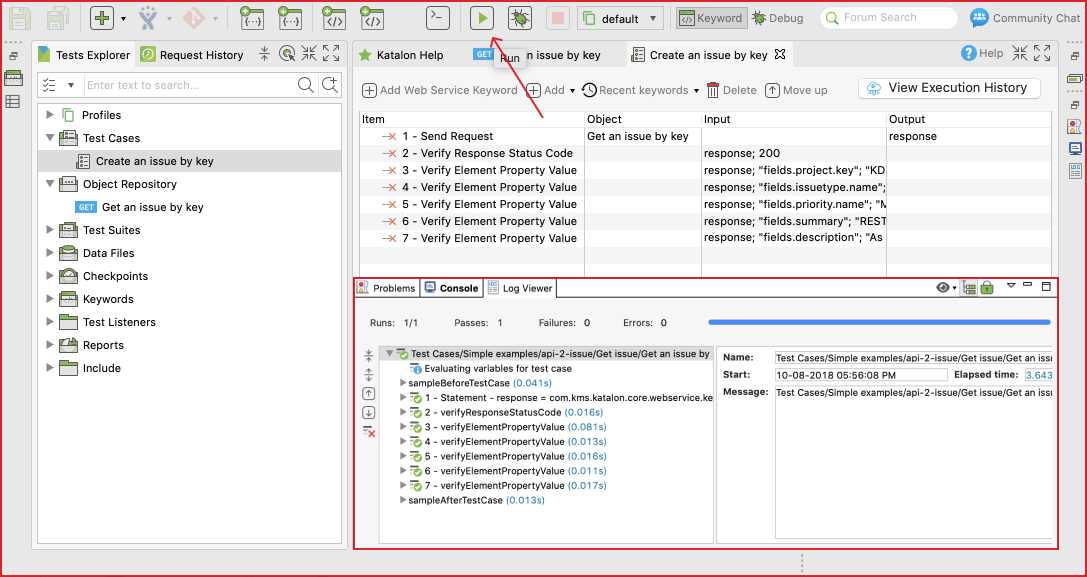
The following test case illustrates how we can call the request with verification steps from a test case:
The test case can be executed as a normal test case in Katalon Studio. Each verification step can be viewed from the log.
 Step 6: Add the test case to the test suite
A test case can be added to a test suite via either the drag-and-drop feature or the Add test case tool. Once the test case is added to the test suite, we can execute the whole test suite with the Run button (without selecting the browser as in UI testing).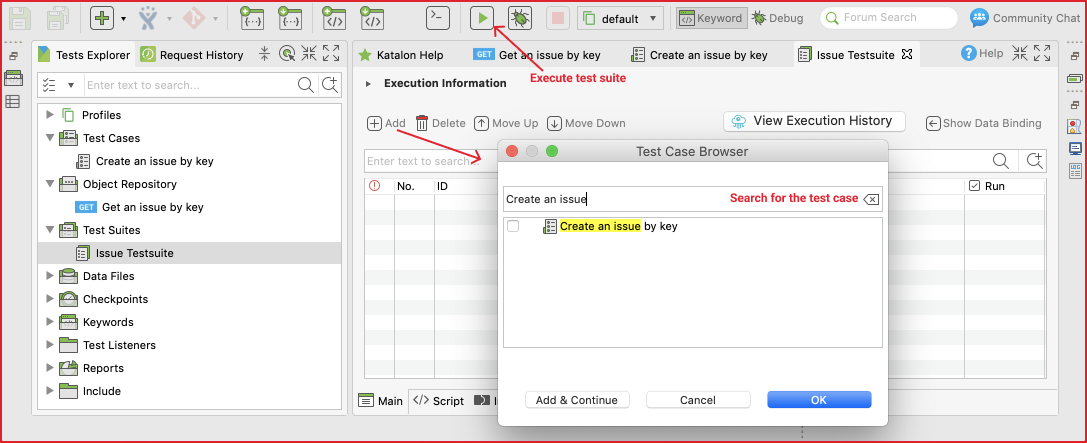
Published at DZone with permission of Jefferey Dunn. See the original article here.
Opinions expressed by DZone contributors are their own.

Comments