Testing Robin, the RPA Programming Language Using Itself
The purpose of this article is to show how a programming language can be tested by using the salient features of RPA that are built-in Robin.
Join the DZone community and get the full member experience.
Join For FreeSoftware testing in most software houses involves testing web/mobile apps, on-premise, in the cloud or hybrid installations, desktop apps, embedded software/hardware platforms and the like. What about testing a programming language though? How do you approach such a task?
Of course, given the fact there are many popular, tried-and-tested languages out there, there are a plethora of possible approaches but we will attempt to follow a different one (approach) and provide an RPA domain-specific example.
Robin is an RPA scripting language, free to download, install and start creating with it, built with scripting simplicity and process automation in mind. Its modules are decomposed in automation actions, combined with different data-types, statements, functions, exception handling and the appropriate syntax.
To provide a real-life scenario we will smoke test the Excel module and give attended and unattended automation options for issuing Jira bugs. Our proposal can be easily extended to other modules and Jira ticket types.
For detailed documentation of Robin’s features please visit the official docs site, here.
Real-Life Scenario — Hands-On Example
We will use Robin to test Robin. A script containing smoke tests for the Excel module will be executed. The Excel module is part of Robin’s standard module library. When bugs are found we will also use Robin to make our lives easier by issuing Jira tickets for the captured bugs.
We are going to showcase both attended automation (in case a bug occurs the user will be prompted via a dialog to select the severity of the issue) and unattended automation (severity will be given directly by the Robin script — we have followed the following logic: Start executing the highest priority tests first and then continue with the lower priority ones.
_____________________________________________________
Note: To replicate the example you need:
- Robin v0.9.3 installed (free), can be downloaded here
- A Jira account (free)
- A project in Jira with Scrum layout, named “Test Project 1”.
You can download the automation scripts and .appmask file, here.
_____________________________________________________
UI Automation and Jira
To automate a process containing UI Elements (either on desktop or web) we need to provide Robin with UI Selectors, describing the elements we wish to manipulate.
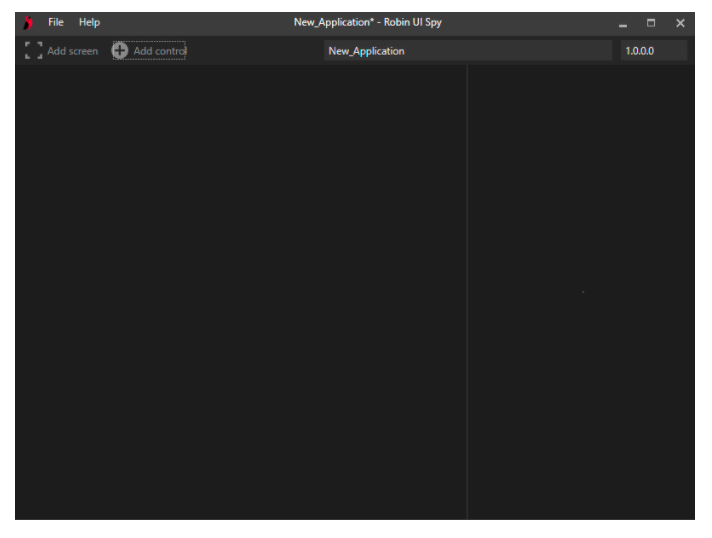
Robin comes pre-bundled with a UI element capturing tool, called UI Spy.
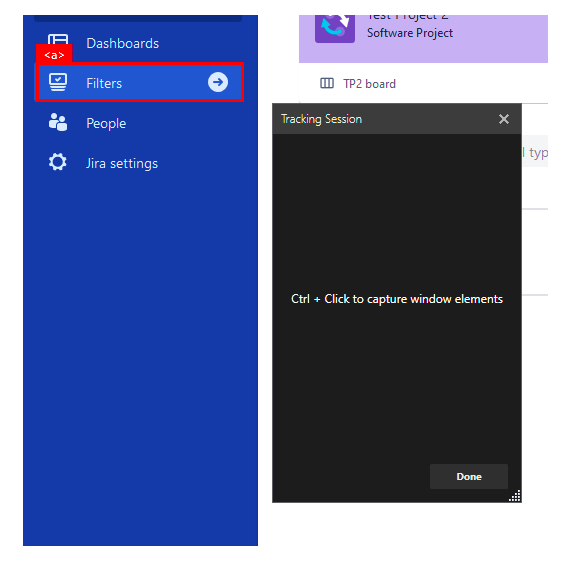
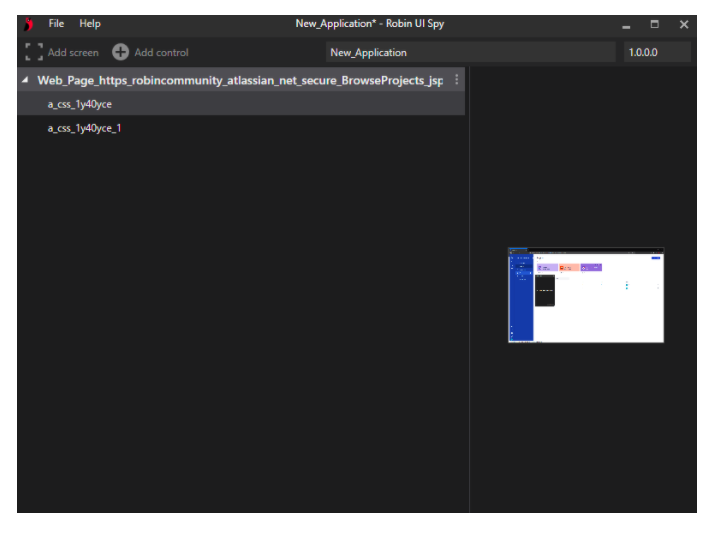
To capture an element (desktop or web) with UISpy, you must run UI Spy, click on the “Add control” button (which opens a tracking session), move your cursor over the requisite element (it will be highlighted) and hit Ctrl + Left click.
In this example, we are going to capture web elements from Jira, needed for our automation scenario.

This is what a selector looks like:
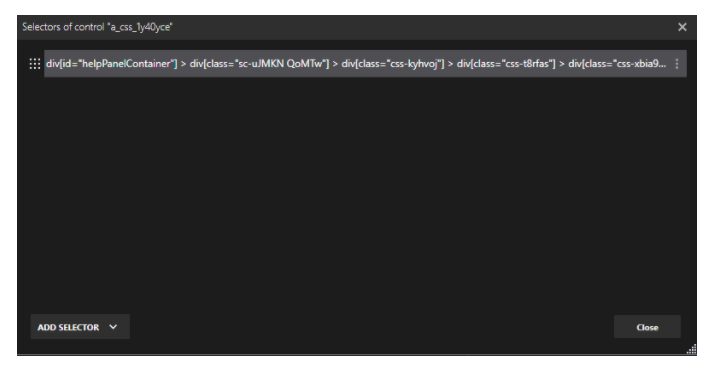
We can modify the extracted selectors to our will by either using UI Spy’s visual builder:
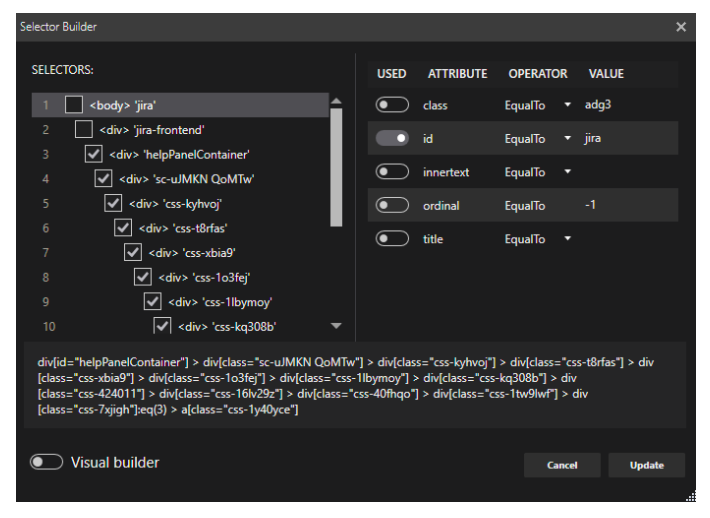
Or by tampering directly with their CSS syntax.
In our scenario, we had to modify the extracted selectors because Jira’s elements change some of their values, after each refresh.
Selectors are saved in .appmask files, that can be utilized by Robin scripts.
After extracting all of the requisite elements for our example this is what the .appmask looks like:
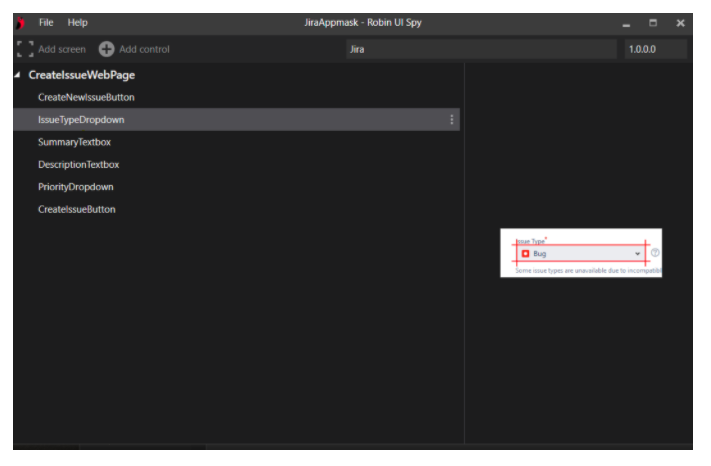
Notice we have renamed the application name, screen name and control name to make our selectors easier to use and our scripts more eligible.
Let’s take a look at our automation script step by step.
We begin with the attended automation scenario.
In order to utilize an appmask file, we have to import it into our script. Import commands go always at the top in Robin.

After that we declare variables to be used throughout our automation script.
Note it is a best practice to use variables for things like URLs, paths etc.
This results in more intelligible and easier to maintain and distribute scripts.
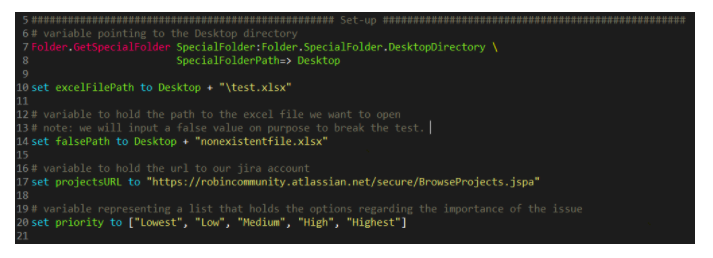
In the section above we:
- Get the Desktop folder by utilizing the GetSpecialFolder action of the Folder module.
- create and initialize a variable that holds a path for storing excel files.
- create a variable to hold a path that we will create an error for our scenario.
- create and initialize a variable that holds the URL to our Jira project (note: you should modify this if you wish to replicate the script and make it point to a personal Jira project).
- create a list that holds the values the importance of a bug can have.
Smoke Tests
Then the smoke tests section begins. A smoke test for an action in Robin executes an action with minimal human intervention. Only the necessary arguments of an action are input whilst the remaining arguments are left with default values.
Let’s take a closer look at a smoke test:
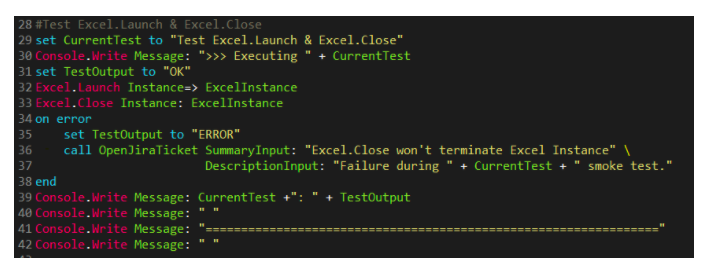
In this particular test, we are checking the Launch and Close actions of the Excel module. The Launch action requires no arguments to be set manually whilst the Close action only requires to set the output argument (ExcelInstance).
In case the test executes successfully, its name and “OK” will be printed in the output section of the Robin editor. In case an error occurs it is captured by the error handling block.
Inside the “on error” block, we set the TestOutput variable to “ERROR” and we call the OpenJiraTicket function with three input parameters. One for the summary of the ticket and one holding a more detailed description.
A Function for Opening Jira Tickets — Attended Automation Mode
Now let’s look inside the OpenJiraTicket function.
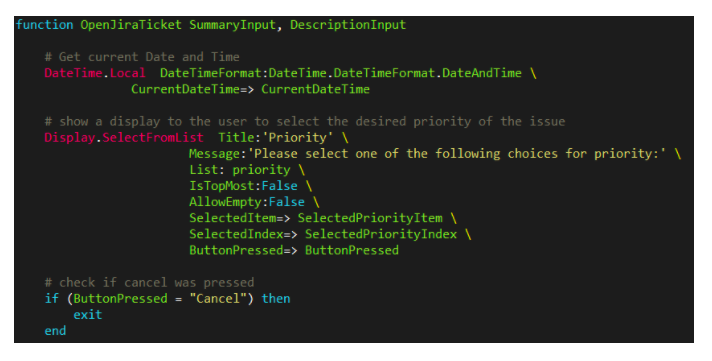
At the top of the function, we retrieve the current timestamp. This timestamp will be used at the ticket’s title and description.
After that, we utilize the SelectFromList action to display a window to the user, with options regarding the priority of the bug.
This is how the display will look like:
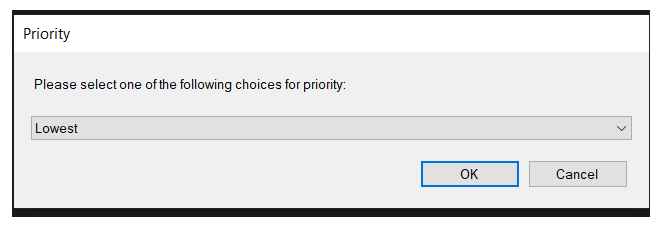
The bug to be reported will have the selected priority.
Now we have all the required info gathered.
Then we launch a Firefox browser instance and navigate to the URL of our Jira project:

We enter a “wait 5” command for a 5 seconds delay in order for everything to properly load inside our webpage.
Note: In our next commands we have included 2” (second) delays to emulate a more physical/ human-like approach for demonstration purposes.
It is now time to utilize the web element selectors we had extracted during the first step of our scenario.
We first have to create a new ticket:

Notice that we utilize the appropriate selector as an input to the “Control” argument.
_____________________________________________________
Note: The syntax to utilize a specific control is the following:
[AppmaskFileName].[Application].[Screen].[Control]
_____________________________________________________
Then we follow the steps (command-wise) the same way we would do if we reported the issue ourselves, utilizing each time the requisite extracted control selectors.
- We click on the “Issue Type” dropdown menu to choose the type of issue we want to open (in our scenario we wish to report bugs).
- We choose “Bug”.
- We populate the “Summary” section of our report.
Notice how we utilize the variables that hold data we gathered previously (summary input and the current timestamp). - We populate the description of the ticket following the same logic as before.
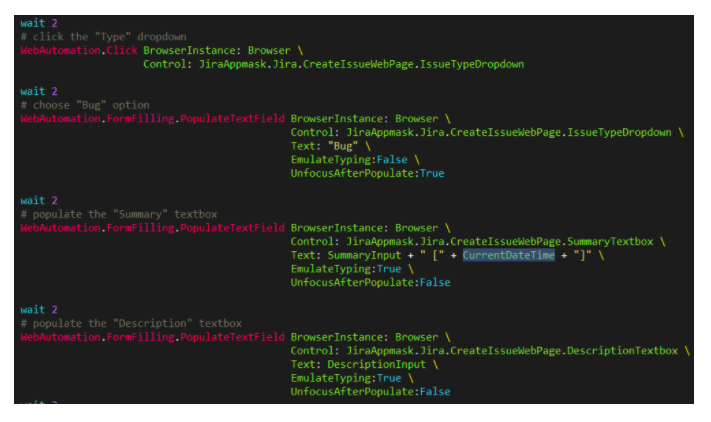
Then we click on the “Priority” of our bug:

And based on the selection we previously made in the displayed dropdown, we populate the selection with the corresponding choice:
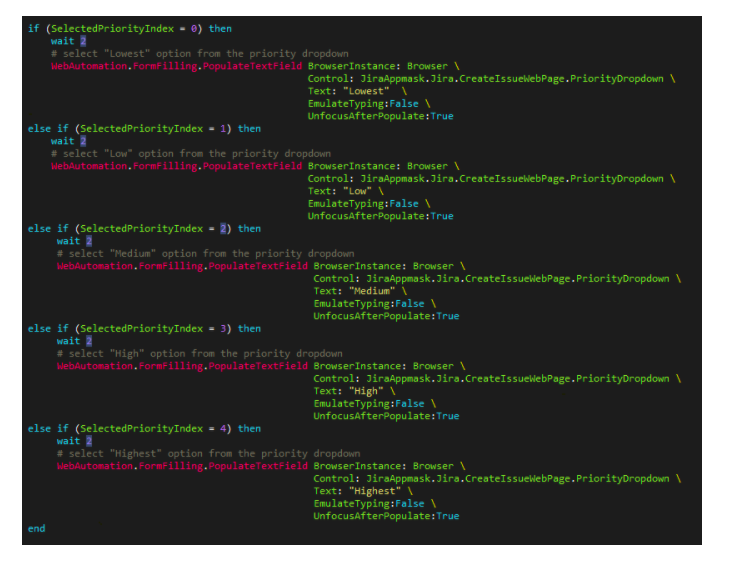
Now that we have populated a series of required fields and given a description to our ticket, we can create it:

Finally, we can close our web browser, and end our function block:

When the function concludes its execution, the execution returns to the main section of the Robin automation script and we proceed with the teardown section of our smoke test. In the teardown section we terminate previously used excel instances and delete files created during the tests:

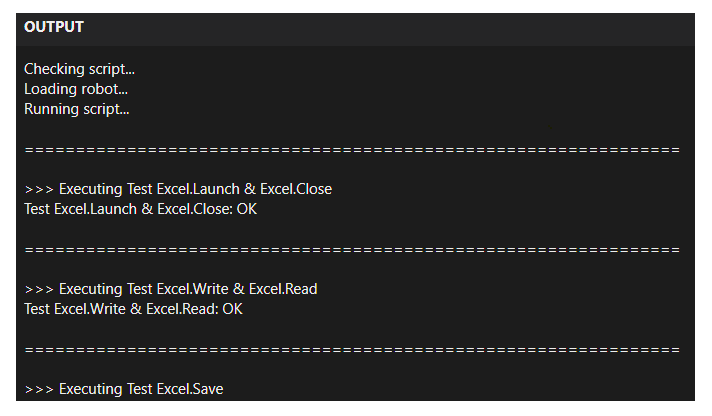
By clicking the “Run” button, our tests will begin.
We can see the state of execution at the editor output:
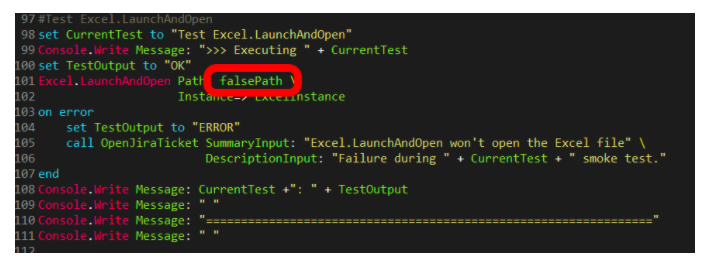
We have created a test that will fail on purpose (we provide it with a false path):
That is when we are presented with the dialog we showed previously.
After we select a priority, Firefox is launched and we can see a ticket been created:
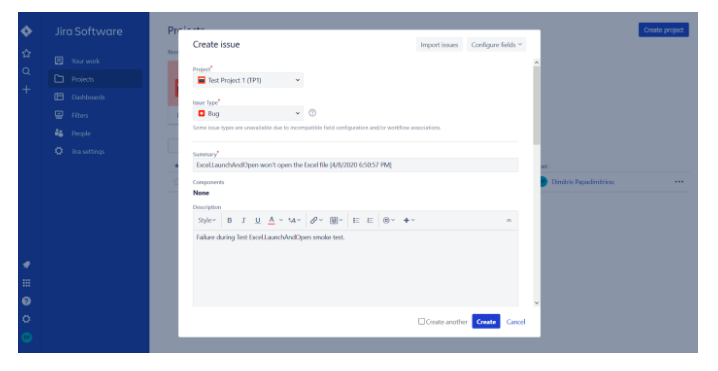
Once the “Create” button is clicked we can find the ticket in our project’s backlog:
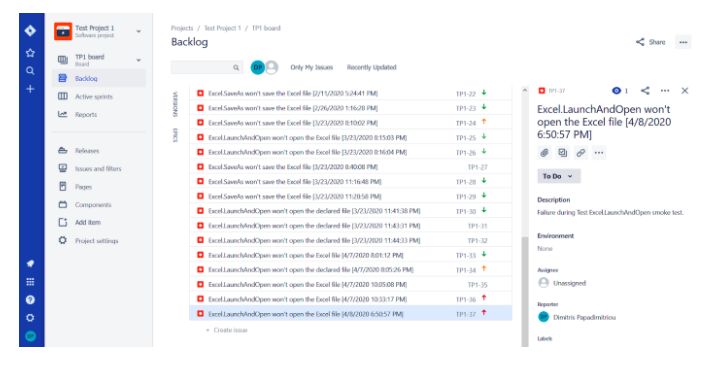
This concludes the execution of our attended automation script.

Unattended Automation Mode
In our unattended automation script, everything happens transparently to the tester. There is no priority dropdown display and the browser runs minimized, yet the creation of tickets happens successfully.
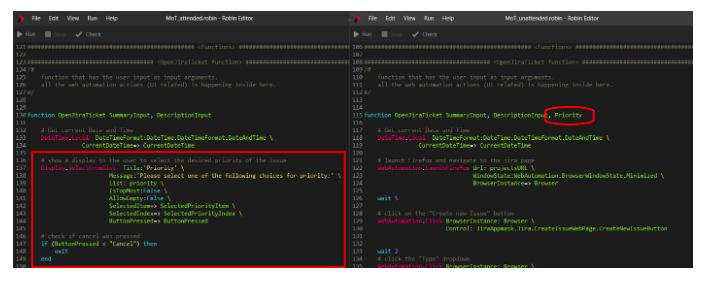
Let’s take a look at the differences in the scripts:
We do not include a list that holds the priority level since we don’t display a dropdown menu:

Instead, we have a variable called “FailedSeverity” which we set before each test and then pass to the OpenJiraTicket function:

Notice how the unattended automation script has a different signature for its OpenJiraFunction and misses the Display action:
Also, the launched browser is maximized in the attended automation script, whereas in the un-attended it minimized:

Lessons Learned
RPA domain-based testing of a programming language may start with simple smoke tests on the basic functionality of the language. Progressively, more complex tests can be created and executed similarly, based on our goals and constraints. Such smoke tests could be the basis for regression testing suites that can be executed automatically in the scripting manner that we’ve shown.
Robin offers attended and unattended automation modes of operation. We used both modes to issue Jira bugs automatically. There is plenty of room to explore here depending on how much of an automated approach the user/developer/tester wishes to have when communicating with Jira. Although we explore two cases only, we hope that the interested reader will find it straightforward to communicate with Jira using Robin, at an automation level that fits her/his needs.
The basis of creating great automation scripts lies almost entirely in solid business analysis and critical thinking skills. It is important to be able to break down big, complex problems into smaller, simpler and more straightforward processes. The use of a general-purpose programming language comes with a potential knowledge debt, sometimes for even the simplest of tasks. You have to invest and train yourself to program/develop using a programming language. Robin thrives in this sense through its simplicity. Whether you are a fully dedicated RPA developer or a tech-savvy business user you will find it really easy to jumpstart your RPA journey with Robin.
Conclusion
Robin is the first fully dedicated RPA language designed with simplicity and feature richness built into its core. Its simple syntax, combined with the ability to extend Robin itself by utilizing its SDK, allows for limitless expansion in functionality and the use-cases it can cover.
We’ve shown a simple way to test Robin using Robin based on smoke tests. We also depicted how Jira bugs could be automated. It’s up to the reader to explore and extend our scripts and decide how much automation with Jira would be appropriate.
Published at DZone with permission of James Papadimitriou. See the original article here.
Opinions expressed by DZone contributors are their own.

Comments