Test Driven Development Using TestNG, Gradle
Basic Approach to start with TDD. Simple example using Java, TestNG, Jacoco and Gradle
Join the DZone community and get the full member experience.
Join For FreeWhat Is TDD?
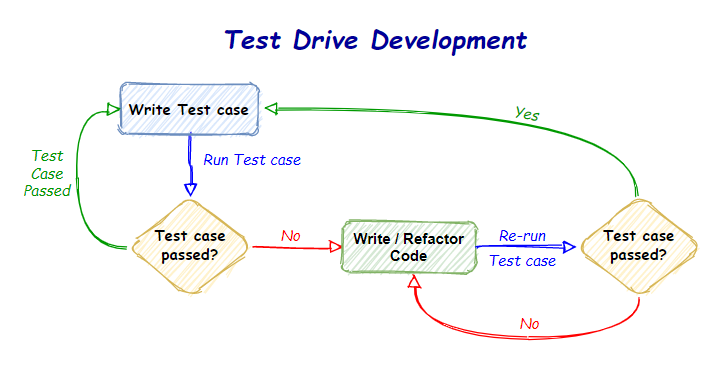
Test Driven Development is a process where developers write the test case first and then run the test case to fail. Then, they gradually write the minimum corresponding code needed to successfully execute the test cases and then finally refactors the new code to acceptable standards.
 Just to summarize the following is the sequence of steps in TDD approach.
- Add a test.
- Run all tests and see if it fails.
- Write some code.
- Re-Run tests.
- Refactor code.
- Repeat.
Benefits of TDD:
The following are the benefits of TDD approach.
- TDD Forces to write simple code.
- Development costs and time are reduced.
- Test cases become safety net for code.
- Codes become almost bug free (if done correctly).
- Improves code quality.
- Easy maintenance.
Create Java - Gradle Project
In this below example, we are going to see a basic example of writing test cases and then gradually writing the corresponding class to make the test cases run successful.
Also, we will see how to integrate the Jacoco plugin in Gradle to create the test result report.
Prerequisites
You should have Java Development Kit (JDK) and Gradle build tool installed on your system. Here, I am using JDK 1.8 and Gradle 6.5 for this example.
First, you can create a Java Gradle project using IntelliJ or Eclipse.
Once you open the build.gradle file in your project it will have the basic configurations for a Java project and the file will look like below.
xxxxxxxxxx
plugins {
id 'java'
id 'jacoco'
}
group 'sample.tdd.demonstration'
version '1.0-SNAPSHOT'
sourceCompatibility = 1.8
repositories {
mavenCentral()
}
dependencies {}
Adding the TestNG Dependency in Gradle
You can find your desired TestNG version in https://mvnrepository.com/artifact/org.testng/testng. Add the dependency to your build.gradle file as below snippet.
Here, I am using version 7.1.0, but you can use any version of your choice.
xxxxxxxxxx
dependencies {
compile group: 'org.testng', name: 'testng', version: '7.1.0'
}
Enable the TestNG Support
After adding the dependency, you should enable the support for TestNG in build.gradle file.
xxxxxxxxxx
test {
// enable TestNG support
useTestNG()
}
Now, we are set to go, but we also want to see our test results are logged to the console. So, to do that, we need to add one more option testLogging under this "test" section as below.
Here, we have used the option to show results in console for PASS, FAILED and SKIPPED test cases.
xxxxxxxxxx
test {
// enable TestNG support
useTestNG()
// enable console logging of test results
testLogging {
events "PASSED", "FAILED", "SKIPPED"
}
}
Basic Example of the TDD Approach
Suppose you have given a scenario of writing an email validation functionality.
We already have added TestNG in our project and enabled the support. Now, we are all set for our first TDD approach to develop the above functionality.
First, we need to write one test class under "src\test\java" pkg in your project. Let's say I have given the name as "EmailValidateTest.java"(this can be any name).
xxxxxxxxxx
import org.testng.Assert;
import org.testng.annotations.Test;
public class EmailValidateTest {
public void testEmailAddress(){
EmailValidator emailValidateObj = new EmailValidator();
Assert.assertEquals(true,emailValidateObj.isValidEmail("example@email.com"));
}
}
If you notice carefully, in the above code I have mentioned a class "EmailValidator.java", it is the class which we are going to write, along with the isValidEmail method inside it.
While writing the test class, we already decided/thought that this above class and method will contain the original code for the email validation functionality.
Also if you look carefully at Line no 8, we are using Assert. It's a class with different function, in TestNG API which helps to verify the conditions of the test and decide whether test has failed or passed.
To know more about TestNG classes and functions, you can refer to TestNG 7.1.0 API
Now to make this above test case run successfully, we should write the "EmailValidator.java" under "src\main\java" pkg, along with the implementation of email validation logic.
xxxxxxxxxx
import java.util.regex.Matcher;
import java.util.regex.Pattern;
public class EmailValidator {
private static final String VALID_EMAIL_REGEX = "^[\\w-\\+]+(\\.[\\w]+)*@[\\w-]+(\\.[\\w]+)*(\\.[a-z]{2,})$";
private static Pattern eMailPattern = Pattern.compile(VALID_EMAIL_REGEX, Pattern.CASE_INSENSITIVE);
private Matcher matcher;
public boolean isValidEmail(String email) {
matcher = eMailPattern.matcher(email);
return matcher.matches();
}
}
Run the Test Case
Now, if you run the test class, you can see that the test case ran successfully in console.

What Is Jacoco?
Jacoco is a free code coverage library for Java. It helps in visual representation and helps in analyzing code coverage report. In simple terms, it's a code coverage report generator plugin.
Adding Jacoco in Gradle
You can add the Jacoco plugin in build.gradle file as below snippet. The below part you should add on top of your existing build.gradle file content.
Below, I have just shown the part which is required to include the Jacoco plugin.
xxxxxxxxxx
plugins {
id 'jacoco'
}
jacoco {
toolVersion = "0.8.5"
}
test {
// report is always generated after tests run
finalizedBy jacocoTestReport
}
jacocoTestReport {
// tests are required to run before generating the report
dependsOn test
reports {
//destination directory of test case report
html.destination file("${buildDir}/jacocoHtml")
}
}
Re-run Your Test Case
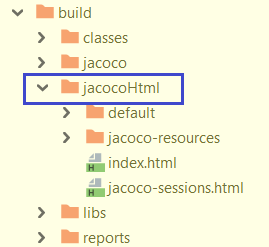
Now, if you run the "EmailValidateTest.java" file to run the test case, you can see one "jacocoHtml" folder got created inside "build" directory.

If you open the index.html file in your web browser, you can see the visual representation of your code coverage of of the original functionality.
In the below image, you can see that the inValidEmail test function is properly executed with 100% code coverage.

If you click on the isValidEmail hyperlink in the report, it will show you the original class and method in details. In the below image, you can see that the main logic of email validation code is properly covered and tested during our test case run.

Conclusion
The benefits of test-driven development more than normal development approaches. It helps in writing a standard, flexible and modular code within very short time of development. Codes are very much cleaner, and almost bug free and very easily maintainable.
Opinions expressed by DZone contributors are their own.

Comments