A RESTful Web Service Project in Java JAX-RS with Spring and Apache CXF
We show you step-by-step, how to use these tools and frameworks to create a callable, REST web service. Let's get started!
Join the DZone community and get the full member experience.
Join For FreeThe code can be downloaded from my GitHub repo.
Prerequisites for this project are:
Knowledge of the Spring Framework.
Knowledge of JAX-RS.
JSON message structure.
Knowledge of Eclipse.
Also, download IBM Liberty for developers.
Here I am referring to the Wikipedia documentation only. Obviously, you can further research and read any documentation on all the above topics which you think may be more valuable for you.
The aim of this small project is to help developers/students to develop a REST web service application with the Spring and Jersey frameworks. You are welcome to add any advice or examples in the comments. Based on your advice I will keep updating the project in the future.
We are using JSON messaging in this example. I am developing this project in Eclipse.
1. First, create a Dynamic Web Project.
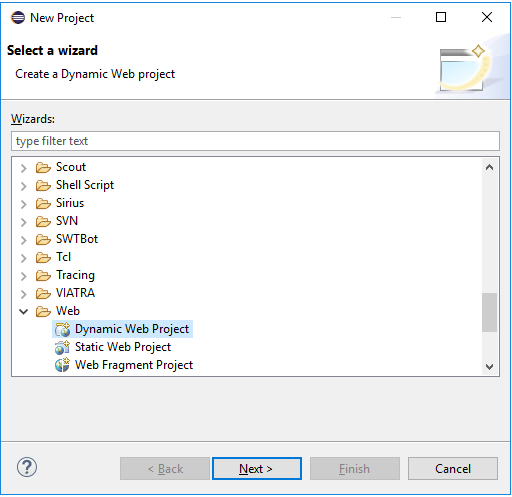
Click next and name it RESTExample1.
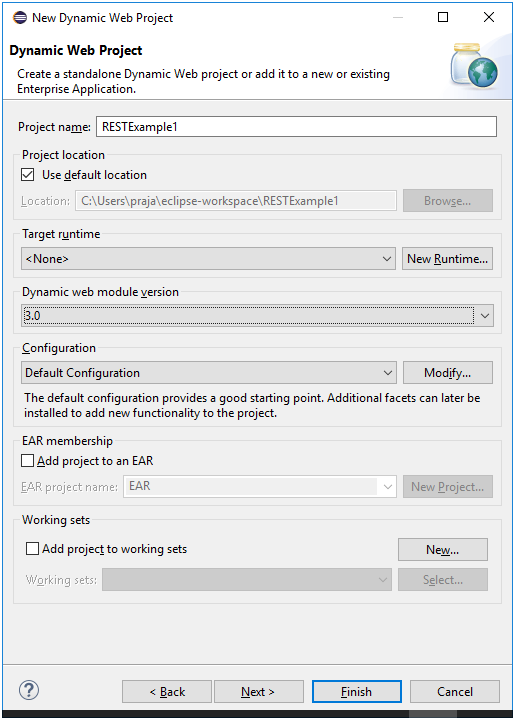
And click ‘Finish.’
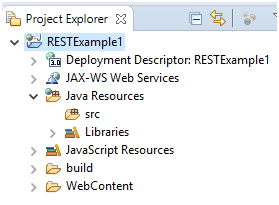
Now, you will see a project has been created, like below:
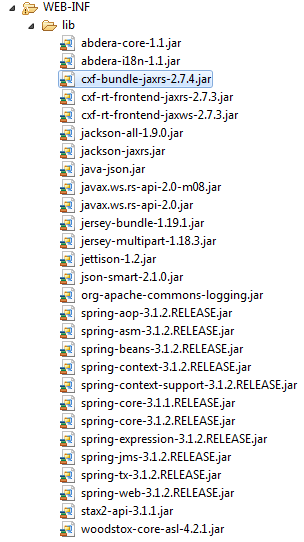
2. Expand the ‘WebContent’ folder and add the below jars in the project lib folder (you can download these jar files online). Just type download, followed by the jar name. For example, type 'download abdera-core-1.1.jar' into Google. It's better to download them from the Maven site (it is not mandatory to add all these jar files in the lib folder. You can deploy these jars in your server and add all of them in your classpath).
3. Now, create the package explained below and add an interface to the project.
Right-click on the project RESTExample1 in the window, highlight new, and, from the sub-window, select the package, enter the below name and click the ‘Finish’ button.
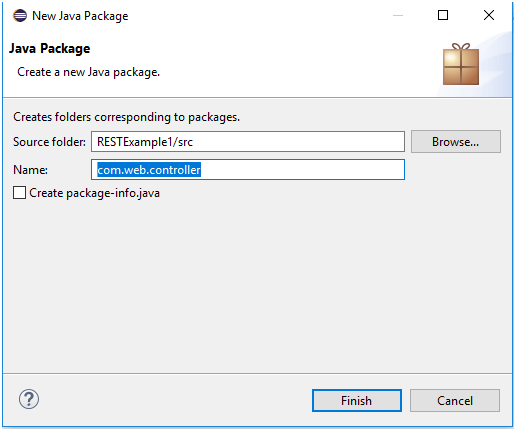
Now you will see an empty package like below:
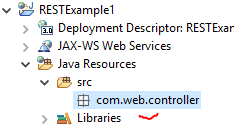
Now, right click on the package ‘com.web.controller’ and select ‘New,’ and, from the sub-window, select the interface and give it the name, VehicleController.
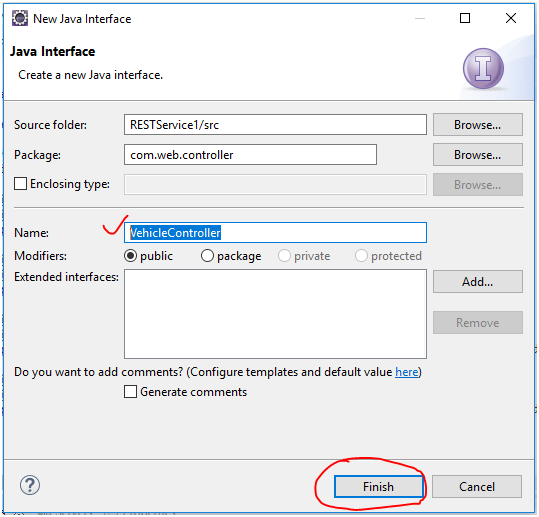
Add the below code into the empty interface (in the interface file, press ‘ctrl+A’ and copy and paste the below code – just replace all auto-generated code with the below code, but make sure you comment out both the POST method and its implementation in the class until you complete the GET method call test).
package com.web.controller;
import javax.ws.rs.Consumes;
import javax.ws.rs.GET;
import javax.ws.rs.HeaderParam;
import javax.ws.rs.POST;
import javax.ws.rs.Path;
import javax.ws.rs.PathParam;
import javax.ws.rs.Produces;
import javax.ws.rs.core.Context;
import javax.ws.rs.core.MediaType;
import javax.ws.rs.core.Response;
import javax.ws.rs.core.UriInfo;
import com.rest.car.bean.CarDetailBean;
import com.rest.car.bean.CarInfoBean;
@Path("/v/vehicle")
public interface VehicleController {
    //Below four different get examples
    @GET
    @Produces(MediaType.APPLICATION_JSON)
 public Response getVehicles();

 @GET @Path("/{id}")
 @Produces(MediaType.APPLICATION_JSON)
 public Response getVehicleById(@PathParam("id") int id);

 @GET @Path("/{id}/{id2}")
 @Produces(MediaType.APPLICATION_JSON)
 public Response getVehicleById(@Context UriInfo info, @PathParam("id") int id, @PathParam("id2") int id2);

 @GET @Path("/{id}/car/{zone}")
 @Produces(MediaType.APPLICATION_JSON)
 public Response getVehicleById(@Context UriInfo info, @PathParam("id") int id, @PathParam("zone") String zone,@HeaderParam("user") String user);

 //Below two different POST examples
 //comment out below two methods for time being

 @POST
 @Produces(MediaType.APPLICATION_JSON)
 @Consumes(MediaType.APPLICATION_JSON)
 @Path("/orders")
 public Response registerCar(@Context UriInfo info, CarDetailBean carDetailBean, @HeaderParam("user") String user);

 @POST
 @Produces(MediaType.APPLICATION_JSON)
 @Consumes(MediaType.APPLICATION_JSON)
 @Path("/orderlist/vehicle.json")
 public Response placeCarOrder(@Context UriInfo info, CarInfoBean carInfoBean, @HeaderParam("user") String user);

}
Please look at the different the @Path declarations above. The intention of declaring a different path here is to explain different examples of the @Path declaration by which you can design your own REST web services, as per your requirements.
4. Create the below controller class and implement the above interface (follow the above steps and select the class this time instead of the interface).
package com.web.controller.impl;
import java.io.StringWriter;
import java.io.Writer;
import java.util.List;
import net.minidev.json.JSONObject;
import org.codehaus.jackson.map.ObjectMapper;
import javax.ws.rs.core.MediaType;
import javax.ws.rs.core.MultivaluedMap;
import javax.ws.rs.core.Response;
import javax.ws.rs.core.UriInfo;
import javax.ws.rs.core.Response.Status;
import com.web.data.Vehicle;
import com.web.data.VehicleStore;
import com.rest.car.bean.CarDetailBean;
import com.rest.car.bean.CarInfoBean;
import com.web.controller.VehicleController;

public class VehicleControllerImpl implements VehicleController{

 ObjectMapper JSON_MAPPER = new ObjectMapper();
 String result = null;


 @Override
 public Response getVehicles(){

  System.out.println("In getVehicles()");
  VehicleStore vehicleStore = VehicleStore.getStoreInstance();
  List<Vehicle> listOfVehicles = vehicleStore.getVehicleList();
  JSONObject obj=new JSONObject();
  try{
   obj.put("Vehicles", listOfVehicles);
  }catch(Exception je){
   je.printStackTrace();
   return Response.status(Status.EXPECTATION_FAILED).entity(je.getMessage()).type(MediaType.APPLICATION_JSON).build();
  }
  System.out.println("Exit getVehicles()");
  return Response.status(Status.OK).entity(obj).type(MediaType.APPLICATION_JSON).build();
 }

 @Override
 public Response getVehicleById(int id){
  System.out.println("In getVehicleById(int id)");
  System.out.println("id :"+id);
  VehicleStore vehicleStore = VehicleStore.getStoreInstance();
  List<Vehicle> listOfVehicles = vehicleStore.getVehicleList();
  JSONObject obj=new JSONObject();
  for (Vehicle vehicle: listOfVehicles) {
   if(vehicle.getId()==id){
   try{
    obj.put("Vehicle", vehicle);
    return Response.status(Status.OK).entity(obj).type(MediaType.APPLICATION_JSON).build();
   }catch(Exception je){
    je.printStackTrace();
    return Response.status(Status.EXPECTATION_FAILED).entity(je.getMessage()).type(MediaType.APPLICATION_JSON).build();
   }
    }

  }
  return Response.status(Status.EXPECTATION_FAILED).entity("No Data found").type(MediaType.APPLICATION_JSON).build();
 }

 @Override
 public Response getVehicleById(UriInfo info, int id1, int id2){
  System.out.println("In getVehicleById(UriInfo info, int id1, int id2)");
  System.out.println("id1 :"+id1);
  System.out.println("id2 :"+id2);
  MultivaluedMap <String, String> parameters = info.getQueryParameters();
  String userID = parameters.getFirst("user");
  String srvcURL = info.getRequestUri().toString();
  System.out.println("srvcURL : "+srvcURL);
  VehicleStore vehicleStore = VehicleStore.getStoreInstance();
  List<Vehicle> listOfVehicles = vehicleStore.getVehicleList();
  JSONObject obj=new JSONObject();
  boolean vehicleFound = false;
  for (Vehicle vehicle: listOfVehicles) {
   if(vehicle.getId()==id1 || vehicle.getId()==id2){
   try{
    obj.put("Vehicle"+vehicle.getId(), vehicle);
    vehicleFound = true;
   }catch(Exception e){
    e.printStackTrace();
    return Response.status(Status.EXPECTATION_FAILED).entity(e.getMessage()).type(MediaType.APPLICATION_JSON).build();
   }
    }

  }
  if(vehicleFound)
   return Response.status(Status.OK).entity(obj).type(MediaType.APPLICATION_JSON).build();
  return Response.status(Status.EXPECTATION_FAILED).entity("No Data found").type(MediaType.APPLICATION_JSON).build();
 }

 @Override
 public Response getVehicleById(UriInfo info, int id,String zone,String user){
  System.out.println("In getVehicleById(UriInfo info, int id,String zone,String user)");
  System.out.println("id : "+id);
  System.out.println("user : "+user);
  System.out.println("Zone : "+zone);
  VehicleStore vehicleStore = VehicleStore.getStoreInstance();
  List<Vehicle> listOfVehicles = vehicleStore.getVehicleList();
  JSONObject obj=new JSONObject();
  for (Vehicle vehicle: listOfVehicles) {
   if(vehicle.getId()==id){
   try{
    vehicle.setCountryName("Vehicle From :" + zone);
    obj.put("Vehicle", vehicle);
    Writer strWriter = new StringWriter();
    JSON_MAPPER.writeValue(strWriter, vehicle);
    result = JSON_MAPPER.writeValueAsString(strWriter);
    return Response.status(Status.OK).entity(result).type(MediaType.APPLICATION_JSON).build();
   }catch(Exception e){
    e.printStackTrace();
    return Response.status(Status.EXPECTATION_FAILED).entity(e.getMessage()).type(MediaType.APPLICATION_JSON).build();
   }
    }

  }
  return Response.status(Status.EXPECTATION_FAILED).entity("No Data found").type(MediaType.APPLICATION_JSON).build();
 }

 @Override
 public Response registerCar(UriInfo info, CarDetailBean carDetailBean, String user) {
  System.out.println("In registerCar(UriInfo info, CarDetailBean carDetailBean, String user)");
  VehicleStore vehicleStore = VehicleStore.getStoreInstance();
  List<Vehicle> listOfVehicles = vehicleStore.getVehicleList();
  for (Vehicle vehicle: listOfVehicles) {
   if(vehicle.getId()==carDetailBean.getCarId()){
    return Response.status(Status.EXPECTATION_FAILED).entity("Car id already present. Please use different id").type(MediaType.APPLICATION_JSON).build();
    }

  }
  System.out.println("In registerCar(UriInfo info, CarDetailBean carDetailBean, String user)2");
  Vehicle newvehicle = new Vehicle(carDetailBean.getCarId(), carDetailBean.getCarInfo());
  System.out.println("In registerCar(UriInfo info, CarDetailBean carDetailBean, String user)3");
  vehicleStore.addVehicle(newvehicle);
  System.out.println("In registerCar(UriInfo info, CarDetailBean carDetailBean, String user)4");
  JSONObject obj=new JSONObject();
  try{
   obj.put("Vehicles", listOfVehicles);
  }catch(Exception je){
   je.printStackTrace();
   return Response.status(Status.EXPECTATION_FAILED).entity(je.getMessage()).type(MediaType.APPLICATION_JSON).build();
  }
  System.out.println("Exit getVehicles()");
  return Response.status(Status.OK).entity(obj).type(MediaType.APPLICATION_JSON).build();
 }

 @Override
 public Response placeCarOrder(UriInfo info, CarInfoBean carInfoBean,  String user) {
  System.out.println("In placeCarOrder(UriInfo info, CarInfoBean carInfoBean,  String user)");
  JSONObject obj=new JSONObject();
  obj.put("CarOrder", carInfoBean);
  return Response.status(Status.OK).entity(obj).type(MediaType.APPLICATION_JSON).build();
 }
}
5. Now, add/create a bean class called Vehicle as demonstrated below:
package com.web.data;
import java.io.Serializable;
import org.codehaus.jackson.annotate.JsonIgnoreProperties;
import org.codehaus.jackson.annotate.JsonProperty;
import org.codehaus.jackson.annotate.JsonPropertyOrder;
@JsonPropertyOrder({"id", "VehicleName"})
@JsonIgnoreProperties(ignoreUnknown = true)
public class Vehicle implements Serializable{

 private static final long serialVersionUID = -3501772243949297054L;

 @JsonProperty("id")
 private int id;

 @JsonProperty("vehicleName")
 private String vehicleName;

 @JsonProperty("countryName")
 private String countryName;

 public Vehicle(){};
 public Vehicle(int i, String vehicleName){
  super();
  this.id = i;
  this.vehicleName = vehicleName;
 }

 public int getId(){
  return id;
 }

 public void setId(int id) {
  this.id = id;

 }

 public String getVehicleName() {
  return vehicleName;
 }

 public void setVehicleName(String vehicleName) {
  this.vehicleName = vehicleName;
 }

 public String getCountryName() {
  return countryName;
 }

 public void setCountryName(String countryName) {
  this.countryName = countryName;
 }
}
6. Now, create a singleton class as shown below:
package com.web.data;
import java.util.ArrayList;
import java.util.List;
public class VehicleStore {
 static VehicleStore vehicleStore = null;
 List<Vehicle> _listOfVehicles = null;

 private VehicleStore() {
  _listOfVehicles = createVehicleList();
 }

 public static VehicleStore getStoreInstance() {
  if(vehicleStore == null) {
   vehicleStore = new VehicleStore();
  }
  return vehicleStore;
 }

 public void addVehicle(Vehicle vehicle) {
  _listOfVehicles.add(vehicle);
 }

 public List<Vehicle> getVehicleList(){
  return _listOfVehicles;
 }

 public List<Vehicle> createVehicleList(){
   System.out.println("Creating Vehicle List");
   Vehicle suzukiVehicle=new Vehicle(1, "Swif");
   Vehicle bmwVehicle=new Vehicle(4, "BMW");
   Vehicle volvoVehicle=new Vehicle(3, "Volvo");
   Vehicle jeepVehicle=new Vehicle(2, "Jeep");
   List<Vehicle> listOfVehicles = new ArrayList<Vehicle>();
   listOfVehicles.add(suzukiVehicle);
   listOfVehicles.add(bmwVehicle);
   listOfVehicles.add(volvoVehicle);
   listOfVehicles.add(jeepVehicle);
   return listOfVehicles;
 }
}
7. Now, create two handler classes as discussed below:
(First create the package, ‘com.web.cxf.in.handler’ and add the class CxfInPutHandler)
The handler class plays a very important role. They are interceptors. The first one is for all incoming requests and the second one is for all outgoing responses. During testing, just check the logs or put a breakpoint to check how it works. An input handler will receive all web service calls first before it diverts it to the actual web method to call. Therefore, you can use this class for any authentication purposes or any other activities which you think should be executed first, i.e., before the control hits the actual web service method.
package com.web.cxf.in.handler;
import javax.servlet.http.HttpServletRequest;
import org.apache.cxf.interceptor.Fault;
import org.apache.cxf.message.Message;
import org.apache.cxf.phase.AbstractPhaseInterceptor;
import org.apache.cxf.phase.Phase;
import org.apache.cxf.transport.http.AbstractHTTPDestination;
public class CxfInPutHandler extends AbstractPhaseInterceptor<Message> {
 public CxfInPutHandler(){
  super(Phase.PRE_STREAM);
 }
 @Override
 public void handleMessage(final Message message) throws Fault {
  try {
   System.out.println("In in handleMessage() ");
   String user = "";//header param
   String pid = "";//header param
   String pathInfo = "";
   if (message.getExchange().getInMessage() != null) {
    if (message.getExchange().getInMessage().get(AbstractHTTPDestination.HTTP_REQUEST) != null) {
     HttpServletRequest req = (HttpServletRequest) message.getExchange().getInMessage().get(AbstractHTTPDestination.HTTP_REQUEST);
     user = req.getHeader("user");
     pid = req.getHeader("pid");
     pathInfo = req.getPathInfo();
    }
   } else {
    System.out.println("Fail to get the http request ");
   }

  }catch(Exception e){
   e.printStackTrace();
  }

 }

}
And below we have the out-handler. All the web service responses (before returning to the caller) will hit this service. Just think what business logic you would like to implement here.
package com.web.cxf.out.handler;
import javax.servlet.http.HttpServletRequest;
import org.apache.cxf.interceptor.Fault;
import org.apache.cxf.message.Message;
import org.apache.cxf.phase.AbstractPhaseInterceptor;
import org.apache.cxf.phase.Phase;
import org.apache.cxf.transport.http.AbstractHTTPDestination;
public class CxfOutPutHandler extends AbstractPhaseInterceptor<Message> {

  public CxfOutPutHandler() {
         super(Phase.PRE_STREAM);
     }
     @Override
     public void handleMessage(final Message message) throws Fault {
         System.out.println("In out handleMessage() ");
         if (message.getExchange().getInMessage() != null) {
             if (message.getExchange().getInMessage().get(AbstractHTTPDestination.HTTP_REQUEST) != null) {
                 HttpServletRequest req = (HttpServletRequest) message.getExchange().getInMessage().get(AbstractHTTPDestination.HTTP_REQUEST);
                 //origin = req.getHeader("Origin");
             }
         } else {
             System.out.println("Fail to get the http request ");
         }
     }

}
During testing, check the log information to understand how the control flows through the code. See the below log information:
In  handleMessage() (hit in handler interceptor before calling getVehicles)

In  getVehicles()

Creating Vehicle List

Exit getVehicles()

In Out handleMessage() (finally hit out interceptor )
Now we are going to introduce one filter here. Control will hit the Filter first, even before the input handler. It works the same as a handler.
Just follow the previous steps and add the below filter class:
package com.web.filter;
/*
 * A filter is typically used to perform a particular piece of functionality
either before or after the primary functionality of a web application is
performed. As an example, if a request is made for a particular resource such
as a servlet and a filter is used, the filter code may execute and then pass
the user on to the servlet. As a further example, the filter might determine
that the user does not have permissions to access a particular servlet, and it might
send the user to an error page rather than to the requested resource.
 */
import java.io.IOException;
import java.util.HashMap;
import java.util.Map;
import javax.servlet.Filter;
import javax.servlet.FilterChain;
import javax.servlet.FilterConfig;
import javax.servlet.ServletException;
import javax.servlet.ServletRequest;
import javax.servlet.ServletResponse;
import javax.servlet.http.HttpServletRequest;
import javax.servlet.http.HttpServletRequestWrapper;

public class UserFilter implements Filter{

    @Override
    public void destroy() {
    }
/*
 * Here I am just setting a header field before control goes to the servlet.
 * We can also authenticate a user here before re-directing to a servlet
 */
    @Override
    public void doFilter(ServletRequest request, ServletResponse response,
            FilterChain chain) throws IOException, ServletException {
       System.out.println("Im in UserFilter");
     HttpServletRequest req = (HttpServletRequest) request;
        HeaderRequestWrapper requestWrapper = new HeaderRequestWrapper(req);
        requestWrapper.addHeader("user", "Test1234");
        chain.doFilter(requestWrapper, response);
    }
    @Override
    public void init(FilterConfig filterConfig) throws ServletException {
    }
    public class HeaderRequestWrapper extends HttpServletRequestWrapper {

        public HeaderRequestWrapper(HttpServletRequest request) {
            super(request);
        }
        private Map<String, String> headerMap = new HashMap<String, String>();
        public void addHeader(String name, String value) {
            headerMap.put(name, value);
        }
        @Override
        public String getHeader(String name) {
            String headerValue = super.getHeader(name);
            if (headerMap.containsKey(name)) {
                headerValue = headerMap.get(name);
            }
            return headerValue;
        }
    }
}
For the filter, you have to add the below definition in a web.xml file.
<filter>
  <filter-name>MyFilter</filter-name>
  <filter-class>com.web.filter.UserFilter</filter-class>
 </filter>

 <filter-mapping>
  <filter-name>MyFilter</filter-name>
  <url-pattern>/*</url-pattern>
 </filter-mapping>
8. Now, create a Spring Bean definition file, ‘spring-beans.xml,’ as shown below under WEB-INF.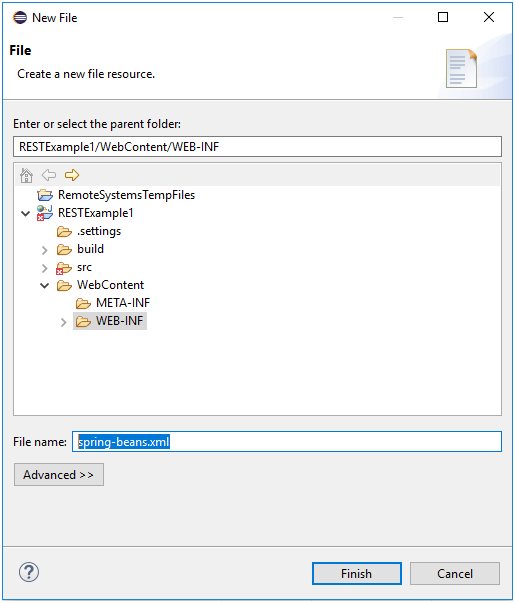
<?xml version="1.0" encoding="UTF-8"?>
<beans xmlns="http://www.springframework.org/schema/beans"
    xmlns:xsi="http://www.w3.org/2001/XMLSchema-instance" xmlns:cxf="http://cxf.apache.org/core"
    xmlns:jaxrs="http://cxf.apache.org/jaxrs" xmlns:context="http://www.springframework.org/schema/context"
    xmlns:cache="http://www.springframework.org/schema/cache" xmlns:p="http://www.springframework.org/schema/p"
    xsi:schemaLocation="http://www.springframework.org/schema/beans http://www.springframework.org/schema/beans/spring-beans-3.1.xsd
  http://cxf.apache.org/jaxrs http://cxf.apache.org/schemas/jaxrs.xsd
  http://cxf.apache.org/core http://cxf.apache.org/schemas/core.xsd
  http://www.springframework.org/schema/cache http://www.springframework.org/schema/cache/spring-cache-3.1.xsd
  http://www.springframework.org/schema/context http://www.springframework.org/schema/context/spring-context-3.1.xsd">
 <import resource="classpath:META-INF/cxf/cxf.xml" />
 <import resource="classpath:META-INF/cxf/cxf-servlet.xml" />
 <jaxrs:server id="vehicleservice" address="/rest/example">
  <jaxrs:serviceBeans>
   <ref bean="vehicleController" />
  </jaxrs:serviceBeans>
  <jaxrs:providers>
   <ref bean="jsonProvider" />
  </jaxrs:providers>
 </jaxrs:server>

 <bean id="vehicleController" class="com.web.controller.impl.VehicleControllerImpl">
  <description>
   This Bean contains REST methods.
  </description>
 </bean>

 <bean id="jsonProvider" class="org.codehaus.jackson.jaxrs.JacksonJsonProvider">
  <description>
   This Bean contains implementation to serilized json object.
  </description>
 </bean>

 <bean id="cxfOutPutHandler" class="com.web.cxf.out.handler.CxfOutPutHandler">
  <description>
   This Bean implements Interceptor for all out going responses
  </description>
 </bean>

 <bean id="cxfInputHandler" class="com.web.cxf.in.handler.CxfInPutHandler" >
  <description>
   This Bean implements Interceptor for all in coming request
  </description>
 </bean>
 <cxf:bus>
  <cxf:outInterceptors>
   <ref bean="cxfOutPutHandler" />
  </cxf:outInterceptors>
  <cxf:inInterceptors>
   <ref bean="cxfInputHandler" />
  </cxf:inInterceptors>
 </cxf:bus>
</beans>
9. Now, put the reference in the web deployment file, web.xml.
Right-click on the project and go to Java EE Tools and, from the sub-window, select ‘Generate deployment descriptor stub.’ It will generate a web.xml file, and, in that file, after the line ‘</welcome-file-list>’ add the below lines and save the file.
<listener>
  <listener-class>org.springframework.web.context.ContextLoaderListener</listener-class>
</listener>

 <servlet>
  <servlet-name>CXFServlet</servlet-name>
  <servlet-class>org.apache.cxf.transport.servlet.CXFServlet</servlet-class>
  <init-param>
   <param-name>disable-address-updates</param-name>
   <param-value>true</param-value>
  </init-param>
  <load-on-startup>1</load-on-startup>
 </servlet>

 <servlet-mapping>
  <servlet-name>CXFServlet</servlet-name>
  <url-pattern>/*</url-pattern>
 </servlet-mapping>

 <context-param>
  <param-name>contextConfigLocation</param-name>
  <param-value>
   /WEB-INF/spring-beans.xml
  </param-value>
</context-param>
<filter>
  <filter-name>MyFilter</filter-name>
  <filter-class>com.web.filter.UserFilter</filter-class>
 </filter>

 <filter-mapping>
  <filter-name>MyFilter</filter-name>
  <url-pattern>/*</url-pattern>
 </filter-mapping>
Now you are ready to test all the GET web service calls.
You can use two approaches here. One is to generate a war or ear package and deploy it on your Web Server. The second approach is to just right-click on your project and select ‘Run As’ followed by ‘Run on Server.’ Make sure that you have added the server to your Eclipse project already. If not, check online materials to see how to add a server to Eclipse. You can add either Apache Tomcat or IBM Liberty for testing purposes.
After successful deployment, copy and paste the below URL into the address bar of any browser and see the response:
http://host:port/RESTService1
For me, the response returned is: http://localhost:9080/RESTService1
Now you can see the below output in your browser:
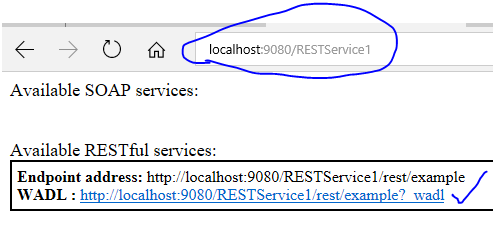
Now, just follow the URL above to see all the web services available in it:
<?xml version="1.0"?>
<application xmlns:xs="http://www.w3.org/2001/XMLSchema" xmlns="http://wadl.dev.java.net/2009/02">
    <grammars />
    <resources base="http://localhost:9080/RESTService1/rest/example">
        <resource path="/v/vehicle">
            <method name="GET">
                <response>
                    <representation mediaType="application/json" />
                </response>
            </method>
            <resource path="/orderlist/vehicle.json">
                <method name="POST">
                    <request>
                        <representation mediaType="application/json" />
                        <param name="user" type="xs:string" />
                    </request>
                    <response>
                        <representation mediaType="application/json" />
                    </response>
                </method>
            </resource>
            <resource path="/orders">
                <method name="POST">
                    <request>
                        <representation mediaType="application/json" />
                        <param name="user" type="xs:string" />
                    </request>
                    <response>
                        <representation mediaType="application/json" />
                    </response>
                </method>
            </resource>
            <resource path="/{id}">
                <param name="id" type="xs:int" />
                <method name="GET">
                    <request />
                    <response>
                        <representation mediaType="application/json" />
                    </response>
                </method>
            </resource>
            <resource path="/{id}/vehicle/{zone}">
                <param name="id" type="xs:int" />
                <param name="zone" type="xs:string" />
                <method name="GET">
                    <request>
                        <param name="user" type="xs:string" />
                    </request>
                    <response>
                        <representation mediaType="application/json" />
                    </response>
                </method>
            </resource>
            <resource path="/{id}/{id2}">
                <param name="id" type="xs:int" />
                <param name="id2" type="xs:int" />
                <method name="GET">
                    <request />
                    <response>
                        <representation mediaType="application/json" />
                    </response>
                </method>
            </resource>
        </resource>
    </resources>
</application>
Now let's test all the GET REST calls (comment out both the POST web services to avoid compilation error):
http://localhost:9080/RESTService1/rest/example/v/vehicle

In some web browsers, it will allow you to download a JSON file instead of displaying the message in the browser itself. Download the JSON file and open it.
Test the REST of each of these files:
http://localhost:9080/RESTService1/rest/example/v/vehicle/1 (2, 3, and 4)
http://localhost:9080/RESTService1/rest/example/v/vehicle/1/3 (use a different combination of numbers from 1 to 4)
http://localhost:9080/RESTService1/rest/example/v/vehicle/1/car/India
Let's Try Our POST REST Service Calls
First, uncomment the first POST method and add the below bean into your project, including packages.
(If you are unsure how to test GET and POST separately, first write all the code for the GET and POST calls and compile and test both at the same time.)
package com.rest.car.bean;
import org.codehaus.jackson.annotate.JsonProperty;
public class CarDetailBean {
 @JsonProperty("carId")
 private int carId;
 @JsonProperty("carInfo")
 private String carInfo;
 public int getCarId() {
  return carId;
 }
 public void setCarId(int carId) {
  this.carId = carId;
 }
 public String getCarInfo() {
  return carInfo;
 }
 public void setCarInfo(String carInfo) {
  this.carInfo = carInfo;
 }
}
Now, compile the code and deploy it into your web server or right click on the project and select 'run as' followed by 'run on server' and select the deployed server from the list.
For a POST web services call, you cannot use a browser. It's best to use a SOAP UI tool for this test or create your own client application. To test with SOAP tools, please go to the end of this lesson.
Now use the below URL and JSON message body to test the first POST call:
http://localhost:9080/RESTService1/rest/example/v/vehicle/orders
{
      "carId": 5,
      "carInfo": "Safary"
}
The above JSON body will be injected into the bean class declared above by the JSON framework.
Let's implement the second POST call and test it.
First, add all the below beans into your project. This one is a bit complex. The reason behind using this complex architecture is to help you to understand how you can manage different complex designs, as per your requirements. Here, in each bean, I am implementing a list along with an object. In the first bean, ‘CarInfoBean,’ I am using one object called CustomerRequestInfo. There will be more than one CustomerRequestInfo, hence we are using a list to store it.
Now on to the second bean, CustomerRequestInfo. Here I am also declaring one more object call, OrderDetail. The intention is very clear so that you can even design more complex calls as per your requirements.
package com.rest.car.bean;
import java.util.List;
import org.codehaus.jackson.annotate.JsonProperty;
public class CarInfoBean {
 @JsonProperty("userId")
 private String userId;
 @JsonProperty("passWord")
 private String passWord;
 @JsonProperty("customerRequestInfo")
 private List<CustomerRequestInfo> customerRequestInfo;
 public String getUserId() {
  return userId;
 }
 public void setUserId(String userId) {
  this.userId = userId;
 }
 public String getPassWord() {
  return passWord;
 }
 public void setPassWord(String passWord) {
  this.passWord = passWord;
 }
 public List<CustomerRequestInfo> getCustomerRequestInfo() {
  return customerRequestInfo;
 }
 public void setCustomerRequestInfo(List<CustomerRequestInfo> customerRequestInfo) {
  this.customerRequestInfo = customerRequestInfo;
 }
}
package com.rest.car.bean;
import java.util.List;
import org.codehaus.jackson.annotate.JsonProperty;
public class CustomerRequestInfo {
@JsonProperty("requestId")
private String requestId;
@JsonProperty("orderDetail")
private List<OrderDetail> orderDetail;
public String getRequestId() {
return requestId;
}
public void setRequestId(String requestId) {
this.requestId = requestId;
}
public List<OrderDetail> getOrderDetail() {
return orderDetail;
}
public void setOrderDetail(List<OrderDetail> orderDetail) {
this.orderDetail = orderDetail;
}
}And, finally, the OrderDetail bean:
package com.rest.car.bean;
import org.codehaus.jackson.annotate.JsonProperty;
public class OrderDetail {
 @JsonProperty("carID")
 private String carID;
 @JsonProperty("carModule")
 private String carModule;
 @JsonProperty("carColor")
 private String carColor;
 @JsonProperty("customerComment")
 private String customerComment;
 public String getCarID() {
  return carID;
 }
 public void setCarID(String carID) {
  this.carID = carID;
 }
 public String getCarModule() {
  return carModule;
 }
 public void setCarModule(String carModule) {
  this.carModule = carModule;
 }
 public String getCarColor() {
  return carColor;
 }
 public void setCarColor(String carColor) {
  this.carColor = carColor;
 }
 public String getCustomerComment() {
  return customerComment;
 }
 public void setCustomerComment(String customerComment) {
  this.customerComment = customerComment;
 }
}
Now use the below URL and JSON body to test this POST call. Also, look carefully at how the framework injects values into their respective fields.
http://localhost:9080/RESTService1/rest/example/v/vehicle/orderlist/vehicle.json
{
    "userId" : "97912345",
    "passWord":"Xlcb#11",
    "customerRequestInfo":[
        {
            "requestId":"12345",
            "orderDetail":[
     {
   "carID":"1",
   "carModule":"IM3",
   "carColor":"RED",
   "customerComment":"Should be a right hand car"
         },
     {
     "carID":"7",
     "carModule":"BM3",
     "carColor":"BLUE",
     "customerComment":"Should be a Left hand car"
         },
     {
     "carID":"5",
     "carModule":"MM3",
     "carColor":"PINK",
     "customerComment":"Should be a Left hand car"
         }
       ]
        },
    {
            "requestId":"12346",
            "orderDetail":[
    {
     "carID":"2",
     "carModule":"XB1",
     "carColor":"RED",
     "customerComment":"Should be a right hand car"
        },
    {
     "carID":"3",
     "carModule":"XM3",
     "carColor":"BLUE",
     "customerComment":"Should be a Left hand car"
        },
    {
     "carID":"4",
     "carModule":"XX2",
     "carColor":"PINK",
     "customerComment":"Should be a Left hand car"
        }
      ]
        }
    ]
}
My advice is to play around with the code so that you can understand the code better. Try to retrieve different values from the carInfoBean object and print it.
1. First, download SoapUI from the below URL and install it on your computer.
https://www.soapui.org/downloads/latest-release.html
2. Open the application, and, from the file menu, select the new REST service project and in the window past your URL (the first example for a GET web service call):
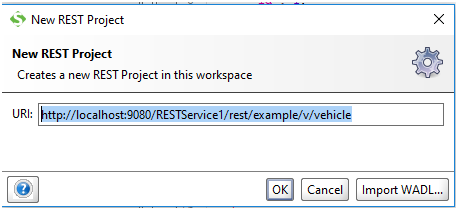
And click ‘OK.’
3. Now, from the project explorer window, double-click Request1:
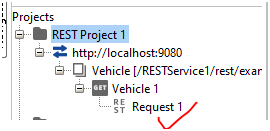
And click the green arrow on the left-hand side:
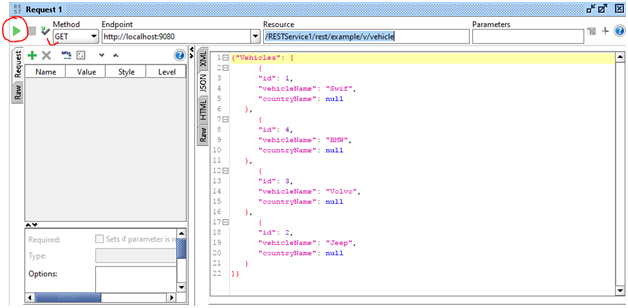
If you need to set some header parameters for your test, you can do it as I've shown below:
Select the Header:
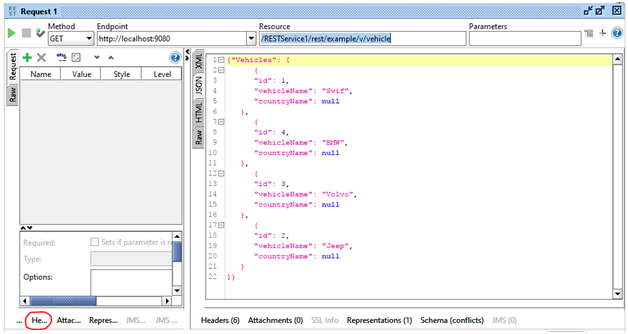
Now click on the plus button:
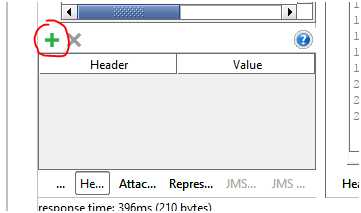
Now add your header parameter as shown below:
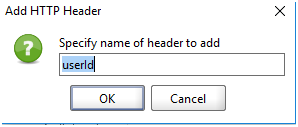
And click the ‘OK’ button.
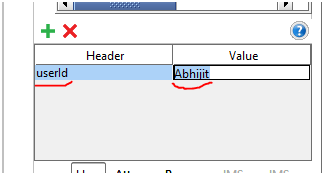
Now you can see the header parameter, ‘userId,’ has been added to your project and you can add values to it.
Opinions expressed by DZone contributors are their own.

Comments