Step-by-Step Guide to Use Anypoint MQ: Part 4
Learn how to create a message exchange, bind queues to a message exchange, publish messages to an exchange, and delete a message exchange in Anypoint MQ.
Join the DZone community and get the full member experience.
Join For FreeThis is the last part of the Anypoint MQ Series. You can read previous parts here: Part 1; Part 2; Part 3. In this post, we will learn about message exchanges and how we can use the to send messages to multiple queues. We will also see how we can bind queues and publish messages to a message exchange. We may need to send the same message to more than one queue (to broadcast the message); in that scenario, message exchanges can be used.
What Is a Message Exchange?
A message exchanges bind one or more queues so that the message sent to exchange appears in all the queues bound to it simultaneously. In other words, with message exchanges, we can send the same message to all the queues which are bound to it.
Some features of message exchanges include:
- Maximum size of a message sent to a message exchange is 10 MB.
- Queues and message exchanges are unique to the region in which they were created and we cannot share messages or queues between regions.
- We can only bind standard queues with a message exchange. We cannot bind FIFO queues to a message exchange.
- A queue can be bound to one or more message exchanges.
How to Create a Message Exchange
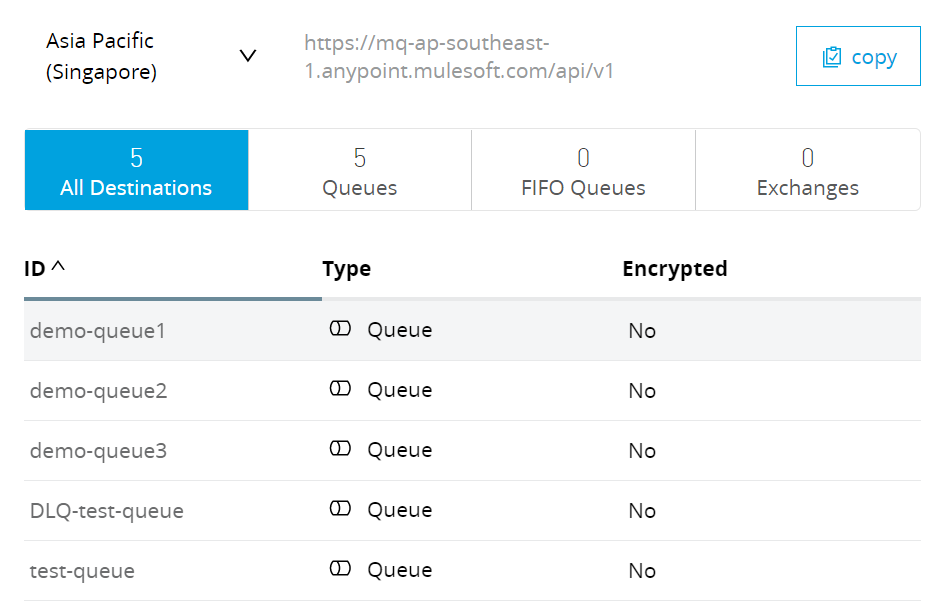
Before creating a message exchange, we need queues which we want to bind to it. As shown in the below image, we can see we have five queues. We are going to bind demo-queue1, demo-queue2 and demo-queue3 with a message exchange.
Now that we have a queue, we will create a message exchange. For this, we will go to Anypoint Platform --> AnypointMQ --> Click on the + icon. There, we will see the option to choose Exchange; select it.

Note: Message exchanges and the queue we want to bind need to be in the same region.
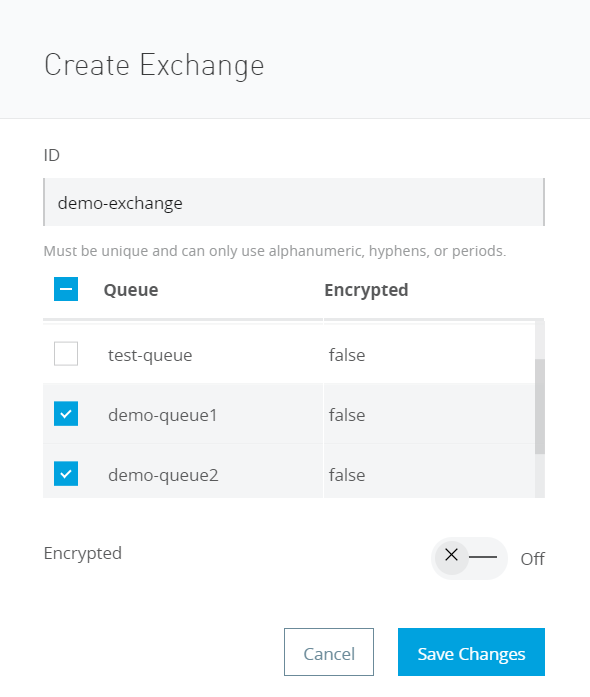
Upon clicking Exchange, a 'Create Exchange' pop-up will appear, as shown in below image. We will first provide an ID to the message exchange. Next, we will be able see the standard queues created within the same region; they are each denoted with a checkbox. We can then select the checkbox for the queues that we want to bind with Message Exchange. Below, we have selected two queues, demo-queue1 and demo-queue2. These two queues will be bound to a message exchange. Once we fill-in the ID field and check the required queue, we click on Save Changes.
After this, we can see the newly created message exchange in the MQ console.

After clicking on this newly created exchange, we can see the queues that are bound to it.
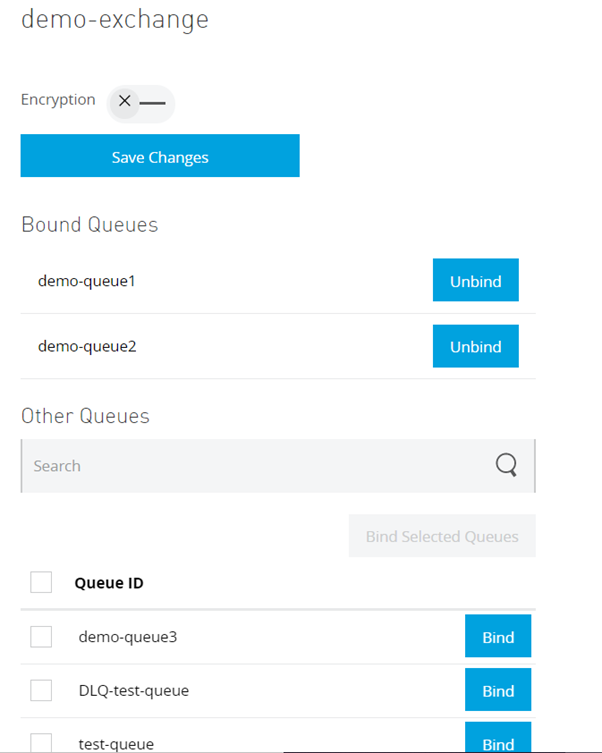
The below image shows the message exchange named demo-exchange and the two queues bound to it. We can also see other available queues listed here.
Next to the bound queue, we can see the 'Unbind' option. We can click on this if we want to unbind the queue from the message exchange.
Similarly, next to the other available queue, we can see the 'Bind' option. We can click on this if we want to bind that particular queue with a message exchange or we can mark multiple queues and then click on 'Bind Selected Queues' to bind multiple queues with a message exchange.
In the below image, we are selecting demo-queue3 and binding it with a message exchange.
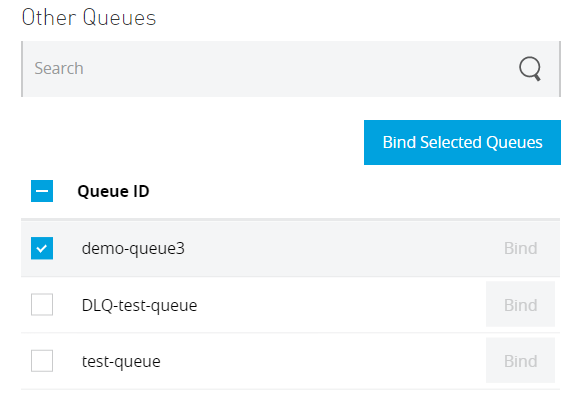
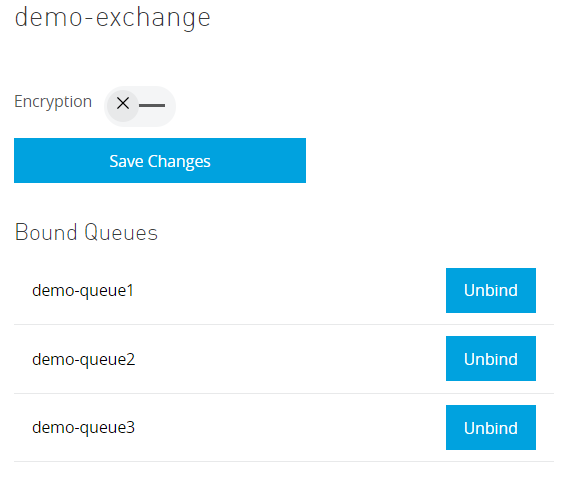
After clicking on the 'Bind Selected Queues' button, we can see there are now three queues bound to the exchange.
Publish a Message to Message Exchange
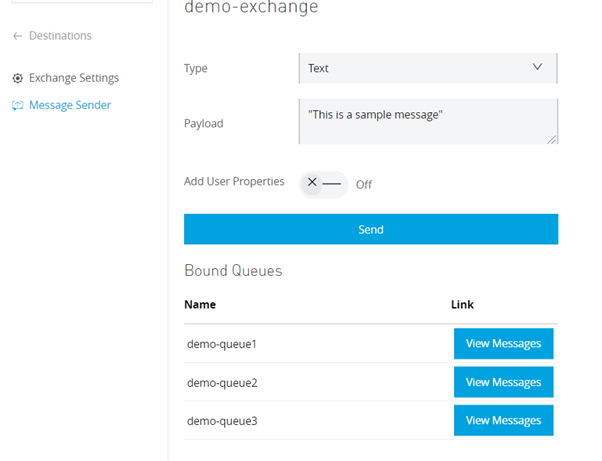
Now, let's try to send a message to a message exchange and see if the same message is received in all three queues. To do this, click on Message Sender and then select the type of message you want to send (Text/JSON/CSV); finally, enter the message in the tab called 'Payload' and click on the 'Send' button.
We can see the name of the queues bound to our message exchange.
Once the message is sent to a message exchange, we will try to see the same message in all three bounded queues.


We can see the same message in all three queues (notice that the ID and Creation Date are the same for the message in all three queues). In this way, we can publish a message to the exchange directly from the console.
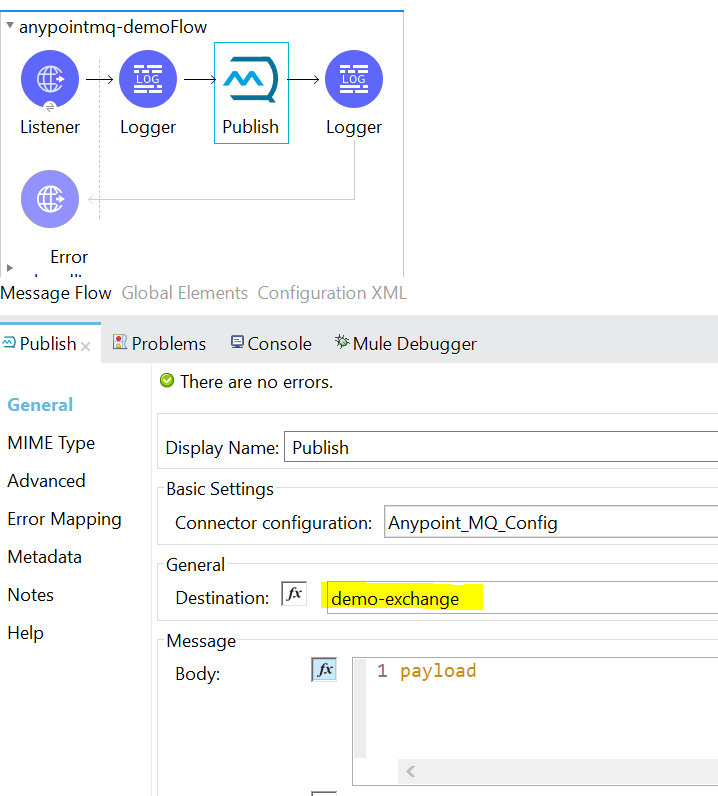
We also can publish a message to a message exchange from Mule Flow using Anypoint MQ's publish operation. Please see the below demo flow. Here, we are receiving a message from an HTTP listener, printing a message using a logger, publishing the message in the message exchange, and displaying a success message.
If we consult the Anypoint MQ publish operation config, we can see that we have entered the name of the message exchange in place of the destination. This is because we want to publish a message to a message exchange.
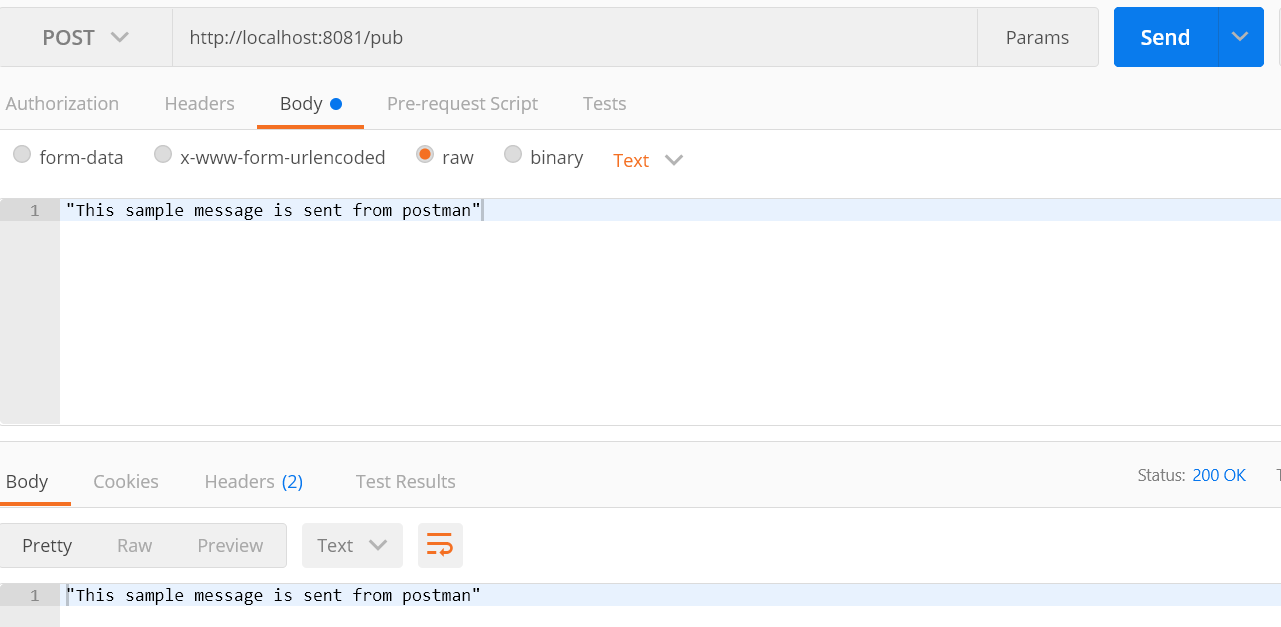
Let's try to run this flow and try to publish a message to a message exchange. We will use Postman to trigger the HTTP endpoint. We can see that the message was sent successfully from Postman.
Let's have a look at the Mule logs:
INFO 2021-01-05 01:41:18,505 [[MuleRuntime].uber.05: [anypointmq-demo].anypointmq-demoFlow.CPU_LITE ] [processor: anypointmq-demoFlow/processors/0; event: 015c6ec0-4ec9-11eb-8484-568d5a57601b] org.mule.runtime.core.internal.processor.LoggerMessageProcessor: message received is "This sample message is sent from postman"
INFO 2021-01-05 01:41:22,044 [[MuleRuntime].uber.04: [anypointmq-demo].anypointmq-demoFlow.CPU_LITE ] [processor: anypointmq-demoFlow/processors/2; event: 015c6ec0-4ec9-11eb-8484-568d5a57601b] org.mule.runtime.core.internal.processor.LoggerMessageProcessor: "Message Published"
In the logs, we can confirm that our Mule flow has been completed successfully. Let's see whether all three queues received this message or not.


We can see the message sent from Postman is present in all three queues and the message ID is the same in all three queues.
In this way, we can send the message to a message exchange and then consume that message from the queues using Anypoint MQ Subscriber or Consumer, based on our requirement.
Unbind a Queue From a Message Exchange
We can remove/unbind any queue from a message exchange at any time. For this, we will go to a message exchange and click the 'Unbind' button next to the name of the queue which we want to unbind.
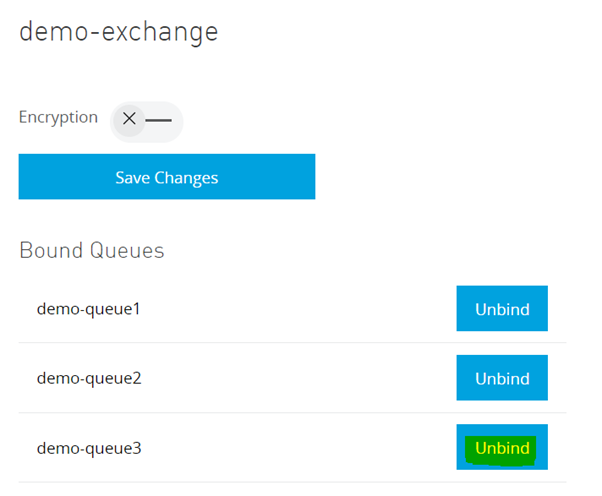
After clicking on the 'Unbind' button, go to demo-queue3 as shown in above image. This queue will unbind from the message exchange.
Note: By using Unbind, we are only removing the queue from the message exchange. An unbound queue will be present in Anyponit MQ and we can use it or delete it based on our requirements.
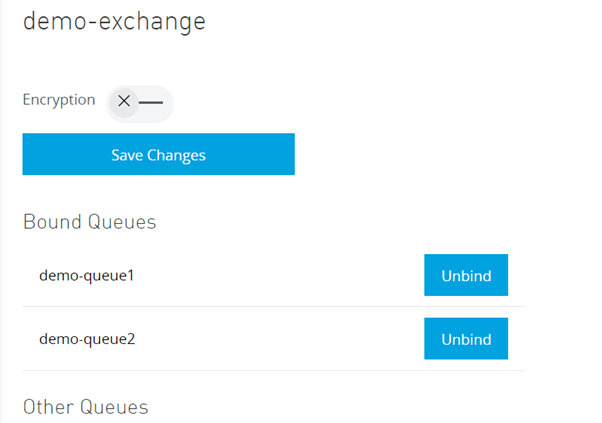
Now, if we look into the message exchange, we can see only two queues bound to it. Any message published to the message exchange will be sent only to these two queues.
Delete a Message Exchange
We can delete a message exchange. By deleting a message exchange, all the queues bound to it will become unbound.
In the MQ Console, if we click on a message exchange we can see a delete option on the right side, as shown in below image:

If we click on the 'Delete' button, a pop up will appear as shown in the below image:
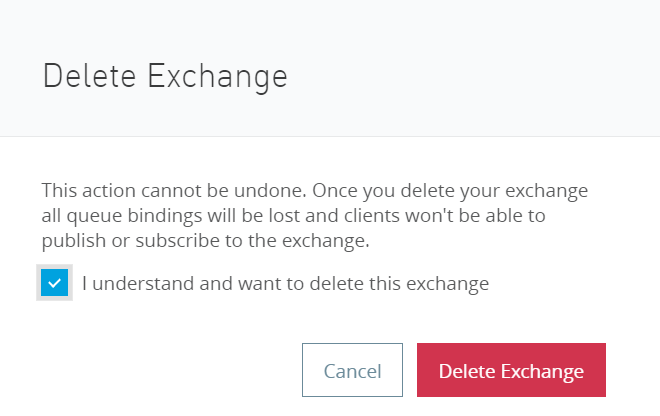
If we click on 'Delete Exchange' the message exchange will be deleted.
In this way, we can create a message exchange, bind queues to a message exchange, publish messages to an exchange, and delete a message exchange in Anypoint MQ.
Opinions expressed by DZone contributors are their own.

Comments