SQL Server Disaster Recovery with Log Shipping
This article discusses the log shipping configuration for SQL Server disaster recovery. Let's understand log shipping and how it increases database availability
Join the DZone community and get the full member experience.
Join For FreeWhile several disaster recovery (DR) techniques exist, many organizations use log shipping for its simplicity, among other factors. Also, log shipping is easy to set up and maintain compared to other DR solutions, like Database Mirroring, Clustering, Replication, etc. This article discusses the steps to configure log shipping for SQL Server disaster recovery. Before discussing the configuration, it's important to have a clear understanding of log shipping.
Understanding Log Shipping Disaster Recovery Solution
Log shipping helps increase database availability by maintaining backups onto a secondary (standby) server to replace the primary server. Essentially, if the primary database becomes unavailable, you can bring a secondary database online manually.
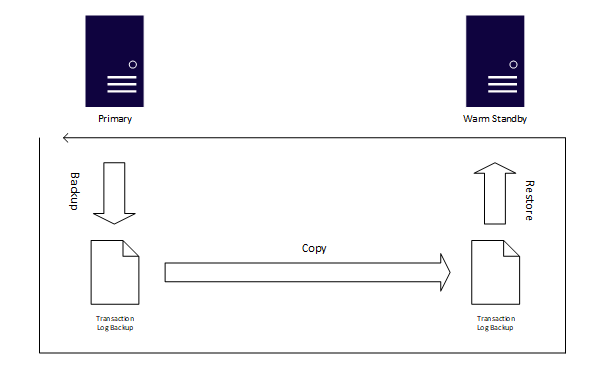
SQL Server creates three agent jobs to automate backup, copy, and restore operations when log shipping is set up on a database including:
- The first job is on the primary instance. It backs up the transaction log on the primary database.
- The second job is on the secondary server. It copies log backups from the primary server to the secondary server.
- The third job is also on the secondary server. It restores log backup, replacing log entries on the secondary database.
While log shipping is easy to configure, there are a few things you need to keep in mind before implementing it.
- Protects at the database level: This makes log shipping a viable option for users who want to protect fewer databases, in the event of a disaster. But, if you've too many databases that you want to save at the SQL Server instance level, log shipping as a disaster recovery solution won't be adequate.
- Manual failover needs to be initiated on the secondary server: Automatic failover from the primary server to the secondary server is not possible with a log shipping configuration. You need to bring the secondary database online manually.
- Manual configuration of SQL logins is required: Logins are not automatically shipped from the primary to the secondary server. You can transfer the logins and passwords from the primary server instance to the secondary server instance to sync the logins.
Note: You also need to manually create maintenance plans, linked servers, and SSIS packages on a warm standby server.
- Risk of Data Loss: If the primary database becomes unavailable, you can recover data only up to the last transaction backup. Essentially, any transactions made after the transaction log backup was shipped (to the secondary server) will be lost, leading to data loss. Suppose, the primary server fails at 9 AM. If the last backup copied to a secondary server instance ‘B’ was taken at 8:45 AM, then the data between 8:45 AM and 9 AM will be lost.
- Reverse log shipping: This is useful when you need to reverse the roles of the server instead of redoing a full database backup. If you've very large backups and need to log ship data from a secondary server to the primary server located far away, copying a full backup can take a considerably long time to complete.
How To Configure and Use Log Shipping?
The process to configure log shipping is divided into two different steps:
Step 1 – Initialize a Database on the Secondary Server
Here we’ve two databases in the primary server instance. We will log ship TestDB1 onto the secondary server, which doesn’t have any databases.
Note: To set up log shipping, a database needs to be in the FULL or BULK-LOGGED recovery model. Log shipping will fail in the case of the SIMPLE recovery model because it does not use transaction log backups.
- Take full database backup and a transaction log backup and restore the backups on the secondary server. Run the following T-SQL query to create ‘Full’ and ‘Transaction Log’ backups:
backup database TestDB1 to disk = ‘c:\backup\TestDB1.bak’ backup log TestDB1 to disk = ‘c:\backup\TestDB1.bak’ |
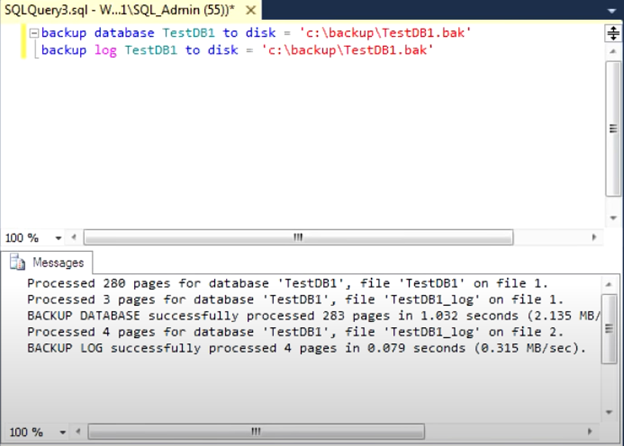
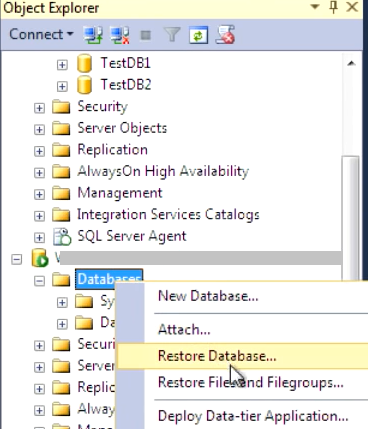
- Now restore backups on the secondary server.
![Screenshot - 2]()
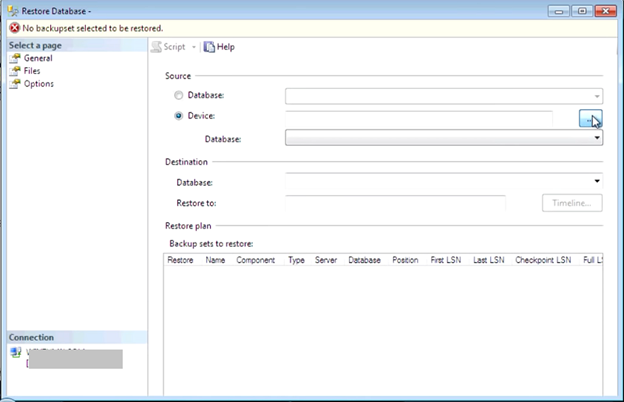
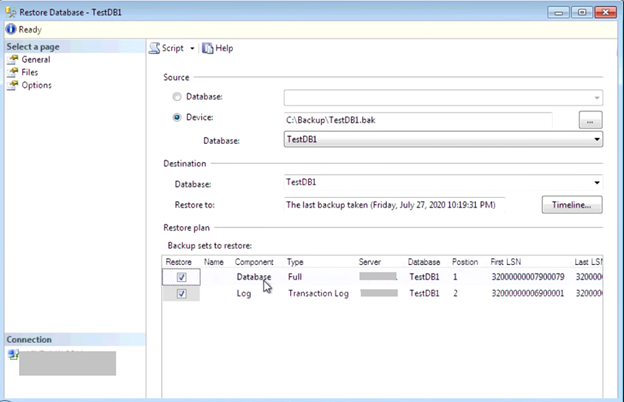
- From the ‘Restore Database’ screen, select ‘Device’ as the source, then click on the icon.
![Screenshot - 3]()
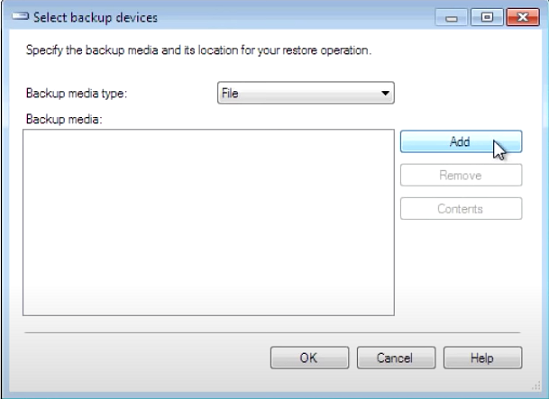
- From the ‘Select backup devices’ dialog box, click Add.
![Screenshot - 4]()
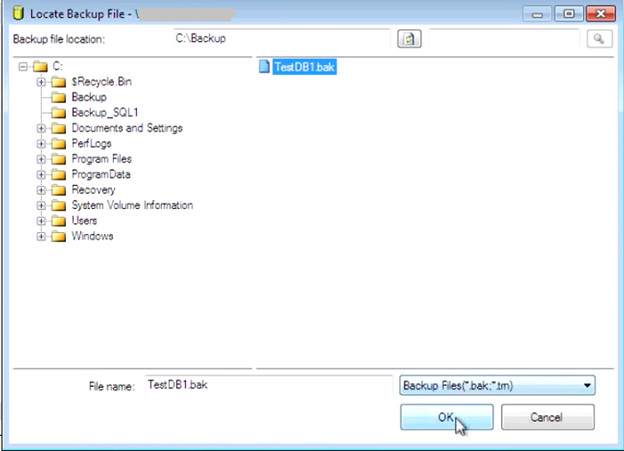
- Select the backup file you want to restore and click ‘OK.’
![Screenshot - 5]()
- The backup of the TestDB1 will be restored.
![Screenshot - 6]()
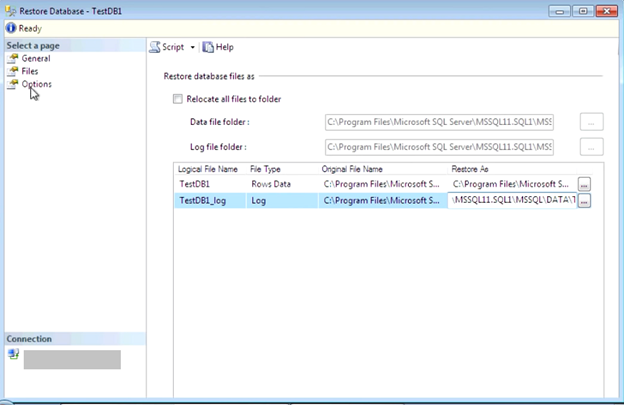
- Click on Files under ‘Select a page' and change the location of the physical database files.
![Screenshot - 7]()
- Next, click on Options. On the ‘Options’ page, select RESTORE WITH STANDBY from the ‘Recovery State’ dropdown list.
Note: Here we’ve selected the ‘RESTORE WITH STANDBY’ option to ensure that the database is read-only. You may select the ‘RESTORE WITH NORECOVERY’ option but it will make the database inaccessible. 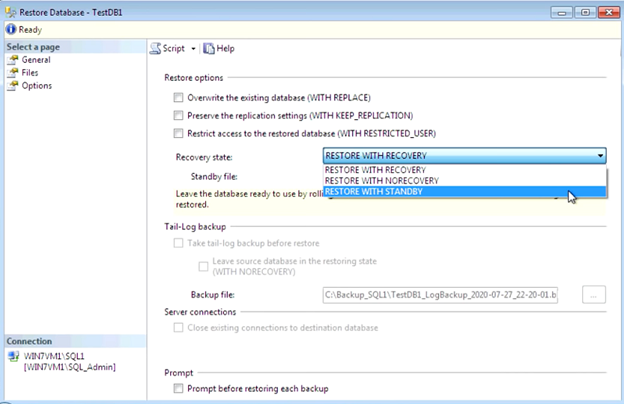
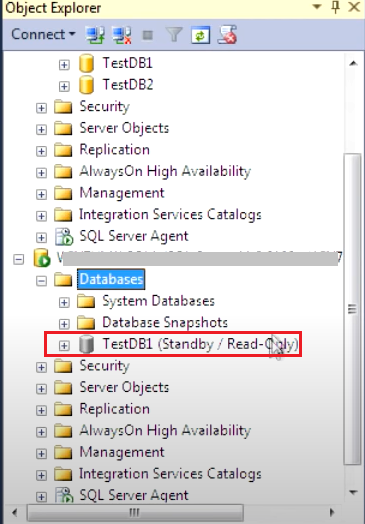
- After selecting the recovery state, click ‘OK.’ The database will be restored successfully. The ‘TestDB1’ database is now restored on the secondary server instance in ‘Standby (Read-Only)’ mode.
![Screenshot - 8]()
The database is now initialized on the secondary server.
Step 2 – Enable Primary Database
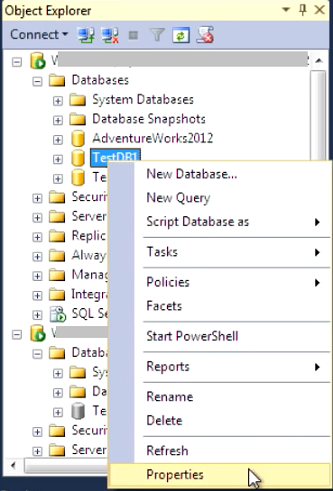
- Right-click on ‘TestDB1’ from the primary server instance and click on ‘Properties.’
![Screenshot - 9]()
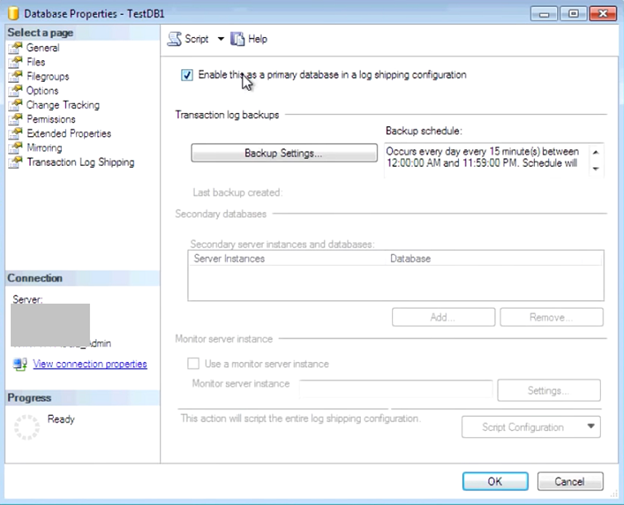
- Select the “Enable this as a primary database in a log shipping configuration” option.
![Screenshot - 10]()
Note: By default, transaction logs are backed up every 15 minutes. However, your transaction logs sometimes become too big to copy and restore within the defined time limit. Also, the backup operation might fail to complete. In that case, you can schedule a log backup. To do so, click on Backup Settings. Then, on the 'Transaction Log Backup Settings' screen, specify the location to save the backup file. Next, click Schedule and change the daily frequency of backups to run every 1-2 minutes. 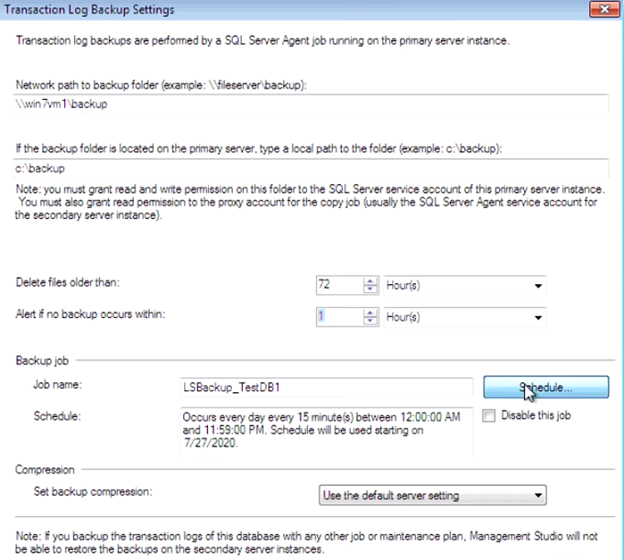
- Click ‘Add’ to set up the secondary databases. You will be prompted to connect to the secondary server instance.
![Screenshot - 12]()
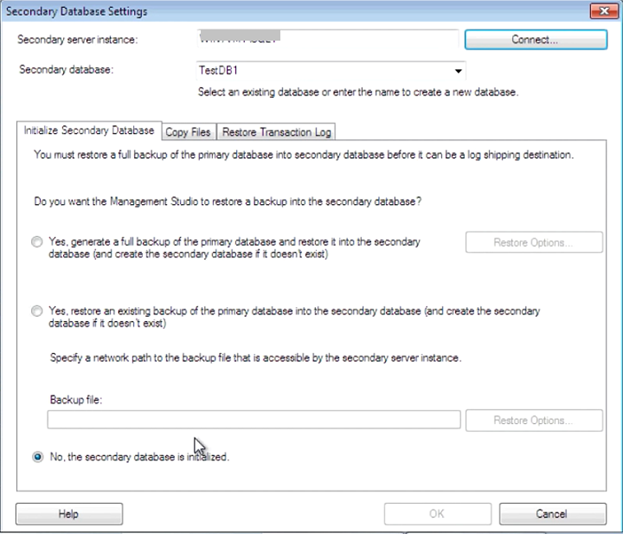
- On the ‘Secondary Database Settings’ screen, we’ll choose the “No, the secondary database is initialized” option as we already did in Step 1.
![Screenshot - 13]()
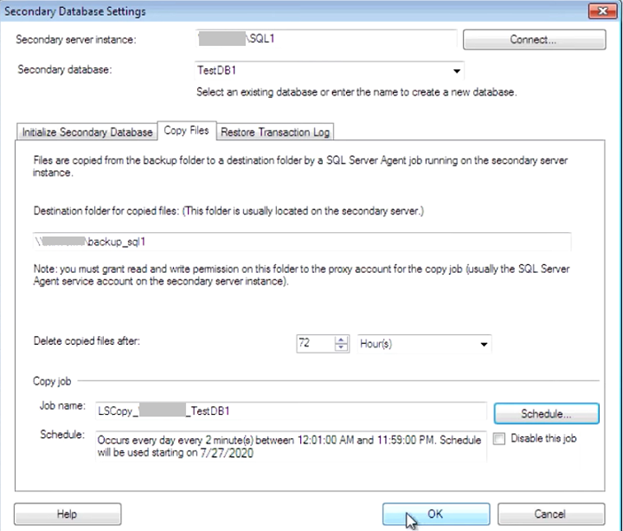
- Now, let’s move on to copy files. Here, enter the location of the backup folder for the secondary server, then schedule the frequency of the backups. Click ‘OK.’
![Screenshot - 14]()
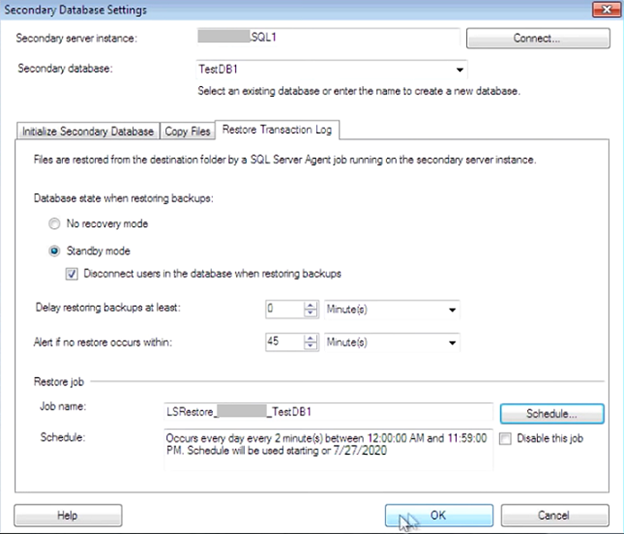
- On the ‘Restore Transaction Log’ screen, select the database state as ‘Standby mode’ and check the “Disconnect users in the database when restoring backups. Schedule the backup interval. Click ‘OK.’
![Screenshot - 15]()
- The secondary server instance and the database will be added. Click ‘OK’ and it will create SQL Server Agent jobs. Click on the primary 'SQL Server Agent,' and you can see that the job to back up the transaction logs gets created.
And, in the secondary 'SQL Server Agent', you can see that two jobs are created. One is to copy the transaction log backups from the primary to the secondary and the other is to restore that transaction log to the secondary DB.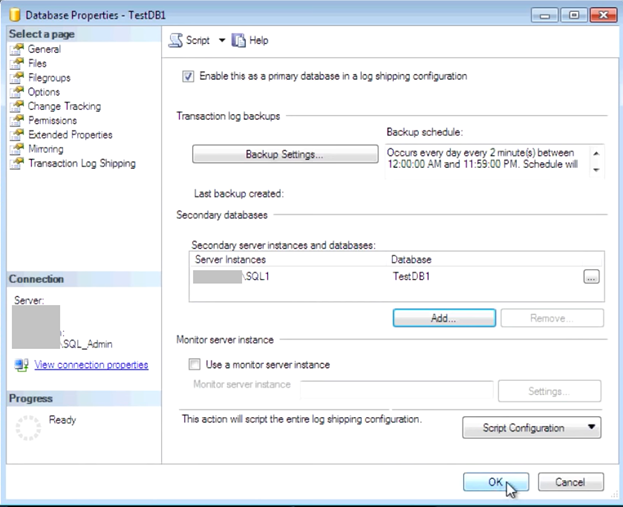
The log shipping disaster recovery solution is now configured. Suppose, if the primary DB goes down, you could bring the secondary DB online. For that, you need to bring the secondary DB out of standby mode by running this query:
Select * from Products RESTORE DATABASE TestDB1 WITH RECOVERY |
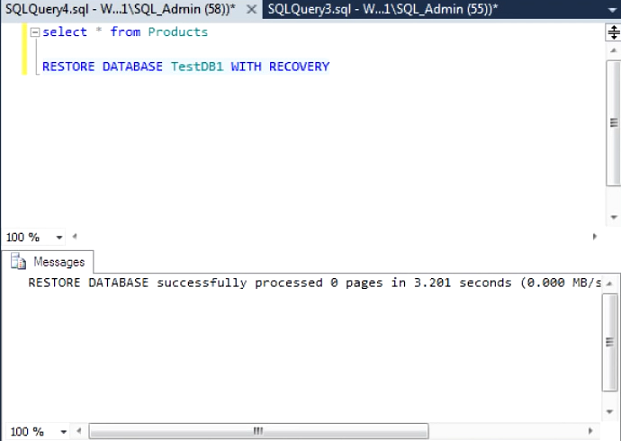
- Refresh Databases, and you will see that the’TestDB1’ database within the secondary server will be online.
Conclusion
Log Shipping is a cost-effective and simple disaster recovery (DR) solution for SQL Server. However, before setting up log shipping, keep in mind that it is an ideal option to perform disaster recovery at the database level only. But, for disaster recovery on a server instance, you could use other DR techniques, such as database mirroring, failover clustering, etc. Also, configuring log shipping may result in data loss. To recover deleted or inaccessible data from a corrupt or damaged SQL database, using a professional SQL recovery tool can come in handy.
Opinions expressed by DZone contributors are their own.


Comments