SpringBoot: Performance War
A closer look at SpringBoot and its role in performance.
Join the DZone community and get the full member experience.
Join For FreePerformance Matrix of Reactive APIs With WebFulx and Redis
Reactive Systems are designed to address challenges posed by modern software systems - the challenges related to a large number of users and high throughput. Reactive systems are expected to be highly responsive, resilient, elastic and message-driven.
In this article we will:
- Build a set of fully non-blocking REST API using SpringBoot 2.0, WebFlux and Reactive Redis.
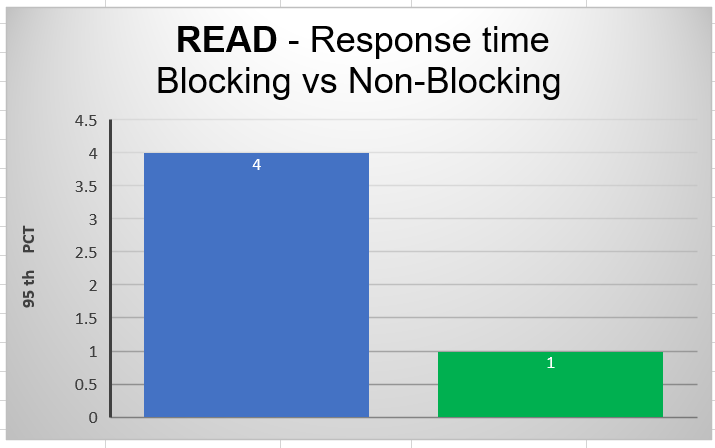
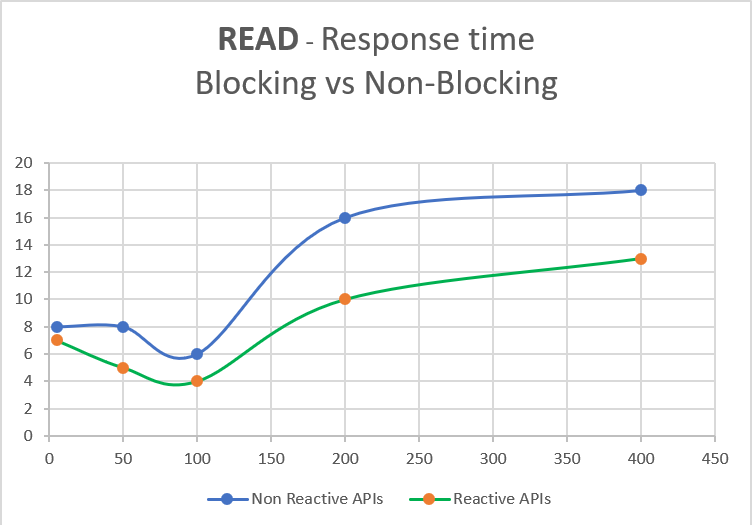
- Performance test the above Reactive APIs against the traditional non-reactive APIs
The code used in this example can be downloaded from GitHub
Step One: Create a Skeleton Reactive WebFlux SpringBoot Project
Create a SpringBoot maven project using - https://start.spring.io
Add the following dependencies:
-
spring-boot-starter-web -
spring-boot-starter-data-redis -
spring-webflux -
spring-boot-starter-data-redis-reactive
Refer to the dependencies in pom.xml
You may also like: All About Spring Boot [Tutorials and Articles].
Step Two: Create Domain Objects
The demo project uses the domain objects Customer and Account. A customer can have multiple accounts.

Step Three: Create Non-Blocking Reactive REST APIs Using WebFlux
Create a REST controller CustomerControllerRx for the purpose of serving the following reactive no-blocking APIs.
- Add/update a Customer
- findById a Customer
The code snippet uses Mono which is an implementation of Reactive streams Publisher interface and ReactiveRedisTemplate and ReactiveValueOperations to interact with Redis in a non-blocking way.
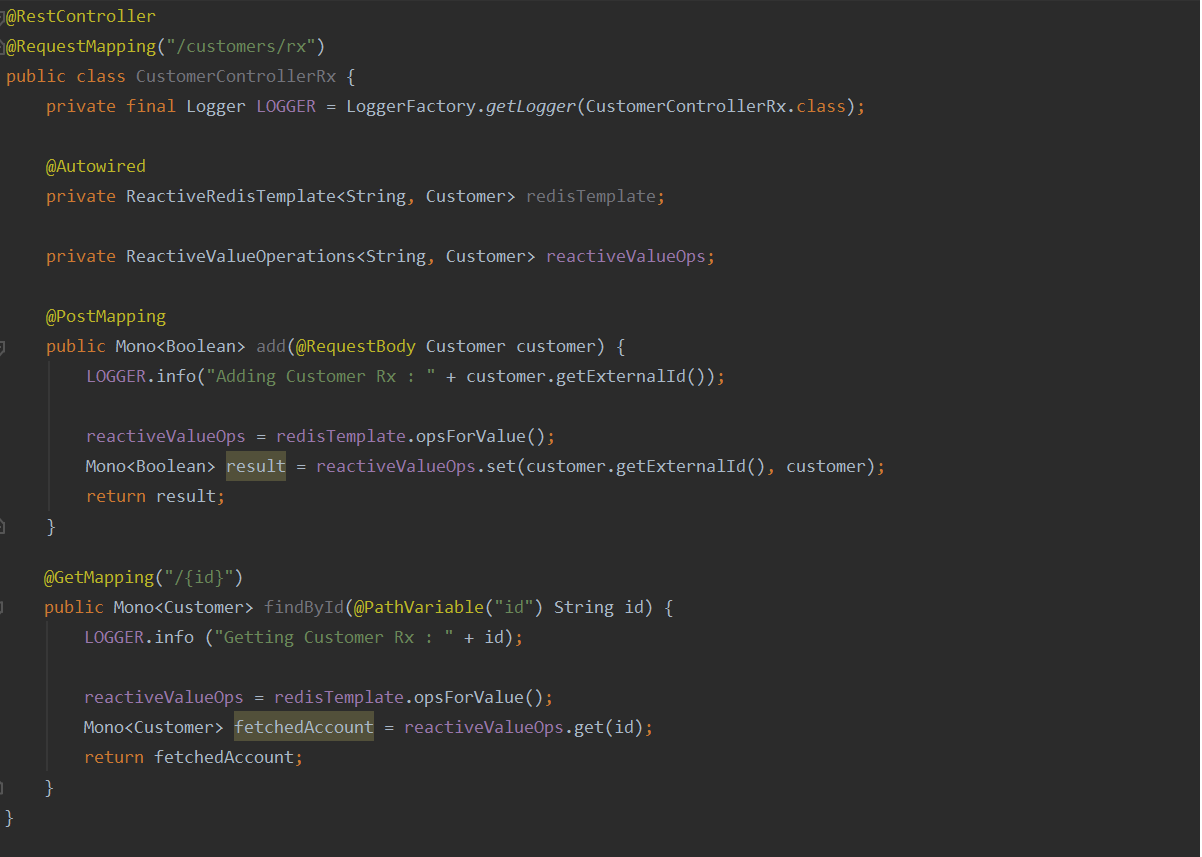
ReactiveRedisTemplate is configured in RedisConfigRx
Step Four: Create Synchronous (Blocking) REST API
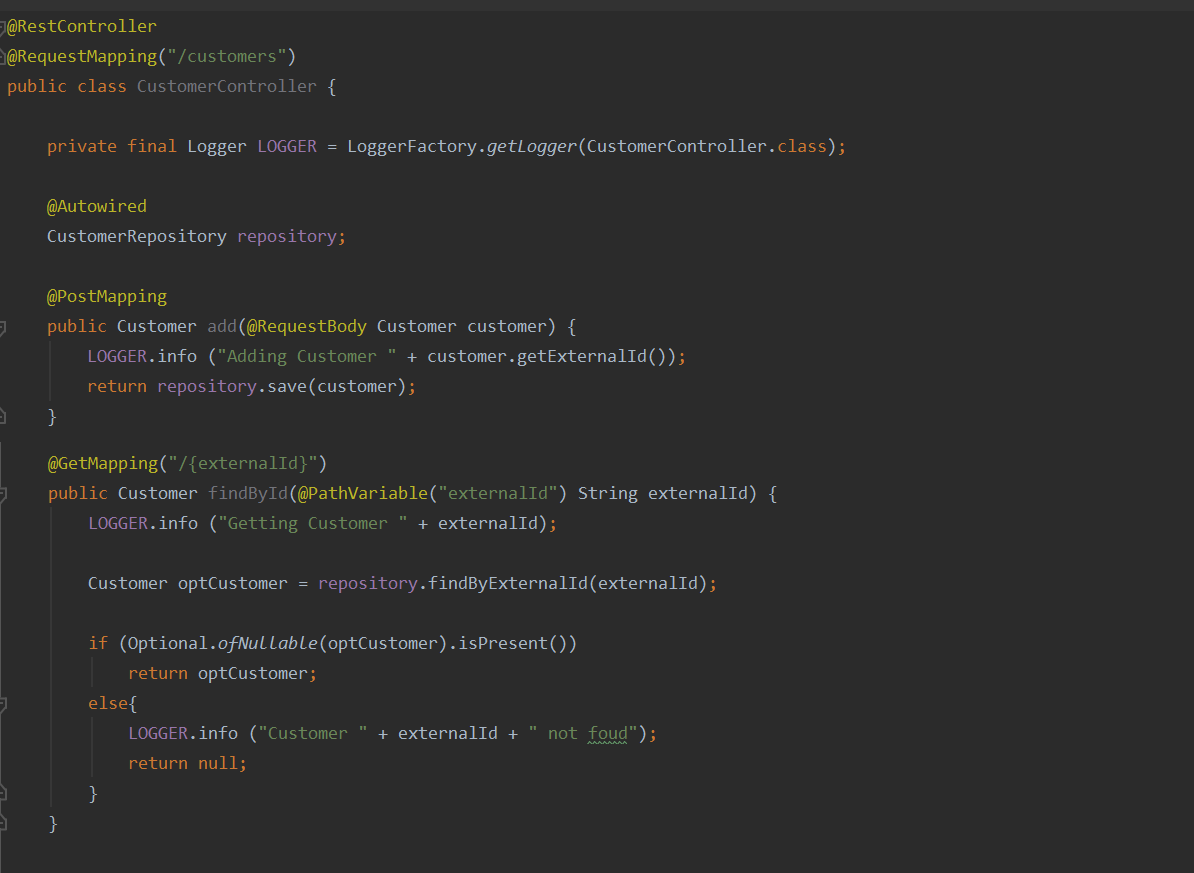
Create a REST controller CustomerController for the purpose of serving non-reactive blocking APIs. We are using CustomerRepository which extends a CurdRepository to interact with the Redis database.
Step Five: Connecting to Redis Using Docker
- Redis doesn’t officially support Windows. However, the easiest way to get Redis up and running for UNIX or Windows is by using Docker.
- Use the following steps to pull a redis image from docker hub and to start on port 6379 in detached mode.
xxxxxxxxxx
$ docker pull redis $ docker run -d -p 6379:6379 --name redis1 redis $ docker ps -a // make sure redis is up and running.
Refer to application.yml for Redis connection properties.
Step Six: Set Up JMeter for Testing
- Install Apache JMeter https://jmeter.apache.org/
- Install the following graph plugins from the plugin downloads site https://jmeter-plugins.org/
- Basic Graphs
- Additional Graphs
The above plugins are zip files and can be extracted to the lib folder of the JMeter installation folder. Once the plugins are installed, JMeter can be started from the bin folder.
The next step is to create Test Plans for the APIs that are required to be benchmarked. I have the following Test Plans for the APIs.
GetCustomers.jmx |
|
SaveCustomers.jmx |
|
GetCustomersRx.jmx |
|
SaveCustomersRx.jmx |
|
The above Test Plans can be opened in JMeter and configured for a different number of concurrent users — E.g. 5, 50, 100, 400, 500 and so on. Now, JMeter test cases can be executed in a non-UI mode as below.
xxxxxxxxxx
jmeter -n -t <TestPLan.jmx> -l <TestPlan.jtl> -e -o <output folder>
Where:
-n run in non-GUI mode
-t provide the name of the test file
-l name of the output report file
-e jMeter to follow post-processing specified in the jmx file.
-o dashboard folder.
Step Seven: Benchmark Reactive REST APIs vs. Blocking REST APIs
Start SpringRedisReactiveApplication
- Make sure the application starts without errors by connecting to the Redis DB on Docker.
- Set no of users (threads) and loops (iterations) for the Test Plans.
Open the TestPlan using JMeter UI and change the number of users (threads) and set the number of loops. Save the test plan. Exit JMeter UI.
- Execute Test Plans
Go to JMeter\bin folder and execute:
xxxxxxxxxx
jmeter -n -t <path>\SaveCustomers.jmx -l <path>\SaveCustomers.jtl -e -o <path>\SaveCustomersOutput-5Users
The above command will run SaveCustomers.jmx TestCases creates a reporting folder named SaveCustomersOutput-5Users
- Repeat step 6 (b) and 6 (c) for the other test plans, every time changing the output folder name.
- SaveCustomersRx.jmx
- GetCustomers.jmx
- SaveCustomersRx
- Repeat step 6 (b), (c) and (d) for 10, 50, 100, 200 and 400 users.
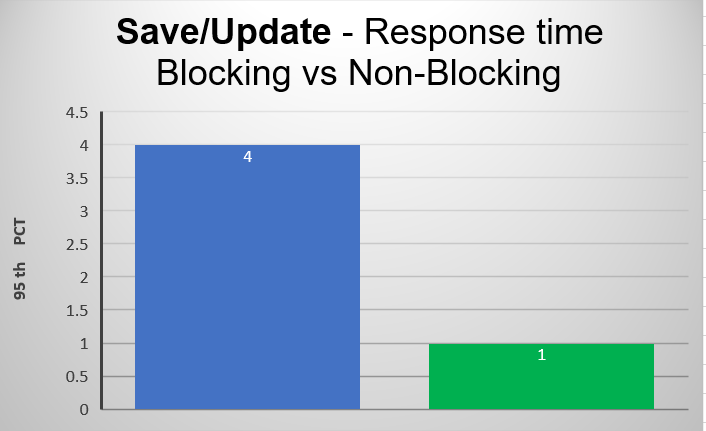
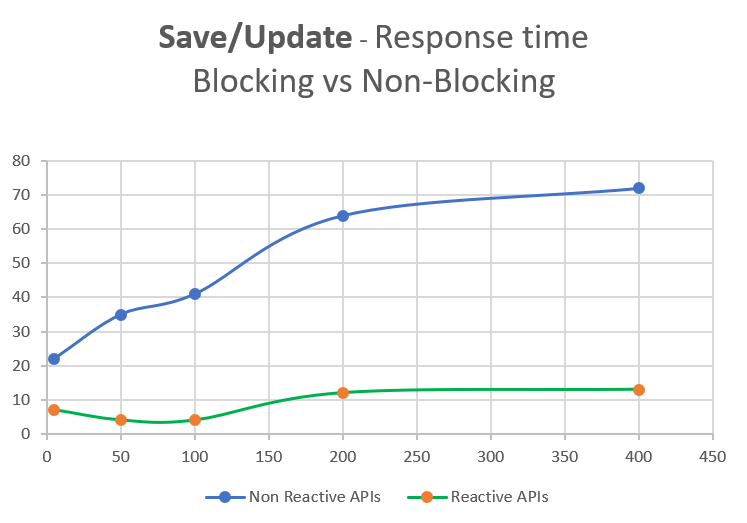
Performance Metrics
|
|
|
|
Small no of concurrent users |
|
A large no of concurrent users |
|
Further Reading
Opinions expressed by DZone contributors are their own.

Comments