Spring Boot and GCP Cloud Pub/Sub
In this post, we will explore how we can use Google Cloud Platform’s (GCP) Pub/Sub service in combination with a Spring Boot application using Spring Integration.
Join the DZone community and get the full member experience.
Join For FreeIn this post, we will explore how we can use Google Cloud Platform’s (GCP) Pub/Sub service in combination with a Spring Boot application using Spring Integration. We will send a message to a sender application which publishes the message to a Topic where a receiver application receives the messages of a Subscription.
Introduction
GCP Pub/Sub is basically just like any other messaging system. You can send a message to a Topic where it is persisted, then a subscriber consumes the message, and after acknowledgment, the message is removed.
Our goal for this post is to create two Spring Boot applications, one sender and one receiver application, which will make use of Spring Integration to send and receive the messages. We will make use of GCP Pub/Sub as our messaging system in the Cloud.
Here are some examples which can serve as a reference:
- The messaging GCP Pub/Sub Spring guide
- Spring Cloud GCP Pub/Sub Code Sample
- Bootiful GCP: Integration with Google Cloud Pub/Sub by Josh Long
Create GCP Topic and Subscription
Before getting started, you will need to create a GCP account if you don’t already have one. Check out the first paragraph of a previous post on how to do so.
In this section, we will create our Topic and Subscription within GCP.
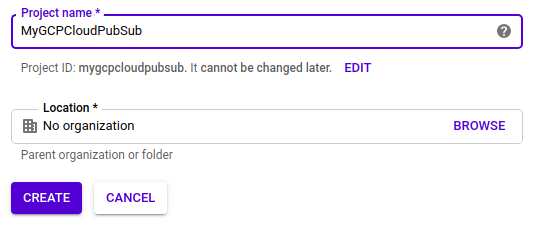
First, we need to create a new project MyGCPCloudPubSub:

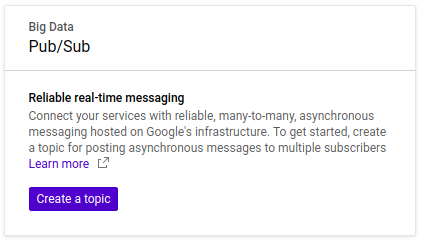
Go to the Big Data section and select Pub/Sub in the menu:

If we are using Pub/Sub for the first time, a message is being shown in order to enable the Pub/Sub API.

After this, we are able to create a Topic.

Create the Topic myTopic and click the Create button:

From the Topic Details page, we click the Create Subscription button and create Subscription mySubscription.

We have created a Topic and a Subscription in GCP. Time to create a receiver and sender application!
Create Receiver Application
The receiver application will make use of the following components:
- The Inbound Channel Adapter listens to messages from a Google Cloud Pub/Sub subscription and sends them to a Spring channel in an application
- The Input Channel receives the message in a Spring Channel
- The ServiceActivator processes the received messages in a Spring Channel
For creating the receiver application mygcpsubplanet, we go to Spring Initialzr and select Java 11. The sources of the receiver application can be found at GitHub.
We need to add the dependencies spring-cloud-gcp-starter-pubsub and spring-boot-starter-integration to our pom. The dependency spring-cloud-gcp-starter-pubsub will auto-configure a PubSubTemplate for Google Cloud Pub/Sub.
<dependency>
  <groupId>org.springframework.cloud</groupId>
  <artifactId>spring-cloud-gcp-starter-pubsub</artifactId>
</dependency>

<dependency>
  <groupId>org.springframework.boot</groupId>
  <artifactId>spring-boot-starter-integration</artifactId>
</dependency>
We also add the Spring Cloud GCP bill of materials to control the version of the dependencies:
<properties>
  <java.version>11</java.version>
  <spring-cloud.version>1.1.1.RELEASE</spring-cloud.version>
</properties>

...

<dependencyManagement>
  <dependencies>
    <dependency>
      <groupId>org.springframework.cloud</groupId>
      <artifactId>spring-cloud-gcp-dependencies</artifactId>
      <version>${spring-cloud.version}</version>
      <type>pom</type>
      <scope>import</scope>
    </dependency>
  </dependencies>
</dependencyManagement>
We will run the receiver application from our development machine. Therefore, it is necessary to provide some account information to the application. There are several ways to do this, but we will define this in the application.properties file in combination with a service account on GCP and a local service key. See paragraph 3.4 of a previous post for the instructions.
The application contains the Inbound Channel Adapter messageChannelAdapter, which links the Subscription mySubscription to the Spring Channel myInputChannel. The ServiceActivator contains the logic we want to be executed when a message is being processed. We just log the message to the console, but in real life, there are numerous things you can do here.
@SpringBootApplication
public class MyGcpSubPlanetApplication {

   private static final Log LOGGER = LogFactory.getLog(MyGcpSubPlanetApplication.class);

   public static void main(String[] args) {
      SpringApplication.run(MyGcpSubPlanetApplication.class, args);
   }

   @Bean
   public PubSubInboundChannelAdapter messageChannelAdapter(
         @Qualifier("myInputChannel") MessageChannel inputChannel,
         PubSubTemplate pubSubTemplate) {
      PubSubInboundChannelAdapter adapter =
            new PubSubInboundChannelAdapter(pubSubTemplate, "mySubscription");
      adapter.setOutputChannel(inputChannel);

      return adapter;
   }

   @Bean
   public MessageChannel myInputChannel() {
      return new DirectChannel();
   }


   @ServiceActivator(inputChannel = "myInputChannel")
   public void messageReceiver(String payload) {
      LOGGER.info("Message arrived! Payload: " + payload);

   }

}
Run the application:
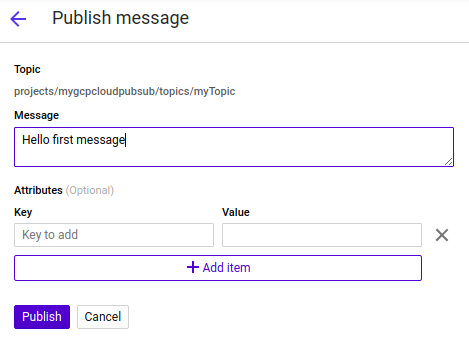
$ mvn spring-boot:runBefore we create the sender application, we can already check whether the receiver application works fine. Therefore, we go to GCP and the Topic myTopic. Click the three vertical dots and click Publish message.

Fill in a message you want to send and click the Publish button.

The console log of the receiver application shows us the processed message:
Message arrived! Payload: Hello first messageWe just send a message from a GCP Topic and pulled it to a locally running receiver application and processed the message. Now we know this is working, it is time to write the sender application.
Create Sender Application
The sender application will make use of the following components:
- the Message Gateway will write messages to the Spring Channel;
- the ServiceActivator will consume the messages in the Spring Channel and sends them to the GCP Topic;
- the Outbound Channel Adapter will ensure that the messages are delivered to the GCP Topic.
For creating the sender application mygcppubplanet, we go to Spring Initialzr and select Java 11. The sources of the sender application can be found at GitHub.
We add the same dependencies as for the receiver application into our pom.
The ServiceActivator listens to messages on the Spring Channel myOutputChannel and publishes them to the Outbound Channel Adapter PubSubMessageHandler which will deliver the message to the GCP Topic myTopic. The Messaging Gateway PubsubOutboundGateway will allow messages to be published to the Spring Channel myOutputChannel.
@SpringBootApplication
public class MyGcpPubPlanetApplication {

   public static void main(String[] args) {
      SpringApplication.run(MyGcpPubPlanetApplication.class, args);
   }

   @Bean
   @ServiceActivator(inputChannel = "myOutputChannel")
   public MessageHandler messageSender(PubSubTemplate pubsubTemplate) {
      return new PubSubMessageHandler(pubsubTemplate, "myTopic");
   }

   @MessagingGateway(defaultRequestChannel = "myOutputChannel")
   public interface PubsubOutboundGateway {
      void sendToPubsub(String text);
   }

}
The only thing we need, is a way to call the Messaging Gateway in order to inject a message to it. We will therefore create a Rest controller in order that we can post a message to it by means of a HTTP call.
Add the Spring Boot MVC dependency spring-boot-starter-web to the pom:
<dependency>
  <groupId>org.springframework.boot</groupId>
  <artifactId>spring-boot-starter-web</artifactId>
</dependency>
The controller will receive a parameter message and send its contents via the Messaging Gateway to the Spring Channel:
@RestController
public class MessageController {

    @Autowired
    private MyGcpPubPlanetApplication.PubsubOutboundGateway messagingGateway;

    @PostMapping("/postMessage")
    public RedirectView publishMessage(@RequestParam("message") String message) {
        messagingGateway.sendToPubsub(message);
        return new RedirectView("/");
    }

}
We add the same application.properties and service-account.json file as for the receiver. We also add the server.port property to the application.properties in order to let the sender application run on a different port so that we don’ t have any port conflicts when we start both applications from the same development machine (we use port 8081 for the sender application).
Run both the sender and the receiver application:
$ mvn spring-boot:runOpen a terminal window and send a message to the sender:
$ curl --data "message=Hello Google Cloud Pub/Sub!" localhost:8081/postMessageThe console log of the receiver application now contains:
Message arrived! Payload: Hello Google Cloud Pub/Sub!Summary
In this post, we made use of GCP Pub/Sub as a messaging system for a Spring Boot sender and receiver application. We made use of Spring Integration to accomplish this. It was fairly easy to set up the Topic and Subscription. The integration of Spring Cloud with GCP also works fine and easily.
Published at DZone with permission of Gunter Rotsaert, DZone MVB. See the original article here.
Opinions expressed by DZone contributors are their own.

Comments