Snake-Based REST API (Python, Mamba, Hydra, and Fast API)
Using Python, Fast API, Hydra, and Mamba to build dockerized applications.
Join the DZone community and get the full member experience.
Join For FreeToday, I would like to try something new and start exploring the world of Python. In this article, I will present a step-by-step tutorial on how to implement a simple REST API using Python, Fast API, Hydra, and Mamba. Moreover, I will provide you with a short description on how to pack all these snakes into a single Docker image and make them work together. The whole code presented below is available on my GitHub.
Let’s start with a short paragraph on why I decided to choose this topic.
Why Even Care?
First of all, I want to share my knowledge, as recently I had to implement a Python-based REST API. The choice of the framework was simple — FAST API. We also needed the dependency management tool so we picked Mamba. We have also decided to choose Hydra for configuration management and loading. All these tools seemed to work fine and offered all the features we needed so the whole combination sounded pretty good. Unfortunately, when we have moved to integrating the tools and tried to make them work together, we found out that it is not all that simple. What is more, the number of resources and examples came out to be fairly limited. This is how I ended up with the idea to write this piece of text.
What Is Mamba?
It is a kind of snake, and a pretty deadly one in fact. Kidding aside, it is a tool for managing dependencies for our project and building python virtual environments. It is built atop Anaconda but is supposed to be much faster and, from my somewhat short experience with Mamba, I can confirm that it is fast. Thanks to it being built atop Conda, we get access to all already existing packages from Conda repositories. What is more, the whole Mamba API is quite similar to Conda, which makes switching to Mamba easier for Conda ex-users.
What Is Fast API?
It is a tool that I probably do not have to introduce to anyone from python’s community: asynchronous, a fast and lightweight tool for building REST APIs. As for now, it is probably a tool recommended for anyone who would like to start a journey with Python and REST. It contains all the features needed to build working API alongside WebSockets and Streaming support. Moreover, FAST API utilizes python type hints so code completion works quite nicely in IDE (at least in PyCharm). Build-in swagger support is another feature which is quite useful in my opinion. In fact, I was quite surprised when I found out about its existence.
What Is Hydra?
Hydra is a monster from ancient Greek mythology who is known for having numerous heads. But seriously, Hydra is an open source tool for managing and running configurations of Python-based applications. It is based on Omega-Conf library and quoting from their main page: “The key feature is the ability to dynamically create a hierarchical configuration by composition and override it through config files and the command line.” What proved quite useful for me is the ability described in the quote above – hierarchical configuration. In my case, it worked pretty well and allowed clearer separation of config files.
Implementation
1. Let’s start the project by creating environment.yaml with configuration of our environment.
name: greeter-service
channels:
  - conda-forge
dependencies:
  - python=3.8.13
  - pip
  - fastapi
  - uvicorn[standard]
  - hydra-core
  - pytest
It contains the name of our new virtual environment (greeter-service) alongside the source from which dependencies should be downloaded (conda-forge) and a full list of dependencies that will be needed by the application to work correctly. Thanks to Mamba I am able to set up the whole environment in minutes with one simple command:
mamba env create -n greeter-service --file environment.yaml
In order to install Mamba, I would recommend following the tutorial created by Mamba authors themselves.
2. In this step, I will define a config.yaml file with all the config needed by application.
app:
  port: ${oc.env:GREETER_API_PORT,8070}
  version: ${oc.env:GREETER_API_VERSION,v1}
  greet_message: "Hello, "
Nothing special here. Only a pretty simple .yaml file with some magic connected with reading environment variables. It is the whole configuration I will be using in this tutorial. It is quite a standard setup:
- a port on which our API will be run and
- API version which will be used in endpoints
The only non standard thing is the greet_message parameter which contains the base for a message that will be returned to the user.
3. I am adding a file named config.py responsible for reading Hydra configuration.
import os

import hydra
from hydra import compose

hydra.initialize_config_dir(config_dir=os.getenv('GREETER_CONFIG_DIR'))

api_config = compose(config_name='config')
First I am initializing the Hydra context based on a directory named config under path ./ . Hydra will use environment variables or take the project root directory. Then I am using the compose method from Hydra to read the config defined in the previous step.
4. Here, I am implementing the first endpoint of the API. I will define it in a file named health_check.py as it will be responsible for handling health check requests.
from fastapi import APIRouter

health_router = APIRouter(prefix='/health', tags=['health_checks'])


@health_router.get('', status_code=200)
def is_ok():
    return 'Ok'
The code is simple and self-descriptive. It is just a FAST API router with a single method that returns Ok and 200 HTTP code upon call.
5. In this step, I am creating the greeter.py file responsible for handling incoming requests.
from fastapi import APIRouter

from api.config import api_config

greeting_router = APIRouter(tags=['greet'])


@greeting_router.get('/greet/{name}', status_code=200)
def say_hello(name: str):
    return api_config.app.greet_message + name
Yet another simple FAST API base endpoint which takes username as input. Then it mixes the provided name with the message format read from config and returns a final hello message to the user.
6. Now I am implementing a main.py file which is bundling together both routers from previous steps.
import uvicorn
from fastapi import FastAPI, APIRouter

from api.config import api_config
from api.greeter_api import greeting_router
from api.health_check import health_router

main_api = FastAPI()

main_router = APIRouter(prefix=f'/{api_config.app.version}')
main_router.include_router(health_router)
main_router.include_router(greeting_router)

main_api.include_router(main_router)


def start():
    uvicorn.run(main_api, host='0.0.0.0', port=api_config.app.port)
It is just ordinary FAST API code. The notable thing here is that I am adding version as a base prefix for all the endpoints. The most important method here is the start method where I am manually starting uvicorn (it is not a typo, it is actually the server name) server on port read from config.
My simple service is ready to be tested but do not be afraid, as it is not the end of our journey for today. Now I will describe how to make it work as a Docker image.
7. I will start this part by defining the setup.py file.
from setuptools import setup

setup(
    name='greeter-service',
    version='1.0',
    packages=['api'],
    entry_points={
        'console_scripts': [
            'greeter-service = api.main:start',
        ]
    }
)
The most important parameter in this script is the entry_points parameter, which effectively defines which python method is responsible for application. In this case, it is the start method from main.py. It also defines the name of the python service which can be used to run the application from the command line.
8. Now it is time to prepare Dockerfile.
FROM condaforge/mambaforge

WORKDIR /greeter-service

COPY environment.yaml environment.yaml

RUN mamba env create -n greeter-service --file environment.yaml

COPY api api
COPY config config
COPY setup.py setup.py

ENV PATH /opt/conda/envs/greeter-service/bin:$PATH

RUN /bin/bash -c "source activate greeter-service" && python setup.py install
What exactly happens here?
- Firstly, I am using the official Mamba image because I do not want to do extra work with installing Mamba on Docker from scratch.
- Then I am setting greeter-service as a working directory and adding
CONFID_DIRas a new environment variable. - This variable will be used by Hydra as a path to application's config files. In the next step, I copied the environment file and used it to create a Mamba virtual environment on Docker.
- A few next lines are just casual copies of directories with application code and config.
- The last two lines are a type of hack around Conda, not exactly working well with docker and, to a certain degree, with the shell itself.
Without this quick workaround you will see exception messages like: Your shell has not been properly configured to use 'conda activate and you will not be able to execute conda activate greeter-service. Unfortunately, no other fix seems to work on that, at least in my case. Some links connected with the topic can be found here, here and here as it gets quite an audience.
9. The last cherry on top is docker compose file that will make setting up of docker image a lot easier.
version: "3.9"

services:
  greeter-api:
    build: .
    command: greeter-service
    ports:
      - "8070:8070"
    environment:
      - GREETER_CONFIG_DIR=/greeter-service/config
      - GREETER_API_PORT=8070
As for now it is just one docker service with a two environment variable used – path to directory with config and port. Compose will build a docker image based on Dockerfile in the local directory. Next, it will use greeter-service as the starting command for a container. It will also expose and bind local port 8070 to port 8070 on the container.
Voilà, the implementation is done. Now it is time to do some tests.
Testing
Just like in my other articles, I will use Postman to perform tests of up and running API. Let’s start testing by getting the docker image up. Simple docker compose build && docker compose up is all that will be needed to set up the whole test environment, at least if everything works as designed.

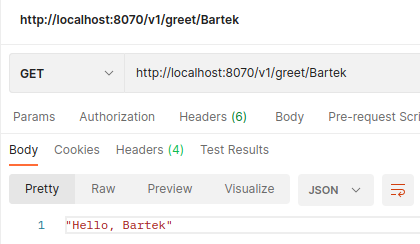
The docker is up so I can test an API. Simple request or two and I can confirm that everything works the way it should. Let's start with greet endpoint.

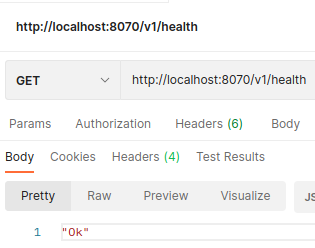
And now health endpoint.

Some logs from docker container — to prove that I did not just draw this images.
The coding is done and the service tested, and now it's time for a quick summary.
Summary
The integration was implemented, tested, and described alongside the lesser-known tools that I decided to use. The example is quite simple, but it contains everything that one may need to run it anywhere you want. Moreover, it can be easily extended and used as a base for more complex projects. I hope that it will be useful for you. Thank you for your time.
Opinions expressed by DZone contributors are their own.


Comments