Shared Caches With NGINX: Part I
Need to speed up your NGINX installation? Implement caching. This allows NGINX Plus to respond directly to clients and reduces the load on the origin server.
Join the DZone community and get the full member experience.
Join For FreeHow can you build a large-capacity, highly available, cache cluster using NGINX or NGINX Plus? This is the first of two posts that each describe an approach to meeting this goal. The second post is coming soon.
As noted, the approaches apply equally to open-source NGINX and NGINX Plus, but for brevity, we’ll refer to NGINX Plus only.
An Overview of NGINX Plus Caching
NGINX Plus can operate as a proxy cache server sitting between the origin server and remote clients. NGINX Plus manages the traffic to the origin server and caches (stores) common, unchanging resources. This allows NGINX Plus to respond directly to clients when these resources are requested and thus reduces the load on the origin server. NGINX Plus’ proxy cache is most commonly deployed in a data center next to the origin server and may also be deployed in a CDN-like fashion in globally distributed PoPs.
Content caching is a surprisingly complex topic. It’s worth familiarizing yourself with some basic caching techniques before continuing with this article:
- The mechanics of NGINX Plus caching (core configuration and the role of the cache loader and cache manager processes).
- Fine-tuning cache times (implementing practices such as micro-caching to control how content is cached and how it is refreshed when it expires).
Why Doesn’t NGINX Plus Use a Shared Disk for Caching?
Each NGINX Plus server acts as an independent web cache server. There are no technical means to sharing a disk-based cache between multiple NGINX Plus servers; this is a deliberate design decision.
Storing a cache on a high-latency, potentially unreliable shared filesystem is not a good design choice. NGINX Plus is sensitive to disk latency, and even though the thread pools capability offloads read() and write() operations from the main thread, when the filesystem is slow and cache I/O is high, then NGINX Plus may become overwhelmed by large volumes of threads. Maintaining a consistent, shared cache across NGINX Plus instances would also require cluster-wide locks to synchronize overlapping cache operations such as fills, reads, and deletes. Finally, shared filesystems introduce a source of unreliability and unpredictable performance to caching, where reliability and consistent performance are paramount.
Why Share a Cache Across Multiple NGINX Plus Servers?
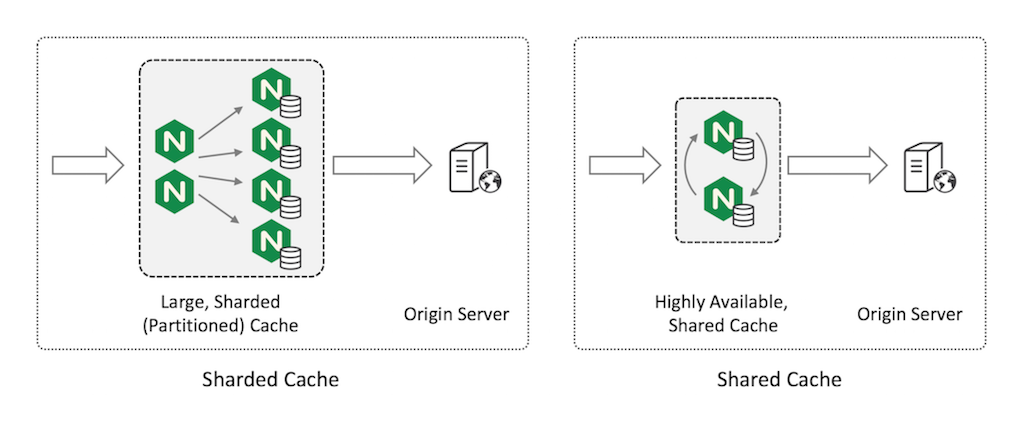
Although sharing a filesystem is not a good approach for caching, there are still good reasons to cache content across multiple NGINX Plus servers, each with a corresponding technique:
- If your primary goal is to create a very high-capacity cache, shard (partition) your cache across multiple servers. We’ll cover this technique in this post.
- If your primary goal is to achieve high availability while minimizing load on the origin servers, use a highly available shared cache. For this technique, see the companion post (coming soon).

Sharding Your Cache
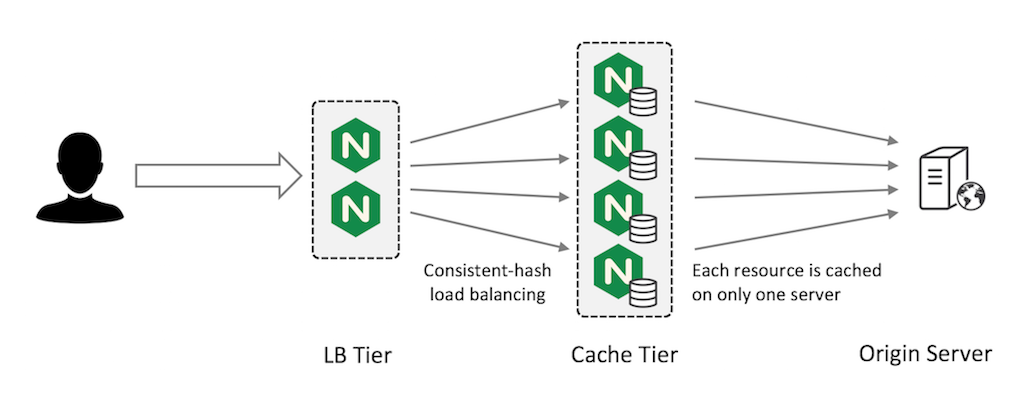
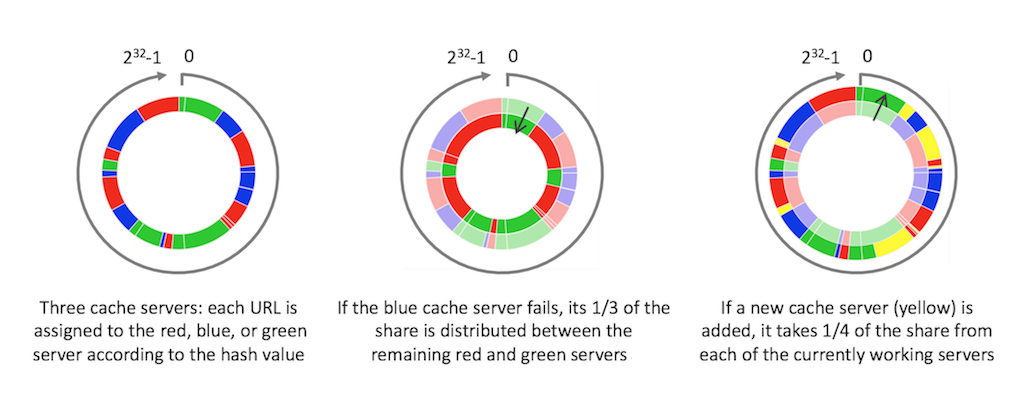
Sharding a cache is the process of distributing cache entries across multiple web cache servers. NGINX Plus cache sharding uses a consistent hashing algorithm to select the one cache server for each cache entry. The figures below show what happens to a cache sharded across three servers (left figure) when either one server goes down (middle figure) or another server is added (right figure).
The total cache capacity is the sum of the cache capacity of each server. You minimize trips to the origin server because only one server attempts to cache each resource (you don’t have multiple independent copies of the same resource).

This pattern is fault tolerant in the sense that if you have N cache servers and one fails, you lose only 1/N of your cache. This lost portion is evenly distributed by the consistent hash across the remaining N –1 servers. Simpler hashing methods instead redistribute the entire cache across the remaining servers and you lose almost all of your cache during the redistribution.
When you perform consistent-hash load balancing, use the cache key (or a subset of the fields used to construct the key) as the key for the consistent hash:
upstream cache_servers {
    hash $scheme$proxy_host$request_uri consistent;
      server red.cache.example.com;
    server green.cache.example.com;
    server blue.cache.example.com;
}
You can distribute incoming traffic across the Load Balancer (LB) tier using the active-passive high availability solution in NGINX Plus, round-robin DNS, or a high-availability solution such as keepalived.
Optimizing Your Sharded Cache Configuration
There are two optimizations you can make to your cache sharding configuration.
1. Combine the Load Balancer and Cache Tiers
You can combine the LB and cache tiers. In this configuration, two virtual servers run on each NGINX Plus instance. The load-balancing virtual server (LB VS in the figure) accepts requests from external clients and uses a consistent hash to distribute them across all NGINX Plus instances in the cluster. The instances are connected by an internal network. The caching virtual server (Cache VS) on each NGINX Plus instance listens on its internal IP address for its share of requests, forwarding them to the origin server and caching the responses. This allows all NGINX Plus instances to act as caching servers, maximizing your cache capacity.

2. Configure a First‑Level Cache
Alternatively, you can configure a first-level cache on the frontend LB tier for very hot content, using the large shared cache as a second-level cache. This can improve performance and reduce the impact on the origin server if a second-level cache tier fails because content only needs to be refreshed as the first‑tier cache content gradually expires.
If your cache cluster is handling a very large volume of hot content, you may find that the rate of churn on the smaller first-level cache is very high. In other words, the demand for the limited space in the cache is so high that content is evicted from the cache (to make room for more recently requested content) before it can be used to satisfy even one subsequent request.
One indicator of this situation is the ratio of written content to served content, which is included in the extended statistics reported by the NGINX Plus Status module and appears on the Caches tab of the built-in live activity monitoring dashboard. (Note that the Status module and live activity monitoring dashboard are not available in open source NGINX.)
If the ratio is too high, then NGINX Plus is writing more content to the cache than it’s serving from it, as depicted in this figure:

In this case, you can fine‑tune your cache to store just the most commonly requested content. The proxy_cache_min_uses directive can help to identify this content.
Summary
Sharding a cache across multiple NGINX or NGINX Plus web cache servers is an effective way to create a very high-capacity scalable cache. The consistent hash provides a good degree of high availability, ensuring that if a cache fails, only its share of the cached content is invalidated.
The companion article to this one describes an alternative shared cache pattern that replicates the cache on a pair of NGINX or NGINX Plus cache servers. Total capacity is limited to the capacity of an individual server, but the configuration is fully fault-tolerant and no cached content is lost if a cache server becomes unavailable.
Published at DZone with permission of Owen Garrett. See the original article here.
Opinions expressed by DZone contributors are their own.


Comments