Set Up a CI/CD Pipeline for An Angular 7 Application From Azure DevOps to AWS S3
The first part of this tutorial demonstrates how to build a CI pipeline using Azure DevOps.
Join the DZone community and get the full member experience.
Join For FreeToday we are going to see how you can set up a CI pipeline over Azure DevOps with CD (continuous deployment) to AWS using Azure DevOps.
As we all know, Azure DevOps provides developer services for smarter collaboration between developers and faster delivery of the project. This means it can be used to manage the sprints and the code. One of the most eye-catching features is the configuration of the build and release of the projects.
Without discussing much theory, let's see the minimum requirements and how you can set up your own pipeline to easily manage the build and release part of the software delivery.
Starting with the minimum requirements:
1) Azure DevOps account (A free account would do for the example, but if you want to run the Build and Release task for multiple projects simultaneously, then you have to pay for the agents)
2) AWS account
3) Sample Angular 7 application
The CI/CD pipeline configuration is divided into steps:
1) Configuring AWS S3 to serve the Angular application
2) Configuring the Build pipeline for the application on Azure DevOps
3) Configuring the Release pipeline for the application on Azure DevOps
4) Authenticating Azure DevOps to upload files in the S3 bucket that would host the Angular application
We will be looking into the S3 configuration and the Build configuration on Azure DevOps in this article.
I will be writing the release and authentication part in an upcoming article just after this.
To Enable Website Hosting for An Amazon S3 Bucket
- Sign in to the AWS Management Console and open the Amazon S3 console.
- In the list, choose the bucket that you want to use for your hosted website.
- Choose the Properties tab.
- Choose Static website hosting, and then choose Use this bucket to host a website.
- You are prompted to provide the index document and any optional error documents and redirection rules that are needed.
- When you configure a bucket as a website, you must make the objects that you want to serve publicly readable.
- Click into your bucket.
- Select the “Permissions” tab at the top.
- Under “Public Access Settings,” we want to click “Edit.”
- Change “Block new public bucket policies,” “Block public and cross-account access if bucket has public policies,” and “Block new public ACLs and uploading public objects,” to be False and Save.
Configure the Build Pipeline for Angular Application on Azure DevOps
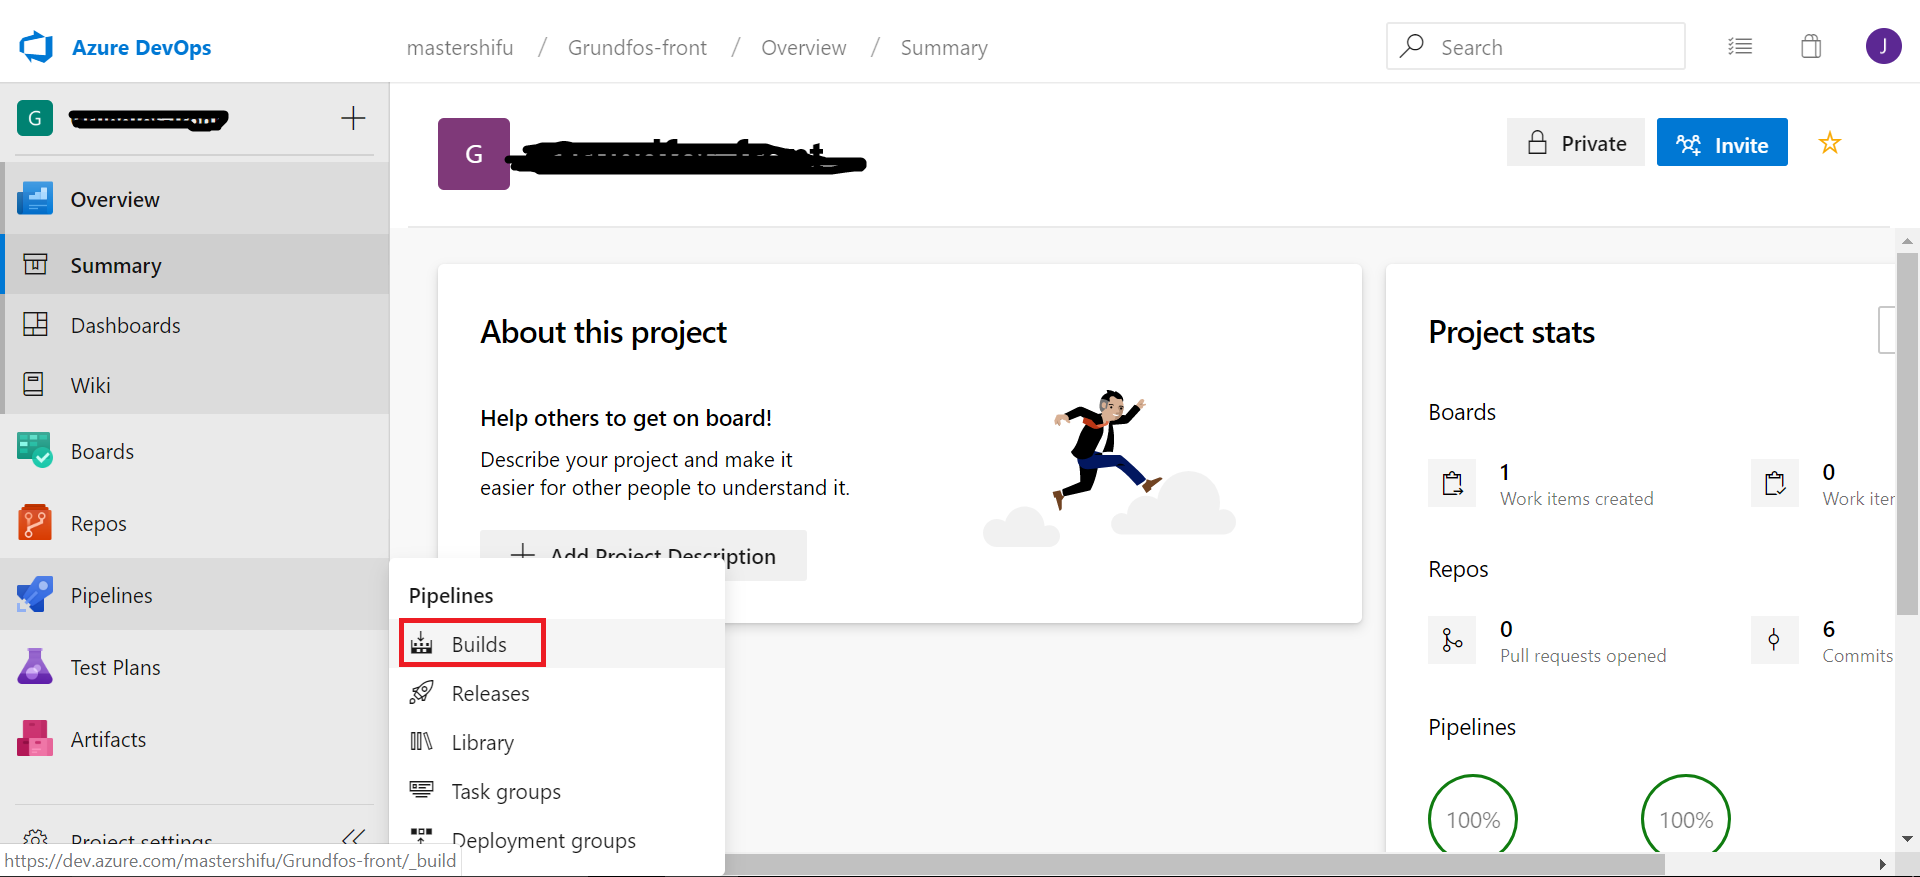
- Go to the Build section of the application as shown below.

- Click on "New" and "New Build Pipeline" from the dropdown
- At the bottom select the "Use the classic editor" option.
- Select the Source, Repository and the branch from which you want the application to build and click "Continue."
- Select the empty job option at the top.
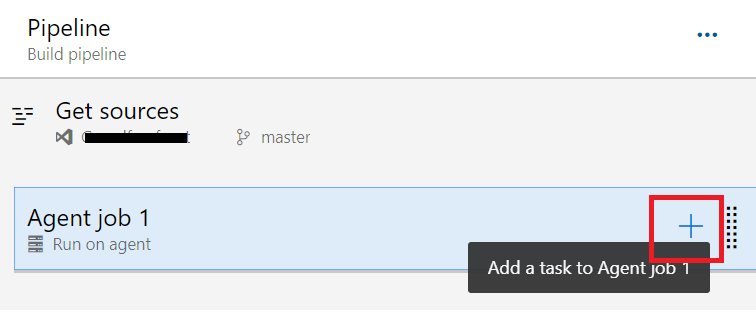
- Now add a task as shown below.

- Search for "Node" and add the task Node.js tool installer from the list of available options
- Click on the added task in the left pane and change the version spec to the Node version you are using to develop the application (make sure the task version is 1.* at the top)
- Add another task and search for "npm" and then add the npm task to the pipeline
- Click on the newly-created npm task and under the command, select "Install" (make sure the task version is 1.* at the top)
- Add another task similar to step 17 (npm task)
- This time select the custom option for command and rename the task to "ng build."
- In the Command and arguments use
run buildor if you--prodor--aotflag from the command line on your local system you have to configure the package.json of your application. For this insert the line under scripts array in your package.json file.
- Add another task and search for "Copy" and add the task "Copy Files" from the list of available options.
- In the source folder type
dist - In the contents put
**/**(without the single quotes) - In the target folder type
{RepositoryName}/dist
- In the source folder type
- Add the last task by searching for "publish" and add the task "Publish pipeline artifact" from the list of available options.
- In the file or directory path type "dist".
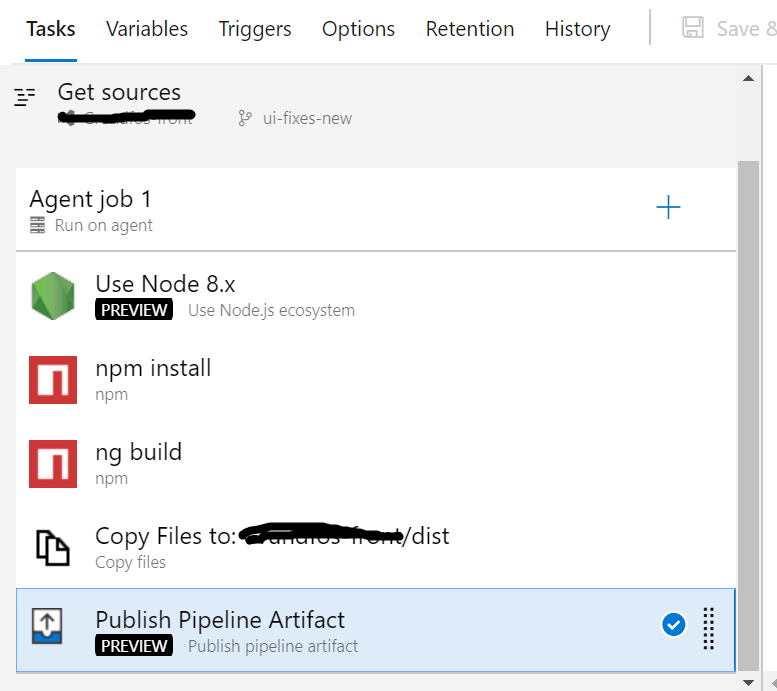
That's it for the Build part of the article. In the end, the configuration should look something like this. That's it! you can now use the Save & Queue button at the top to see that you have successfully learned how you can implement CI for your application in Azure Devops.
I will start writing the second part for the process in a seperate article soon.
I hope this post was helpful and that you learned something new today. Thank you for reading and happy coding.
Opinions expressed by DZone contributors are their own.

Comments