Setting Up History Cleanup in Camunda
Read the tutorial below to learn the essential task of how to set up and perform the historical clean-up of data in Camunda.
Join the DZone community and get the full member experience.
Join For FreeAs we know in Camunda, all the historical data is maintained in the database. How to perform cleanup of the historical data from the databases becomes an essential task in Camunda.
In Camunda, with the introduction of property historyTimeToLive, it is possible to control the clean-up of history data.
How Do You Define?
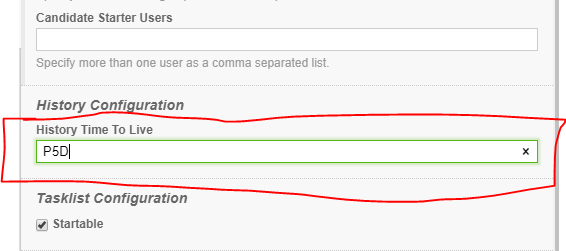
1. It can be set using Camunda Modeler as below, which will take effect once deployed to the process engine.

2. If you want to set the TTL for the already deployed process definitions, REST APIs can be used.
URL: /process-definition/{processDefinitionId}/history-time-to-live
Method: PUT
Request: {"historyTimeToLive": 10 }
Response: 204
3. The TTL can be set using process instance ids as well (taken from the Camunda documentation).
HistoricProcessInstanceQuery query =
  historyService.createHistoricProcessInstanceQuery();

Batch batch = historyService.setRemovalTimeToHistoricProcessInstances()
  .absoluteRemovalTime(new Date()) // sets an absolute removal time
   // .clearedRemovalTime()        // resets the removal time to null
   // .calculatedRemovalTime()     // calculation based on the engine's configuration
  .byQuery(query)
  .byIds("693206dd-11e9-b7cb-be5e0f7575b7", "...")
   // .hierarchical()              // sets a removal time across the hierarchy
  .executeAsync();
How Does It Work?
Once TTL is set successfully for the process definition it can be validated in the ACT_RE_PROCDEF table.

By default, history cleanup is based on the removal time and to achieve this all the history tables are having column to store removal time (REMOVAL_TIME_). This gets updated when the task/process gets completed.
To validate this, create a simple process model with one user task as below. Copy the below xml and save it as bpmn.
<?xml version="1.0" encoding="UTF-8"?>
<bpmn:definitions xmlns:bpmn="http://www.omg.org/spec/BPMN/20100524/MODEL" xmlns:bpmndi="http://www.omg.org/spec/BPMN/20100524/DI" xmlns:dc="http://www.omg.org/spec/DD/20100524/DC" xmlns:camunda="http://camunda.org/schema/1.0/bpmn" xmlns:di="http://www.omg.org/spec/DD/20100524/DI" id="Definitions_1jkgg4h" targetNamespace="http://bpmn.io/schema/bpmn" exporter="Camunda Modeler" exporterVersion="3.4.1">
  <bpmn:process id="test" isExecutable="true" camunda:historyTimeToLive="5">
    <bpmn:startEvent id="StartEvent_1">
      <bpmn:outgoing>SequenceFlow_0vgcs77</bpmn:outgoing>
    </bpmn:startEvent>
    <bpmn:task id="Task" name="User Task">
      <bpmn:incoming>SequenceFlow_0vgcs77</bpmn:incoming>
      <bpmn:outgoing>SequenceFlow_16g20r1</bpmn:outgoing>
    </bpmn:task>
    <bpmn:sequenceFlow id="SequenceFlow_0vgcs77" sourceRef="StartEvent_1" targetRef="Task" />
    <bpmn:endEvent id="EndEvent_0f1cna8">
      <bpmn:incoming>SequenceFlow_16g20r1</bpmn:incoming>
    </bpmn:endEvent>
    <bpmn:sequenceFlow id="SequenceFlow_16g20r1" sourceRef="Task" targetRef="EndEvent_0f1cna8" />
  </bpmn:process>
  <bpmndi:BPMNDiagram id="BPMNDiagram_1">
    <bpmndi:BPMNPlane id="BPMNPlane_1" bpmnElement="test">
      <bpmndi:BPMNShape id="_BPMNShape_StartEvent_2" bpmnElement="StartEvent_1">
        <dc:Bounds x="179" y="99" width="36" height="36" />
      </bpmndi:BPMNShape>
      <bpmndi:BPMNShape id="Task_0ywowje_di" bpmnElement="Task">
        <dc:Bounds x="280" y="77" width="100" height="80" />
      </bpmndi:BPMNShape>
      <bpmndi:BPMNEdge id="SequenceFlow_0vgcs77_di" bpmnElement="SequenceFlow_0vgcs77">
        <di:waypoint x="215" y="117" />
        <di:waypoint x="280" y="117" />
      </bpmndi:BPMNEdge>
      <bpmndi:BPMNShape id="EndEvent_0f1cna8_di" bpmnElement="EndEvent_0f1cna8">
        <dc:Bounds x="452" y="99" width="36" height="36" />
      </bpmndi:BPMNShape>
      <bpmndi:BPMNEdge id="SequenceFlow_16g20r1_di" bpmnElement="SequenceFlow_16g20r1">
        <di:waypoint x="380" y="117" />
        <di:waypoint x="452" y="117" />
      </bpmndi:BPMNEdge>
    </bpmndi:BPMNPlane>
  </bpmndi:BPMNDiagram>
</bpmn:definitions>
It will look like the below graphic:

Paste the .bpmn file into the resources folder of your spring boot application. If not created one spring boot application, then follow the link.
Use tasklist to start the process. You can verify the removal time in ACT_HI_PROCINST and ACT_HI_TASKINST.


Use the tasklist to complete the user task.

Then, verify the above two results again in history tables.


Observe that the removal time is updated as per the TTL configuration in the process definition based on this history clean up will be performed.
Thanks for reading!
Opinions expressed by DZone contributors are their own.

Comments