Scaling Jenkins With Kubernetes
Ramp your pods either up or down depending on need by using Jenkins with Kubernetes.
Join the DZone community and get the full member experience.
Join For FreeIn this article, I will be discussing how to scale Jenkins with Kubernetes, what are the different components required and how to fit those components together to have complete scalable solution.
Note: I will be taking an example of AWS and will be using its terminology but concepts can be easily applied to other cloud vendors, too. A basic understanding of Kubernetes would be required like its components and its basic commands. This article will give you a fair idea but won’t go into very deep in steps. I recommend reading official documentation for deeper understanding.
Jenkins has been a popular choice for CI/CD and it has become a great tool in automating the deployments across different environments. With modern microservices based architecture, different teams with frequent commit cycle need to test the code in different environments before raising pull requests. So we need Jenkins to work as fast as possible.
Step 1: Setting Up Jenkins in Kubernetes Cluster
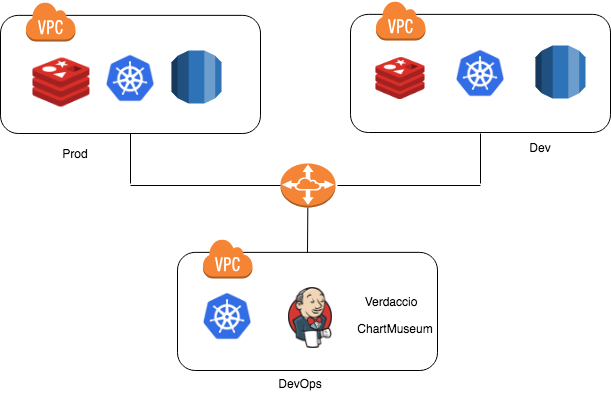
Before starting, we should have Kubernetes cluster running in separate VPC, which is not mandatory but we can have all DevOps related tools which are common to different environments running in their own VPC and then use VPC peering connections to allow access of each other. Below is reference diagram:

For setting up Jenkins inside Kubernetes, create jenkins-deploy.yaml file with the below content:
apiVersion: extensions/v1beta1
kind: Deployment
metadata:
  name: jenkins-master
spec:
  replicas: 1
  template:
    metadata:
      labels:
        app: jenkins-master
    spec:
      containers:
       - name: jenkins-leader
         image: jenkins
         volumeMounts:
          - name: jenkins-home
            mountPath: /var/jenkins_home
          - name: docker-sock-volume
            mountPath: /var/run/docker.sock
         resources:
           requests:
             memory: "1024Mi"
             cpu: "0.5"
           limits:
             memory: "1024Mi"
             cpu: "0.5"
         ports:
           - name: http-port
             containerPort: 8080
           - name: jnlp-port
             containerPort: 50000
      volumes:
       - name: jenkins-home
          emptyDir: {}
       - name: docker-sock-volume
         hostPath:
           path: /var/run/docker.sock
Now expose Jenkins as service by creating another file jenkins-svc.yaml with below content
apiVersion: v1
kind: Service
metadata:
  name: jenkins-master-svc
  labels:
    app: jenkins-master
spec:
  type: NodePort
  ports:
  - port: 80
    targetPort: 8080
    protocol: TCP
    name: http
  - port: 50000
    targetPort: 50000
    protocol: TCP
    name: slave
  selector:
    app: jenkins-master
Now we need to apply this to a Kubernetes cluster with following commands:
kubectl create -f jenkins-deploy.yaml
kubectl create -f jenkins-svc.yaml
We have Jenkins running inside the cluster, you can access it by using kubectl proxy command but since we need to access Jenkins from outside the cluster too, lets set this up
Step 2: Jenkins Access from Outside
For setting up Jenkins access from outside the cluster if we define service type as loadbalancer in Jenkins service file, it will spin up an ELB instance in the cloud and you can access Jenkins with the IP of ELB. The problem with this approach is, if you want to have some other service exposed from the cluster, and follow same approach, you will end up in another ELB instance and that increases cost. To avoid this, Kubernetes supports a feature called ingress.
Ingress is a collection of rules by which outside traffic can reach to the services deployed in Kubernetes and to support ingress we also need to have ingress controller. We will be using nginx-ingress controller which is supported by NGINX. Below is the sample file which can be deployed in Kubernetes as deployment
apiVersion: extensions/v1beta1
kind: Deployment
metadata:
  name: ingress-nginx
spec:
  replicas: 1
  template:
   metadata:
    labels:
     app: ingress-nginx
   spec:
     containers:
     - image: gcr.io/google_containers/nginx-ingress-controller:0.8.3
       name: ingress-nginx
       imagePullPolicy: Always
       ports:
       - name: http
         containerPort: 80
         protocol: TCP
       - name: https
         containerPort: 443
         protocol: TCP
       env:
       - name: POD_NAME
         valueFrom:
          fieldRef:
            fieldPath: metadata.name
       - name: POD_NAMESPACE
         valueFrom:
           fieldRef:
            fieldPath: metadata.namespace
       args:
        - /nginx-ingress-controller
        - --default-backend-service=$(POD_NAMESPACE)/nginx-default-backend
And now expose it as service. We will use the type as a load balancer, which would mean it will spin a ELB in AWS. ELB endpoint is what we can use for outside access:
apiVersion: v1
kind: Service
metadata:
  name: ingress-nginx
spec:
  type: LoadBalancer
  selector:
    app: ingress-nginx
  ports:
  - name: http
    port: 80
    targetPort: http
  - name: https
    port: 443
    targetPort: https
Now, we need to define some rules so ingress controller can decide which service to call. Before defining rules, we need to create sub-domain mapped to an ELB endpoint, let's say we mapped jenkins.yourcompany.com to ELB endpoint. Now, let's write up ingress and use this domain as hostname.
apiVersion: extensions/v1beta1
kind: Ingress
metadata:
  name: jenkins-ingress
  annotations:
    nginx.ingress.kubernetes.io/rewrite-target: /
    nginx.ingress.kubernetes.io/cors-allow-credentials: "true"
    nginx.ingress.kubernetes.io/cors-allow-headers: Authorization, origin, accept
    nginx.ingress.kubernetes.io/cors-allow-methods: GET, OPTIONS
    nginx.ingress.kubernetes.io/enable-cors: "true"
spec:
  rules:
  - host: jenkins.yourcompany.com
    http:
      paths:
      - backend:
        serviceName: jenkins-master-svc
        servicePort: 80
With this ingress in place, whenever a request comes to jenkins.yourcompany.com, it will go to ELB first, ELB will send this to the NGINX controller, which read the ingress and sends the traffic to jenkins-master-svc service. You can define more ingress and map them with your services, so we can use a single ELB to manage the traffic to all services hosted in Kubernetes cluster.
Step 3: Configuring Kubernetes Plugin
You should be able to access the Jenkins by your sub-domain. Initially, you need to set this up as you normally do and configure Kubernetes plugin.
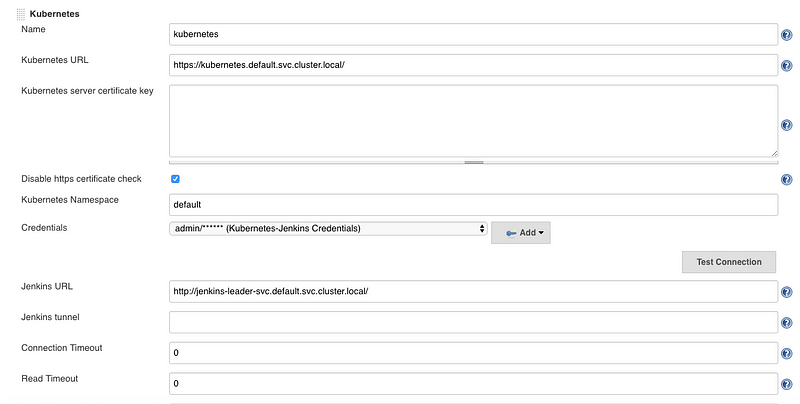
This link has all the information on how to setup this plugin in Jenkins. Since Jenkins has been installed inside the Kubernetes cluster, we will be able to access Kubernetes. If you install Jenkins outside Kubernetes cluster then proper endpoint has to be defined. Below is the configuration, only three things need to be added up, Kubernetes URL, Jenkins URL and credentials for Kubernetes. We don’t need to set up a pod template as we will create them dynamically in the next step.

Step 4: Pod Scheduling in The Cluster
To plan for scaling so it can handle all jobs which keep increasing with time, we can plan for
a. Vertical Scaling: Adding more cores and memory to Jenkins master
b. Horizontal Scaling: Adding more slave nodes which can coordinate with master and run the jobs
While both approaches do solve the scaling issue, cost will also increase with these approaches. This is where we can use Kubernetes by doing on-demand horizontal scaling of Jenkins. In Kubernetes, we setup Jenkins in master-slave mode, where each job can be assigned to run in a specific agent. An agent in our case would be a pod running on the slave node. So when the job needs to run it start creating their pod and execute the job in it and once done the pod gets terminated. This solves the problem of on-demand scaling, below will show example on how to set this up.
For defining pipeline, Jenkins supports two types of syntax:
a. Scripted
b. Declarative
Declarative syntax is an improved version that should be preferred in defining pipeline. In plugin setup, we only need to add Kubernetes and Jenkins endpoints and the rest we configure in the pipeline itself on what type of pod we want to run in which job will execute. In most of cases, you would want you own slave image rather than public one so assuming you have hosted that image in the registry, below is what can be used.
You can create one shared library with all common functions which are being used in the pipeline. For example, the function below is to return the content of a YAML file to run pod on Kubernetes cluster:
def call(){
agent =  """
  apiVersion: v1
  kind: Pod
  metadata:
   labels:
     name: jenkins-slave
   spec:
     containers:
     - name: jenkins-slave
       image: xxx.com/jenkins:slave
       workingDir: /home/jenkins
       volumeMounts:
       - name: docker-sock-volume
         mountPath: /var/run/docker.sock
       command:
       - cat
         tty: true
       volumes:
       - name: docker-sock-volume
         hostPath:
         path: /var/run/docker.sock
"""
return agent
}
Use these functions in the pipeline to use them. Below is sample pipeline which will run the pod in Kubernetes cluster based on custom Jenkins slave image and all the defined steps will get executed in that container
pipeline {
  agent {
    kubernetes {
      label 'jenkins-slave'
      defaultContainer 'jenkins-slave'
      yaml getAgent()
    }
  }
  stages{
     stage ('stage1'){
       steps{
        // Define custom steps as per requirement
       }
     }
  }
}
Step 5: Capacity and cost management
So far, we have Jenkins installed on Kubernetes and each Jenkins job will create container and run its code in it and terminate. Other important aspect we need to plan for is, containers need nodes to run and we need to setup system where nodes are created on demand and gets removed when not in use. This is where cluster autoscaler is helpful
https://github.com/Kubernetes/autoscaler/tree/master/cluster-autoscaler
Purpose of cluster autoscaler is to keep looking for event when pod has failed to start due to insufficient resources and adding node in cluster so pods can run. It also keep monitoring for nodes which doesn’t have any pods running on it so those nodes can be removed from cluster. This solves the problem of on-demand scale out and scale in very well and all we need to do is configure this in our cluster, in configuration we will
Define the min and max nodes count so the cluster scale out operation stays in the limit and we will always have a minimum number of nodes ready to execute the jobs faster. We can also use spot instances to create these nodes instead vs on-demand nodes which will save our cost further
So, this is it, we have scalable Jenkins cluster in place with each trigger of Jenkins job, the pod gets created in a Kubernetes cluster and gets destroyed when it is done. Scaling of the cluster is handled by autoscaler and ingress is used to expose Jenkins outside of the cluster. One part we haven’t covered is the usage of Helm and package manager for Kubernetes. Once we get comfortable in these concepts, we should be deploying in Kubernetes as Helm charts only, more on this later.
Published at DZone with permission of Gaurav Vashishth. See the original article here.
Opinions expressed by DZone contributors are their own.

Comments