Salesforce Functions With Heroku Data for Redis
This article is part two of a three-part series on using Heroku Managed Data products from within a Salesforce Function. In this article, we'll explore using Salesforce Functions with Heroku Data for Redis.
Join the DZone community and get the full member experience.
Join For FreeThis article is part two of a three-part series on using Heroku Managed Data products from within a Salesforce Function. In part one, we focused on Salesforce Functions with Heroku Postgres. In part two, we’ll explore Salesforce Functions with Heroku Data for Redis. Finally, in part three, we’ll cover Salesforce Functions and Apache Kafka on Heroku.
Introduction to Core Concepts
What Is a Salesforce Function?
A Salesforce Function is a custom piece of code used to extend your Salesforce apps or processes. The custom code can leverage the language and libraries you choose while being run in the secure environment of your Salesforce instance.
For example, you could leverage a JavaScript library to calculate and cache a value based on a triggered process within Salesforce. If you are new to Functions in general, check out “Get to Know Salesforce Functions” to learn about what they are and how they work.
What Is Heroku Data for Redis?
Heroku Data for Redis is a Redis key-value datastore that is fully managed for you by Heroku. That means that Heroku takes care of things like security, backups, and maintenance. All you need to do is use it. Because Heroku is part of Salesforce, this makes access and security much easier. The Heroku Dev Center documentation is an excellent place to find more details on Heroku Data for Redis.
Examples of Salesforce Functions + Heroku Data for Redis
Redis is commonly used for ephemeral data that you want quick access to. Examples include cached values, a queue of tasks to be performed by workers, session or state data for a process, or users visiting a website. While Redis can persist data to disk, it is primarily used as an “in-memory” datastore. Let’s review several use cases to give you a better idea of how Salesforce Functions and Redis can fit together.
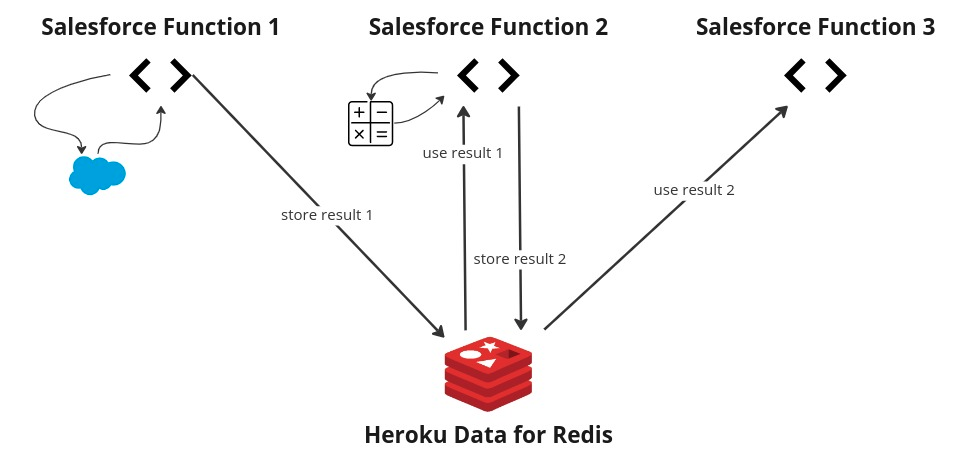
Use Case #1: Store State Between Function Runs
There may be times when a process has multiple stages, with each stage requiring a function run. When the next function runs, you want to capture the state of that function run to be used by the next function that runs.
An example of this might be a price quoting process that requires some backend calculations at each stage. Different people or teams might perform the steps in the process. It’s possible they don’t even all belong within a single Salesforce Org. However, the function that runs at each stage needs to know about the previous outcome.

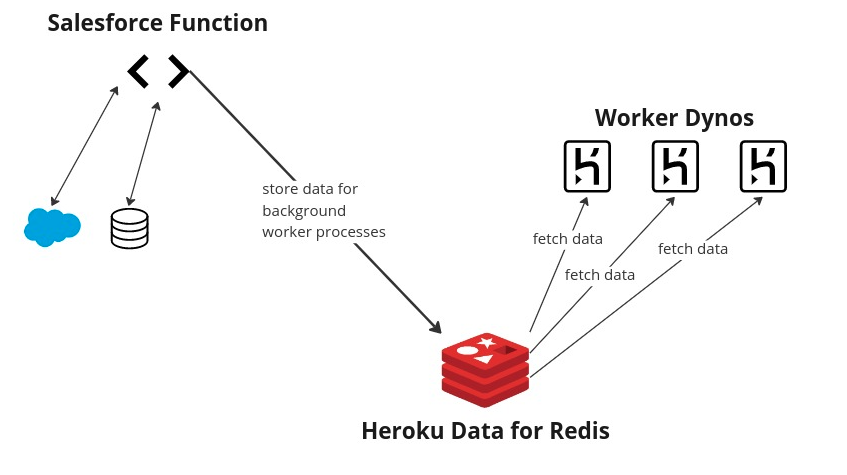
Use Case #2: Managing a Queue for Worker Processes
This use case is concerned with flexibility around background jobs. Because applications built on Salesforce run on a multitenant architecture, Salesforce places restrictions on CPU and memory usage for applications. Long-running programs are often out of bounds and restricted.
Then how might you run a long or heavy task for your Salesforce Org? The answer is Salesforce Functions. You can wire up your function to gather the information needed and insert it into Redis. Then, your Heroku worker processes can retrieve the information and perform the tasks.

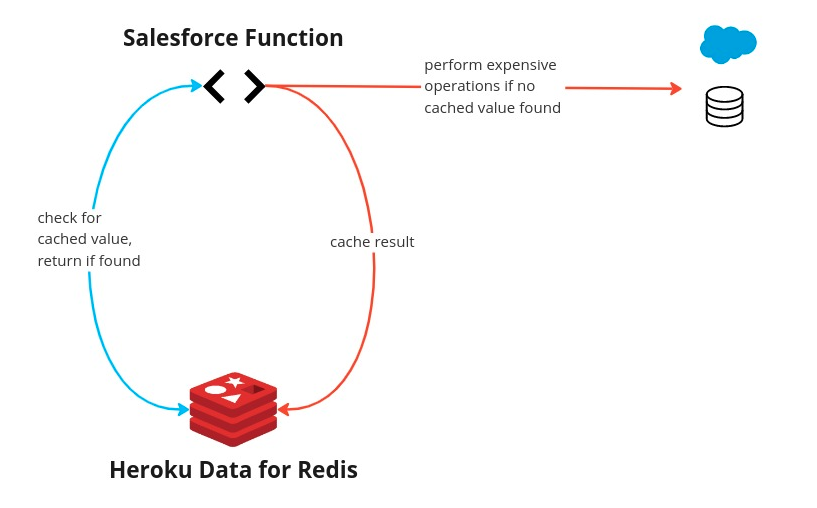
Use Case #3: Cache the Results of Expensive Operations
In this last use case, let’s assume that you have an expensive query or calculation. The result does not change often, but the report that needs the result runs frequently. For example, perhaps we want to match some criteria across a large number of records that seldom change. We can use a Salesforce Function to do the work and Redis to store the result. Subsequent executions of the function can simply grab the cached result.

How Do I Get Started?
To get started, you’ll need to have a few pieces in place—both on the Salesforce Functions side and the Heroku side.
- Prerequisites
- Getting started with Salesforce Functions
Accessing Heroku Data for Redis From a Salesforce Function
Once you have covered the prerequisites and created your project, you can run the following commands to create a Function with Heroku Data for Redis access.
To create the new JavaScript Function, run the following command:
$ sf generate function -n yourfunction -l javascript
That will give you a /functions folder with a Node.js application template.
Connecting to Your Redis Instance
Your function code can use the dotenv package for specifying the Redis URL as an environment variable and the node-redis package as a Redis client. Connecting to Redis might look something like this:
import "dotenv/config";
import { createClient } from 'redis';

async function redisConnect() {
  const redis = createClient({
    url: process.env.REDIS_URL,
    socket: {
      tls: true,
      rejectUnauthorized: false
    }
  });
  await redis.connect();
  return redis;
}
For local execution, using process.env and dotenv assumes that you have a .env file that specifies your REDIS_URL.
Store Data in Redis
The actual body of your Salesforce Function will involve performing some calculations or data fetches, followed by storing the result in Redis. An example may look like this:
export default async function (event, context) {
  const redis = await redisConnect();
  const CACHE_KEY = `my_cache_key`;
  const CACHE_TTL_SECONDS = 86400;

  // Check Redis for cached value
  let cached_value = await redis.get(CACHE_KEY);

  if (cached_value) {
    return { result: cached_value }
  } else {
    // Perform some calculation
    const calculated_value = await perform_long_running_computation();

    // Store in Redis
    redis.set(CACHE_KEY, calculated_value, {
      EX: CACHE_TTL_SECONDS,
      NX: true
    });
    // Return result
    return { result: calculated_value }
  }
}
Test Your Salesforce Function Locally
To test your Function locally, you first run the following command:
$ sf run function startThen, you can invoke the Function with a payload from another terminal:
$ sf run function -l http://localhost:8080 -p '{"payloadID": "info"}'
For more information on running Functions locally, see this guide.
Associate Your Salesforce Function and Your Heroku Environment
After verifying locally that our Function runs as expected, we can associate our Salesforce Function with a computing environment. (See this documentation for more information about creating a compute environment and deploying a function.)
Now, associate your functions and Heroku environments by adding your Heroku user as a collaborator to your function’s compute environment:
$ sf env compute collaborator add --heroku-user username@example.com
The environments can now share Heroku data. Next, you will need the name of the computing environment so that you can attach the data store to it.
$ sf env list
Lastly, attach the data store.
$ heroku addons:attach <your-heroku-redis> --app <your-compute-environment-name>
Here are some additional resources that may be helpful for you as you begin implementing your Salesforce Function and accessing Heroku Data for Redis:
Conclusion
And just like that, you’re up and running with a Salesforce Function connecting to Heroku Data for Redis!
Salesforce Functions give you the flexibility and freedom to work within your Salesforce application to access Heroku data—whether that data is in Postgres, Redis, or even Kafka. In this second part of our series, we’ve touched on using Salesforce Functions to work with Heroku Data for Redis. While this is a fairly high-level overview, you should be able to see the potential of combining these two features. In the final post for this series, we’ll integrate with Apache Kafka on Heroku.
Published at DZone with permission of Michael Bogan. See the original article here.
Opinions expressed by DZone contributors are their own.

Comments