Setting Up and Running Apache Kafka on Windows OS
In this article, we go through a step-by-step guide to installing and running Apache ZooKeeper and Apache Kafka on a Windows OS.
Join the DZone community and get the full member experience.
Join For FreeNote: When you purchase through links on our site, we may receive an affiliate commission.
Introduction
In my last article, we covered setting up and using Hadoop. This article is all about configuring and starting an Apache Kafka server on a Windows OS. This guide will also provide instructions to set up Java and Apache ZooKeeper.
Apache Kafka is a fast and scalable messaging queue, capable of handling heavy loads in context of read and write, i.e. IO-related, stuff. You can find more about Kafka on http://kafka.apache.org/. Apache Kafka requires a running ZooKeeper instance, which is used for reliable distributed coordination. Please find more about ZooKeeper on https://zookeeper.apache.org/..
You might also consider these Apache Kafka resources:
- Getting Started with Apache Kafka 5/5 stars from 785 reviews. 10 day free trial on Pluralsight
- Apache Kafka for Beginners - Learn Kafka by Hands-On 4.3/5.0 stars from 751 reviews on Udemy.
- Apache Kafka Patterns and Anti-Patterns: DZone Refcard
You can get help from this video for setting up Kafka on Windows.
Author's GitHub:
I have created a bunch of Spark-Scala utilities at https://github.com/gopal-tiwari, might be helpful in some other cases.
Downloading the Required Files
- Download Server JRE according to your OS and CPU architecture from http://www.oracle.com/technetwork/java/javase/downloads/jre8-downloads-2133155.html
- Download and install 7-zip from http://www.7-zip.org/download.html
- Download and extract ZooKeeper using 7-zip from http://zookeeper.apache.org/releases.html
- Download and extract Kafka using 7-zip from http://kafka.apache.org/downloads.html
For this tutorial, we are assuming that ZooKeeper and Kafka are unzipped in the C: drive, but you can unzip them in any location. DZone's previously covered the differences between JDK, JRE, and JVM.
Here, we are using full-fledged ZooKeeper and not the one packaged with Kafka because it will be a single-node ZooKeeper instance. If you want, you can run Kafka with a packaged ZooKeeper located in a Kafka package inside the \kafka\bin\windows directory.
Installation
A. JDK Setup
1. Start the JRE installation and hit the “Change destination folder” checkbox, then click 'Install.'
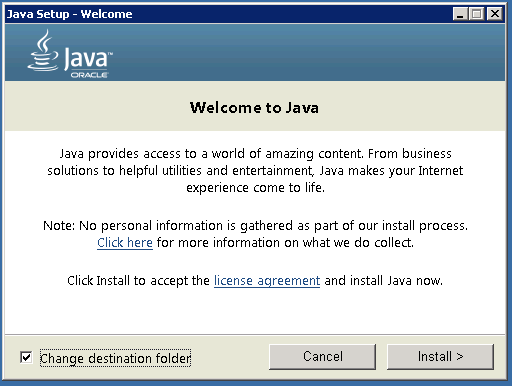
2. Change the installation directory to any path without spaces in the folder name. E.g. C:\Java\jre1.8.0_xx\. (By default it will be C:\Program Files\Java\jre1.8.0_xx), then click 'Next.'
3. Now open the system environment variables dialogue by opening Control Panel -> System -> Advanced system settings -> Environment Variables.
4. Hit the New User Variable button in the User variables section, then type JAVA_HOME in Variable name and give your jre path in the Variable value. It should look like the below image:
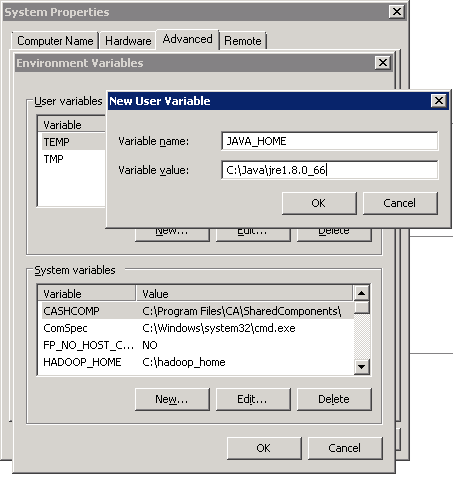 (Java path and version may change according to the version of Kafka you are using)
5. Now click OK.
6. Search for a Path variable in the “System Variable” section in the “Environment Variables” dialogue box you just opened.
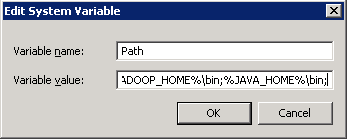
7. Edit the path and type “;%JAVA_HOME%\bin” at the end of the text already written there, just like the image below:
8. To confirm the Java installation, just open cmd and type “java –version.” You should be able to see the version of Java you just installed.

If your command prompt somewhat looks like the image above, you are good to go. Otherwise, you need to recheck whether your setup version matches the correct OS architecture (x86, x64), or if the environment variables path is correct.
Related Tutorial: Kafka Security With SASL and ACL
B. ZooKeeper Installation
1. Go to your ZooKeeper config directory. For me its C:\zookeeper-3.4.7\conf
2. Rename file “zoo_sample.cfg” to “zoo.cfg”
3. Open zoo.cfg in any text editor, like Notepad; I prefer Notepad++.
4. Find and edit dataDir=/tmp/zookeeper to :\zookeeper-3.4.7\data
5. Add an entry in the System Environment Variables as we did for Java.
a. Add ZOOKEEPER_HOME = C:\zookeeper-3.4.7 to the System Variables.
b. Edit the System Variable named “Path” and add ;%ZOOKEEPER_HOME%\bin;
6. You can change the default Zookeeper port in zoo.cfg file (Default port 2181).
7. Run ZooKeeper by opening a new cmd and type zkserver.
8. You will see the command prompt with some details, like the image below:
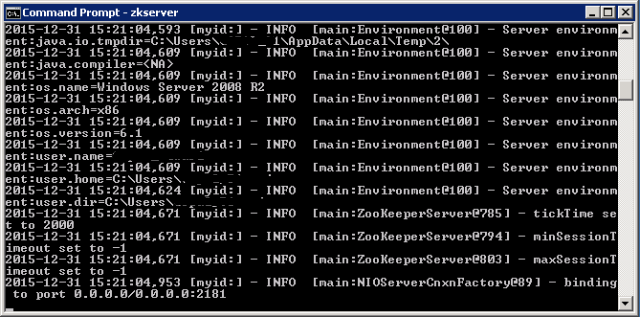
Congratulations, your ZooKeeper is up and running on port 2181!
C. Setting Up Kafka
1. Go to your Kafka config directory. For me its C:\kafka_2.11-0.9.0.0\config
2. Edit the file “server.properties.”
3. Find and edit the line log.dirs=/tmp/kafka-logs” to “log.dir= C:\kafka_2.11-0.9.0.0\kafka-logs.
4. If your ZooKeeper is running on some other machine or cluster you can edit “zookeeper.connect:2181” to your custom IP and port. For this demo, we are using the same machine so there's no need to change. Also the Kafka port and broker.id are configurable in this file. Leave other settings as is. Learn how to setup a Zookeeper cluster.
5. Your Kafka will run on default port 9092 and connect to ZooKeeper’s default port, 2181.
D. Running a Kafka Server
Important: Please ensure that your ZooKeeper instance is up and running before starting a Kafka server.
1. Go to your Kafka installation directory: C:\kafka_2.11-0.9.0.0\
2. Open a command prompt here by pressing Shift + right click and choose the “Open command window here” option).
3. Now type .\bin\windows\kafka-server-start.bat .\config\server.properties and press Enter.
.\bin\windows\kafka-server-start.bat .\config\server.properties
4. If everything went fine, your command prompt will look like this:
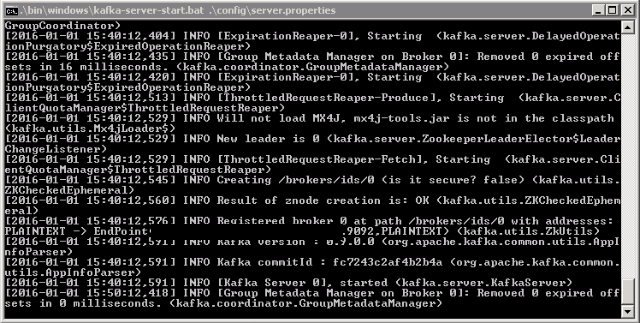
5. Now your Kafka Server is up and running, you can create topics to store messages. Also, we can produce or consume data from Java or Scala code or directly from the command prompt.
E. Creating Topics
1. Now create a topic with the name “test” and a replication factor of 1, as we have only one Kafka server running. If you have a cluster with more than one Kafka server running, you can increase the replication-factor accordingly, which will increase the data availability and act like a fault-tolerant system.
2. Open a new command prompt in the location C:\kafka_2.11-0.9.0.0\bin\windows.
3. Type the following command and hit Enter:
kafka-topics.bat --create --zookeeper localhost:2181 --replication-factor 1 --partitions 1 --topic test
F. Creating a Producer and Consumer to Test Server
1. Open a new command prompt in the location C:\kafka_2.11-0.9.0.0\bin\windows
2. To start a producer type the following command:
kafka-console-producer.bat --broker-list localhost:9092 --topic test3. Again open a new command prompt in the same location as C:\kafka_2.11-0.9.0.0\bin\windows
4. Now start a consumer by typing the following command:
Before kafka version 2.0 (<2.0):
kafka-console-consumer.bat --zookeeper localhost:2181 --topic testAfter kafka version 2.0 (>= 2.0):
kafka-console-consumer.bat --bootstrap-server localhost:9092 --topic test
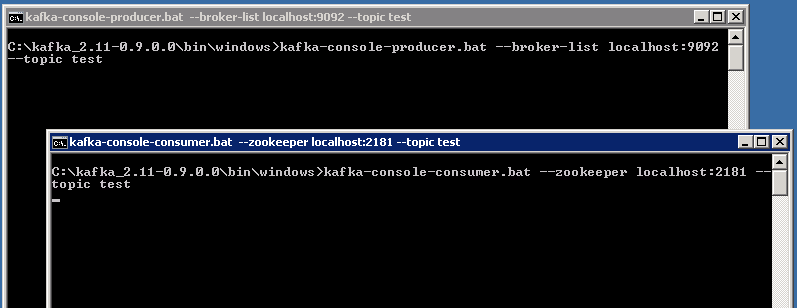
5. Now you will have two command prompts, like the image below:
6. Now type anything in the producer command prompt and press Enter, and you should be able to see the message in the other consumer command prompt.
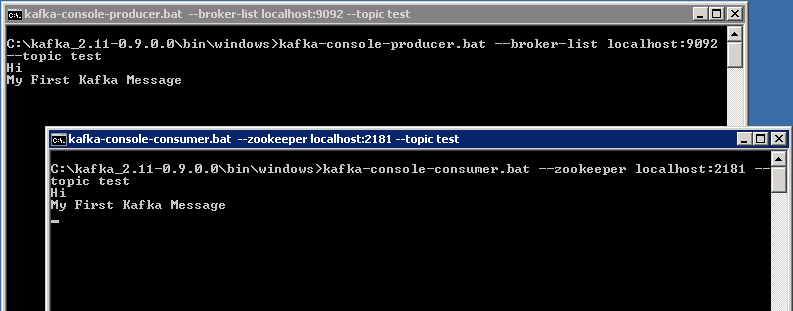
7. If you are able to push and see your messages on the consumer side, you are done with Kafka setup.
Some Other Useful Commands
- List Topics:
kafka-topics.bat --list --zookeeper localhost:2181 - Describe Topic:
kafka-topics.bat --describe --zookeeper localhost:2181 --topic [Topic Name] - Read messages from the beginning
- Before version < 2.0:
kafka-console-consumer.bat --zookeeper localhost:2181 --topic [Topic Name] --from-beginning - After version > 2.0:
kafka-console-consumer.bat --bootstrap-server localhost:9092 --topic [Topic Name] --from-beginn
- Before version < 2.0:
- Delete Topic:
kafka-run-class.bat kafka.admin.TopicCommand --delete --topic [topic_to_delete] --zookeeper localhost:2181
Opinions expressed by DZone contributors are their own.

Comments