REST + MongoDB + HATEOAS?
We take a look at using MongoDB and HATEOAS to create a REST web service that achieves the third level of Richardson's Maturity Model.
Join the DZone community and get the full member experience.
Join For FreeREST?
Recently I had an interesting experience while implementing HATEOAS to a REST web service, and I was also lucky enough to get to try out a NoSQL database named MongoDB, which I found really convenient for a lot of different cases where you don't need to manage transactions. So, today, I'm going to share with you this experience. Maybe some of you are going to learn something new maybe not, but still, you'll get a refresher on what you already know.
So, first of all, we're going to introduce REST, and slowly we'll get to HATEOAS and MongoDB. So, what is exactly REST?
As the World Wide Web Consortium states, REST is:
"… a model for how to build Web services [Fielding]. The REST Web is the subset of the WWW (based on HTTP) in which agents provide uniform interface semantics -- essentially create, retrieve, update, and delete -- rather than arbitrary or application-specific interfaces, and manipulate resources only by the exchange of representations..."
Okay, now that we know what REST is, I'm going to list a brief description of all the constraints that Roy Fielding mentioned in chapter five of his dissertation:
- Client-Server – Implement your service in such way that you'll separate the user interface concerns (client gets portability) from the data storage concerns (server gets scalability).
- Stateless – Implement the communication between client and server in such a way that when the server is processing the request it never takes advantage of any information that is stored in the server context and all the information related to sessions are stored on the client.
- Cache – When the response to a request can be cached (implicitly or explicitly) the client should get the cached response.
- Uniform Interface – All REST services should rely on the same uniform design between the components. Interfaces should be decoupled from the services that are provided.
- Layered System – The client never knows whether they're connected directly to the server or to some intermediary servers along the way. For example, a request can go through a proxy, which has the functionality of load balancing or shared cache.
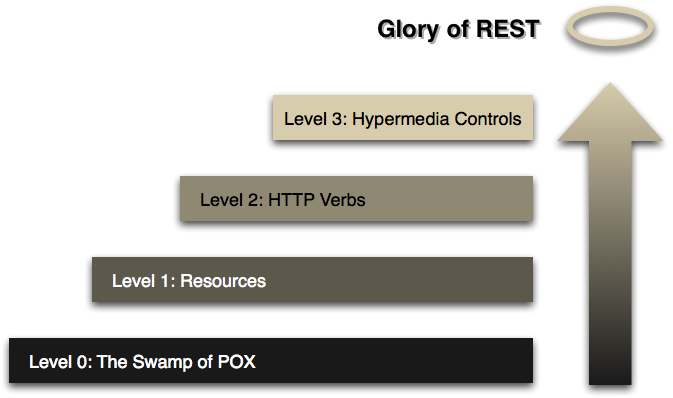
Richardson Maturity Model

Figure 1 – Levels of the Richardson Maturity Model
As Martin Fowler says, this model is a "model (developed by Leonard Richardson) that breaks down the principal elements of a REST approach into three steps. These introduce resources, HTTP verbs, and hypermedia controls."
I'm going to give you a short description of these levels:
- The Swamp of POX – There is just one resource and one request method POST and a single way of communicating – XML.
- Resources – We stick to the POST method, but we're getting more resources that we can address.
- HTTP verbs – Now for appropriate cases (resources), we're using other HTTP methods like GET or DELETE. Usually, CRUD operations are implemented here.
- Hypermedia Controls – HATEOAS (Hypertext As The Engine Of Application State), you should provide the client a start link for using your service, and, after that, each response should contain hyperlinks to other possibilities of your service.
Now that we know what REST is and we've covered its Maturity Model, I'm going to introduce you briefly to a NoSQL database, MongoDB, and, after that, we'll get to the demo!
Why HATEOAS?
First, let's point out that REST is not easy, and nobody who really understands what REST is said that it's easy. Usually, for small services that are not going to grow or change in the near future, it's more than great if you achieved level 2, HTTP Verbs.
What about big services that are going to grow? A lot of people will say that it's okay if you just do level 2. Why? Because HATEOAS is one of the things that make REST complex; it's difficult. If you really want to get its advantages, you have to write more code on the client – handle errors, how resources are interpreted, how provided links are analyzed and server – constructing comprehensive and useful links, etc. Let's look at some of the benefits of HATEOAS :
- Usability – client developers can effectively use, learn about, and explore your service by following the links that you provide. Also, they can imagine the skeleton of your project.
- Scalability – clients that follow the provided links instead of constructing them don't depend on the service's code changes.
- Flexibility – providing links for older and newer versions of the service allows you to easily interoperate with the old version-based clients and with the new version-based ones.
- Availability – clients that rely on HATEOAS never should worry about new versions or code changes on the server like the hardcoded ones.
- Loose coupling – HATEOAS promotes loose coupling between client and server by assigning the responsibility to build and provide links just to the server.
NoSQL? MongoDB?
So, what are NoSQL databases? Derived from the name 'non-SQL' or 'non-Relationary' these databases are not using SQL-like query languages and are often called structured storage. These databases have existed since 1960 but were not that popular until now, when some big companies, like Google and Facebook, started to use them. The most notorious advantages are freedom from a fixed set of columns, joins, and SQL-like query languages.
Sometimes, the name NoSQL may refer to 'not only SQL' to assure you that they may support SQL. NoSQL databases use data structures like key-values, wide columns, graphs, or documents and may be stored in different formats, like JSON.
MongoDB is a schema-less NoSQL database, which is document-oriented, thus, as I mentioned above, it provides high performance and good scalability and is cross-platform. MongoDB recommended itself because of the full index support, the easy and clear structure of saved objects in JSON format, amazing dynamic-document query support, the unnecessary conversion of application objects to database objects, and the professional support by MongoDB.
Time to Code! Get Ready for MongoDB!
Okay, now we're ready to get to the real deal. Let's build a simple EmployeeManager web service, which we'll use to demonstrate HATEOAS with a MongoDB connection.
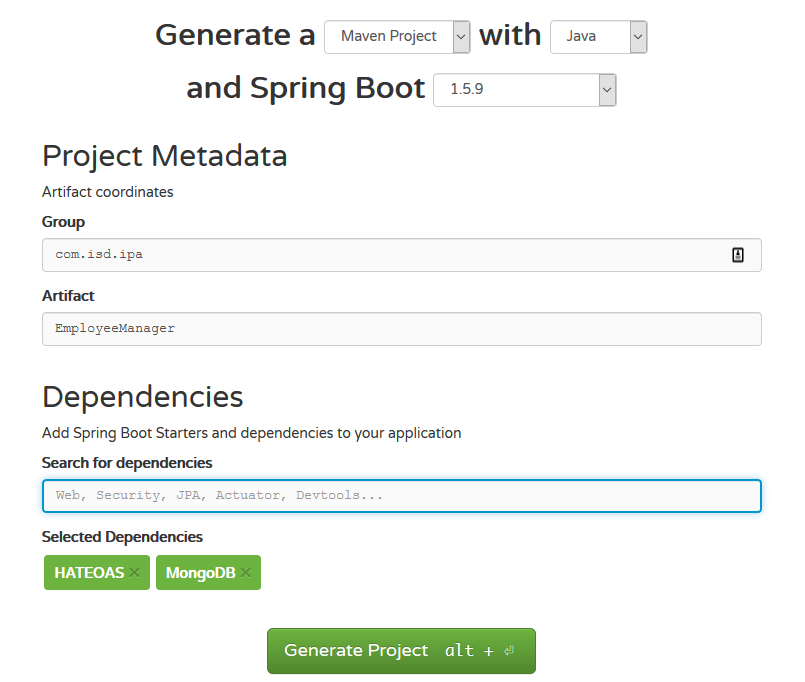
For bootstrapping our application, we'll use Spring Initializr. We're going to use Spring HATEOAS and Spring Data MongoDB as dependencies. You should see something like what I've got below in Figure 2.

Figure 2 – Bootstrapping the application
Once you're done, download the zip and import it as a Maven project in your favorite IDE.
First, let's configure our application.properties. To get a MongoDB connection you should deal with the following parameters :
xxxxxxxxxx
spring.data.mongodb.host= //Mongo server host
spring.data.mongodb.port= //Mongo server port
spring.data.mongodb.username= //Login user
spring.data.mongodb.password= //Password
spring.data.mongodb.database= //Database name
Usually, if everything is freshly installed and you haven't changed or modified any Mongo properties, then you just have to provide a database name (already created one through the GUI).
xxxxxxxxxx
spring.data.mongodb.database=EmployeeManager
Also, to get the Mongo instance started, I created a .bat, which points to the installation folder and to the data folder. It looks like this:
xxxxxxxxxx
"C:\Program Files\MongoDB\Server\3.6\bin\mongod" --dbpath D:\Inther\EmployeeManager\warehouse-data\db
Now, we're going to quickly create our models. I have two models, Employee and Department. Check them out, make sure to have a constructor without parameters, getters, setters, an equals method, and a hashCode generated. (Don't worry, all the code is on GitHub so you can check it later.)
xxxxxxxxxx
public class Employee {
private String employeeId;
private String firstName;
private String lastName;
private int age;
}
public class Department {
private String department;
private String name;
private String description;
private List<Employee> employees;
}
Now that we're done with our models, let's create the repositories so we can test our persistence. The repositories look like:
xxxxxxxxxx
public interface EmployeeRepository
extends MongoRepository<Employee, String> {
}
public interface DepartmentRepository
extends MongoRepository<Department,String>{
}
As you noticed, there are no methods, because, as some of you know, the central interface in Spring Data is named Repository on top of which comes the CrudRepository, which provides the basic operations to deal with our models.
On top of CrudRepository , we have PagingAndSortingRepository, which gives us some extended functionalities to simplify paginating and sorting access. And on the top of all that, in our case, sits MongoRepository, which deals strictly with our Mongo instance.
So, for our case, we don't need any methods other than the ones that came out of the box, but just for learning purposes, I'm going to mention that are two ways in which you can add other query methods:
'Lazy' (Query creation) – this strategy will try to build a query by analyzing your query method's name and deducting the keywords, for example,
findByLastnameAndFirstname.Writing the query – nothing special here. For example, just annotate your method with
@Queryand write your query by yourself. Yeah! As you heard, you can write queries in MongoDB too. Here is an example of a JSON-based query method:
xxxxxxxxxx
("{ 'firstname' : ?0 }")
List<Employee> findByTheEmployeesFirstname(String firstname); .
At this point, we can already test how our persistence works. We just need a couple of adjustments to our models. By adjustments, I mean that we need to annotate some things. Spring Data MongoDB uses a MappingMongoConverter to map objects to documents, and here are some annotations
that we're going to use:
@Id– field level annotation to point out which of your fields is the identity.@Document– a class level annotation to communicate that this class is going to be persisted in your database.@DBRef– field level annotation to describe the referentiality.
Once we're done, we can get some data in our database using the CommandLineRunner, which is an interface used to run pieces of code when the application is fully started, right before the run() method. Below, you can take a look at my bean.
xxxxxxxxxx
public CommandLineRunner init(EmployeeRepository employeeRepository, DepartmentRepository departmentRepository) {
return (args) -> {
employeeRepository.deleteAll();
departmentRepository.deleteAll();
Employee e = employeeRepository.save(new Employee("Ion", "Pascari", 23));
departmentRepository.save(new Department("Service Department", "Service Rocks!", Arrays.asList(e)));
for (Department d : departmentRepository.findAll()) {
LOGGER.info("Department: " + d);
}
};
}
Okay, we have created some models, and we persisted them. Now, we need a way to interact with them. As I said, all the code is available on GitHub, so I'm going to show you just one domain service (the interface and the implementation).
xxxxxxxxxx
public interface EmployeeService {
Employee saveEmployee(Employee e);
Employee findByEmployeeId(String employeeId);
void deleteByEmployeeId(String employeeId);
void updateEmployee(Employee e);
boolean employeeExists(Employee e);
List<Employee> findAll();
void deleteAll();
}
And the implementation:
xxxxxxxxxx
public class EmployeeServiceImpl implements EmployeeService {
private EmployeeRepository employeeRepository;
public Employee saveEmployee(Employee e) {
return employeeRepository.save(e);
}
public Employee findByEmployeeId(String employeeId) {
return employeeRepository.findOne(employeeId);
}
public void deleteByEmployeeId(String employeeId) {
employeeRepository.delete(employeeId);
}
public void updateEmployee(Employee e) {
employeeRepository.save(e);
}
public boolean employeeExists(Employee e) {
return employeeRepository.exists(Example.of(e));
}
public List<Employee> findAll() {
return employeeRepository.findAll();
}
public void deleteAll() {
employeeRepository.deleteAll();
}
}
Nothing special to mention here, so we're going to move on to our last puzzle piece – controllers! You can see an implemented controller for the Employee resource below.
xxxxxxxxxx
("/employees")
public class EmployeeController {
private EmployeeService employeeService;
(value = "/list/", method = RequestMethod.GET)
public HttpEntity<List<Employee>> getAllEmployees() {
List<Employee> employees = employeeService.findAll();
if (employees.isEmpty()) {
return new ResponseEntity<>(HttpStatus.NO_CONTENT);
} else {
return new ResponseEntity<>(employees, HttpStatus.OK);
}
}
(value = "/employee/{id}", method = RequestMethod.GET)
public HttpEntity<Employee> getEmployeeById(("id") String employeeId) {
Employee byEmployeeId = employeeService.findByEmployeeId(employeeId);
if (byEmployeeId == null) {
return new ResponseEntity<>(HttpStatus.NOT_FOUND);
} else {
return new ResponseEntity<>(byEmployeeId, HttpStatus.OK);
}
}
(value = "/employee/", method = RequestMethod.POST)
public HttpEntity<?> saveEmployee( Employee e) {
if (employeeService.employeeExists(e)) {
return new ResponseEntity<>(HttpStatus.CONFLICT);
} else {
Employee employee = employeeService.saveEmployee(e);
URI location = ServletUriComponentsBuilder
.fromCurrentRequest().path("/employees/employee/{id}")
.buildAndExpand(employee.getEmployeeId()).toUri();
HttpHeaders httpHeaders = new HttpHeaders();
httpHeaders.setLocation(location);
return new ResponseEntity<>(httpHeaders, HttpStatus.CREATED);
}
}
(value = "/employee/{id}", method = RequestMethod.PUT)
public HttpEntity<?> updateEmployee(("id") String id, Employee e) {
Employee byEmployeeId = employeeService.findByEmployeeId(id);
if(byEmployeeId == null){
return new ResponseEntity<>(HttpStatus.NOT_FOUND);
} else {
byEmployeeId.setAge(e.getAge());
byEmployeeId.setFirstName(e.getFirstName());
byEmployeeId.setLastName(e.getLastName());
employeeService.updateEmployee(byEmployeeId);
return new ResponseEntity<>(employeeService, HttpStatus.OK);
}
}
(value = "/employee/{id}", method = RequestMethod.DELETE)
public ResponseEntity<?> deleteEmployee(("id") String employeeId) {
employeeService.deleteByEmployeeId(employeeId);
return new ResponseEntity<>(HttpStatus.NO_CONTENT);
}
(value = "/employee/", method = RequestMethod.DELETE)
public ResponseEntity<?> deleteAll() {
employeeService.deleteAll();
return new ResponseEntity<>(HttpStatus.NO_CONTENT);
}
}
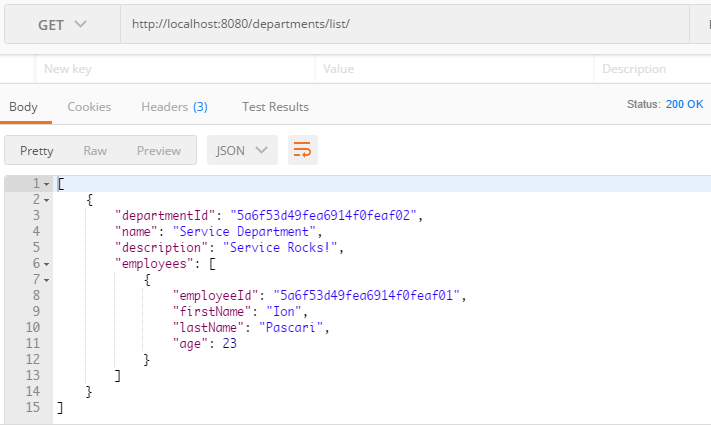
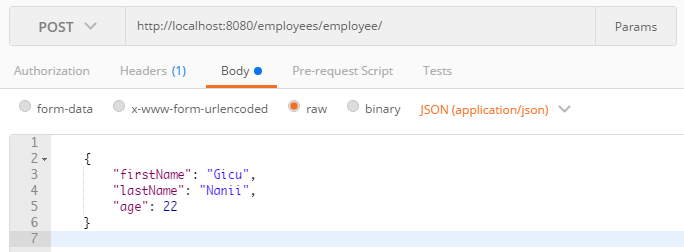
So, with all the methods implemented above, we positioned ourselves at the 2nd level of Richardson's Maturity Model because we used the HTTP verbs and implemented the CRUD operations. Now, we have our means of interacting with the data, and, using Postman, we can retrieve our resources like in figure 3, or we can add a new resource like in figure 4.

Figure 3 – Retrieving a list of departments in JSON

Figure 4 – Adding a new employee in JSON
HATEOAS Is Coming!
A vast majority of people stop right at this level because, usually, it's enough for them or for the purpose of the web service, but that's not why we are here. So, as I mentioned before, a web service that supports HATEOAS or a hypermedia-driven site should be able to provide information on how to use and navigate the web service by including links with some kind of relationships with the responses.

You can imagine HATEOAS as a road sign. While you drive, you're being guided by those signs. For example, if you need to get to the airport you just follow the indicators, if you need to get back — again just follow the indicators and you are always aware of where you're allowed to stay, park, drive, and so on.
Enough talk here. Let's implement the links that will come with our representations of the resources we have to adjust our models by extending the ResourceSupport to inherit the add() method, which will give us a nice option to set values to the resource representation without adding any new fields.
xxxxxxxxxx
public class Employee extends ResourceSupport{...}
Now, let's get to the link creation. For that, Spring HATEOAS provides a Link object to store this kind of information and CommandLinkBuilder to build it.
Let's say that we want to add a link to a GET response for an employee by id.
xxxxxxxxxx
(value = "/employee/{id}", method = RequestMethod.GET)
public HttpEntity<Employee> getEmployeeById(("id") String employeeId) {
Employee byEmployeeId = employeeService.findByEmployeeId(employeeId);
if (byEmployeeId == null) {
return new ResponseEntity<>(HttpStatus.NOT_FOUND);
} else {
byEmployeeId.add(linkTo(methodOn(EmployeeController.class).getEmployeeById(byEmployeeId.getEmployeeId())).withSelfRel());
return new ResponseEntity<>(byEmployeeId, HttpStatus.OK);
}
}
If you notice there is:
add()— method to set the link value.linkTo(Class controller)— a statically imported method that allows for the creation a newControllerLinkBuilder[1] with a base pointing to a controller class.methodOn(Class controller, Object... parameters)— a statically imported method that creates an indirection to the controller class giving the ability to invoke a method from that class and use its return type.withSelfRel()— a method that finally creates the Link with a relationship pointing by default to itself.
Now, a GET will produce the following response:
xxxxxxxxxx
{
"employeeId": "5a6f67519fea6938e0196c4d",
"firstName": "Ion",
"lastName": "Pascari",
"age": 23,
"_links": {
"self": {
"href": "http://localhost:8080/employees/employee/5a6f67519fea6938e0196c4d"
}
}
}
The response not only contains the employee's details but also contains the self-linking URL where you can navigate.
_linksrepresents the newly set value for our resource representation.selfstands for the type of relationship that link is pointing to. In this case, it's a self-referencing hyperlink. It's also possible to have another kind of relationships too, like pointing to another class (we'll see that in a second).hrefis the URL that identifies the resource.
Now, let's say that we want to add links to the GET response for a list of departments. Here, things are getting more interesting because a department is not pointing just to itself, but to its employees too, and the employees are pointing to themselves and to their list as well. So, let's take a look at the code:
xxxxxxxxxx
(value = "/list/", method = RequestMethod.GET)
public HttpEntity<List<Department>> getAllDepartments() {
List<Department> departments = departmentService.findAll();
if (departments.isEmpty()) {
return new ResponseEntity<>(HttpStatus.NO_CONTENT);
} else {
departments.forEach(d -> d.add(linkTo(methodOn(DepartmentController.class).getAllDepartments()).withRel("departments")));
departments.forEach(d -> d.add(linkTo(methodOn(DepartmentController.class).getDepartmentById(d.getDepartmentId())).withSelfRel()));
departments.forEach(d -> d.getEmployees().forEach(e -> {
e.add(linkTo(methodOn(EmployeeController.class).getAllEmployees()).withRel("employees"));
e.add(linkTo(methodOn(EmployeeController.class).getEmployeeById(e.getEmployeeId())).withSelfRel());
}));
return new ResponseEntity<>(departments, HttpStatus.OK);
}
}
So, this code will produce the following response:
xxxxxxxxxx
{
"departmentId": "5a6f6c269fea690904a02657",
"name": "Service Department",
"description": "Service Rocks!",
"employees": [
{
"employeeId": "5a6f6c269fea690904a02656",
"firstName": "Ion",
"lastName": "Pascari",
"age": 23,
"_links": {
"employees": {
"href": "http://localhost:8080/employees/list/"
},
"self": {
"href": "http://localhost:8080/employees/employee/5a6f6c269fea690904a02656"
}
}
}
],
"_links": {
"departments": {
"href": "http://localhost:8080/departments/list/"
},
"self": {
"href": "http://localhost:8080/departments/department/5a6f6c269fea690904a02657"
}
}
}
Nothing changed except for the fact that there are some links with relationships that aren't named self. These are the other kinds of relationships that I was talking about earlier and they were constructed with
withRel(String rel)— a method that finally creates the Link with a relationship pointing to the given rel.
So, congratulations! At this point we can say that we reached the 3rd level of Richardson's Maturity Model, of course, we did not because we need many more checks and improvements on our web service like providing the link regarding the state of a resource or any other things, but we almost did it!
You can get the full source code here GitHub
Hope that you liked it.
Published at DZone with permission of Ion Pascari. See the original article here.
Opinions expressed by DZone contributors are their own.

Comments