Build Your Own Shopping Cart With React Hooks
In this tutorial, learn how to implement the following React Hooks: useState hook, useReducer hook, useEffect, Custom hook, component functional, and more.
Join the DZone community and get the full member experience.
Join For FreeIn this tutorial, we'll go over how to use and understand React Hooks. This article is an extension of article React Hooks With Typescript: Use State and Effect in 2020. It has been expanded with other hooks and logic and lessons learned.
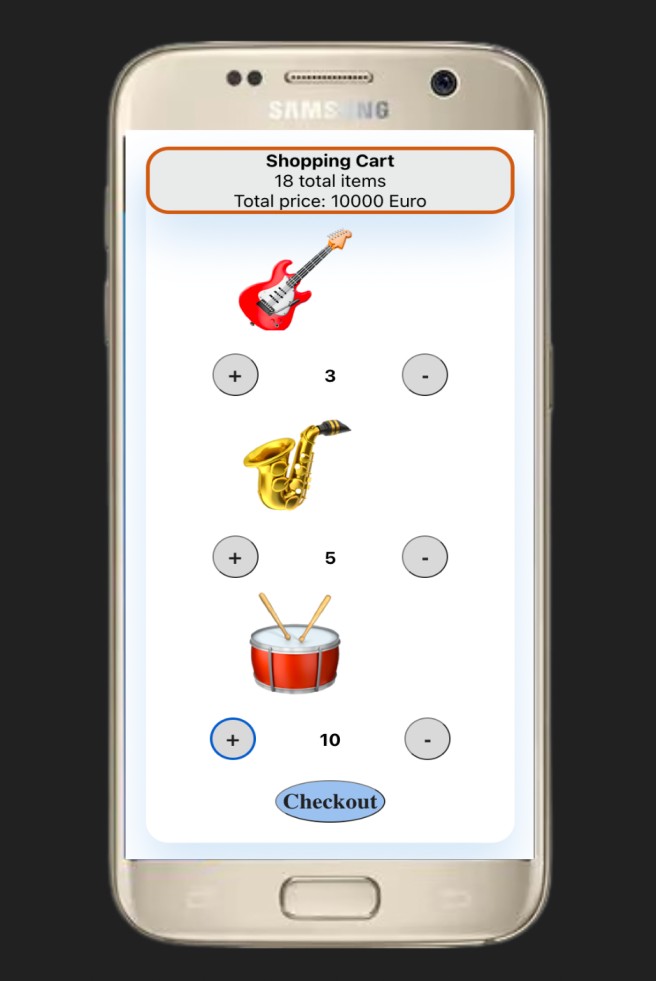
Here, we create a simple product page with a shopping cart (see the image below). The shopping cart represents the memory (or the "state") of the product page. The state generally refers to application data that must be tracked.
To understand React hooks, we start with a better understanding of the useState hook to update the state (specifically: the shopping cart) in the application.
Next, we replace the useState hook with the useReducer hook. The useReducer hook is usually preferred if you have complex state logic. We implement the useEffect hook to fetch data and finally we create a custom hook!

As a starting point for the tutorial, clone the following GitHub repository:
git clone https://github.com/petereijgermans11/react-hooks
Install the dependencies:  npm i && npm start
And start the app at http://localhost:3000
What Is a Component in React?
Before we get started with the implementation of the product page, let's zoom in on what a component is in React.
Components are independent and reusable pieces of code. They serve the same purpose as JavaScript functions but return HTML. In the case of React, JSX code is returned. JSX allows us to write HTML elements in JavaScript and place them in the DOM without using the createElement() and/or appendChild() methods. See Listing 1 for an example of a functional component that receives properties (as function arguments) and returns JSX. See also section: Class components versus functional components for more context.
function Product(props) {
    return <div> {props.message} </div>
}

export default Product;
Note that to embed a JavaScript expression in JSX, the JavaScript must be wrapped with curly braces, such as {props.message}. Also, the name of a React component must always start with a capital letter.
To make this component available in the application you need to export it (listing 1).
Components in Files
React is all about reusing code, and it's recommended that you split your components into separate files.
To do that, create a new file with a .js file extension and put the code for the Component in it. In our example, we put the code in the file Product.js. in the folder: src/Components/Product. Note that the file name must also start with a capital letter.
A Component in a Component
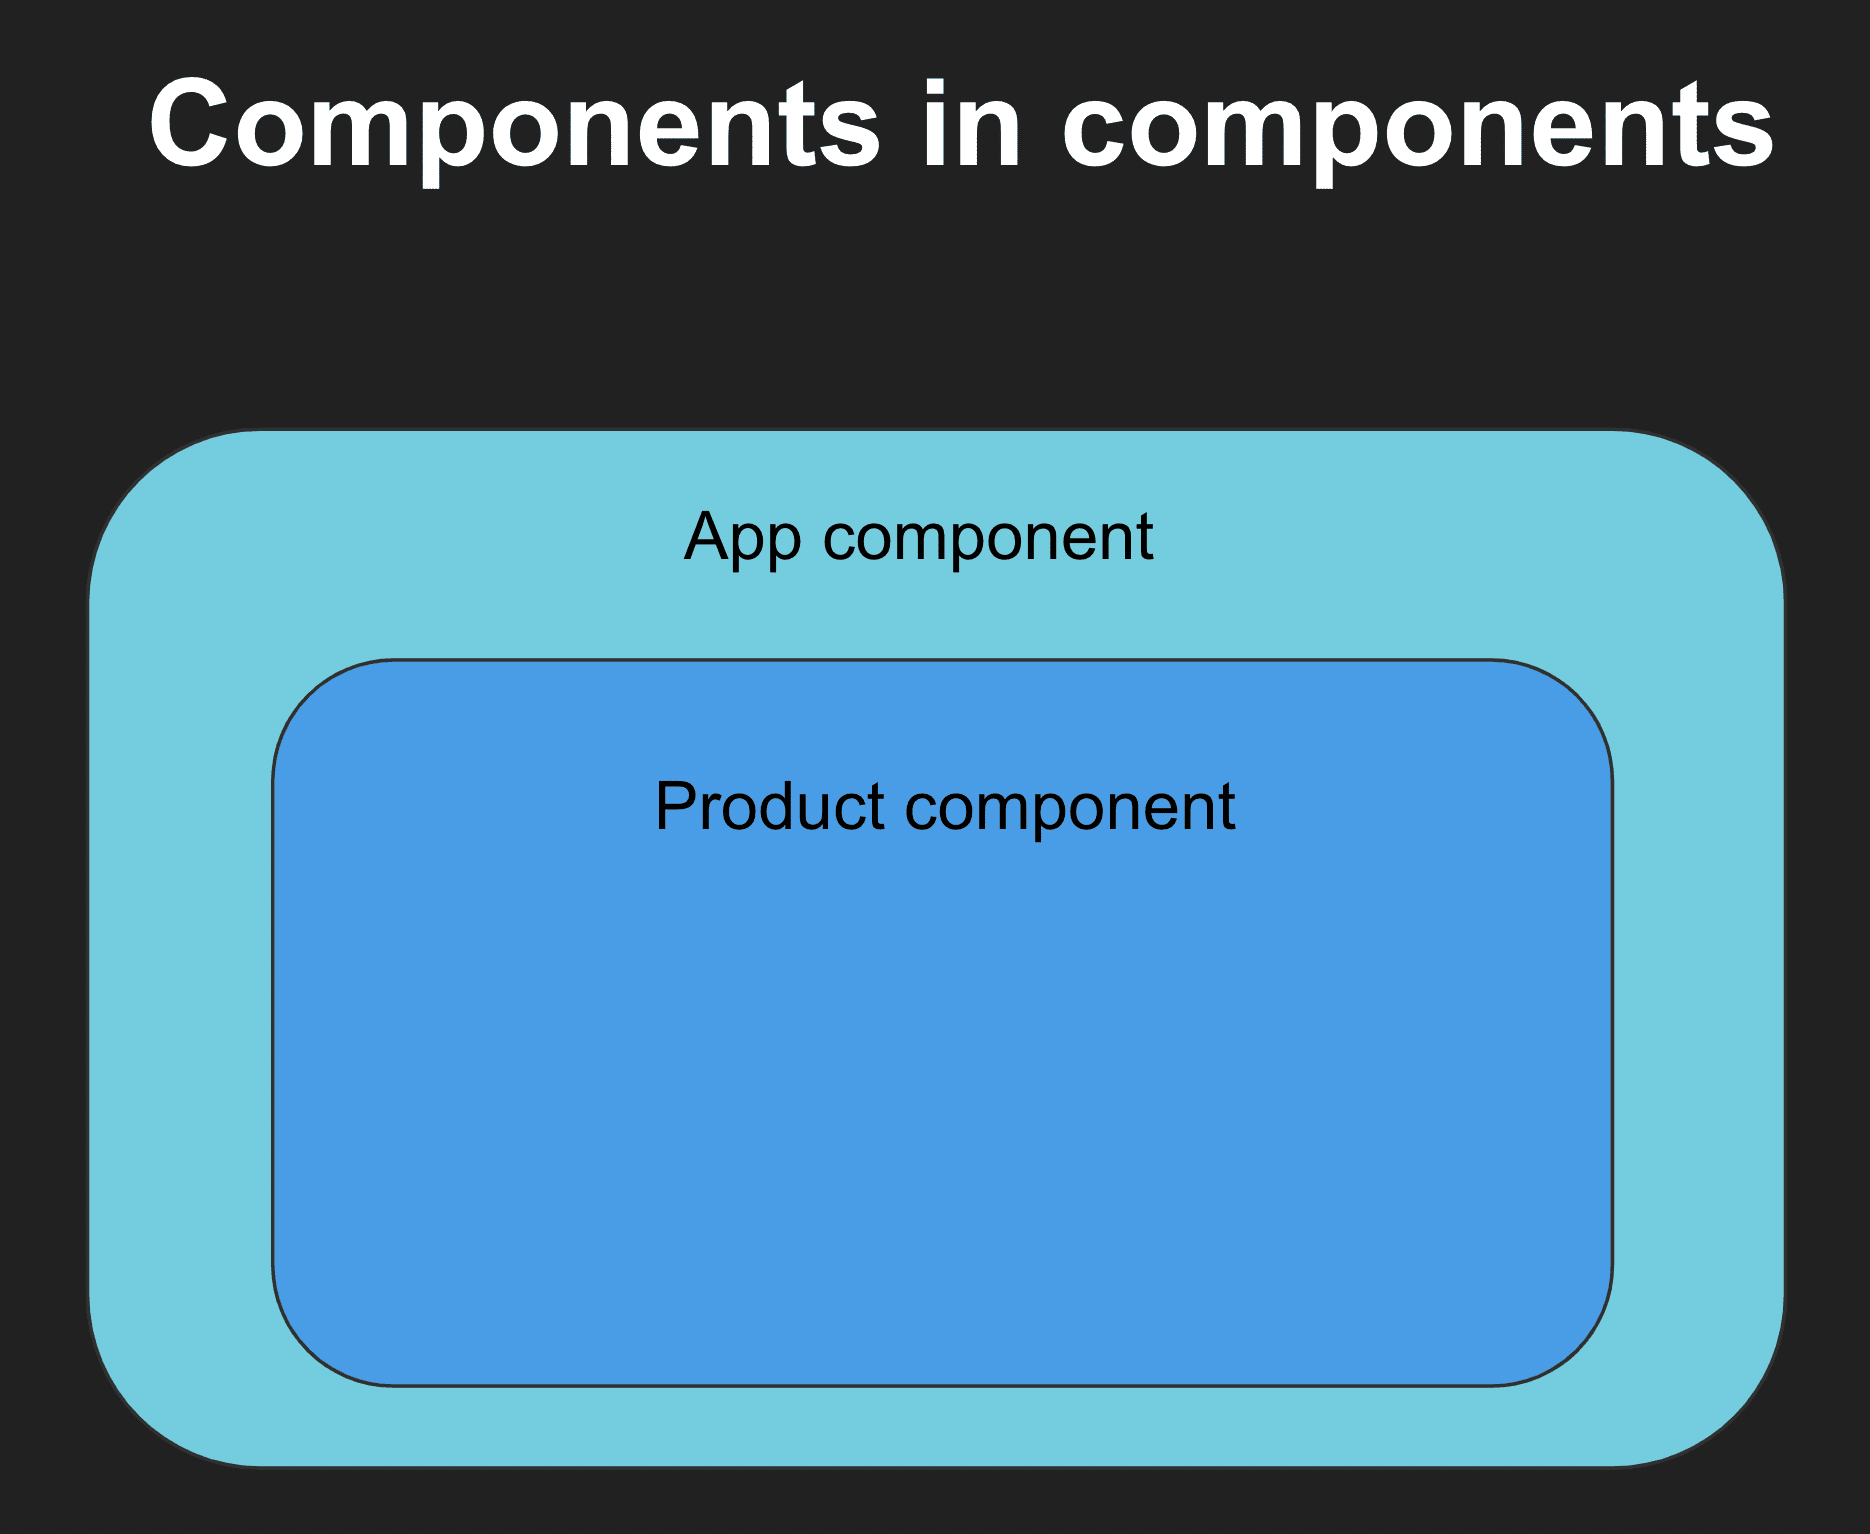
Now you have a component called Product, which returns a message. This Product component is part of the App component:

To use this Product component in your application, use a similar syntax to normal HTML: <Product />. See Listing 2 for an example of how to call this component with a message property in an App component:
import Product from '../Product';

function App() {
    return <Product message=”My awesome shopping cart” ></div>
}

export default App;
Class Components Versus Functional Components
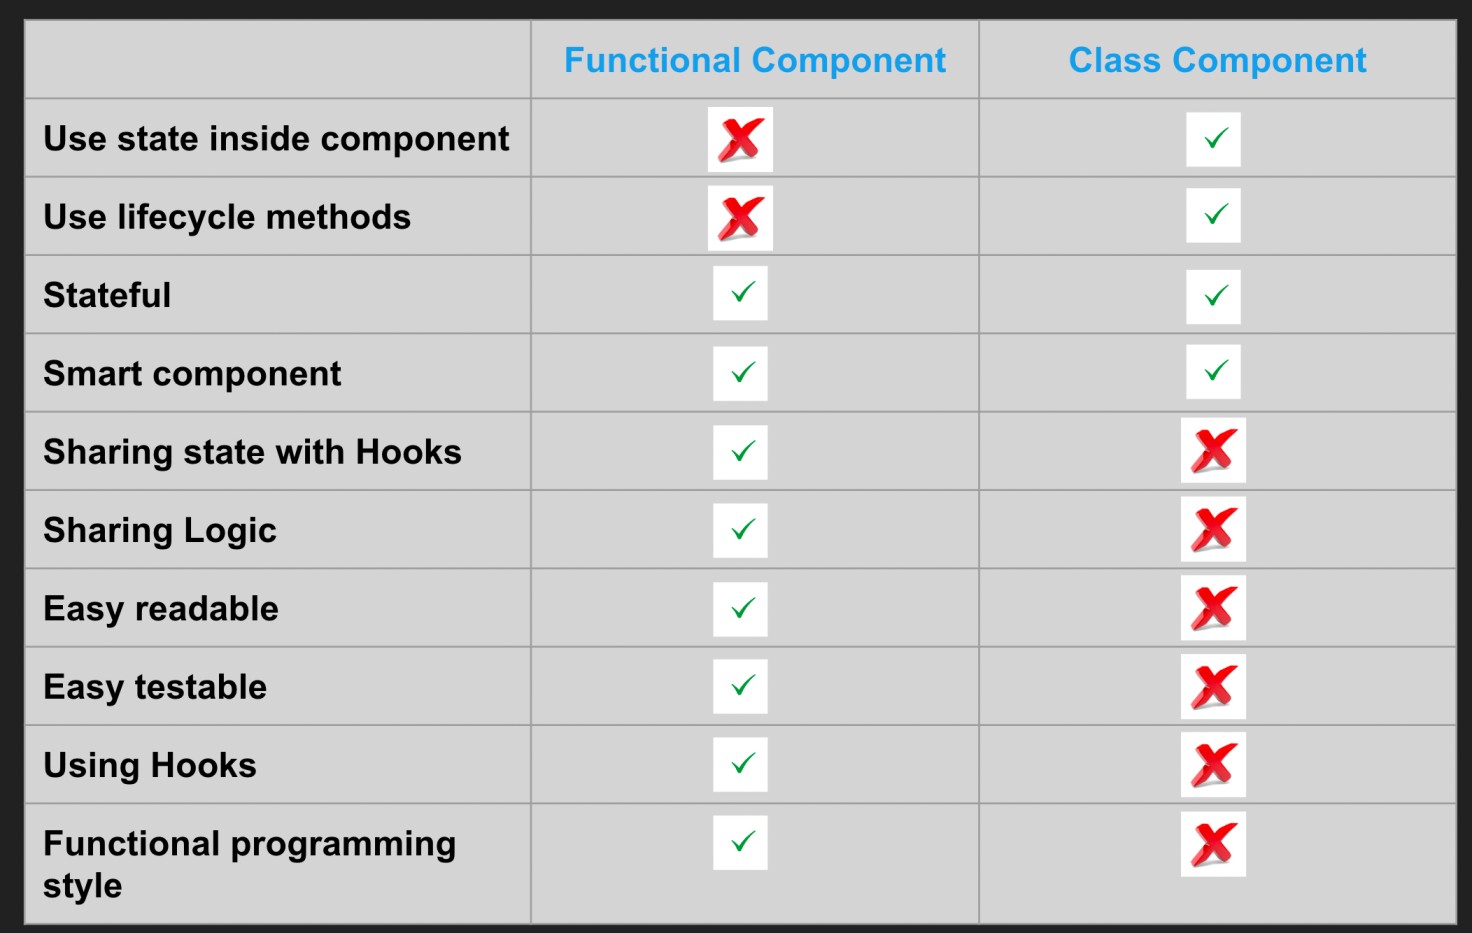
There are two types of components in React: class components and functional components. In this tutorial, we will focus on functional components because React hooks only work in functional components.
For global understanding we compare the two types of components:
After this short introduction, we start by creating a simple Product 'functional component' with React (see Listing 3). The component consists of two parts:
- The shopping cart, which contains the total number of items selected and the total price
- The product part, which has two buttons to add or remove the item from the shopping cart
Add the following code to the Product.js for a Product functional component (see also Product_1.js):
export default function Product() {

  return(
    <div>
      <div>Shopping Cart: 0 total items selected</div>
      <div>Total price: 0</div>
      <div><span role="img" aria-label="gitar"> </span></div>
         <button>+</button>
         <button>-</button>
    </div>
  )
}
In this code, you used JSX to create and return the HTML elements for the Product component, with an emoji to represent the product.
Step 2: Implement the UseState Hook
In this Product component, we will store the 'shopping cart' and the 'total costs' in the 'state'. Both can be stored in the state using the useState hook (see Listing 4).
const [cart, setCart] = useState([]);
const [total, setTotal] = useState(0);
What Is a UseState Hook?
useState declares a "state variable." Our state variables are called cart and total. This is a way to "preserve" values between function calls. Normally variables "disappear" when a function is closed, but state variables are preserved by React.
What Does UseState Yield?
It returns an array with the following two values:
- The current state (the variable 'cart' or 'total' contain the current state)
- and a function that allows you to update this state variable like '
setCart'
What Can You Pass as an Argument to UseState?
The only argument we can pass to useState() is the initial state. In our example, we pass an empty array as the initial state for our variable cart. And we pass the value 0 as the initial state for our variable total.
What Happens When the SetCart or SetTotal Functions Are Called?
In addition to updating the state variable, these functions cause this component to be re-rendered as soon as it is called.
import React, { useState } from 'react';

const products = [
   {
       emoji: '\uD83C\uDFB8',
       name: 'gitar',
       price: 500
   }];

export default function Product() {

   const [cart, setCart] = useState([]);
   const [total, setTotal] = useState(0);

   function add(product) {
       setCart(current => [...current, product.name]);
       setTotal(current => current + product.price);
   }

   return(
       <div>
           <div>Shopping Cart: {cart.length} total items</div>
           <div>Total price: {total}</div>
           <div>
               {products.map(product => (
                  <div key={product.name}>
                     <span role="img" aria-label={product.name}>{product.emoji}</span>
                     <button onClick={() => add(product)}>+</button>
                     <button>-</button>
                  </div>
               ))}
           </div>
       </div>
   )
}
In Listing 5 we extend our Product component with multiple products by defining a product array. In the JSX we use the .map method to iterate over these products (see Product_2.js).
An add() function has also been defined to be able to update the shopping cart and the total costs via the Add button. In this add function, we use the setCart and setTotal functions defined in the useState hook.
Instead of passing the new product directly to the setCart and setTotal functions, it passes an anonymous function that takes the current state and returns a new updated value.
However, be careful not to mutate the cart state directly. Instead, you can add the new product to the cart array by spreading the current cart array (...current) and appending the new product to the end of this array. Note: the spread operator creates a new instance/clone of the cart array and you have no side effects.
Attention!
Notice that hooks in general can only be called at the top level of a functional component. It's the only way React can be sure that every hook is called in the exact same order every time the component is rendered.
Step 3: Implement the UseReducer Hook
There is another Hook called useReducer that is specifically designed to update the state in a manner similar to the .reduce array method. The useReducer hook is similar to useState, but when you initialize this Hook, you pass a function that the Hook executes when you change the state along with the initial data. The function, also called the 'reducer', has two arguments: the state and the product.
Refactor the shopping cart to use the useReducer Hook (listing 6). Create a function called shoppingCartReducer that takes the state and product as arguments. Replace useState with useReducer, then pass the function shoppingCartReducer as the first argument and an empty array as the second argument, which is the initial state.
import React, { useReducer, useState } from 'react';

function shoppingCartReducer(state, product) {
  return [...state, product.name]
}

export default function Product() {
  const [cart, setCart] = useReducer(shoppingCartReducer, []);
  const [total, setTotal] = useState(0);

  function add(product) {
    setCart(product);
    setTotal(current => current + product.price);
  }

  return(...)
}
Make this change for setTotal as well. The end result of this first refactoring can be found in component Product_3.js.
Now it's time to add the 'remove' function (to remove a product from the shopping cart). To implement this we use a common pattern in reducer functions to pass an action object as the second argument. This action object consists of the product and the action type (listing 7).
function shoppingCartReducer(state, action) {
  switch(action.type) {
    case 'add':
      return [...state, action.product];
    case 'remove':
      const productIndex = state.findIndex(item => item.name === action.product.name);
      if(productIndex < 0) {
        return state;
      }
      const update = [...state];
      update.splice(productIndex, 1)
      return update
    default:
      return state;
  }
}
Within the shoppingCartReducer, the total selected products is updated based on the action type. In this case, you add products to the shopping cart at action-type: add. And remove them with action-type: remove. The remove action updates the state by splicing out the first instance of the found product from the cart array. We use the spread operator to make a copy of the existing state/cart array so that we will not be bothered by side effects during the update.
Remember to return the final state at the end of each action.
After updating the shoppingCartReducer, we create a remove function that calls the setCart with an action object. This action object contains the product and action type: remove.
Also modify the add function that calls the setCart with an action-type: add.
And finally, remove the existing call to setTotal() from the add()- function. And create a getTotal() function that calculates the total price based on the total cart state. Here you can use the 'cart.reduce() function'. See listing 8 and Product_5.js.
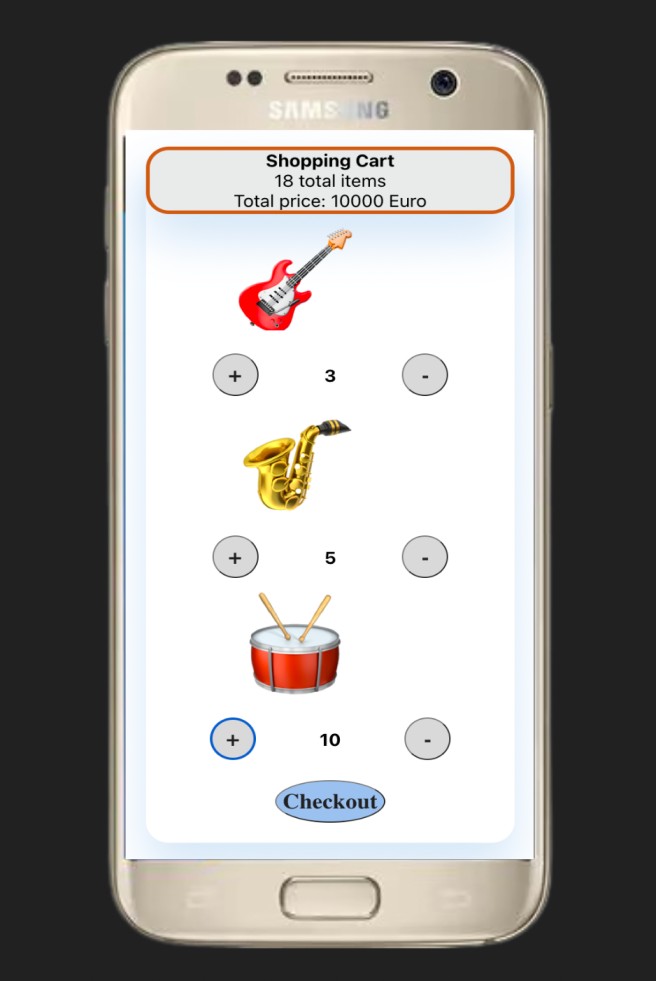
Also, create a getTotalSelectedAmountPerProduct() function to calculate the total selected amount per product. This amount will be rendered per product (see image 1)
import React, { useReducer } from 'react';
import './Product.css';

const products = [
  {
    emoji: "\uD83C\uDFB8",
    name: 'gitar',
    price: 5
  },
  {
    emoji: "\uD83C\uDFB7",
    name: 'saxophone',
    price: 120,
  },
  {
    emoji: "\uD83E\uDD41",
    name: 'drums',
    price: 5
  },
];

function getTotal(cart) {
  return cart.reduce((totalCost, item) => totalCost + item.price, 0);
}

function shoppingCartReducer(state, action) {
  switch(action.type) {
    case 'add':
      return [...state, action.product];
    case 'remove':
      const productIndex = state.findIndex(item => item.name === action.product.name);
      if(productIndex < 0) {
        return state;
      }
      const update = [...state];
      update.splice(productIndex, 1)
      return update
    default:
      return state;
  }
}

function getTotalSelectedAmountPerProduct(cart, productName) {
    return cart.filter(item => item.name === productName).length;
}

export default function Product() {
  const [cart, setCart] = useReducer(shoppingCartReducer, []);

  function add(product) {
    const action = { product, type: 'add' };
    setCart(action);
  }

  function remove(product) {
    const action = { product, type: 'remove' };
    setCart(action);
  }

  return(
    <div className="wrapper">
      <div className="shoppingcart">
        <strong>Shopping Cart</strong>
        <div>
           {cart.length} total items
        </div>
        <div>Total price: {getTotal(cart)} Euro</div>
      </div>
      <div>
        {products.map(product => (
          <div key={product.name}>
            <div className="product">
                <span role="img" aria-label={product.name}>{product.emoji}</span>
            </div>
            <div className="selectproduct">
              <button onClick={() => add(product)}>+</button><b>{getTotalSelectedAmountPerProduct(cart, product.name)}</b>
              <button onClick={() => remove(product)}>-</button>
            </div>
          </div>
        ))}
      </div>
      <br></br>
      <div className="checkout"><button>Checkout</button></div>
      <br></br>
    </div>
  )
}
The final result:

Step 4: Implement the UseEffect Hook
The useEffect Hook allows you to perform side effects on your components. Some examples of side effects are: fetching data and directly manipulating the DOM.
useEffect accepts two arguments: a <function> and a <dependency>. The dependency is optional - useEffect(<function>, <dependency>)
What Does UseEffect Do?
By using this Hook, you tell React that your component needs to do something after rendering. In our example, we use this hook to fetch product data with the function fetchProductData() and store it in the state via the function setProducts() (see Listing 9 and Product_6.js)
import { fetchProductData } from '../../services/ProductService';

export default function Product() {
  const [cart, setCart] = useReducer(shoppingCartReducer, []);

  useEffect(() => {
     setProducts(fetchProductData())
  }, []);

  const [products, setProducts] = useState([]);

  ...
The fetchProductData() function from the ProductService contains static data:
export function fetchProductData() {
    return [
      {
        emoji: "\uD83C\uDFB8",
        name: 'gitar',
        price: 500
      },
      {
        emoji: "\uD83C\uDFB7",
        name: 'saxophone',
        price: 3000,
      },
      {
        emoji: "\uD83E\uDD41",
        name: 'drums',
        price: 2000
      },
    ]
  }
When Is This Hook Executed?
That depends on the dependency that is passed as an argument in the hook. In our example, we use an empty array!
We have 3 possibilities (see also example useEffect below):
- When no dependency is passed as an argument, then the hook runs after every render.
- When an empty array is passed as an argument, then the hook runs only after the first render.
- When property values are passed as arguments, then the hook runs after every render and any time any value of the given property changes.
Examples of useEffect:
1. When no dependency is passed in the hook:
useEffect(() => { // this hook runs after every render });
2. An empty array as a dependency:
useEffect(() => { // this hook runs only after the first render }, [ ] );
3. Props values as a dependency:
useEffect(() => { //Runs after the first render //And any time any dependency value changes }, [prop] );
Step 5: Implement a Custom Hook
Hooks are reusable functions. When you have component logic that needs to be used by multiple components, we can extract that logic to a custom Hook.
A custom Hook is a JavaScript function whose name starts with ”use” and that may call other Hooks. For example, we create a new js-file with the name useStatesHook.js which contains a function with the name useStatesHook. And this function contains all the logic needed for managing the state. This logic is equivalent to the original code examples in step 3 (see Listing 10 and Product_6.js).
useStatesHook.js
import { useState, useReducer } from 'react';

const useStatesHooks = () => {
  const [cart, setCart] = useReducer(shoppingCartReducer, []);
  const [products, setProducts] = useState([]);
  return { cart,  products, setCart, setProducts };
}

function shoppingCartReducer(state, action) {

  switch(action.type) {
    case 'add':
      return [...state, action.product];

    case 'remove':
      const productIndex = state.findIndex(
            item => item.name === action.product.name);

      if(productIndex < 0) {
        return state;
      }
      const update = [...state];
      update.splice(productIndex, 1)
      return update
    default:
      return state;
  }
}

export default useStatesHooks;
Do Custom Hooks Start With “Use”?
Without it, React could not check for violations of rules for Hooks.
Do Multiple Components Use the Same Hook Share State?
No. You can reuse stateful logic with custom hooks. Every time you use a custom Hook, all states and effects inside of it are fully isolated.
How Can We (Re)Use This Custom Hook?
To reuse this hook, you have to:
Return all our data from our Hook.
return { cart, products, setCart, setProducts };
Export our useStatesHook.
In
Product_7.js, we are importing our useStatesHook in the Product component and utilizing it like any other Hook.
import useStatesHooks from './useStatesHooks';

export default function Product() {
    const { cart, products, setCart, setProducts } = useStatesHooks();

 ...
Step 6: Fetch Data From a Local File
You can easily store your Product data in a local file and fetch it with Axios.
Axios is a javascript library used to make HTTP requests. In our example, we use it to fetch de Product data from a local file. Our local file is defined in a folder: public/data/data.json
Before we can use Axios er have to install it first:
npm install axios
And import Axios (Listing 13):
import axios from 'axios'
See Product_8.js for the final solution.
import useStatesHooks from './useStatesHooks';
import axios from 'axios';

export default function Product() {
  const { cart, products, setCart, setProducts } = useStatesHooks();

  useEffect(() => {
    axios.get('data/data.json')
    .then(response => {
      setProducts(response.data)
    }
    );
  }, []);

  ....
Finally
There are certainly other ways to apply useState and useReducer. useState and useReducer is not recommended for managing state in very large, complex projects, keep that in mind.
In addition to the hooks covered here, React offers many other hooks, Examples of other hooks are:
useCallback, returns a memoized callback function. Think of memoization as caching a value so that it does not need to be recalculated.- and
useContext, is a way to maintain the state globally.
You can find the final solution here: React hooks
Opinions expressed by DZone contributors are their own.


Comments