PWA Push Notifications in JavaScript? Yes, You Can in 12 Steps!
Push notifications were a privilege for native apps, but now can be sent directly to a PWA. This tutorial discusses how to implement the Push API in 12 steps.
Join the DZone community and get the full member experience.
Join For FreeIntroduction
Where until recently push notifications were a privilege for native apps, that has now changed. Push notifications can now be sent directly to a PWA: just like with a native app, the browser does not have to be open, not even in the background.
This tutorial discusses how to implement the Push API in 12 steps. We add this API to the existing PWA for creating "Selfies" (access my previous tutorials from my profile).

Project Setup
As a starting point for the tutorial, clone the following GitHub repository:
git clone https://github.com/petereijgermans11/progressive-web-app Next, in your terminal, go to the directory:
 cd progressive-web-app

 cd pwa-article/pwa-app-native-features-push-api-init
Install the dependencies using:
npm i && npm start Open the web app at: http://localhost:8080/index.html.
Push API With JavaScript
Web Push Notifications Flow
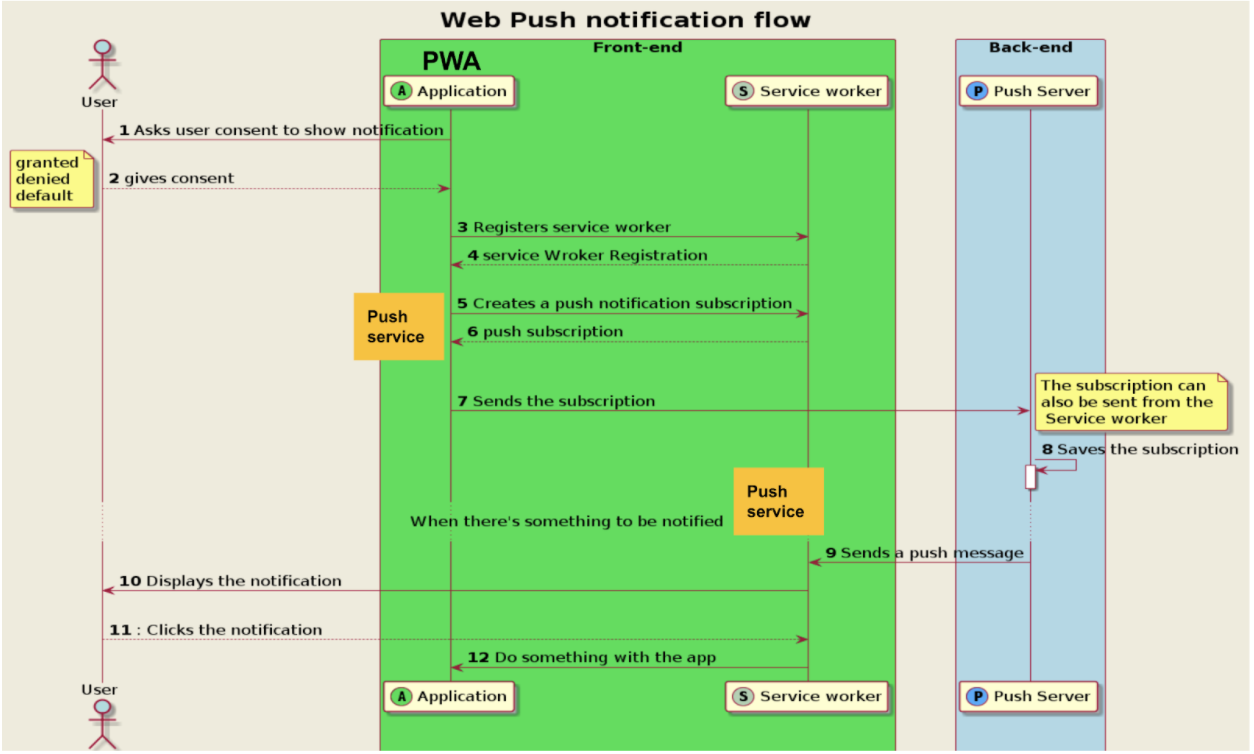
The Web Push Notification is a protocol that involves 4 actors (image 1):
- The User: This is who wants to receive the notifications.
- The Application or PWA: It runs in the browser. Browsers using the Push API contain a push service that is responsible for routing push notifications from the server to the user.
- The Service Worker: This acts as a proxy server between the application, the browser, and the network
- The Push Server or Server: This sends push notifications to the Service Worker via the push service.

Image 1
1. The flow starts when the application asks the user for permission to receive the push notifications.
2. Once the user has given permission, the application registers a Service Worker.
3. - 6. When the PWA receives the registration from the Service Worker, the PWA can use it to create a push subscription. A push service is also required to create a push subscription. The push subscription contains an endpoint of the push service to send the push notification, too.
7. At this point, the application sends the created push subscription to the server. The server needs the push subscription endpoint to send push notifications.
8. When the server receives the push subscription, it is stored in a database called subscriptionsDB.
9. The server sends a push notification to the endpoint from the push subscription. The push notification is then routed via the push service to the Service Worker, who listens for the push-event.
10. The Service Worker then forwards the push notification to the user.
11. When the user clicks on the push notification, the Service Worker receives it through a notification click event.
12. The Service Worker can now do almost anything he wants with the push notification.
Now that you know the flow, it's time to move on to the real implementation.
Steps 1 and 2: User Permissions
Before you can send push notifications to a user, you must ask that user for permission by displaying a prompt. In order for this prompt to start, add the code below to the existing file: src/js/pushpi.js (Listing 1).
src/js/pushapi.js
const enableNotificationsButtons = document.querySelectorAll('.enable-notifications');

const askForNotificationPermission = () => {
      Notification.requestPermission(result => {
      if (result === 'granted') {
          displayConfirmNotification();
          // configurePushSubscription();
      }
   });
};

if ('Notification' in window) {
      for (let i = 0; i < enableNotificationsButtons.length; i++) {
          enableNotificationsButtons[i].style.display = 'inline-block';
          enableNotificationsButtons[i].addEventListener('click', askForNotificationPermission);
      }
}

...
Listing 1
Place the code below at the bottom of the src/index.html so that we can use the pushapi.js (Listing 2):
<script src="src/js/pushapi.js"></script>
Listing 2
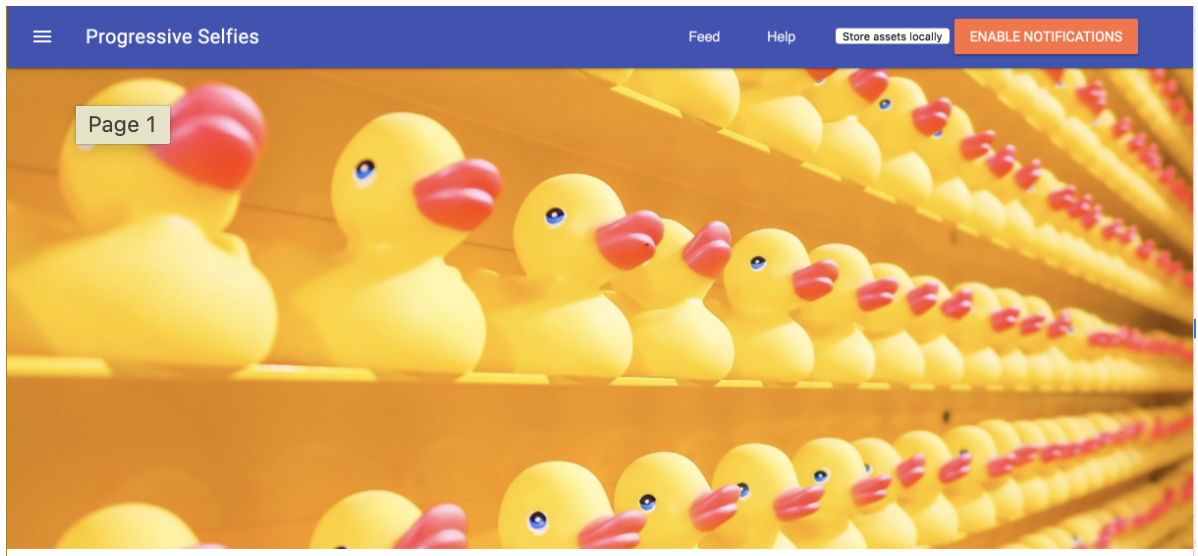
We ask the user for permission when clicking the "Enable Notifications" button in our existing PWA (Image 2). The button should only be visible if the browser supports push notifications! In the code, you can recognize this check by the condition: "if ('Notification' in window)".

Image 2
Add the following in src/css/app.css (Listing 3).
.enable-notifications {
  display: none;
}
Listing 3
Showing a Notification
As a first step, we show a Notification to the user (with an okay/cancel button) when we get permission (Listing 4).
Add this code to src/js/pushapi.js
const displayConfirmNotification = () => {
     if ('serviceWorker' in navigator) {
        const options = {
              body: 'You successfully subscribed to our Notification service!',
              icon: 'src/images/icons/app-icon-96x96.png',
              image: 'src/images/main-image-sm.jpg',
              dir: 'ltr',
              lang: 'en-US',
              badge: 'src/images/icons/app-icon-96x96.png',
              tag: 'confirm-notification',
              actions: [
                 {
                      action: 'confirm',
                      title: 'Okay',
                      icon: 'src/images/icons/app-icon-96x96.png'
                  },
                  {
                      action: 'cancel',
                      title: 'Cancel',
                      icon: 'src/images/icons/app-icon-96x96.png'

                  }
              ]
       };
       navigator.serviceWorker.ready
         .then(sw => sw.showNotification('Successfully subscribed!', options));
     }
};


...
Listing 4
The navigator.serviceWorker.ready... checks whether the Service Worker is activated. Also, via the function sw.showNotification(), a Notification is shown.
Steps 3 and 4: Register Service Worker
Registering and activating the Service Worker has already been described in my first tutorial on PWA.
Step 5: Subscribe to Push Notifications
To subscribe a user to push notifications, two steps are required:
- First, obtain user consent (steps 1 and 2).
- Obtain a push subscription via the push service (step 5).
What Is a Push Service?
- Each browser manages push notifications via its own system, a so-called "push service."
- When the user gives permission for push notifications, the app is able to subscribe to the push service of the browser.
- This creates a special push subscription that contains the "endpoint URL" of the push service, which is different for each browser (Listing 5).
- In step 9, your push notifications are sent to these URLs, encrypted with a public key.
- The push service ensures that the push notification is sent to the correct client.
{
  'endpoint': 'https://SOME.PUSHSERVICE.COM/SOMETHING-UNIQUE',
  'keys': {
	'p256dh': 'BGhFV5qx5cdOaD_XF293OqMdYSUIrMrzj2-RuzGwOTIhdW8v’,
	'auth': 'HA1JEiRAp2HLuVH639Oumw'
  }
};

...
Listing 5
The endpoint is the push service URL. The server uses this endpoint to send a push notification (step 9). The key object contains the values used to encrypt the notification.
How Does the Push Service Know Which Client To Send the Push Notification To?
The endpoint URL contains a unique identifier. This identification is used by the push service to route the received push notification to the correct device. When the notification is processed by the browser, it is determined which Service Worker (Step 10) should handle the request by means of a push-event.
Application Server Keys
Before subscribing a user to a push notification, you must generate a set of "applicationServer Keys". The applicationServer Keys, also known as VAPID keys, are unique to the server. They enable a push service to know to which server a user has subscribed. The keys ensure that it is the same server that sends the push notifications to that user.
Configure Push Subscription
Listing 6 shows you how to configure a push subscription and how to send this PushSubscription to the server.
Attention!
To activate the function below (Listing 6) you need to:
1. Activate the configurePushSubscription() in the askForNotificationPermission() function (Listing 1).
2. Also, remove the displayConfirmNotification() function call.
Add in src/js/pushapi.js
const configurePushSubscription = () => {
   if ('serviceWorker' in navigator && "PushManager" in window) {
       let serviceWorkerRegistration;
        // Service worker registratie (step 4)
       navigator.serviceWorker.ready
           .then(registration => {
               serviceWorkerRegistration = registration;
               return registration.pushManager.getSubscription();
           })
           .then(subscription => {
               if (subscription === null) {
                   // Create a new Push Subscription (step 5 and 6)
                   return serviceWorkerRegistration.pushManager.subscribe({
                       userVisibleOnly: true,
                       applicationServerKey: urlBase64ToUint8Array(
                            'BPg36y0YwKrMOgutw18ZeX9Ps3fBy5tNnA_OdPIor’
                       )
                   });
               }
           })
            // Verzenden Push Subscription naar de server (step 7)
           .then(pushSubscription => {
               return fetch(`${SERVER_URL}/subscriptions`, {
                   method: 'POST',
                   headers: {
                       'Content-Type': 'application/json',
                       'Accept': 'application/json'
                   },
                   body: JSON.stringify(pushSubscription)
               });
           })
           .then(response => {
               if (response.ok) {
                   displayConfirmNotification();
               }
           })
           .catch(error => console.log(error));
   }
};

....
Listing 6
First, the above code checks whether push notifications and the Service Worker are supported in the browser, using the conditions: if ('serviceWorker' in navigator && "PushManager" in window) { }
If the Service Worker is registered and active (navigator.serviceWorker.ready...), we check whether a push subscription is present via the call: registration.pushManager.getSubscription().
If it is null, we call registration.pushManager.subscribe() to get a new push subscription via the push service. For this, enter the applicationServerKey.
How To Create Application Server Keys
You can create a public and private set of applicationServerKeys from the server root. To do this, first clone the server via:
git clone https://github.com/petereijgermans11/progressive-web-app-server Go to the root folder of this server via the terminal and run the following command to generate the keys:
npm i && npm run web-push - After generating the keys, make sure to replace the public key in your frontend, in the function configurePushSubscription() in src/js/pushpi.js.
- And also that you replace the public and private keys on the server side in the routes/routes.js file (Listing 7).
const VAPID_PUBLIC_KEY = 'plak hier je public key';

const VAPID_PRIVATE_KEY = 'plak hier je private key';

webpush.setVapidDetails(VAPID_MAIL, VAPID_PUBLIC_KEY, VAPID_PRIVATE_KEY);

...
Listing 7
Steps 6 and 7: Sending the Push Subscription to the Server
Once you have subscribed the user to push notifications and have received a push subscription back from the push service, the push subscription is sent to the server (Listing 6). Finally, on the server, you store this push subscription in a subscriptionsDb database.
Step 8: Receive Push Subscriptions on the Server
In the previous steps, you have already cloned the server.
Then go to the root directory of this server in your terminal, and install the dependencies and start the server with:
npm i && npm startThe server is running on localhost:3000.
In the progressive-web-app-server/routes/routes.js, the code is already waiting for us to receive the push subscriptions and commit them to a node-json-db called subscriptionsDb. This is a simple database to store information in a JSON file. The push subscriptions come in via the POST URL `/subscriptions` (List 8).
app.post('/subscriptions', (req, res) => {

  const subscription = req.fields;

  subscription.id = uuid.v4();

  subscriptionsDb.push(`subscriptions/${subscription.id}`, subscription, false);

  res.status(200).send('subscription saved');
});

...
Listing 8
Step 9: Sending Push Notifications With Web Push to the User
From now on, we can send push notifications to the user. In our example, a push notification is sent to the relevant user via the webpush API when a "Selfie" is received on the server. How to send "Selfies" with your PWA is described in my previous tutorials.
Pre-existing code in route.js:
 app.post('/selfies', (req, res) => {
   const post = {title: req.fields.title, location: req.fields.location};
   const selfieFileName = path.basename(req.files.selfie.path);
   post.selfieUrl = `${req.protocol}://${req.get('host')}/images/${selfieFileName}`;
   post.id = req.fields.id;

   selfiesDb.push(`selfies/${post.id}`, post, false);

   const subscriptions = subscriptionsDb.getData('/');
   Object.values(subscriptions).forEach(subscription => {
     if (subscription.endpoint && subscription) {
        webpush.sendNotification(subscription, JSON.stringify({
         title: 'New Selfie Added!',
         content: `${post.title} @ ${post.location}`,
         imageUrl: post.selfieUrl,
         openUrl: 'help'
     })).catch(error => console.log(error));
   }
 });
 res.status(200).send({message: 'Selfie stored', id: post.id});
});

...
Listing 9
In the above code (Listing 9) the sent "Selfies" arrive via the POST URL '/selfies'.
These Selfies are stored in a node-json-db called selfiesDb. Then the subscriptions are removed from the subscriptionsDb, using subscriptionsDb.getData('/'). Finally, for every subscription found, a push notification is sent with the webpush.sendNotification().
Step 10: Receiving Push Notifications via the Service Worker
To receive push notifications as a user, we need to add the following code in our Service Worker (Listing 10):
Add this code to the existing sw.js:
self.addEventListener('push', event => {
  const data = JSON.parse(event.data.text());
   const options = {
       body: data.content,
       icon: 'src/images/icons/app-icon-96x96.png',
       badge: 'src/images/icons/app-icon-96x96.png',
       data: {
           url: data.openUrl
       }
   };
   event.waitUntil(
       self.registration.showNotification(data.title, options)
   );
});

...
Listing 10
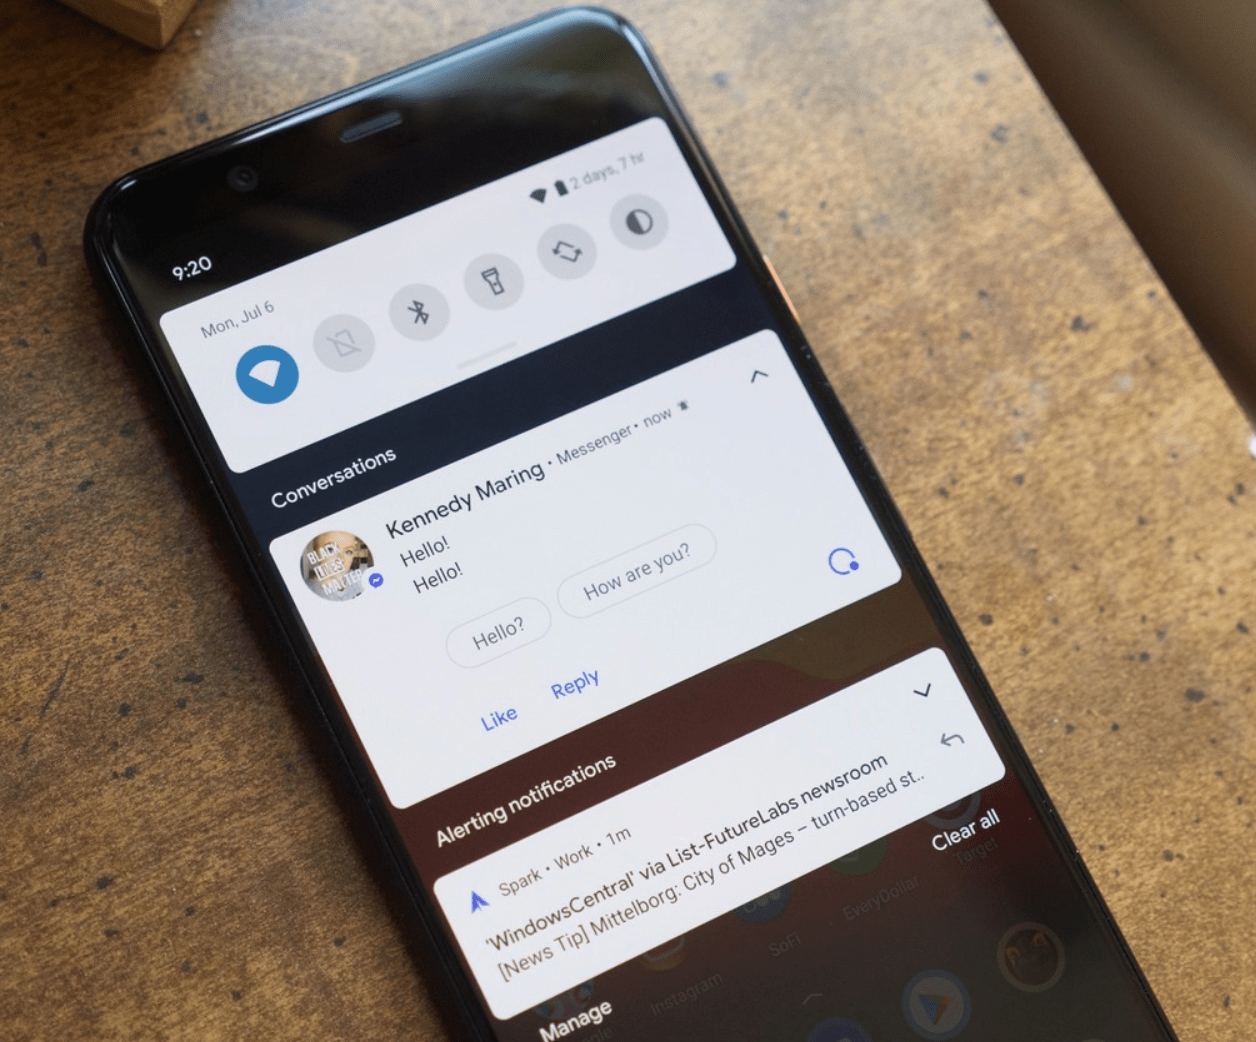
The above code listens for the push-event and reads the payload of the data sent from the server. With this payload data, you can then display a push notification in the browser (Image 3) using self.registration.showNotification().
 Image 3
Testing
To test the push notifications, you need to send a "Selfie" via your PWA. This can of course be done via localhost:8080.
However, if you want to test on your mobile or tablet, you can use ngrok for a public URL.
Install ngrok using:
npm install -g ngrok.Why Aren’t You Getting Push Notifications?
- Enable push notifications in your browser.
- Before sending a "Selfie", you must click the "Enable Notifications" button (Image 2). Click to grant permission.
- The applicationServer Keys are not set.
- Only under localhost: "Unregister" manually your Service Worker via your (Chrome) Dev Tools and reload your PWA.
Finally
After you have completed the above steps, you still need to implement steps 11 and 12. These steps are already implemented in the final version: pwa-app-native-features-push-api-final.
Opinions expressed by DZone contributors are their own.


Comments