Pulumi With an Azure Blob Storage Backend
Pulumi without Pulumi Service.
Join the DZone community and get the full member experience.
Join For FreeBy default when you use Pulumi, the state is managed by Pulumi Service which is very convenient as you can concentrate on building your project infrastructure instead of spending time on where to store the state and how to handle concurrency. However, sometimes for governance or pricing concerns, or any other reasons, you don't want to use Pulumi Service and you prefer to manage the state yourself with your own backend. In this article, we will see how we can do that using Azure.
A Quick Reminder About States and Backends
What Is This State We Need to Store?
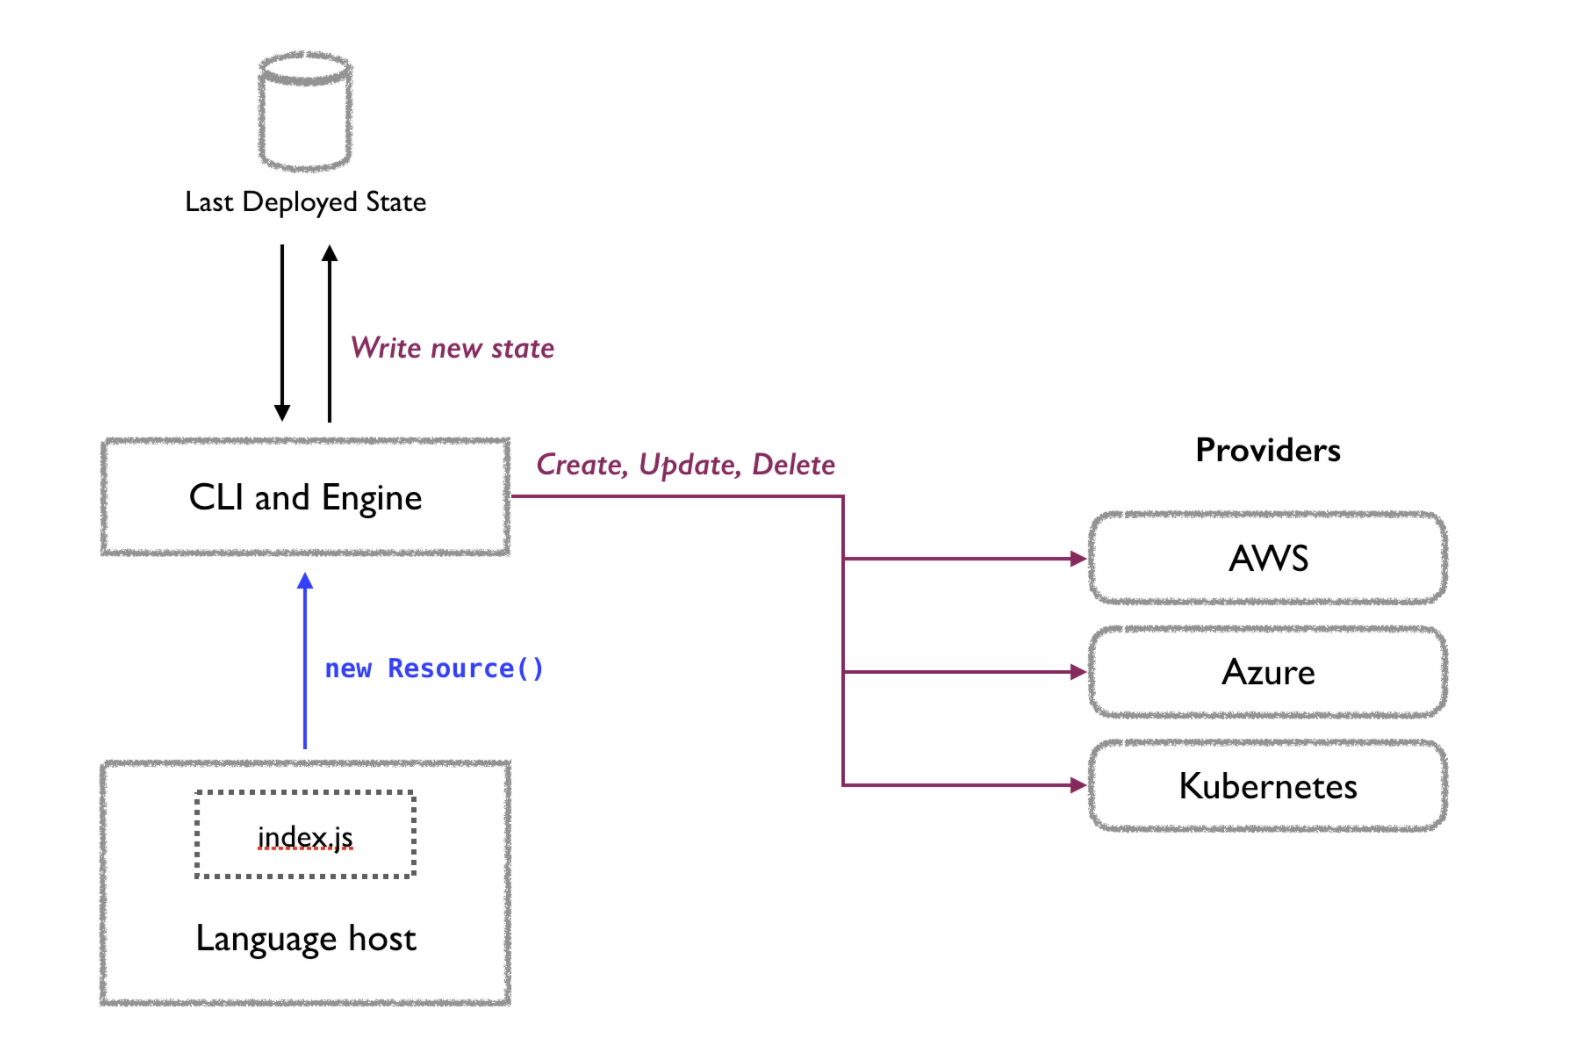
Like other Infrastructure as Code platforms, Pulumi uses a declarative approach:
- we write code to describe the desired state of our infrastructure
- Pulumi engine compares this desired state with the current state of the infrastructure and determines what changes need to be made
- Pulumi deploys these changes and updates the current state of the provisioned infrastructure
Some people think using Pulumi means adopting an imperative approach because we are using programming languages (so imperative languages) instead of using declarative languages (like YAML, JSON, and HCL). However, being declarative is not about the language used but about defining the "what" (the infrastructure we want to provision) instead of the "how" (the steps to provision this infrastructure). So Pulumi has the best of both worlds by being declarative while using programming languages.
As you understood, being able to provision and modify an infrastructure with this declarative approach requires 2 states: the desired state and the current state of the infrastructure. The desired state is the infrastructure code that we usually store in a Git repository alongside the application code. The current state however is computed by the Pulumi engine each time we modify the infrastructure and needs to be stored somewhere.
That is why we need a "backend" to use Pulumi, it's just a place to store the current state of the provisioned infrastructure.
If you want more information about states and backend, Pulumi has a documentation page about that and there is also a page about how Pulumi works.

What "Backends" Can We Use to Manage the Infrastructure?
The default backend is Pulumi Service which is a web application that stores the infrastructure state and has additional features like concurrent state locking, team policies, or deployment history. This service is managed by Pulumi, is free for individuals but charged for teams, and enterprises. It can be self-hosted in the enterprise plan. Just as a side note, Pulumi Service (along with support and training) is how the company Pulumi makes money because everything else is free and open source.
Yet, we don't have to pay anything to use Pulumi because Pulumi Service, no matter how good it may be, is not the only solution to store the infrastructure state. Indeed, Pulumi supports other backends that we can manage ourselves:
- Local Filesystem
- AWS S3 (or compatible server)
- Google Cloud Storage
- Azure Blob Storage
In the rest of this article, we will see how to use Pulumi with Azure Blob Storage as the backend for our infrastructure state.
Using Pulumi With the Azure Blob Storage Backend
What Do We Need?
Pulumi documentation on using Azure Blob Storage backend is short. It only says that we need to:
- set the AZURE_STORAGE_ACCOUNT environment variable to specify the Azure storage account to use
- set the AZURE_STORAGE_KEY or the AZURE_STORAGE_SAS_TOKEN environment variables to let Pulumi access the storage
- execute the following command
pulumi login azblob://<container-path>wherecontainer-pathis the path to a blob container in the storage account
Once this command is executed, we can start using Pulumi as we would with any other backend. The infrastructure's current state will automatically be stored in the blob container you specified. It will be compared to the desired state when a change is made in the code to know what resources need to be created/updated/deleted.
In fact, that is not very complex. Nevertheless, the documentation assumes we already have created an Azure storage account with a blob container in it and retrieved the key to access it. That is not the case, so now that we know what we need let's script it!
How to Create and Configure the Azure Blob Storage Backend?
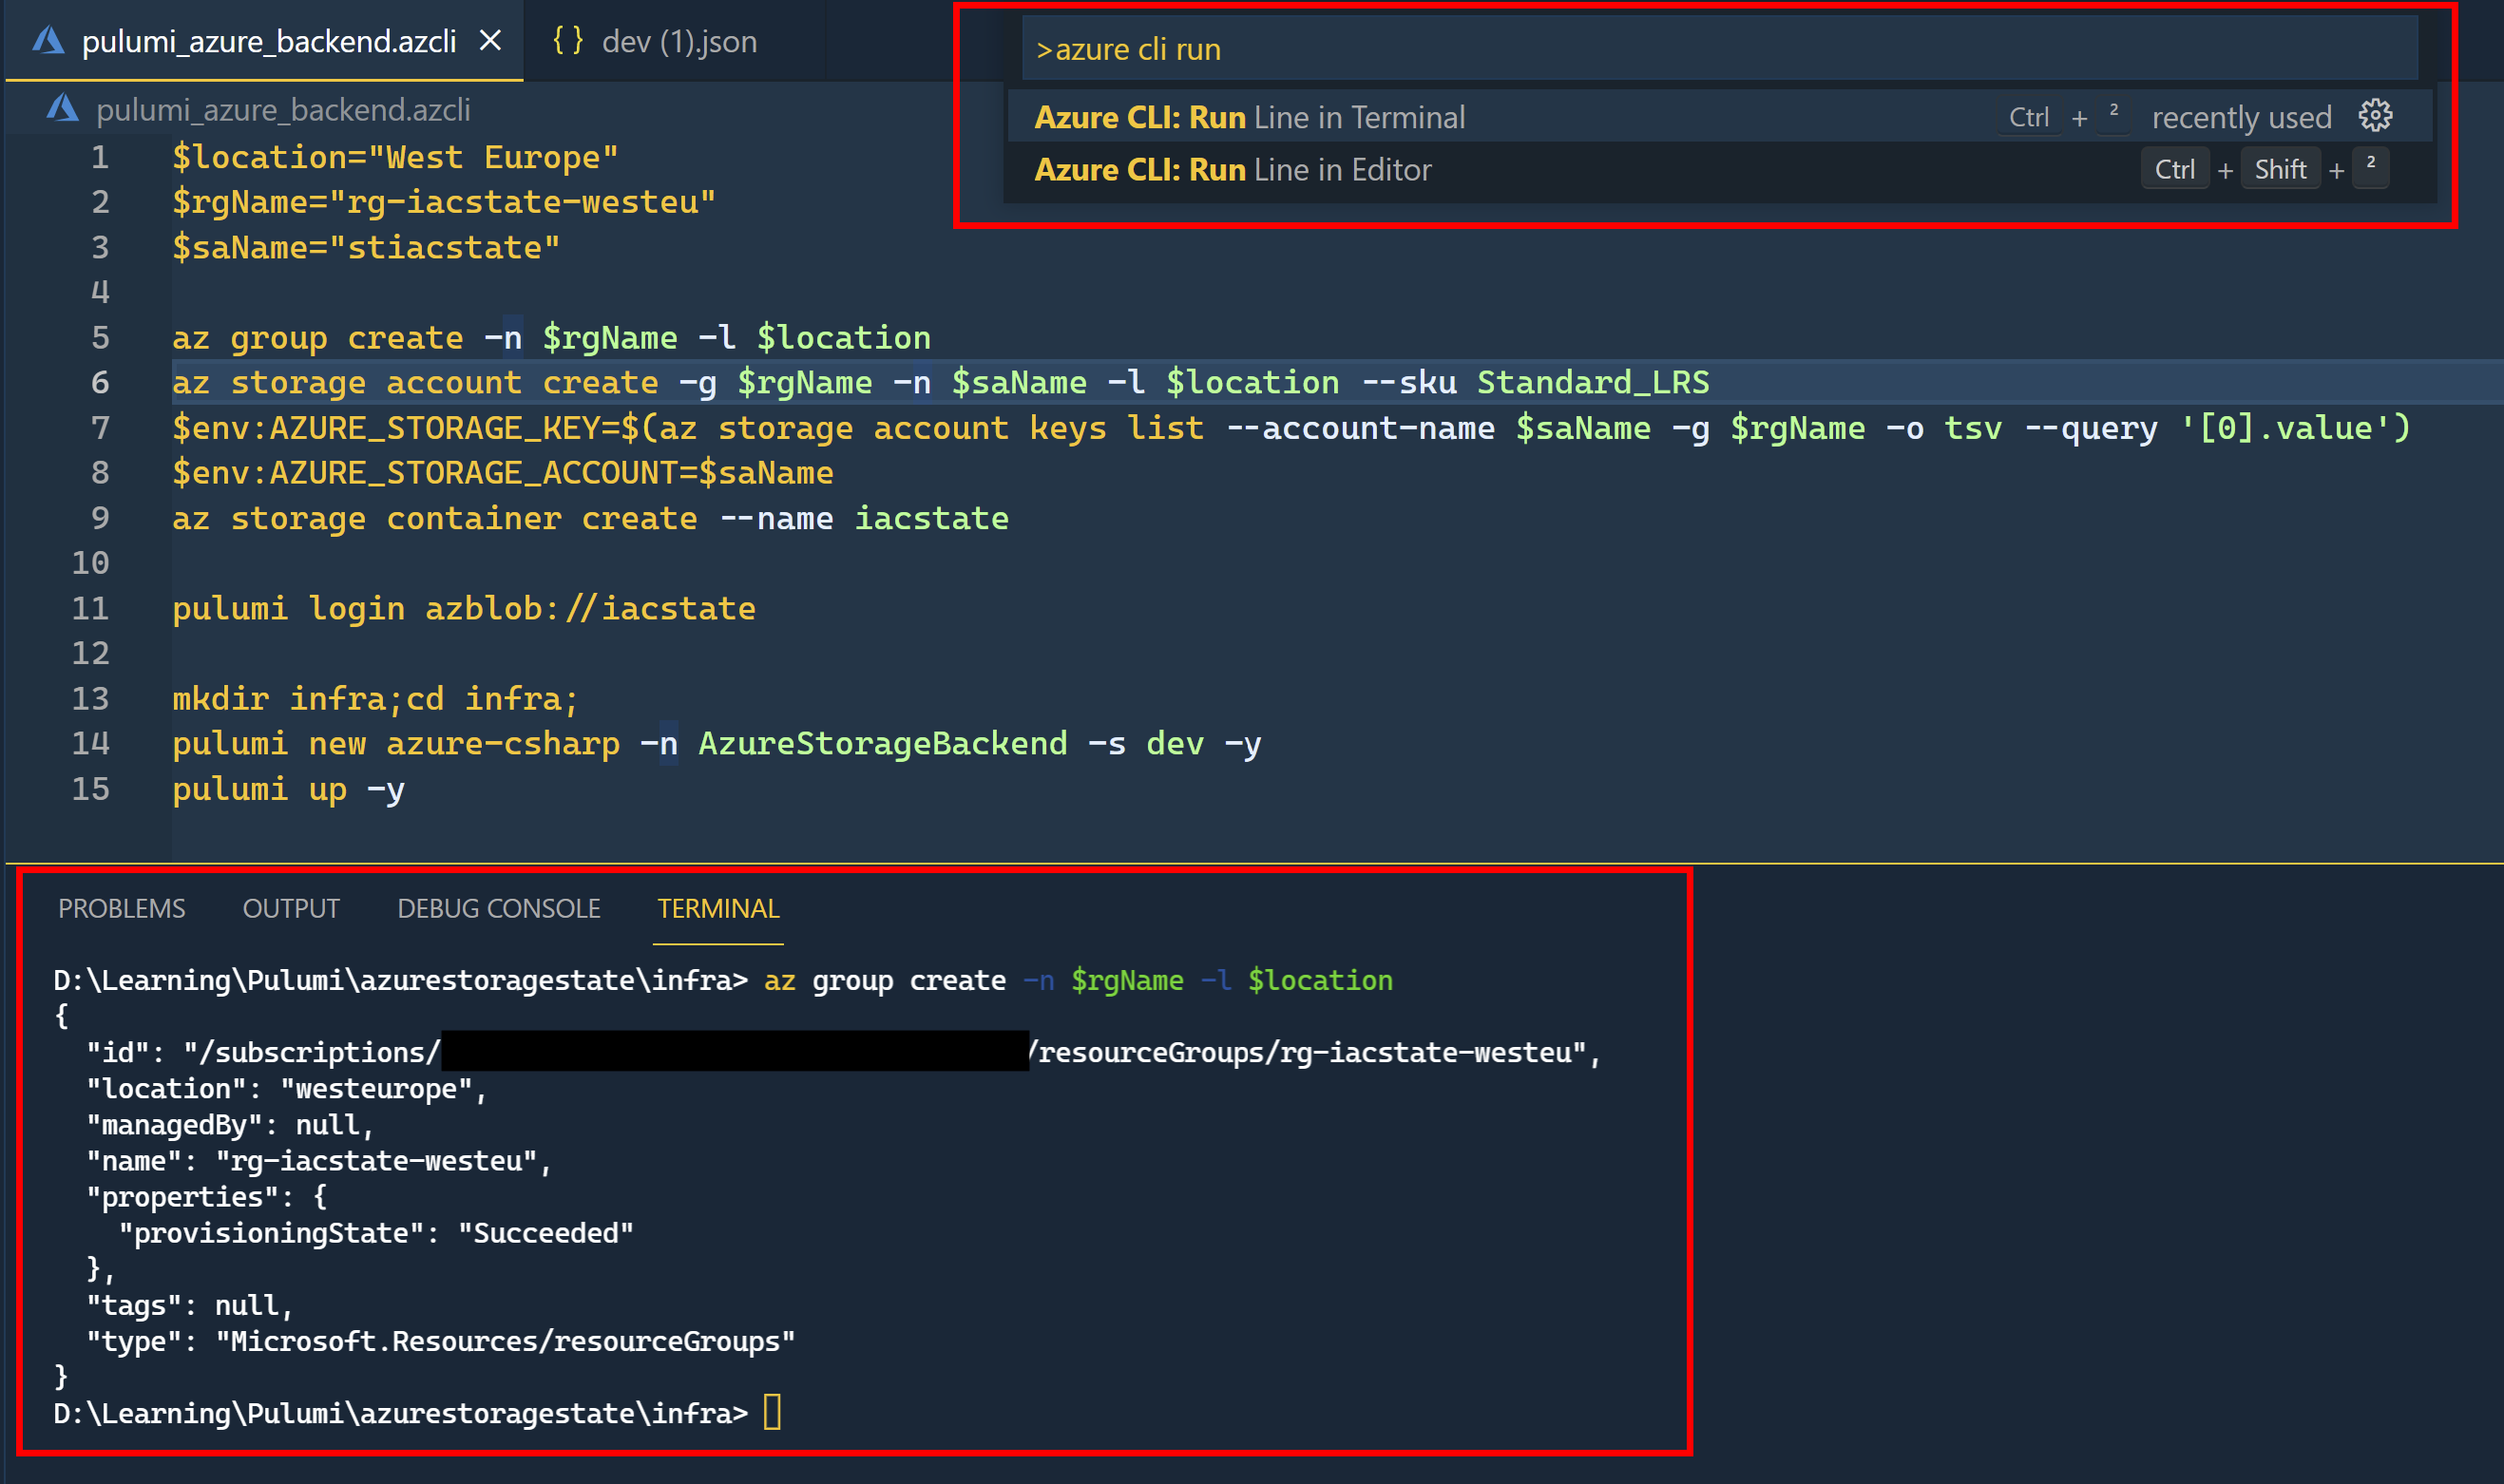
For me, the easiest way to write a script to create and configure the storage account we need is to use Azure CLI. One nice way of writing Azure CLI scripts is to do it in vscode with the Azure CLI Tools extension: you can create .azcli files with IntelliSense on them and run the commands you are writing in the integrated terminal (see screenshot below).

If you are not familiar with Azure CLI, you can check my article "Goodbye Azure Portal, Welcome Azure CLI".
Let's first define a few environment variables: the name of the resource group that will contain our storage account, its location, and the name of the storage account (I am using PowerShell but don't forget to change the syntax if you are using another shell like bash).
$random=Get-Random -Maximum 1000

$location="West Europe"

$rgName="rg-iacstate-westeu-$random"

$saName="stiacstate$random"
Then let's create our resource group and our storage account:
az group create -n $rgName -l $location

az storage account create -g $rgName -n $saName -l $location --sku Standard_LRS
The key to access the storage account can be retrieved with the following command:
az storage account keys list --account-name $saName -g $rgName -o tsv --query '[0].value'Using this command, we can now set the environment variables that will be used by the Pulumi CLI to access our Azure Blob Storage account backend:
$env:AZURE_STORAGE_KEY=$(az storage account keys list -n $saName -g $rgName -o tsv --query '[0].value')

$env:AZURE_STORAGE_ACCOUNT=$saName
And finally, we can create the blob container that will contain the infrastructure state:
az storage container create -n iacstateHow to Provision Your Project Infrastructure Using the Azure Blob Storage Backend?
Now that our blob container exists, we can use the pulumi login command we already talked about to indicate pulumi to use the newly created azure blob storage as the backend.
pulumi login azblob://iacstateTo verify Pulumi can correctly provision cloud resources using our Azure Blob Storage backend, we can create a new Pulumi project using the `azure-csharp` template and deploy the infrastructure with the `pulumi up` command:
mkdir infra;cd infra;

pulumi new azure-csharp -n AzureStorageBackend -s dev -y

pulumi up -y
When executing these commands, Pulumi will ask us to provide a passphrase. Why is that? It is to encrypt secrets contained in the infrastructure state. This way no secret is stored in plain text in the state.
Once the `pulumi up` command is finished, the infrastructure requested is provisioned, and we can see a new state file has been created in the `iacstate` blob container.

Managing State Sensitive Data
Why Is it Needed to Protect Sensitive Data in the State?
The state is transmitted and stored securely by Pulumi and whatever the backend you use you should restrict its access. For instance, in our example, you should have assigned the permissions on the storage account so that only the right people have access to it. Nevertheless, securing the state file is not enough because it contains sensitive data (keys, connection strings, ...) that you probably don't want anyone that has access to the file to be able to get.
Indeed, it's not because a developer needs to read the state file to debug an issue that you want him to be able to see some production-sensitive data in plain text in the state. Having secrets in plain text in a state file would be like putting secrets in your source control and telling it is safe because only developers of the project team have access to it. Moreover, even if an unauthorized person succeeds to get access to the state file, it won't be an issue if all secrets in it are encrypted. Hence that is very nice to see Pulumi take security seriously and always encrypt sensitive information.
What Are the Available Encryption Providers?
As we have seen previously, when using a self-managed backend like Azure Blob Storage, by default Pulumi uses a passphrase to encrypt sensitive data.
The passphrase is just one of the supported encryption/secrets providers but there are others:
- AWS Key Management Service
- Azure Key Vault
- Google Cloud Key Management Service
- HashiCorp Vault Transit Secrets Engine
- Pulumi Service (used by default when using Pulumi Service as the backend)
As for the backend, you don't have to use the default encryption provider and can come with your own resource. These providers can be used whatever the backend you chose, which lets you many possibilities. Now let's see how to use Azure Key Vault as our encryption provider.
How to Use Azure Key Vault as the Encryption Provider?
Let's first create a Key Vault:
$kvName="kv-iacstate-westeu-$random"

$vaultId=az keyvault create -g $rgName -n $kvName --enable-rbac-authorization true --query "id"
We retrieve its id so that we can use it to assign the correct role to my user to be able to perform cryptographic operations. With the --enable-rbac-authorization parameter we set the permissions model on the key vault to Role-Based Access Control but you can use the classic Vault access policies as well. I prefer using RBAC because I think it's more modern and more consistent with how we manage permissions on other Azure resources.
To assign the appropriate permission to the current logged-in user, we will need its current identifier in Azure that we can retrieve with the following command:
$myUserId=az ad signed-in-user show --query "objectId" -o tsv We can then assign to this user the `Key Vault Crypto Officer` role that will allow us to create a key and encrypt/decrypt data.
az role assignment create --scope $vaultId --role "Key Vault Crypto Officer" --assignee $myUserId The key to encrypt/decrypt data can be created with the following command:
az keyvault key create -n encryptionState --vault-name $kvNameBy default, Pulumi CLI will try to use environment variables to authenticate to the key vault, so we need to tell it to use the Azure CLI instead as we gave the permission on the key vault to the user currently logged in:
$env:AZURE_KEYVAULT_AUTH_VIA_CLI="true"Now that everything is configured, we can modify our previous command to create a new Pulumi project by specifying the encryption provider to use:
pulumi new azure-csharp -n AzureStorageBackend -s dev -y --secrets-provider="azurekeyvault://$kvName.vault.azure.net/keys/encryptionState"Comparing With How Terraform Handle State
Terraform is another very popular Infrastructure as Code platform with lots of similarities so I thought it might be interesting to look at how Terraform handles state compared to Pulumi.
Terraform has a SaaS platform called Terraform Cloud that can be used to manage the infrastructure state. It is similar to what Pulumi Service offers. However, when using Terraform the default backend is not Terraform Cloud but the local filesystem. That is not better or worse, just a different choice HashiCorp (the company behind Terraform) did. Although I must say that when I started working on Pulumi, I found it easier not having to take care of where the state is stored and how it is managed, so maybe a SaaS backend by default is simpler.
On Microsoft documentation, there is a tutorial Store Terraform state in Azure Storage" that shows how to use Terraform with an Azure Storage backend. I have done it and it is very similar to what we have done in this article with Pulumi. Instead of using a CLI command to configure the infrastructure to use Azure Blob Storage as the backend for the state, in Terraform, you configure it directly in one of the code files but the idea is the same. Both IaC tools store the infrastructure state in a JSON file in a blob container.
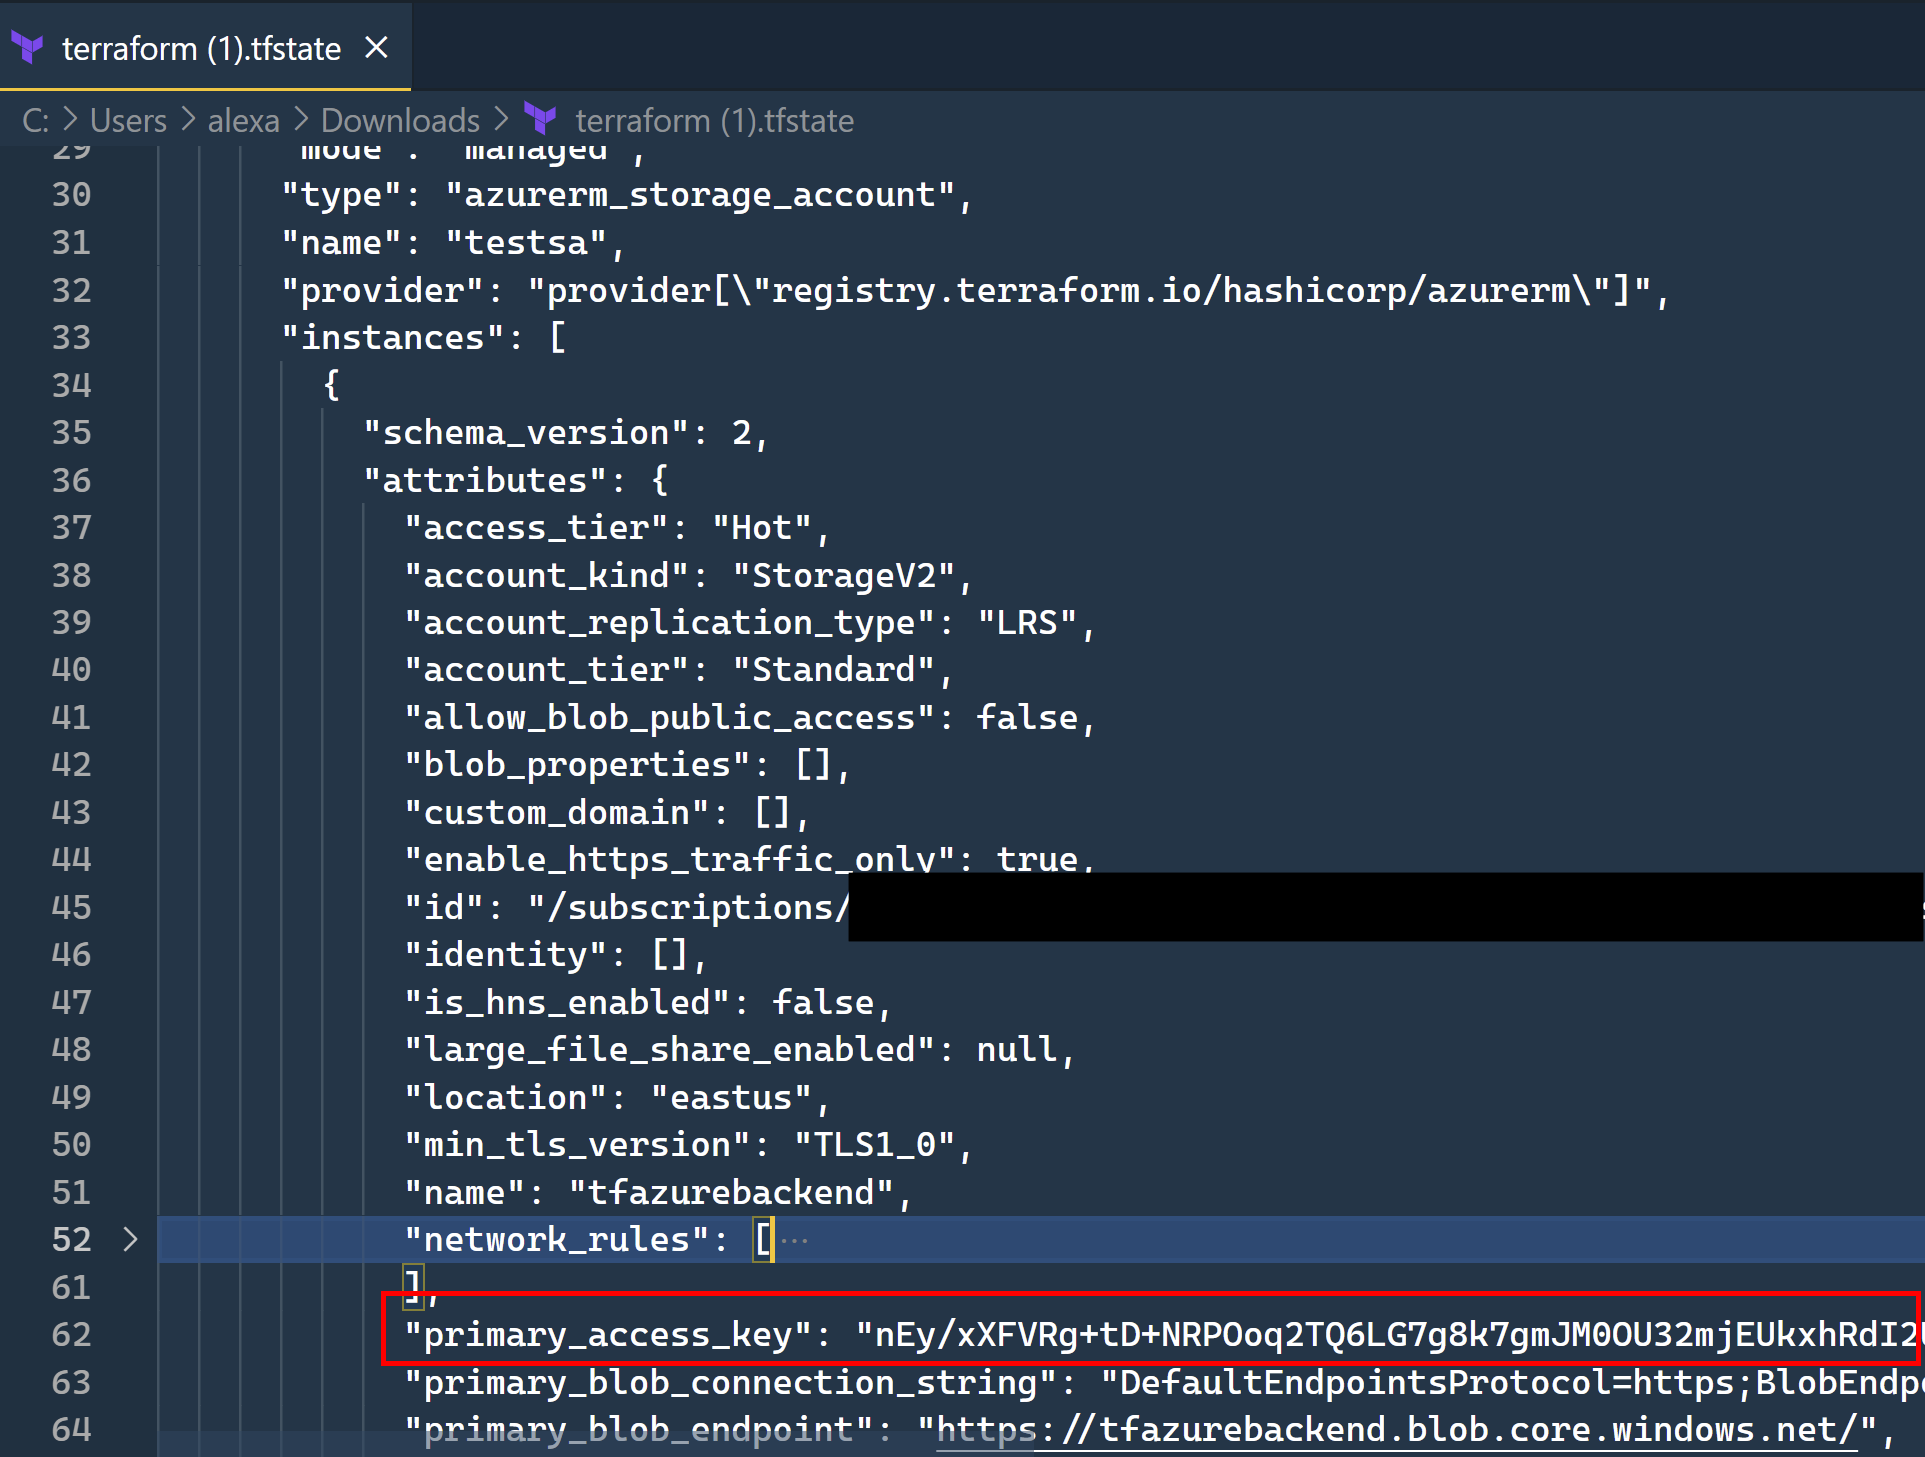
One big difference however is that by default Terraform does not encrypt sensitive information in the state file. As far as I know, there is no concept of secret providers in Terraform so no built-in solution. Terraform documentation just says to "treat the state itself as sensitive data". That means when I created a storage account using Terraform with the Azure Blob Storage backend, the keys of my storage were available in plain text in my state file (as you can see in the image below).

You should not have this kind of security issue using Terraform Cloud and there are probably external tools to avoid this, but I think an IaC platform should be secure by default and that encryption of sensitive data should be built-in.
To Conclude
You can find below the complete Azure CLI script used in this article:
# PowerShell variables used in the script

$random=Get-Random -Maximum 1000

$location="West Europe"

$rgName="rg-iacstate-westeu-$random"

$saName="stiacstate$random"

$kvName="kv-iacstate-westeu-$random"

az group create -n $rgName -l $location

# Configure the Azure Blob Storage that will contain the state

az storage account create -g $rgName -n $saName -l $location --sku Standard_LRS

# Set environment variables needed to write on the storage account

$env:AZURE_STORAGE_KEY=$(az storage account keys list -n $saName -g $rgName -o tsv --query '[0].value')

$env:AZURE_STORAGE_ACCOUNT=$saName

az storage container create -n iacstate

# Configure the Key Vault that will be used to encrypt the sensitive data

$vaultId=az keyvault create -g $rgName -n $kvName --enable-rbac-authorization true --query "id"

$myUserId=az ad signed-in-user show --query "objectId" -o tsv

az role assignment create --scope $vaultId --role "Key Vault Crypto Officer" --assignee $myUserId

az keyvault key create -n encryptionState --vault-name $kvName

# Use az cli to authenticate to key vault instead of using environment variables

$env:AZURE_KEYVAULT_AUTH_VIA_CLI="true"

# Indicate pulumi to use the newly created azure blob storage as a backend

pulumi login azblob://iacstate

# Create and use a folder to store the infrastructure code

mkdir infra;cd infra;

# Create a new Pulumi project using the azure blob storage as the backend and the keyvault as the encryption provider

pulumi new azure-csharp -n AzureStorageBackend -s dev -y --secrets-provider="azurekeyvault://$kvName.vault.azure.net/keys/encryptionState"

# Deploy the infrastructure

pulumi up -y
Using Pulumi without Pulumi Service was not complicated as I thought it would be. I like the fact that Pulumi is not limited to being used with Pulumi Service backend and secret provider. It gives us the choice to use what we want: if I want to use Google Cloud Storage as my back-end and AWS Key Management Service as my encryption provider I totally can. Many options are available and well-integrated without requiring much work which is nice.
Yet honestly, I think that using Pulumi Service will be my default choice because of the many built-in features it offers (deployment history, concurrent state locking, collaboration functionalities, ...). It's free for individuals so I would not bother with a self-managed backend for individuals. For teams and companies, you have to pay (even if there is a monthly free grant of credits for the team plan) but I don't have enough perspective to say if it's worth it. You can find the pricing if you want to see it by yourself. I guess the choice between that and a self-managed backend will probably depend more on the project and the organization you are working for.
Published at DZone with permission of Alexandre Nedelec. See the original article here.
Opinions expressed by DZone contributors are their own.

Comments