How To Run OWASP ZAP Security Tests in Azure DevOps Pipeline
In this article, learn how configuring OWASP ZAP security tests for webpage UI or API helps to identify the security risks.
Join the DZone community and get the full member experience.
Join For FreeSecurity testing is an essential part of testing. Every organization wants to do at least basic security testing before releasing the code to production. Security testing is like an ocean; it might be difficult to perform complete security testing without the help of trained professionals. Some of the open-source tools provide automated basic scanning of the website. Once we add it to pipelines like any other test such as smoke or regression, the security tests also can run as part of deployment and report issues.
What Is OWASP ZAP?
ZAP is a popular security testing tool and open source. ZAP tool helps to find the vulnerabilities in the applications or API endpoints. Vulnerabilities include cross-site scripting, SQL injection, broken authentication, sensitive data exposure, broken access control, security misconfiguration, insecure deserialization, etc.
The beauty of this tool is that it provides both UI and Command Line Interfaces to run the tests. Since it provides a command-line interface we can integrate it as part of our pipeline. The pipeline can be triggered when we release code into production, this helps to find the potential security issues.
What Are We Going To Learn?
- How to configure and set up OWASP ZAP security test into Azure Release Pipeline
- How to run OWASP ZAP security tests on websites in Azure DevOps Pipeline using Docker
- How to perform API security testing using OWASP ZAP security testing tool in Azure DevOps Pipelines with Docker Images
- How to publish OWASP ZAP security testing results in Azure DevOps Pipeline
- How to publish OWASP ZAP HTML test results into Azure Artifacts by creating feed and packages
- How to download artifacts containing OWASP ZAP HTML test results using the Azure CLI tool
What Are the Prerequisites?
Create a Repository
Create a repository inside your organization (preferred), download the file OWASPToNUnit3.xslt, and keep it inside the repository. This file is needed to convert the OWASP ZAP security test result XML file to publish results in Azure DevOps.
Create a Feed Azure DevOps Artifact
This feed is helpful for publishing OWASP ZAP HTML results. The steps are as follows:
Step 1
Navigate to Azure DevOps > Click on Artifacts > Click on Create Feed: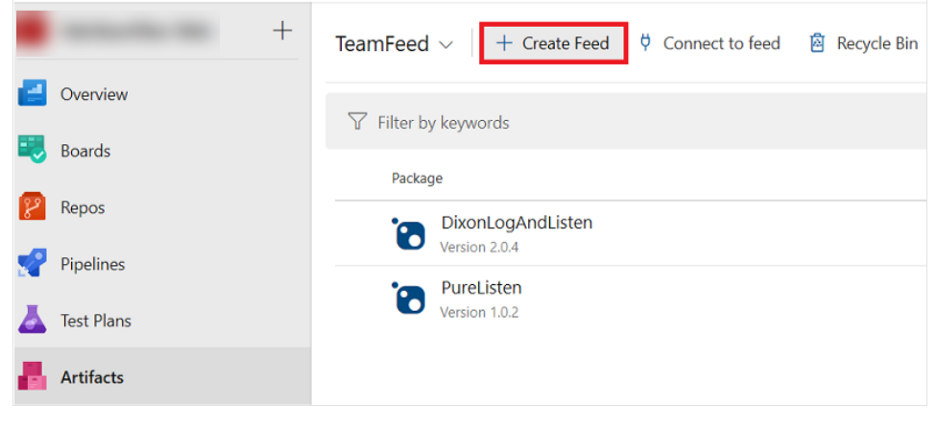
Step 2
In the "Create new feed" form, enter the correct text, and click on Create.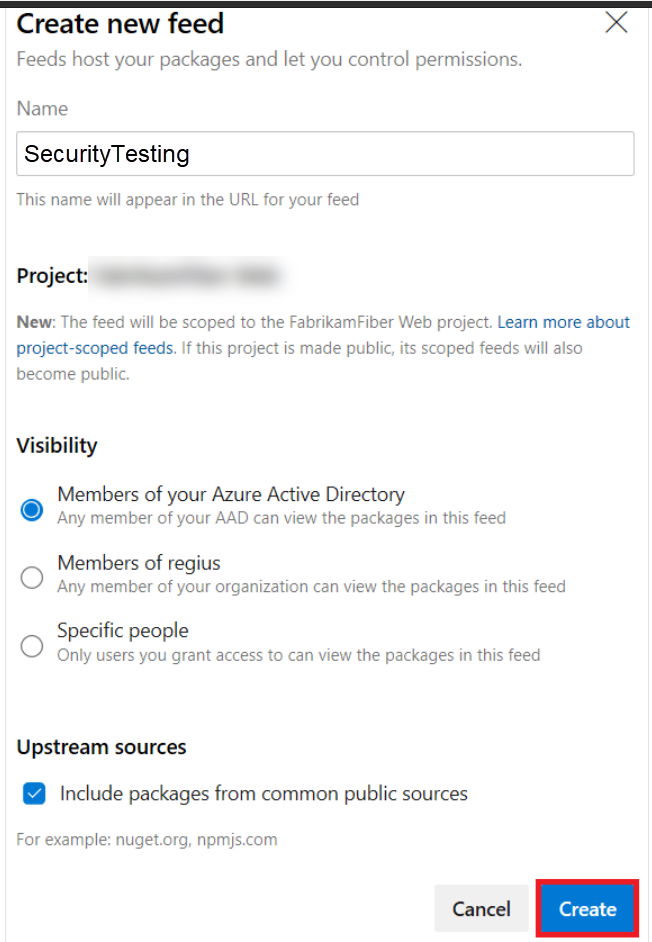
Note: We will be using the feed name while configuring tasks. You need to choose the same from the drop-down, so note down the feed name.
Step 3
Create a sample package inside the feed using the command line.
Install Azure CLI. After installation, run the command below to create a sample package:
az artifacts universal publish - -organization https://dev.azure.com/[Your_Org_Name] --feed SecurityTesting --name security_testing --version 1.0.0 --description "Your description" --path .Upon completion of Step 3, Navigate to Azure DevOps > Artifact > and select feed as SecurityTesting. You should see the newly created package:
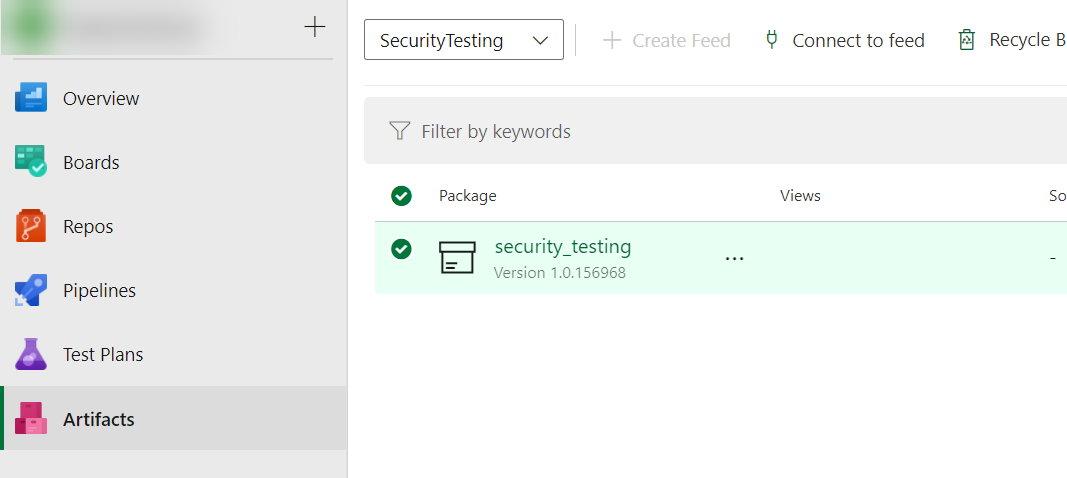
We have completed all initial setup and prerequisites, and are good to start with pipelines now. Refer to Microsoft Documentation for more details.
How to Configure OWASP ZAP Security Tests in Azure DevOps Pipeline
Let's discuss in detail step by step by setting up OWASP ZAP Security Tests Pipeline using Docker Image.
Step 1: Create a New Release Pipeline
1. Navigate to Azure DevOps > Pipeline > click on Releases.
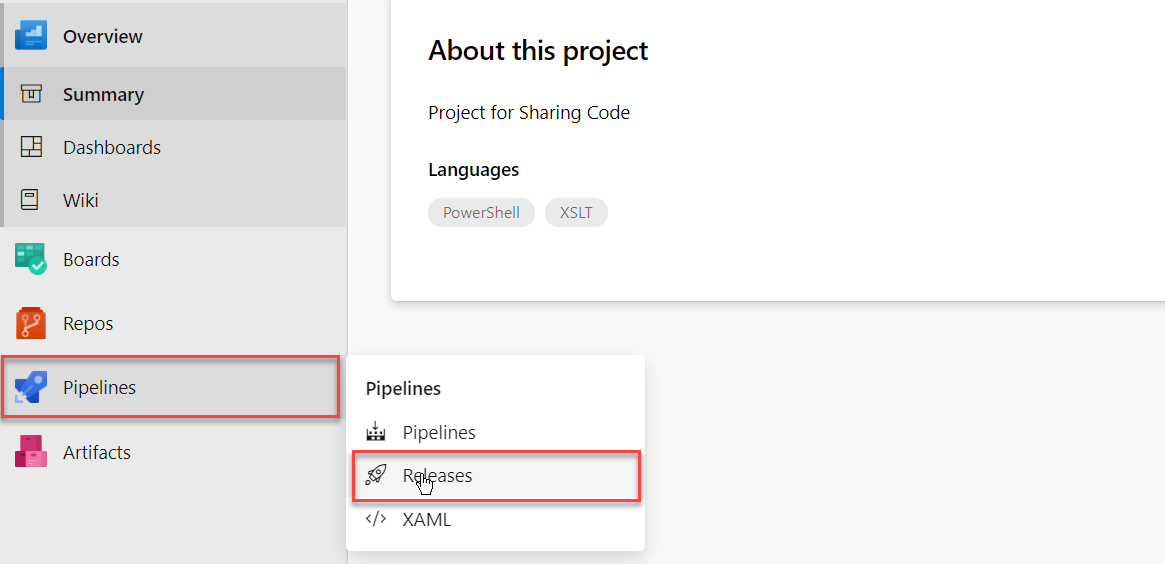
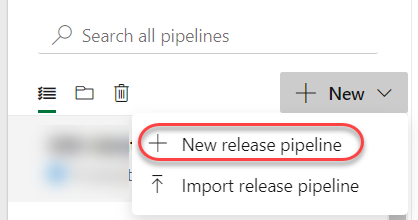
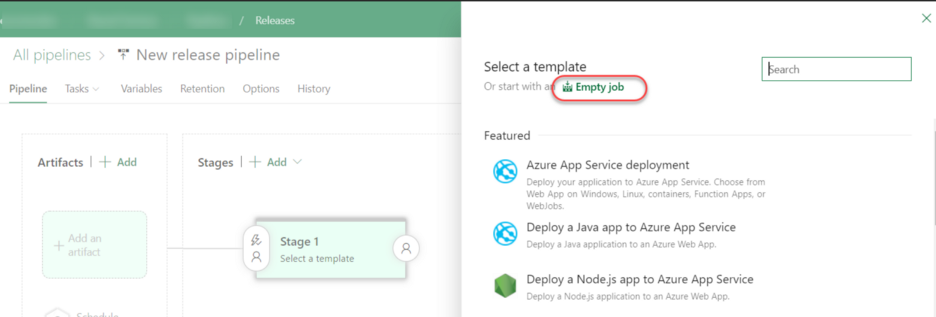
3. Choose Empty job when the template window prompts:
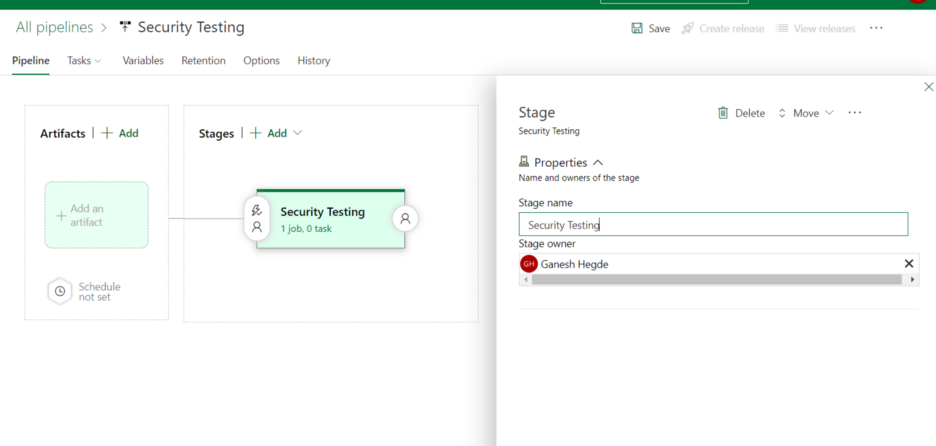
4. Name the stage Security Testing (or any other name you wish).
Step 2: Add Artifact to Release Pipeline
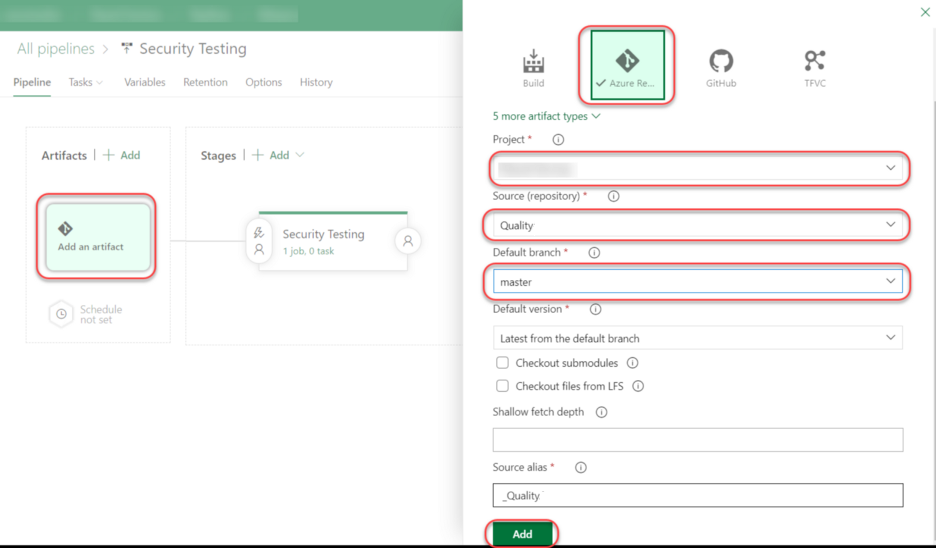
- Click on Add an artifact.
- In the popup window, choose Azure Repository.
- Choose your Project.
- Choose the Source repository (this is the place where you created the XSLT file in the prerequisite section).
- Choose the default branch as master.
- Click Add.
Step 3: Add Tasks to Pipeline
We need to add tasks to the pipeline. In our case, we have created only one stage, which is security testing.
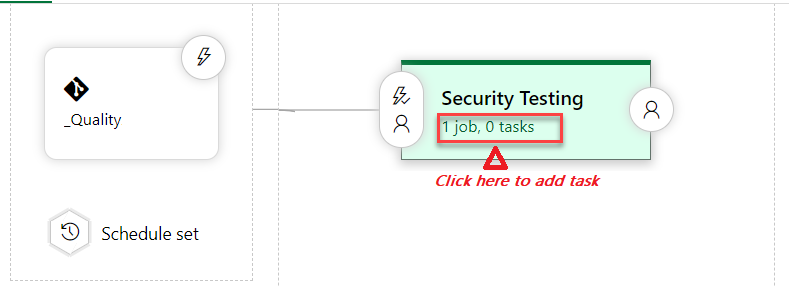
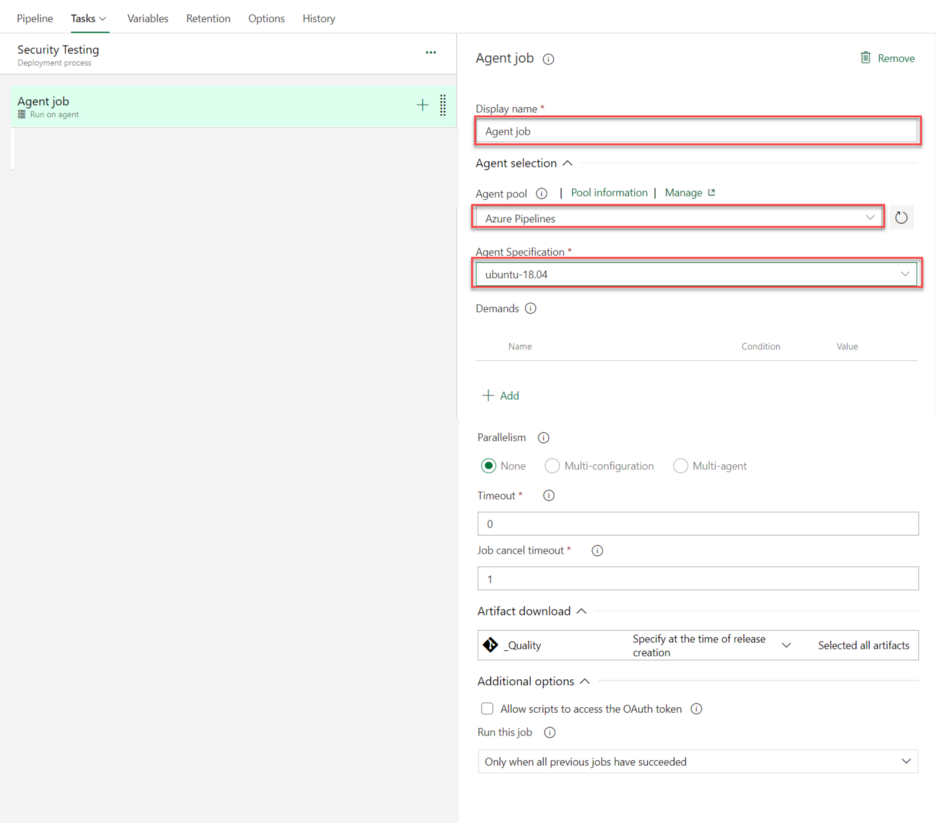
Step 4: Configure Agent Job Details
- Display Name: Agent Job or anything you wish
- Agent pool: Choose Azure Pipelines.
- Agent Specification: Choose any Ubuntu agent from the dropdown.
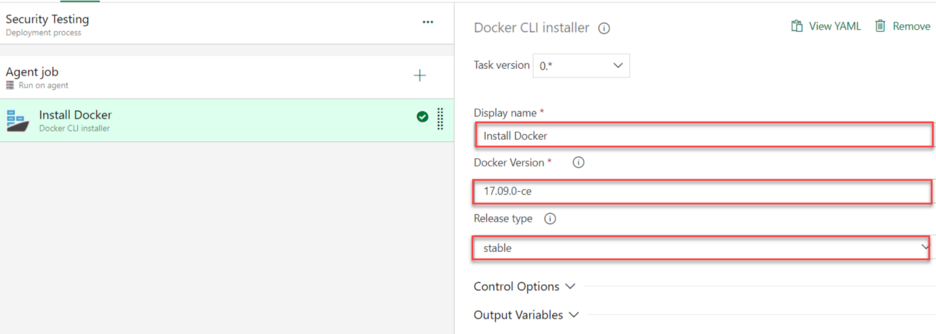
Step 5: Add Docker Installer Task
In the search box, search for Docker CLI, Add the task, and configure the Docker CLI Task.

Step 6: Add Bash Script Task

Step 7: Configure Bash Script Task
- Enter display name: Security Test Run
- Type: Click on the Inline Radio button.
- Script: Copy and paste the below code (don't forget to replace your URL).
Example:
chmod -R 777 ./

docker run --rm \
  -v $(pwd):/zap/wrk/:rw \
  -t owasp/zap2docker-stable \
  zap-full-scan.py \
  -t https://dzone.com \
  -g gen.conf \
  -x OWASP-ZAP-Report.xml \
  -r scan-report.html
How To Run OWASP ZAP Security Test for API
The above-mentioned script works well with websites and webpages, but if your requirement is an API, then you need to add different inline scripts. The rest of the things remain the same.
Script for OWASP ZAP API Security Scan
chmod -R 777 ./
docker run — rm -v $(pwd):/zap/wrk/:rw -t owasp/zap2docker-weekly zap-api-scan.py -t [your-api-url] -f openapi -g api-scan.conf -x OWASP-ZAP-Report.xml -r api-scan-report.html
true
Example:
chmod -R 777 ./

docker run --rm \
  -v $(pwd):/zap/wrk/:rw \
  -t owasp/zap2docker-weekly \
  zap-api-scan.py \
  -t https://dzone.com/swagger/v1/swagger.json \
  -f openapi \
  -g api-scan.conf \
  -x OWASP-ZAP-Report.xml \
  -r api-scan-report.html

true
Thanks to sudhinsureshr for this.
Step 8: Add Powershell Task To Convert ZAP XML Report To Azure DevOps NUnit Report Format To Publish Results
- Add PowerShell task using the add Azure DevOps/add tasks window.

- Configure Powershell task. Convert ZAP XML to NUnit XML.
- Display Name: Anything you wish
- Type: Inline
- Script: Inline
Sample Inline Script
Note: This script contains a relative path to the repository and folder. The content of the script may change based on the name you specified in your project.
$XslPath = "$($Env:SYSTEM_DEFAULTWORKINGDIRECTORY)/_Quality/SecurityTesting/OWASPToNUnit3.xslt"
$XmlInputPath = "$($Env:SYSTEM_DEFAULTWORKINGDIRECTORY)/OWASP-ZAP-Report.xml"
$XmlOutputPath = "$($Env:SYSTEM_DEFAULTWORKINGDIRECTORY)/Converted-OWASP-ZAP-Report.xml"
$XslTransform = New-Object System.Xml.Xsl.XslCompiledTransform
$XslTransform.Load($XslPath)
$XslTransform.Transform($XmlInputPath, $XmlOutputPath)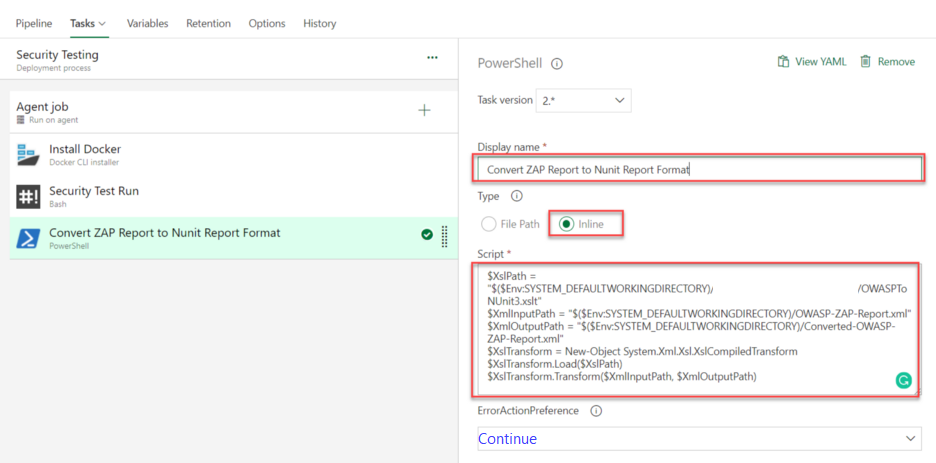
Step 9: [Optional] Publish OWASP ZAP Security Testing HTML Results To Azure Artifact
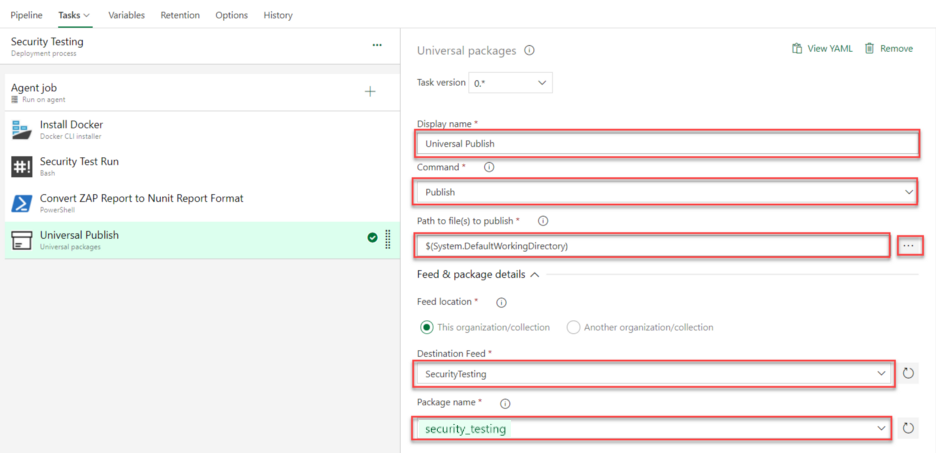
- Add Universal Package task:

- Configure Universal Package task:
-
Display Name: Anything you wish
-
Command: Publish (Choose from the dropdown)
-
Path to Publish: $(System.DefaultWorkingDirectory) or you can choose from the selection panel (…) menu
-
Feed Location: This organization's collection
-
Destination Feed: SecurityTesting (This is the one that you created in prerequisite step 2.)
-
Package Name: security_testing (This is the one that you created in prerequisite step 3.)
Step 10: Publish OWASP ZAP Results Into Azure DevOps Pipeline
- Add Publish Results task:
![OWASP ZAP Results into Azure DevOps Pipeline]() Configure Publish Results Task
Configure Publish Results Task- Display Name: Any name
- Test Result format: NUnit
- Test Result Files: Output file name in Step 8. In our case, it's Converted-OWASP-ZAP-Report.xml.
- Search Folder: $(System.DefaultWorkingDirectory)
After completion of Step 10, trigger Azure OWASP ZAP release. The release starts running and shows the progress in the command line.
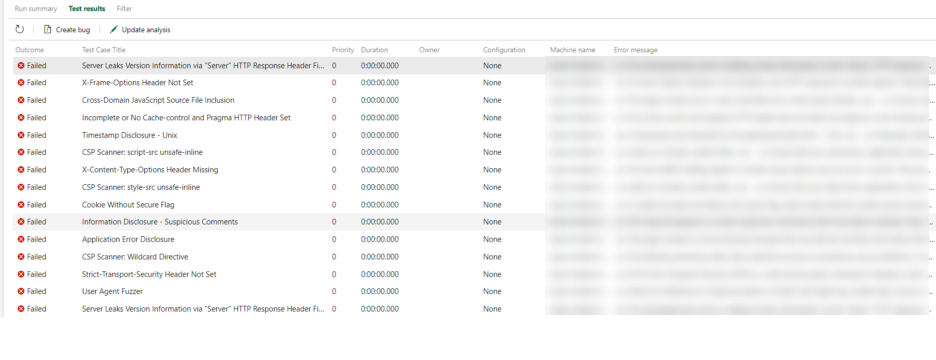
Step 11: Viewing OWASP/ZAP Security Testing Results
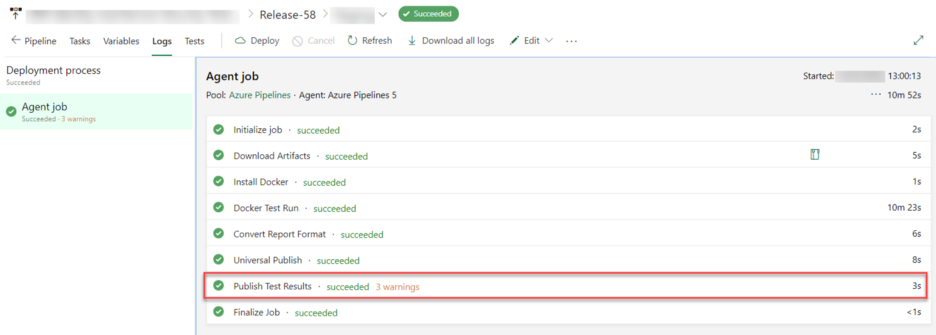
Once the release is completed, navigate to completed tasks and click on the Publish Test Results task.
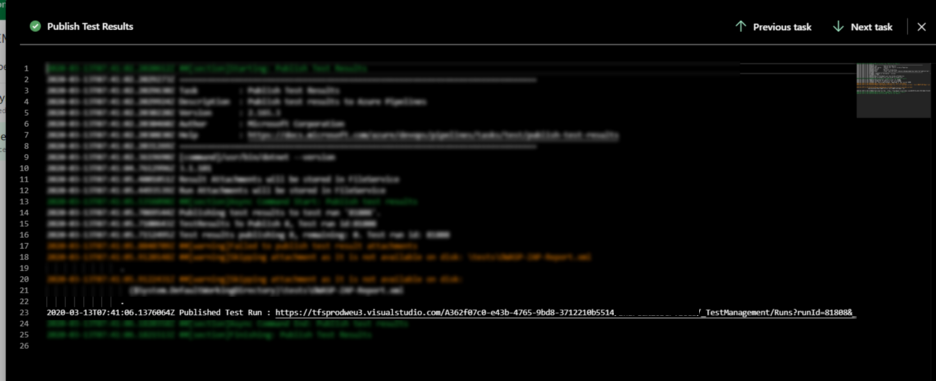
The window with the link to the result opens:
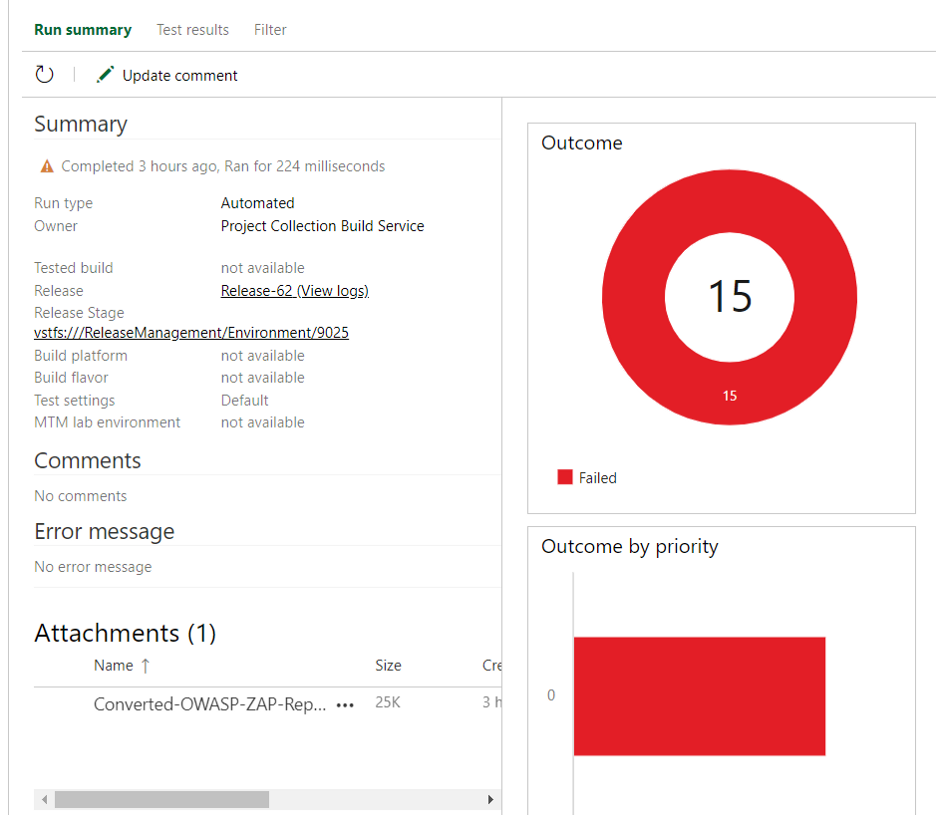
Once you click the link, you can see the results.
Final Thoughts
ZAP is an acronym for Zed Attack Proxy, formerly known as OWASP ZAP. It is primarily used as a web application security scanner. The goal is to find vulnerabilities in an application or API endpoint that are prone to various types of attacks. ZAP is actively maintained by a dedicated team of volunteers and is used extensively by professional penetration testers. As we can see in this article, the detailed configuration steps to set up security testing can be added to the DevOps pipeline just like any other tests, and run as a part of deployment and report issues.
Opinions expressed by DZone contributors are their own.

 Configure Publish Results Task
Comments