CI/CD for Kubernetes With Jenkins and Spinnaker
Here's a new tool that can help you continuously deploy new builds to your Kubernetes clusters.
Join the DZone community and get the full member experience.
Join For FreeWhether you are a novice or experienced in the world of continuous integration and continuous delivery (CI/CD) and containerization, this article will equip you with the basic understanding of setting up Spinnaker for your software application delivery needs.
Understanding Jenkins, Spinnaker, and Kubernetes
Kubernetes and Jenkins, are two powerful tools that work with each other to aid the software developers in automating the entire process of software release and enable them to deliver high-quality applications with much less effort.
Jenkins is an open-source automation server that helps developers automate tasks such as building, testing, and deploying applications continuously in a pipeline. Developed in Java, this tool encompasses a vast range of plugins that can easily incorporate test and build frameworks in the CI/CD pipeline.
Spinnaker, on the other hand, focuses on simplifying the code deployment process for software applications. It provides a centralized approach to manage deployment pipelines for Kubernetes which makes it efficient for promoting and rolling back releases.
Kubernetes is an open-source container management tool that manages containerized applications and services. Application developers, DevOps engineers, and system administrators use this tool to automatically build, scale, deploy, and maintain containerized applications across clusters.
Streamlining Continuous Integration and Deployment With Spinnaker
Every organization that has adopted DevOps practices wants to quickly adopt "Continuous" everything, be it integration, deployment, testing, or monitoring. For a successful DevOps operation, CI/CD is very important for any small or large organization to shorten development cycles and innovate faster, reduce deployment failures, save rollbacks, and reduce MTTR (mean time to recover).
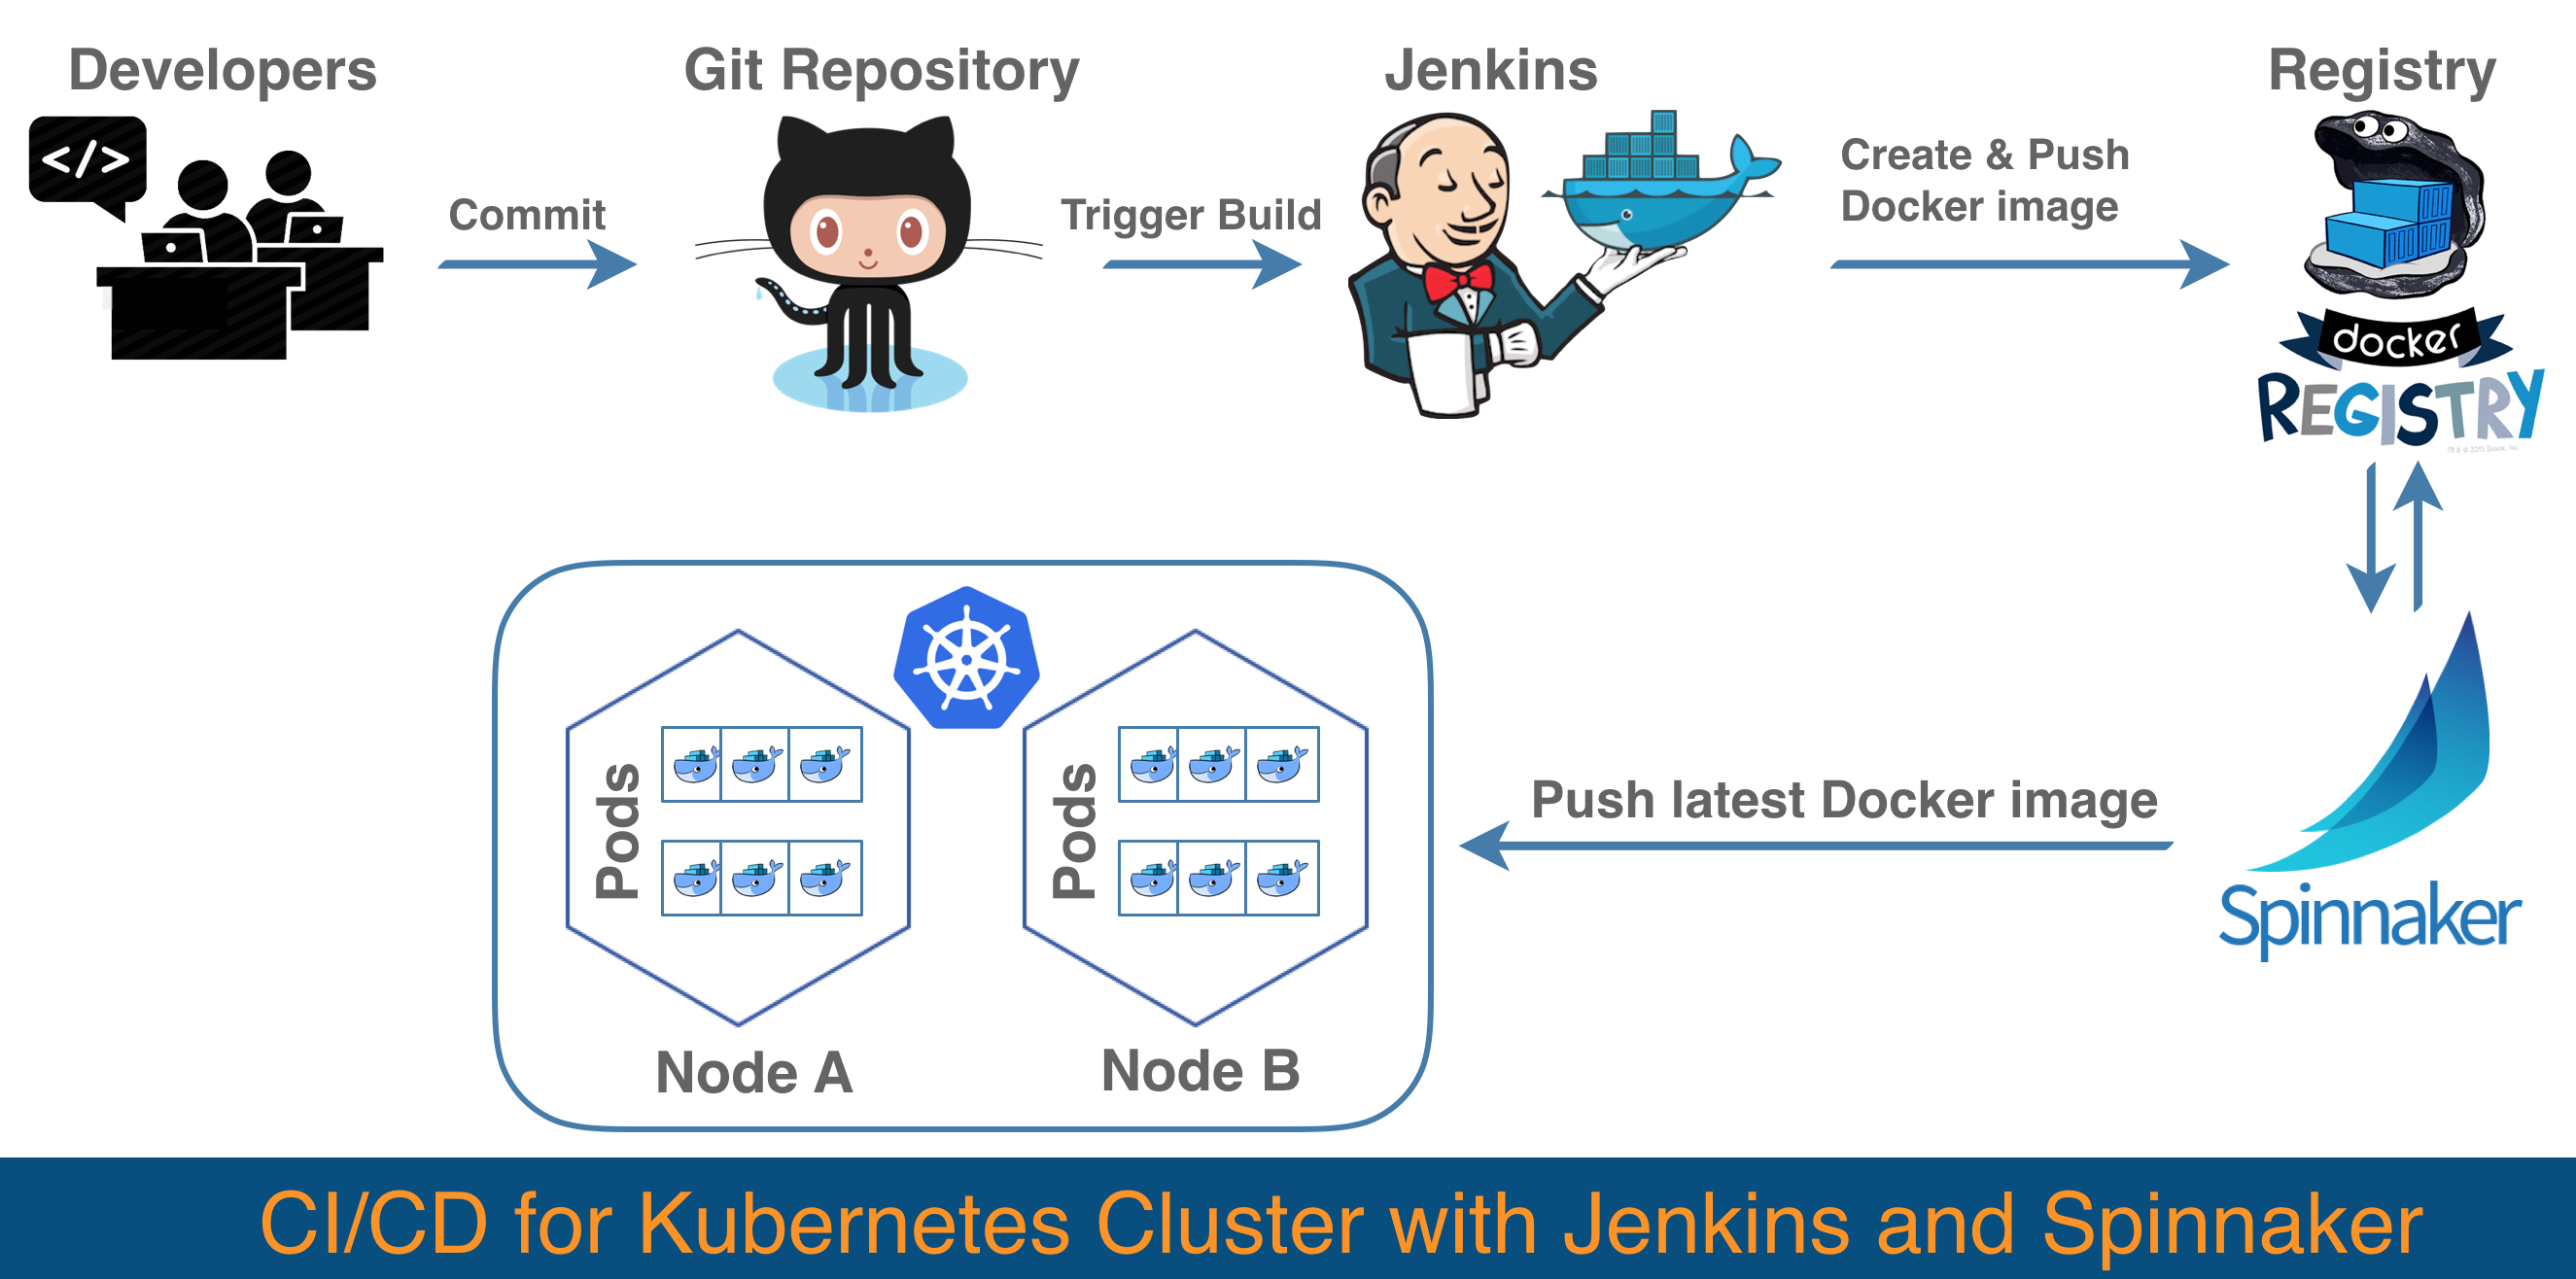
In this article, we will uncover a new way of bringing continuous integration and continuous delivery of applications to your Kubernetes cluster. We are using Jenkins as the CI tool, which will poll the Git repositories to build Docker images on commits and push them to the Docker registry. We will use Spinnaker as the CD tool, which continuously polls the Docker registry and triggers the deployment pipelines to update applications in your Kubernetes cluster.

The above diagram shows when the developer commits changes to Github, Jenkins polls for commits to a configured branch and triggers a new build on a new commit. Jenkins builds the Docker image and pushes it to the Docker registry with a tag (you can choose different techniques to tag your images like using the build-commit number or an incremental number). With Spinnaker, we configure the deployment pipeline such that it will trigger the deployment when there is a new tag (Docker image) found in the registry.
Introduction to Spinnaker
Spinnaker is an open-source, multi-cloud continuous delivery tool created by Netflix. It allows us to configure multiple deployment strategies such as Highlander, and Red/Black. It not only allows us to roll back in case of failures but also triggers promoted pipelines. This means we can configure complex pipelines by allowing us to define testing pipelines and promote them to the next stage or rollback easily and safely in controlled Kubernetes cluster(s). We will learn more about deployment strategies and pipeline configuration in the next article in this series.
Components of Spinnaker
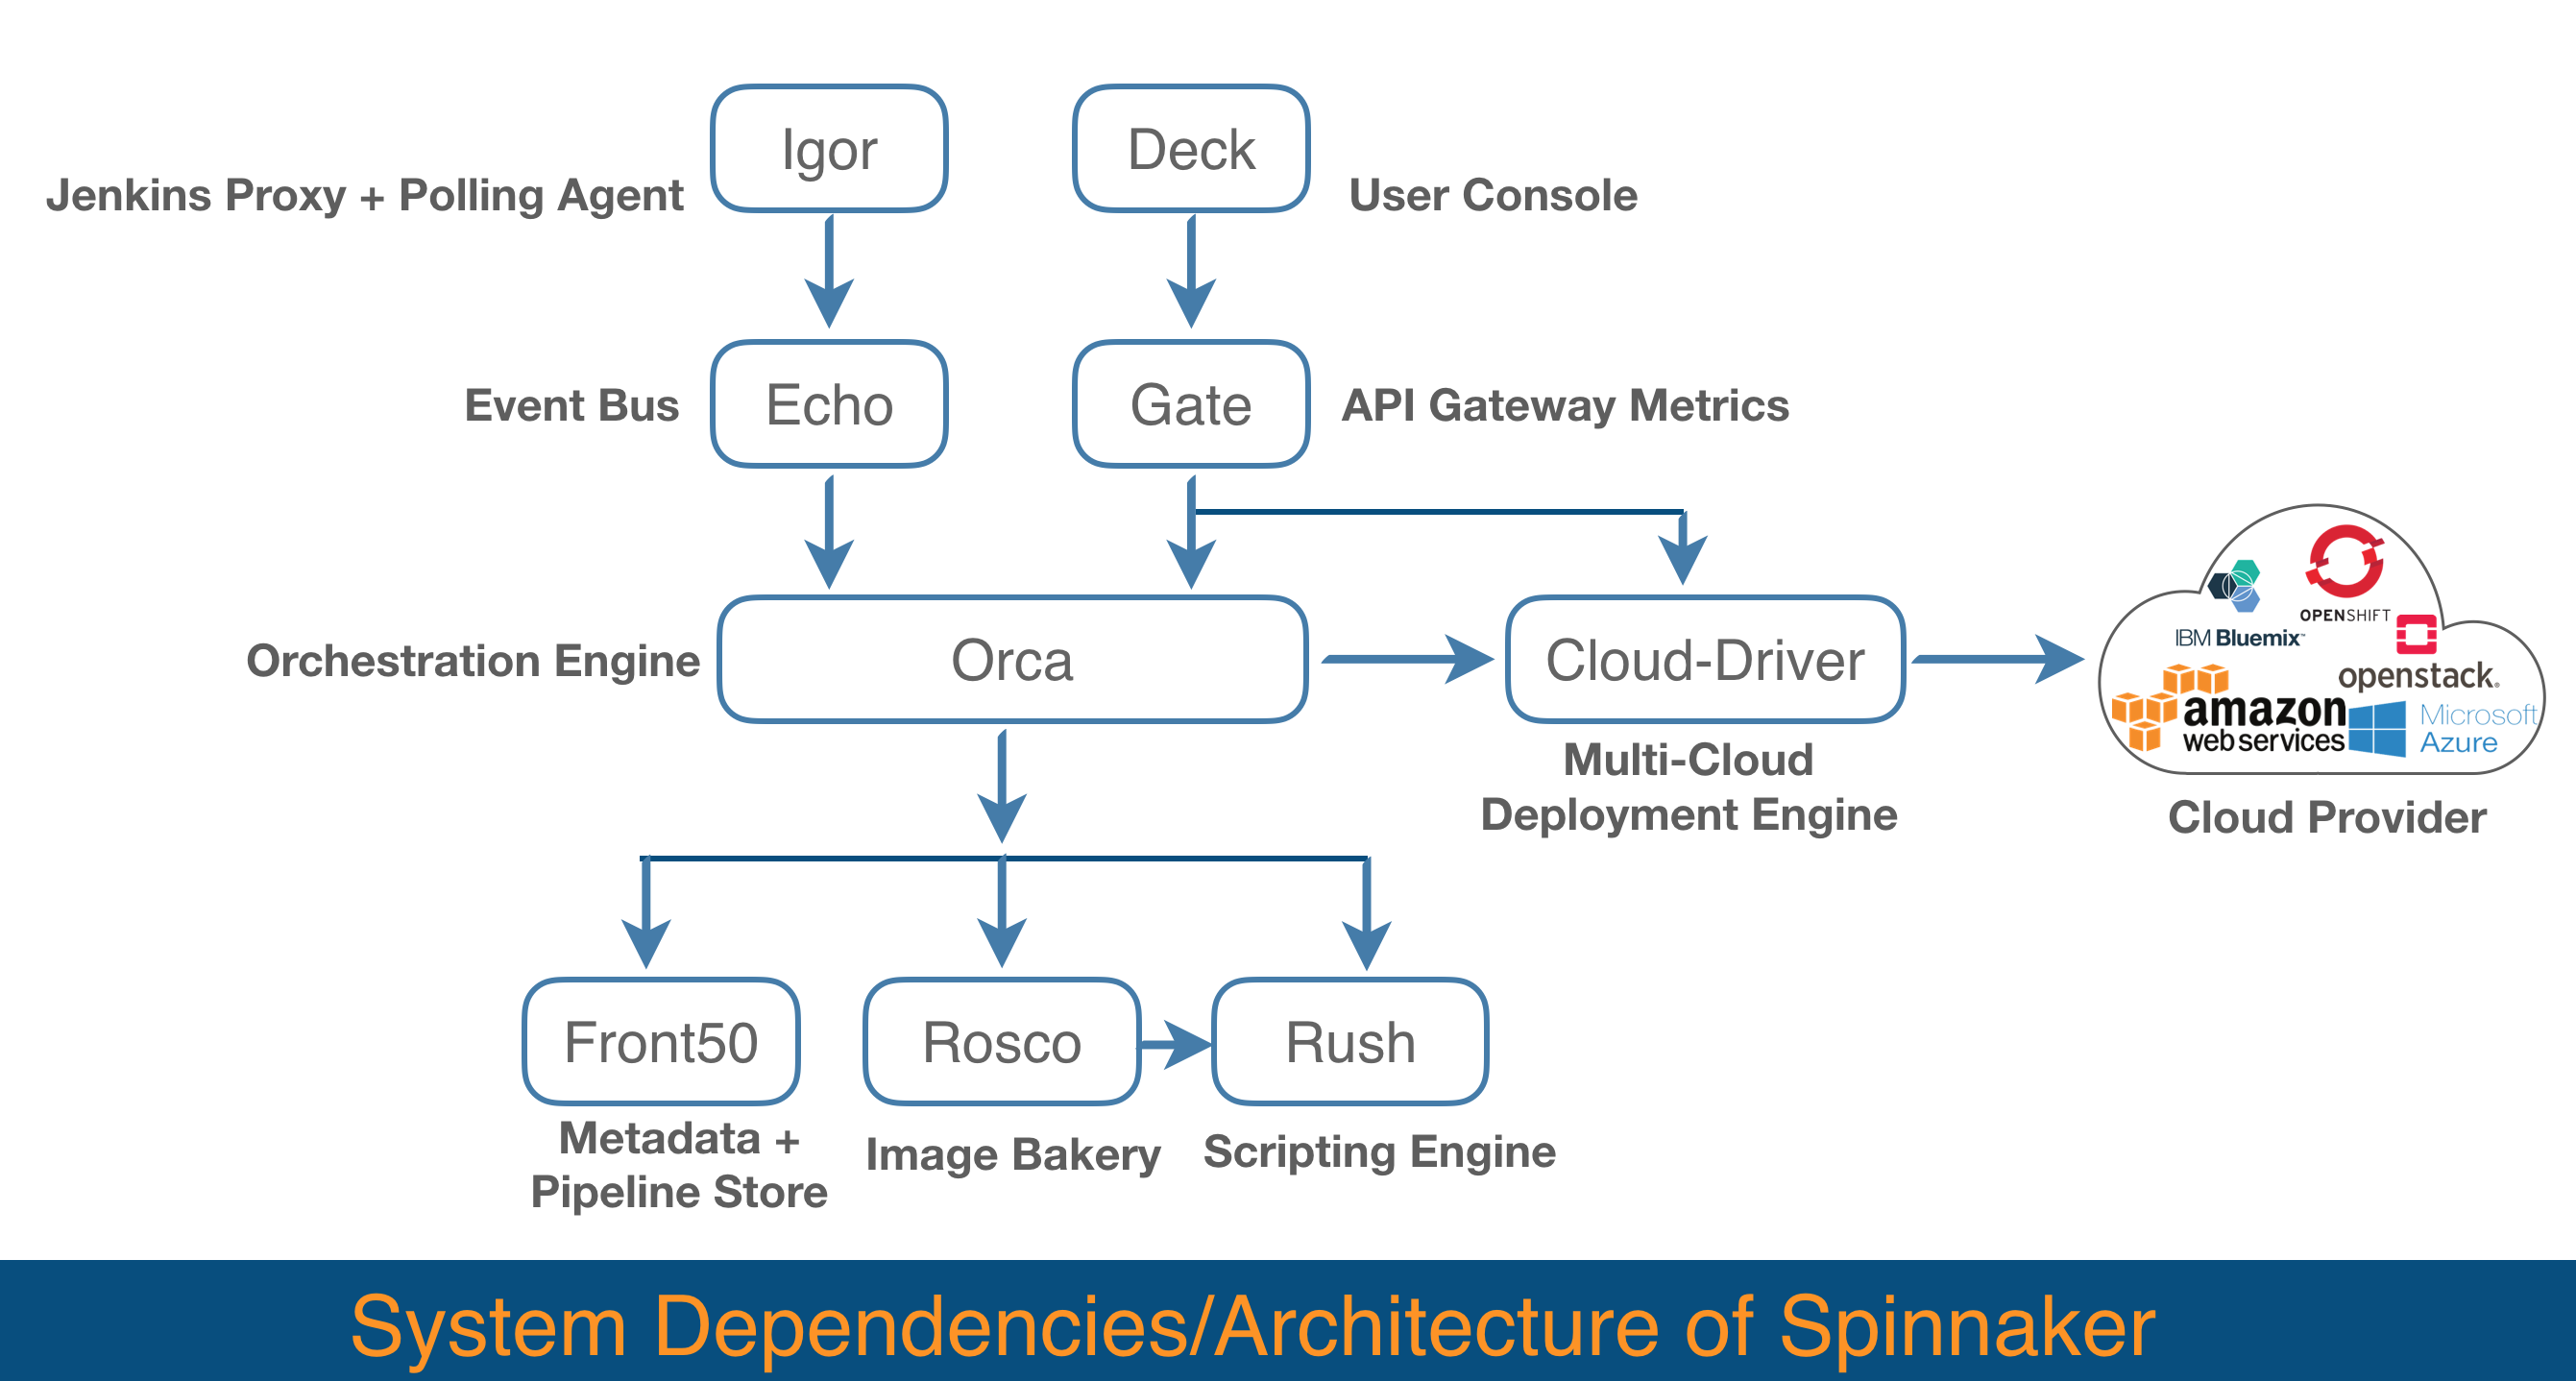
To understand the installation of Spinnaker we need to understand its working components. Let's take a brief look at its components and their functions.

You can view the detailed dependency matrix and default bind ports for the following components at Spinnaker's official documentation page.
Deck: Browser-based UI for Spinnaker.
Gate: API callers and Spinnaker UI communicate to the Spinnaker server via this API gateway called Gate.
Orca: Pipelines and other ad-hoc operations are managed by this orchestration engine called Orca.
Clouddriver: Indexing and Caching of deployed resources are taken care of by Clouddriver. It also facilitates calls to cloud providers like AWS, GCE, and Azure.
Echo: It is responsible for sending notifications, it also acts as an incoming webhook.
Igor: It is used to trigger pipelines via continuous integration jobs in systems like Jenkins and Travis CI, and it allows Jenkins/Travis stages to be used in pipelines.
Front50: It's the metadata store of Spinnaker. It persists metadata for all resources which include pipelines, projects, applications, and notifications.
Rosco: Rosco bakes machine images (AWS AMIs, Azure VM images, GCE images).
Rush: It is Spinnaker's script execution engine.
Installation of Spinnaker
Requirements:
Before we start installation, let's look at the following requirements. Halyard has the following requirements. We used Ubuntu 16.04 in our case.
- Ubuntu 14.04 or 16.04 (Ubuntu 16.04 requires Spinnaker 1.6.0 or later)
- Debian 8 or 9
- If you are installing on the local machine, macOS only (tested on High Sierra)
Setting up Spinnaker for Kubernetes Deployment
Let's walk through the steps for setting up Spinnaker for Kubernetes deployment
1. Setup Halyard
We start with the Halyard installation. It is the lifecycle manager of Spinnaker deployment.
The following command will install the latest version of Halyard.
curl -O https://raw.githubusercontent.com/spinnaker/halyard/master/install/debian/InstallHalyard.sh
sudo bash InstallHalyard.sh
2. Setting the Spinnaker version
After that, we will set the Spinnaker version that we want to use.
hal version list ### This will return avaialable version
hal config version edit --version $VERSION
3. Configure Spinnaker storage
Now we will choose the storage driver where Spinnaker will store all its data. Spinnaker supports multiple storage drivers like S3, Minio, and Redis. We will use Minio as our storage driver.
This will run Minio as a container on the server and add Minio as storage in Spinnaker.
docker run -p 9000:9000 --name minio1 \
  -e "MINIO_ACCESS_KEY={{access_key}}" \
  -e "MINIO_SECRET_KEY={{secret_key}} \
  -v /mnt/data:/data \
  -v /mnt/config:/root/.minio \
  minio/minio server /data

echo {{secret_key}} | hal config storage s3 edit --endpoint http://localhost:9000 \
    --access-key-id {{access_key}} \
    --secret-access-key
hal config storage edit --type s3
4. Adding Kubernetes as a cloud provider
After setting up storage for Spinnaker, we will add Kubernetes cluster(s) as cloud-provider(s).
The account name will be the name of the Kubernetes cluster. This way we can manage multiple cloud providers (K8s clusters) from a single Spinnaker.
Kubeconfig-file will be the config file of Kubernetes, which you can get from the "~/.kube/" folder on the Kubernetes master node.
hal config provider kubernetes account add {{account name}} --kubeconfig-file={{ kubeconfig-file path }}5. Deployment
Once we add cloud-provider, apply your changes to Spinnaker using the following command:
hal deploy apply Now our Spinnaker setup is ready. If you are wondering why Jenkins is missing in this article, we will have a brief section on Jenkins setup as an image builder for our use case in the next article as well.
Conclusion
In this article, we have seen how you can leverage Spinnaker and Kubernetes for your application delivery needs. By using this tool, the application development team can focus more on creating high-quality applications and let Jenkins and Spinnaker take care of the release process. That's it. In the next article, we will go through steps on how to create applications and deploy the changes using Spinnaker pipelines.
Opinions expressed by DZone contributors are their own.

Comments