MuleSoft: Digitally Sign and Verify a Document
This article details a way to secure, sign, and verify a document to prove its originality.
Join the DZone community and get the full member experience.
Join For FreeMax created and stored a document in a public folder. He wants to share it with other staffers so he doesn't need to send it via email. However, someone, intentionally or not, modified the content without his authorization. Obviously, Max must take the responsibility for those changes.
To protect the document, then he thinks to digitally sign it, hoping the readers will be able to identify whether it is the original one.
In this article, Max will show how to implement that through a simple Mule project. It is started with a flow to generate a mockup document in XML, sign it with a digital signature, and finally, in another flow, the document will be verified to ensure its original content.
Before we start to create the project, install the Anypoint Enterprise Security first:
- Open menu Help >> Install New Software…
- Click Add.
- Fill the Name field with: Anypoint Enterprise Security.
- Fill the Location field with: http://security-update-site-1.6.s3.amazonaws.com.
- Click OK to finish the configuration.
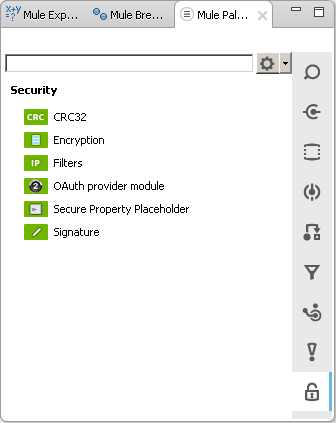
- Select all security connector options, and finish the installation.
- A new Security section will be displayed in the palette.

After that, let's create an empty project and create the first flow:
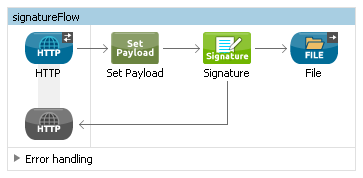
- Drag and drop the HTTP connector.
- Complete the Connector Configuration setting.
- Click +.
- Leave all default values.
- Click OK.
- Complete the Basic Settings.
- Set the Field with /generateDoc.
- Set the Allowed Method with GET.
- Drag and drop Set Payload on Process.
- Replace its default value with the following script:
<PurchaseOrder><Item number="130046593231"><Description>Video Game</Description><Price>10.29</Price></Item><Buyer id="8492340"><Name>My Name</Name><Address><Street>One Network Drive</Street><Town>Burlington</Town><State>MA</State><Country>United States</Country><PostalCode>01803</PostalCode></Address></Buyer></PurchaseOrder>Then continue to put the next message processor:
- Drag and drop the Signature connector.
- Complete the Connector Configuration setting.
- Click +.
- Set the Name with XML_Signature.
- Set the Default Signer with XML_SIGNER.
- Set the Operation with Sign XML.
- Leave the Input with its default value #[payload].
- Set the Key with any value, e.g.: maxKey.
- Finally, set the rest of four required fields:
Field Name | Notes |
Canonicalization Algorithm | The algorithm Mule uses for XML canonicalization: |
Digest Method Algorithm | The algorithm Mule uses to encrypt the digest: |
Signature Method Algorithm | The algorithm Mule uses to protect the message from tampering: |
Signature Type | Defines whether the signature applies to: |
Next, put the final message processor in this flow:
- Drag and drop the File connector at the end of this flow.
- Set its Basic Setting as required.
- Set the Path with any location, e.g.: src/main/resources/output.
- Set the File Name/Pattern with any name or pattern, e.g.: doc.xml.

At this phase, we have created the first flow to generate a mockup document. In the next step, we will create another flow to verify the document.
- Drag and drop the File connector into the Canvas to initiate the new flow.
- Set the Path field with src/main/resources/input.
- Set the Move to Directory field with src/main/resources/output.
- Drag and drop the Byte Array to String transformer into the Process area.
- Drag and drop the Signature connector.
- Set the Connector Configuration to refer to the existing one.
- Set the Operation with Verify signature and leave all default values as is.
- Finally, put a Logger at the end of this flow.
- Set its value with any message, e.g.: XML Verified!

Now we have finished our simple project, and it is ready for testing. Run the project and open a browser to initiate the mockup document creation.
- Execute the URL e.g.: http://localhost:8081/generateDoc.
- This execution will return XML including the signature at the bottom of its content.
- You can find the newly create XML document in src/main/resources/output.
That is the first scenario for signing a document. And it is successfully signed. Next, we have to ensure that the document can be verified.
- Move that document into src/main/resources/input folder.
- Mule will read and move it to the src/main/resources/output folder.
- Look at the console/log message, and it's confirmed: XML Verified!
But wait, how if the document is modified by others?
- To simulate this issue, open the document in any text editor.
- Modify any value, e.g.: <Price>10.29</Price> replaced with <Price>15.29</Price>.
- Save and move it into src/main/resources/input folder.
- Mule will read and move it to src/main/resources/output folder.
- Validation will not proceed to the next processor.
- Look at the console/log message, Mule read the file but does not confirm that it is verified.
That is all! So, through this exercise, we have successfully secured a document and verified it. There are many other scenarios and connectors supported by Anypoint Enterprise Security. Feel free to improve this project and explore other possibilities which suit your purposes.
Opinions expressed by DZone contributors are their own.

Comments