MuleSoft Custom Connector With XML SDK
We go over a tutorial on how to work with the new MuleSoft XML SDK to perform basic operations and connect these operations to MuleSoft's Anypoint Exchange.
Join the DZone community and get the full member experience.
Join For FreeIntroduction
MuleSoft created an XML SDK that lets developers write custom connectors and it's actually easier than using the Java-based Mule SDK. The new XML SDK is one of the easiest ways to write code for a custom connector with MuleSoft.
Here are the basic components of the new SDK:
- Operations: these are basically a set of parameters, the body, and the output. Operations are a type of function which takes multiple parameters, performs a given set of actions, and gives a single output. For example, if you want to add two numbers, 'Add' is the operation. It will take two parameters, and the action will be performed in the body, which will add the two numbers. The output will then be the sum of these two numbers.
- Input parameters: a set of parameters that declares the type to be entered when calling the operation.
- Body: where the action is performed. It executes the sequence of components, like flows.
- Output: declares an output type for your XML SDK module.
- Errors: declares an error type that the XML SDK can raise in the body.
Setting Up an XML SDK Connector Project
To get started, add the below profile to the settings.xml file located in your .m2 repository.
<profiles>
<profile>
<id>Mule</id>
<activation>
<activeByDefault>true</activeByDefault>
</activation>
<repositories>
<repository>
<id>mulesoft-releases</id>
<name>MuleSoft Repository</name>
<url>http://repository.mulesoft.org/releases/</url>
<layout>default</layout>
</repository>
</repositories>
</profile>
</profiles>
Next, add Anypoint credentials to your settings.xml file located in the .m2 repository.
xxxxxxxxxx
<servers>
<server>
<id>Repository</id>
<username>Anypoint_Username</username>
<password>Anypoint_Password</password>
</server>
</servers>
Complete the settings.xml File
Your settings.xml file should now look like this:
xxxxxxxxxx
<settings><profiles>
<profile>
<id>Mule</id>
<activation>
<activeByDefault>true</activeByDefault>
</activation>
<repositories>
<repository>
<id>mulesoft-releases</id>
<name>MuleSoft Repository</name>
<url>http://repository.mulesoft.org/releases/</url>
<layout>default</layout>
</repository>
</repositories>
</profile>
</profiles>
<servers>
<server>
<id>Repository</id>
<username>Anypoint_Username</username>
<password>Anypoint_Password</password>
</server>
</servers>
</settings>
Use the below command to generate a Maven project using an archetype. This command can be executed in command prompt or any command line interface.
x
mvn archetype:generate
-DarchetypeGroupId=org.mule.extensions
-DarchetypeArtifactId=mule-extensions-xml-archetype
-DarchetypeVersion=1.2.0
-DgroupId=math-connector-extension
-DartifactId=math-connector-extension
-DmuleConnectorName=math-connector
Here is a brief description of all the attributes contained in the above command:
| Attributes | Description |
archetypeGroupId |
The GroupId in the Mule repository where the skeleton of the XML SDK is defined. |
archetypeArtifactId |
The ArtifactId of the archetype in the Mule repository. |
archetypeVersion |
A version of the archetype. |
groupId |
The GroupId for your application or module. Generally, it should be an AnypointOrganizationId. |
artifactId |
The ArtifactId for your project or module. |
muleConnectorName |
The name of your Mule custom connector. |
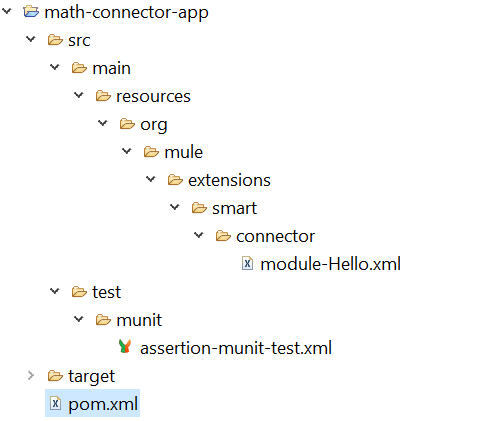
Once the project is generated, you can import it into Anypoint Studio. This will generate the skeleton of your project and it will look like this:

We will write all our code in the module-<app>.xml file contained in the following folder: src/main/resources/org/mule/extensions/smart/connector.
Next, we will write the following four operations and deploy the connector to Anypoint Exchange.
- Add two numbers.
- Subtract two numbers.
- Multiply two numbers.
- Divide two numbers.
Here is the code with these four operations:
xxxxxxxxxx
<module name="Hello Smart Connector"
prefix="module-hello"
doc:description="This module relies in runtime provided components"
xmlns="http://www.mulesoft.org/schema/mule/module"
xmlns:mule="http://www.mulesoft.org/schema/mule/core"
xmlns:doc="http://www.mulesoft.org/schema/mule/documentation"
xmlns:xsi="http://www.w3.org/2001/XMLSchema-instance"
xsi:schemaLocation="
http://www.mulesoft.org/schema/mule/module http://www.mulesoft.org/schema/mule/module/current/mule-module.xsd
http://www.mulesoft.org/schema/mule/core http://www.mulesoft.org/schema/mule/core/current/mule.xsd
http://www.mulesoft.org/schema/mule/module-hello http://www.mulesoft.org/schema/mule/module-hello/current/mule-module-hello.xsd">
<operation name="add-two-numbers" doc:description="Add Two Numbers">
<parameters>
<parameter name="value1" type="number" />
<parameter name="value2" type="number" />
</parameters>
<body>
<mule:set-payload value="#[vars.value1 + vars.value2]"/>
</body>
<output type="number" doc:description="Payload's output"/>
</operation>
<operation name="subtract-two-numbers" doc:description="Subtract Two Numbers">
<parameters>
<parameter name="value1" type="number" />
<parameter name="value2" type="number" />
</parameters>
<body>
<mule:set-payload value="#[vars.value1 - vars.value2]"/>
</body>
<output type="number" doc:description="Payload's output"/>
</operation>
<operation name="multiply-two-numbers" doc:description="Multiply Two Numbers">
<parameters>
<parameter name="value1" type="number" />
<parameter name="value2" type="number" />
</parameters>
<body>
<mule:set-payload value="#[vars.value1 * vars.value2]"/>
</body>
<output type="number" doc:description="Payload's output"/>
</operation>
<operation name="divide-two-numbers" doc:description="Divide Two Numbers">
<parameters>
<parameter name="value1" type="number" />
<parameter name="value2" type="number" />
</parameters>
<body>
<mule:set-payload value="#[vars.value1 / vars.value2]"/>
</body>
<output type="number" doc:description="Payload's output"/>
</operation>
</module>
Deploying a Connector to Exchange
Add the below Anypoint Exchange repository to the pom.xml file under the distributionManagement tag. Make sure {orgId} is replaced with your AnypointOrganizationId.
xxxxxxxxxx
<distributionManagement>
<snapshotRepository>
<id>Repository</id>
<name>Exchange Repository</name>
<url>https://maven.anypoint.mulesoft.com/api/v1/organizations/{orgId}/maven</url>
<layout>default</layout>
</snapshotRepository>
<repository>
<id>Repository</id>
<name>Exchange Repository</name> <url>https://maven.anypoint.mulesoft.com/api/v1/organizations/{orgId}/maven</url>
<layout>default</layout>
</repository>
</distributionManagement>
Execute the below command on the root of your project and it will deploy the project to Anypoint Exchange.
xxxxxxxxxx
mvn deploy

Adding a Connector to a Mule Application
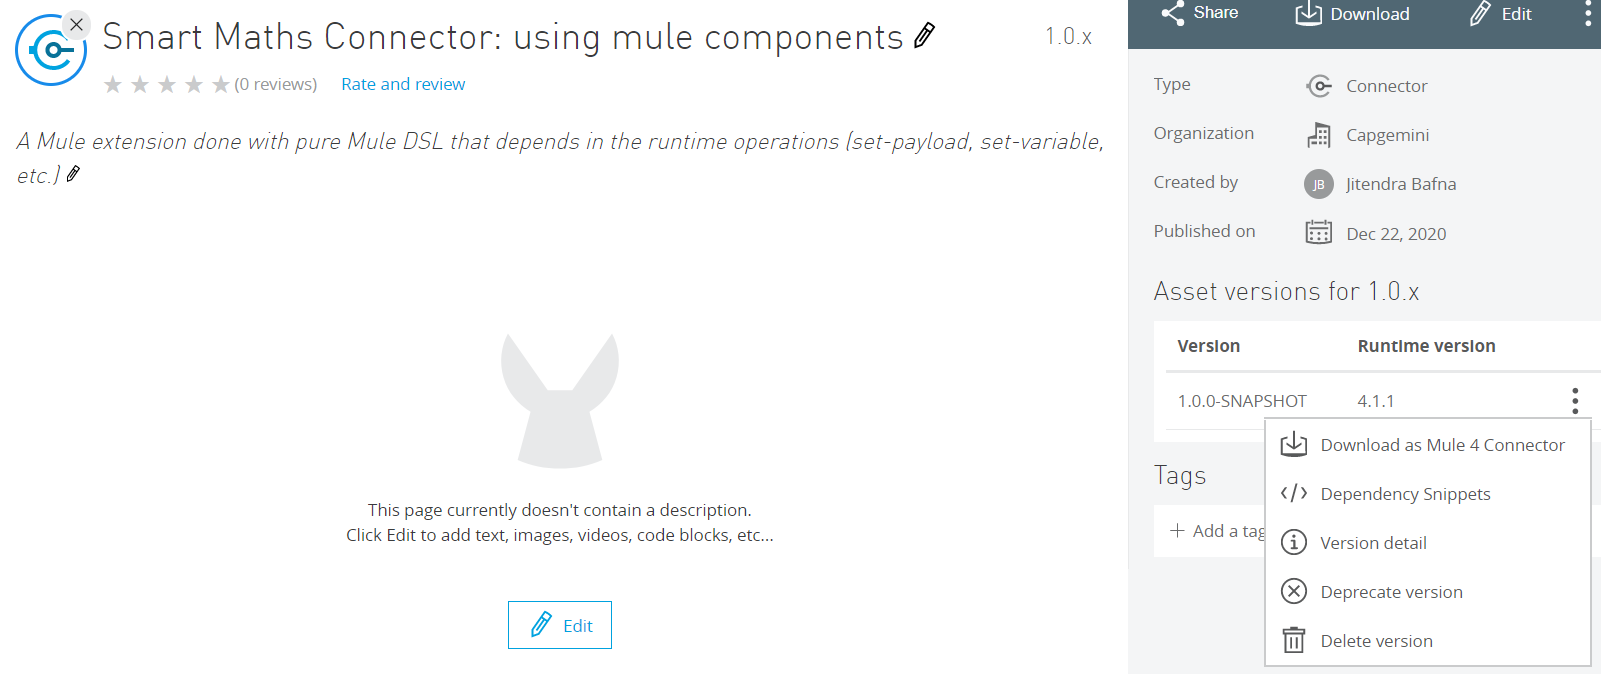
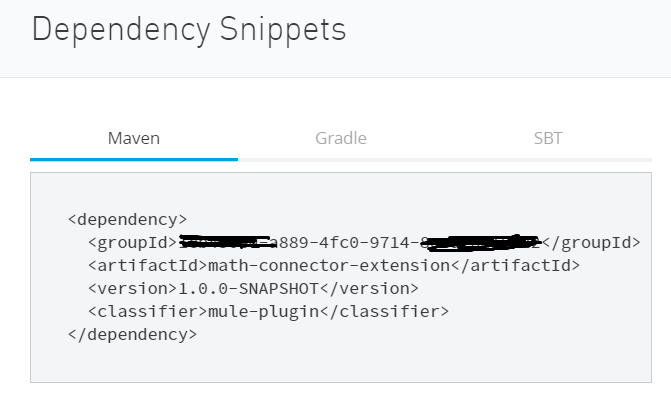
We need to add a connector dependency to the application's pom.xml file. We can fetch this from the Anypoint Exchange connector details page.

You need to click on the Dependency Snippets and it will provide a dependency that you need to add in to your application.

Once you add the dependency, the connector and its operation will be visible in your Mule Palette.

GitHub Code: https://github.com/Jitendra85/MuleSoft-XML-SDK-Connector.git
Now you know how to use the MuleSoft XML SDK to create a custom connector.
Opinions expressed by DZone contributors are their own.

Comments