Microservices in Practice: Deployment Shouldn't Be an Afterthought
Follow this article to learn more about the set of cloud-native abstractors in Ballerina’s built-in Kubernetes support for Microservices your deployment.
Join the DZone community and get the full member experience.
Join For FreeMicroservice architecture is one of the most popular software architecture styles that enables the rapid, frequent, and reliable delivery of large, complex applications. There are numerous learning materials on the benefits of microservices, design, and implementations. However, there are very few resources that discuss how to write your code to cloud-native platforms like Kubernetes in a way that just works. In this article, I am going to use the same microservice E-Commerce sample used in the Rethinking Programming: Automated Observability article and discuss Ballerina’s built-in Kubernetes support to extend it to run in Kubernetes platforms.
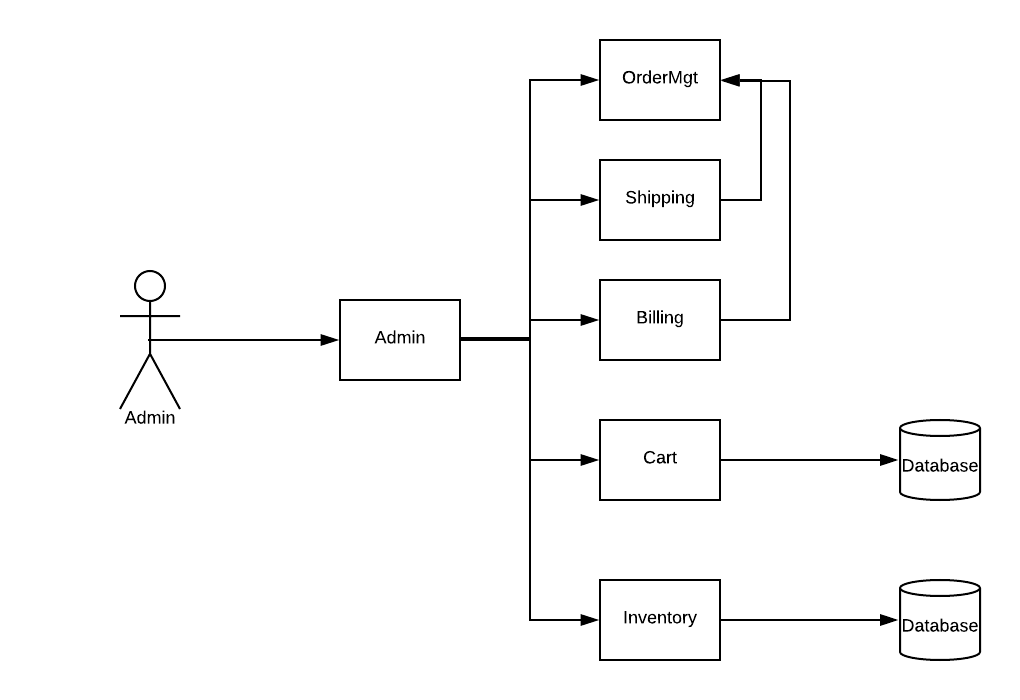
The sample code covers the implementation of an e-commerce backend that simulates the microservices required to implement searching for goods, adding them to a shopping cart, doing payments, and shipping.

Code to Kubernetes
Docker helps to package the application with its dependencies while Kubernetes helps to automate deployment and scaling and to manage containerized applications. Kubernetes defines a set of unique building blocks that collectively provide mechanisms to deploy, maintain, and scale applications.
On the other hand, the developer has to write code in a certain way to work well in a given execution environment. The microservices have to be designed, architected, and implemented in a way that performs well in a platform like Kubernetes. Otherwise, the application code will not be well-fitting to the Kubernetes building blocks. In other words, deployment should not be an afterthought, we should design and write our code to run in Kubernetes.
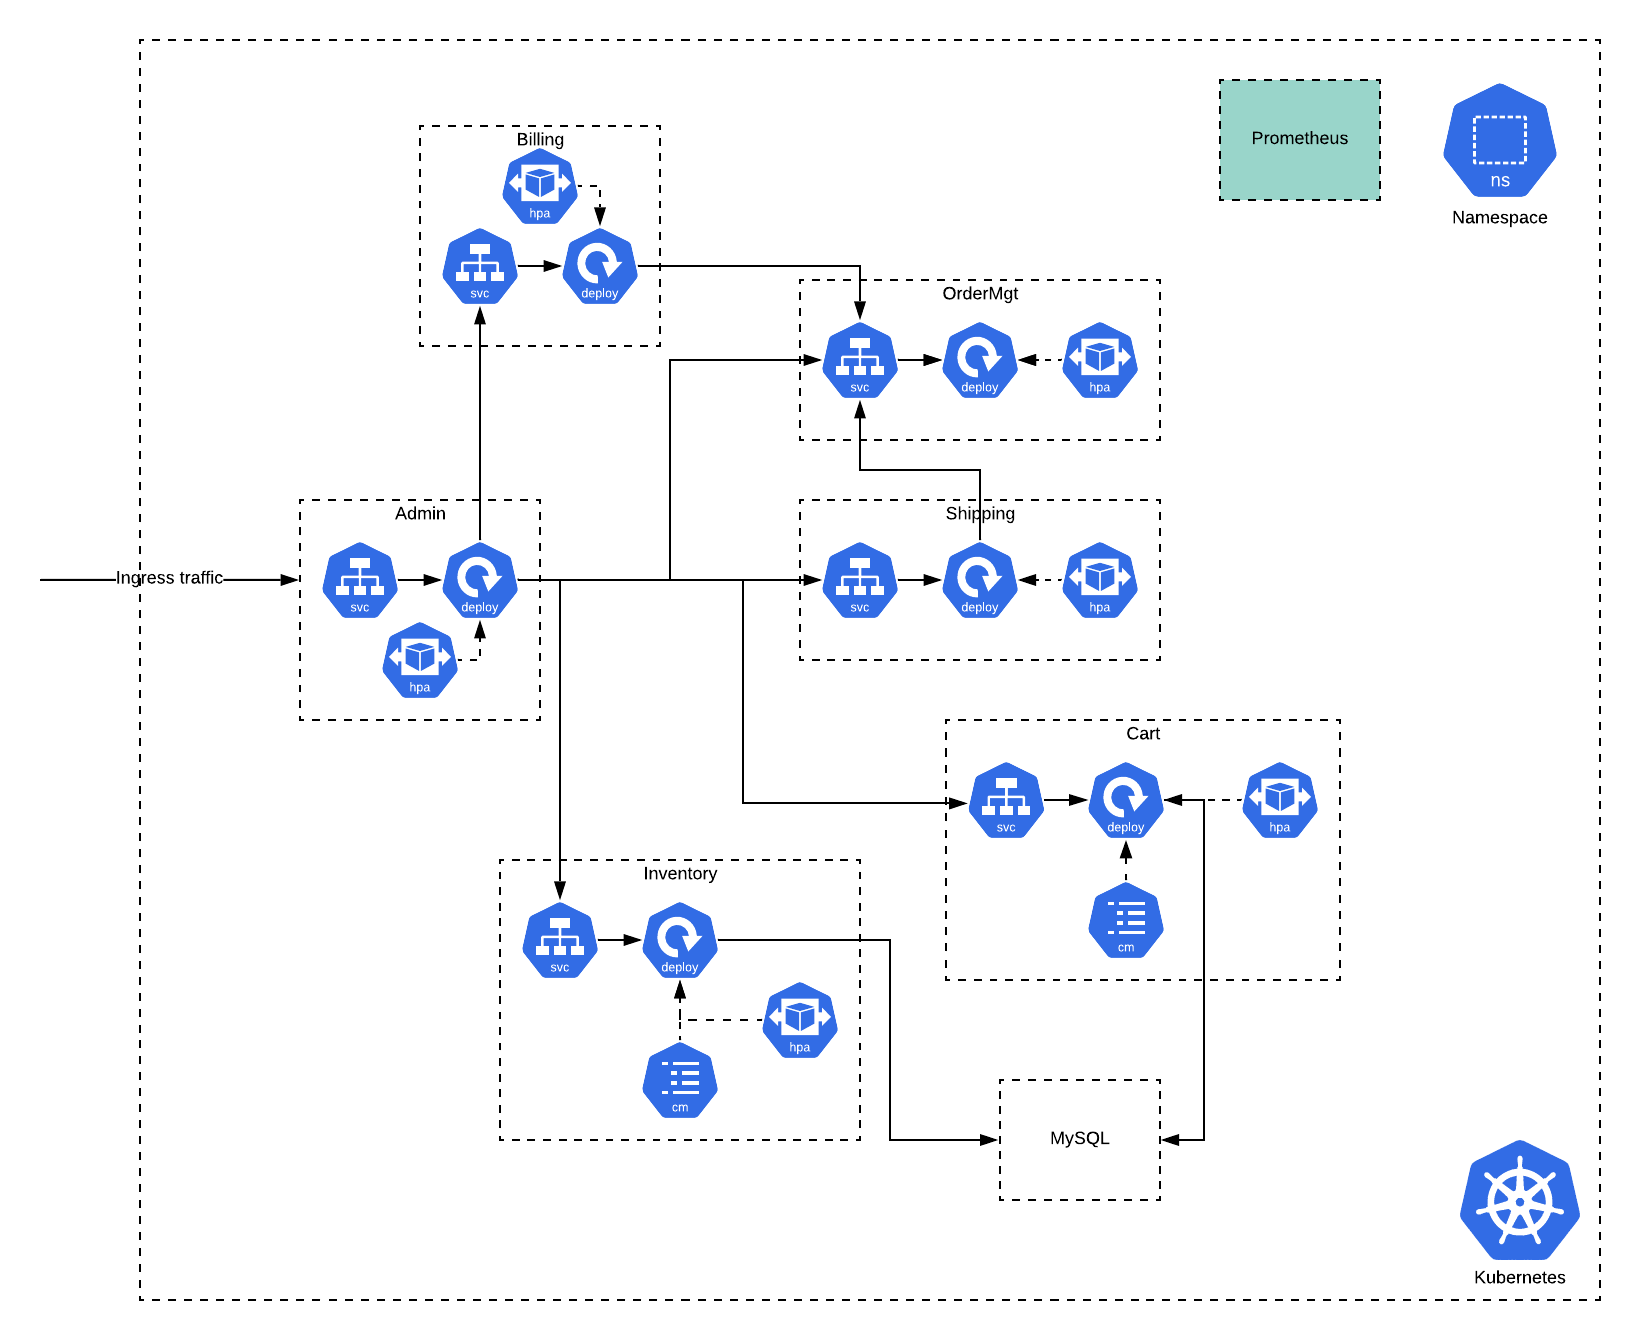
Let’s look at potential Kubernetes deployment architecture for the above e-commerce application.

One of the main challenges that developers are facing is the lack of tools and programing language abstraction support to design and implement the microservices to work well in Kubernetes. As a solution to this problem, Ballerina has introduced a set of cloud-native abstractions and tools to write microservices that just work in platforms like Kubernetes.
Let’s look at how we can use Ballerina’s Kubernetes abstraction to extend the e-commerce microservices to run in Kubernetes.
Order Management Microservice
The order management microservice named OrderMgt is the simplest microservices because it provides a set of functionality for billing, shipping, and admins but it is not dependant on any other microservices to complete the tasks. Let’s see how we can extend the OrderMgt microservice to support running in Kubernetes.
:HPA {
minReplicas: 1,
maxReplicas: 4,
cpuPercentage: 75,
name: "ordermgt-hpa"
}
:Service {
name: "ordermgt-svc"
}
:Deployment {
name: "ordermgt",
image: "index.docker.io/$env{DOCKER_USERNAME}/ecommerce-ordermgt:1.0",
username: "$env{DOCKER_USERNAME}",
password: "$env{DOCKER_PASSWORD}",
push: true,
livenessProbe: true,
readinessProbe: true,
prometheus: true
}
service OrderMgt on new http:Listener(8081) {
Listing 1: OrderMgt Microservice
In the code snippet above, I have added three Kubernetes annotations on top of the OrderMgt service code block. I have set some properties in @kubernetes:Deployment to extend the code to run in Kubernetes.
- image : Name, registry and tag of the Docker image
- username : Username for Docker registry
- password : Password for Docker registry
- push : Enable pushing Docker image to the registry
- livenessProbe. : Enable livenessProbe for the health check
- readinessProbe : Enable readinessProbe for the health check
- prometheus : Enabled Prometheus for observability
When you build the OrderMgt microservices, in addition to the application binaries, it will automatically create the Docker image by bundling application binaries with its dependencies, all while following the Docker image building best practices. Since we have set the push property as true, it will automatically push the created Docker image into the Docker registry.
xxxxxxxxxx
> export DOCKER_USERNAME=<username>
> export DOCKER_PASSWORD=<password>
> ballerina build ordermgt
Generating artifacts...
@kubernetes:Service - complete 1/1
@kubernetes:Deployment - complete 1/1
@kubernetes:HPA - complete 1/1
@kubernetes:Docker - complete 3/3
@kubernetes:Helm - complete 1/1
Run the following command to deploy the Kubernetes artifacts:
kubectl apply -f target/kubernetes/ordermgt
Run the following command to install the application using Helm:
helm install --name ordermgt target/kubernetes/ordermgt/ordermgt
The following Dockerfile is created and used to build the corresponding Docker image.
xxxxxxxxxx
# Auto Generated Dockerfile
FROM ballerina/jre8:v1
LABEL maintainer="dev@ballerina.io"
RUN addgroup troupe \
&& adduser -S -s /bin/bash -g 'ballerina' -G troupe -D ballerina \
&& apk add --update --no-cache bash \
&& chown -R ballerina:troupe /usr/bin/java \
&& rm -rf /var/cache/apk/*
WORKDIR /home/ballerina
COPY ordermgt.jar /home/ballerina
EXPOSE 8081 9797
USER ballerina
CMD java -jar ordermgt.jar --b7a.observability.enabled=true --b7a.observability.metrics.prometheus.port=9797
Listing 2: Autogenerated OrderMgt Dockerfile
As you can see, the Ballerina compiler read the source code and constructed the Dockerfile to build the image. It has set adequate security by updating and creating groups and copying the application binary with correct permissions. It has also correctly exposed the service ports: 8081 is the orderMgt service port, and 9797 is exposed because we have enabled the observability by setting Prometheus as true. Also, it has correctly constructed CMD as well as all additional parameters required to run properly in the containerized environment.

In addition to the Docker image, the compiler has generated the Kubernetes artifacts based on the annotation we defined.
xxxxxxxxxx
apiVersion"apps/v1"
kind"Deployment"
metadata
annotations
labels
app"ordermgt"
name"ordermgt"
spec
replicas1
selector
matchLabels
app"ordermgt"
template
metadata
annotations
labels
app"ordermgt"
spec
containers
image"index.docker.io/lakwarus/ecommerce-ordermgt:1.0"
imagePullPolicy"IfNotPresent"
livenessProbe
initialDelaySeconds10
periodSeconds5
tcpSocket
port8081
name"ordermgt"
ports
containerPort8081
protocol"TCP"
containerPort9797
protocol"TCP"
readinessProbe
initialDelaySeconds3
periodSeconds1
tcpSocket
port8081
nodeSelector
Listing 3: Autogenerated OrderMgt Kubernetes deployment YAML
You can see that the generated deployment YAML consists of some properties we have set in the annotations and the rest will be correctly populated by reading the source code combined with the meaningful defaults.
In the @kubernetes:Service annotation, I have set the service name ordermgt-svc. Other microservices can access the OrderMgt microservices by using this Kubernetes service with the defined service name. The Kubernetes service will be act as an internal load balancer with the default clusterIP type, where it’s only available to the internal network by blocking all external traffic to it.
xxxxxxxxxx
apiVersion"v1"
kind"Service"
metadata
annotations
labels
app"ordermgt"
name"ordermgt-svc"
spec
ports
name"http-ordermgt-svc"
port8081
protocol"TCP"
targetPort8081
selector
app"ordermgt"
type"ClusterIP"
---
apiVersion"v1"
kind"Service"
metadata
annotations
labels
app"ordermgt"
name"ordermgt-svc-prometheus"
spec
ports
name"http-prometheus-ordermgt-svc"
port9797
protocol"TCP"
targetPort9797
selector
app"ordermgt"
type"ClusterIP"
Listing 4: Autogenerated OrderMgt Kubernetes service YAML
In addition to the ordermgt-svc Kubernetes service, the compiler has generated ordermgt-svc-prometheus because we have set prometheus: true. This generated service name can be used to set up Prometheus to pull the observability stats. Prometheus setup will be discussed in the latter part of this article.
One of the main benefits of microservice architecture is that individual services can be scaled independently. We can configure our microservices deployment to automatically scale depending on the load running on the service. Kubernetes Horizontal Pod Autoscaler (HPA) is the way to do it. Our @kubernetes:HPA annotation will correctly generate the required HPA YAML to run in Kubernetes.
xxxxxxxxxx
apiVersion"autoscaling/v1"
kind"HorizontalPodAutoscaler"
metadata
annotations
labels
app"ordermgt"
name"ordermgt-hpa"
spec
maxReplicas4
minReplicas2
scaleTargetRef
apiVersion"apps/v1"
kind"Deployment"
name"ordermgt"
targetCPUUtilizationPercentage75
Listing 5: Autogenerated OrderMgt Kubernetes HPA YAML
In addition to the Docker image and Kubernetes YAMLs, the compiler has generated HELM charts, if someone wants to run using HELM.
Two kubectl commands are also printed and just a copy and paste will work with the configured Kubernetes cluster. The Kubernetes cluster can run locally or in a public cloud-like Google GKE, Azure AKS, or Amazon EKS.
Shipping and Billing Microservices
Like the OrderMgt microservice, we have set the following annotations in the shipping and billing microservices.
- @kubernetes:Deployment
- @kubernetes:Service
- @kubernetes:HPA
You can find the full source code of the shipping and billing microservices here. In addition to annotations, we have used the ordermgt-svc name and port as the URL in the orderMgtClient config.
xxxxxxxxxx
http:Client orderMgtClient = new("http://ordermgt-svc:8081/OrderMgt");
Listing 6: orderMgtClient configuration
When you build these modules, the compiler will generate all Kubernetes and Docker artifacts corresponding to these two services.
Cart and Inventory Microservices
Both Cart and Inventory microservices connect to the MySQL database to perform database operations. The dbClient has used the Ballerina config API to read the MySQL database username and password.
xxxxxxxxxx
jdbc:Client dbClient = new ({
url: "jdbc:mysql://mysql-svc:3306/ECOM_DB?serverTimezone=UTC",
username: config:getAsString("db.username"),
password: config:getAsString("db.password"),
poolOptions: { maximumPoolSize: 5 },
dbOptions: { useSSL: false }
});
Listing 7: dbClient configuration
The MySQL database username and password set in ballerina.conf resides in the corresponding module directory. In the Kubernetes world, these config files can be passed into PODs by using Kubernetes ConfgiMaps. We have set corresponding configMap annotations in both the Cart (as seen below) and the Inventory microservices code.
xxxxxxxxxx
:ConfigMap {
conf: "src/cart/ballerina.conf"
}
Listing 8: Cart microservice configMap annotation
When you compile the Cart module you can see the following line in the generated Dockerfile.
xxxxxxxxxx
CMD java -jar cart.jar --b7a.observability.enabled=true --b7a.observability.metrics.prometheus.port=9797 --b7a.config.file=${CONFIG_FILE}
Listing 9: CMD command of the Cart Dockerfile
You can see that it’s passing --b7a.config.file=${CONFIG_FILE} to read the config file that comes from the config map in addition to other properties required.
The compiler generates the following Kubernetes configMap along with the other Kubernetes artifacts.
xxxxxxxxxx
apiVersion"v1"
kind"ConfigMap"
metadata
annotations
labels
name"shoppingcart-ballerina-conf-config-map"
binaryData
data
ballerina.conf"[db]\nusername=\"xxxx\"\npassword=\"xxxx\"\n"
Listing 10: Autogenerated Cart microservice Kubernetes configMap YAML
Also, the generated Kubernetes deployment YAML for the Cart microservice has been updated by adding the corresponding configMap along with the volume mounting instruction properties.
xxxxxxxxxx
spec
containers
env
name"CONFIG_FILE"
value"/home/ballerina/conf/ballerina.conf"
image"index.docker.io/lakwarus/ecommerce-cart:1.0"
imagePullPolicy"IfNotPresent"
livenessProbe
initialDelaySeconds10
periodSeconds5
tcpSocket
port8080
name"cart"
ports
containerPort8080
protocol"TCP"
containerPort9797
protocol"TCP"
readinessProbe
initialDelaySeconds3
periodSeconds1
tcpSocket
port8080
volumeMounts
mountPath"/home/ballerina/conf/"
name"shoppingcart-ballerina-conf-config-map-volume"
readOnlyfalse
nodeSelector
volumes
configMap
name"shoppingcart-ballerina-conf-config-map"
name"shoppingcart-ballerina-conf-config-map-volume"
Listing 11: Spec section of the autogenerated Cart deployment YAML
Admin Microservice
The Admin microservices connect all the other five microservices and expose the admin functionality to the administration actor. All other microservices communicate via their corresponding Kubernetes service name that we have defined in the annotations.
xxxxxxxxxx
http:Client cartClient = new("http://cart-svc:8080/ShoppingCart");
http:Client orderMgtClient = new("http://ordermgt-svc:8081/OrderMgt");
http:Client billingClient = new("http://billing-svc:8082/Billing");
http:Client shippingClient = new("http://shipping-svc:8083/Shipping");
http:Client invClient = new("http://inventory-svc:8084/Inventory");
Listing 12: Client configurations in the Admin microservice
The Admin microservice needs to open to the external network while all the other microservices only allow local traffic. This is achieved by setting the correct serviceType in the @kubernetes:Service annotation.
xxxxxxxxxx
:Service {
name: "admin-svc",
serviceType: "NodePort",
nodePort: 30300
}
Listing 13: Kubernetes service annotation for Admin microservice
When compiling the source code, it generates a Kubernetes service with the nodePort type which allows access to the admin microservice by using the Node IP and the port defined in the annotation. If you are running the Kubernetes cluster in a cloud provider you can set it as LoadBalancer type. Then it will generate the corresponding cloud load balancer config to expose admin services.
Running in a Kubernetes Cluster
Now that we have looked at how we can extend the e-commerce microservices to generate the required artifacts to run well in Kubernetes by using Ballerina’s built-in Kubernetes support. Let’s test the deployment.
Step 1: Compile the source code
Clone the Git repo and run the following command to compile the source code.
xxxxxxxxxx
> ballerina build -a
This will generate all necessary artifacts to run in Kubernetes.
Step 2: Set up MySQL
xxxxxxxxxx
> kubectl apply -f resources/mysql.yaml
Step 3: Deploy e-commerce microservices
You can use the compiler output command to deploy all the microservices.
xxxxxxxxxx
> kubectl apply -f target/kubernetes/ordermgt
> kubectl apply -f target/kubernetes/billing
> kubectl apply -f target/kubernetes/shipping
> kubectl apply -f target/kubernetes/inventory
> kubectl apply -f target/kubernetes/cart
> kubectl apply -f target/kubernetes/admin
Step 4: Set up Prometheus and Grafana
Deploy Prometheus
xxxxxxxxxx
> kubectl create configmap ecommerce --from-file resources/prometheus.yml
> kubectl apply -f resources/prometheus-deploy.yaml
Note: I have configured prometheus.yml to pull stats from all six microservices by using Kubernetes service names generated from the compiler.
Deploy Grafana
xxxxxxxxxx
> kubectl apply -f resources/grafana-datasource-config.yaml
> kubectl apply -f resources/grafana-deploy.yaml
Step 5: Verify the deployment
xxxxxxxxxx
> kubectl get all
NAME READY STATUS RESTARTS AGE
pod/admin-d8d598584-txfnk 1/1 Running 0 35s
pod/billing-5d9fc8f5c-7frcs 1/1 Running 0 22s
pod/cart-68c8786f5c-smpbl 1/1 Running 0 14s
pod/grafana-6d7cc69ffb-2zws7 1/1 Running 0 8m23s
pod/inventory-848d9dbd7c-j2vk2 1/1 Running 0 9s
pod/mysql-574cf47d6b-fpmbp 1/1 Running 0 47s
pod/ordermgt-54fb955d47-cz2m6 1/1 Running 0 4s
pod/prometheus-deployment-d97c996b6-jg5t2 1/1 Running 0 8m34s
pod/shipping-6c6df49cb7-x7lcm 1/1 Running 0 28s
NAME TYPE CLUSTER-IP EXTERNAL-IP PORT(S) AGE
service/admin-svc NodePort 10.98.142.252 <none> 8085:30300/TCP 35s
service/admin-svc-prometheus ClusterIP 10.104.157.241 <none> 9797/TCP 35s
service/billing-svc ClusterIP 10.99.0.148 <none> 8082/TCP 22s
service/billing-svc-prometheus ClusterIP 10.106.106.169 <none> 9797/TCP 22s
service/cart-svc ClusterIP 10.99.37.61 <none> 8080/TCP 14s
service/cart-svc-prometheus ClusterIP 10.102.26.25 <none> 9797/TCP 14s
service/grafana NodePort 10.96.73.66 <none> 3000:32000/TCP 8m23s
service/inventory-svc ClusterIP 10.111.77.230 <none> 8084/TCP 9s
service/inventory-svc-prometheus ClusterIP 10.101.1.91 <none> 9797/TCP 9s
service/kubernetes ClusterIP 10.96.0.1 <none> 443/TCP 27d
service/mysql-svc ClusterIP None <none> 3306/TCP 47s
service/ordermgt-svc ClusterIP 10.100.221.87 <none> 8081/TCP 4s
service/ordermgt-svc-prometheus ClusterIP 10.106.39.3 <none> 9797/TCP 4s
service/prometheus ClusterIP 10.106.45.109 <none> 9090/TCP 8m35s
service/shipping-svc ClusterIP 10.109.118.101 <none> 8083/TCP 28s
service/shipping-svc-prometheus ClusterIP 10.102.198.42 <none> 9797/TCP 28s
NAME READY UP-TO-DATE AVAILABLE AGE
deployment.apps/admin 1/1 1 1 35s
deployment.apps/billing 1/1 1 1 22s
deployment.apps/cart 1/1 1 1 14s
deployment.apps/grafana 1/1 1 1 8m23s
deployment.apps/inventory 1/1 1 1 9s
deployment.apps/mysql 1/1 1 1 47s
deployment.apps/ordermgt 1/1 1 1 4s
deployment.apps/prometheus-deployment 1/1 1 1 8m35s
deployment.apps/shipping 1/1 1 1 28s
NAME DESIRED CURRENT READY AGE
replicaset.apps/admin-d8d598584 1 1 1 35s
replicaset.apps/billing-5d9fc8f5c 1 1 1 22s
replicaset.apps/cart-68c8786f5c 1 1 1 14s
replicaset.apps/grafana-6d7cc69ffb 1 1 1 8m23s
replicaset.apps/inventory-848d9dbd7c 1 1 1 9s
replicaset.apps/mysql-574cf47d6b 1 1 1 47s
replicaset.apps/ordermgt-54fb955d47 1 1 1 4s
replicaset.apps/prometheus-deployment-d97c996b6 1 1 1 8m35s
replicaset.apps/shipping-6c6df49cb7 1 1 1 28s
NAME REFERENCE TARGETS MINPODS MAXPODS REPLICAS AGE
horizontalpodautoscaler.autoscaling/billing-hpa Deployment/billing <unknown>/75% 1 2 1 22s
horizontalpodautoscaler.autoscaling/ordermgt-hpa Deployment/ordermgt <unknown>/75% 1 4 0 4s
horizontalpodautoscaler.autoscaling/shipping-hpa Deployment/shipping <unknown>/75% 1 2 1 28s
Step 6: Run the simulator
xxxxxxxxxx
> ballerina run target/bin/simulator.jar 100 1000
Step 7: Test observerbility in Grafana dashboard
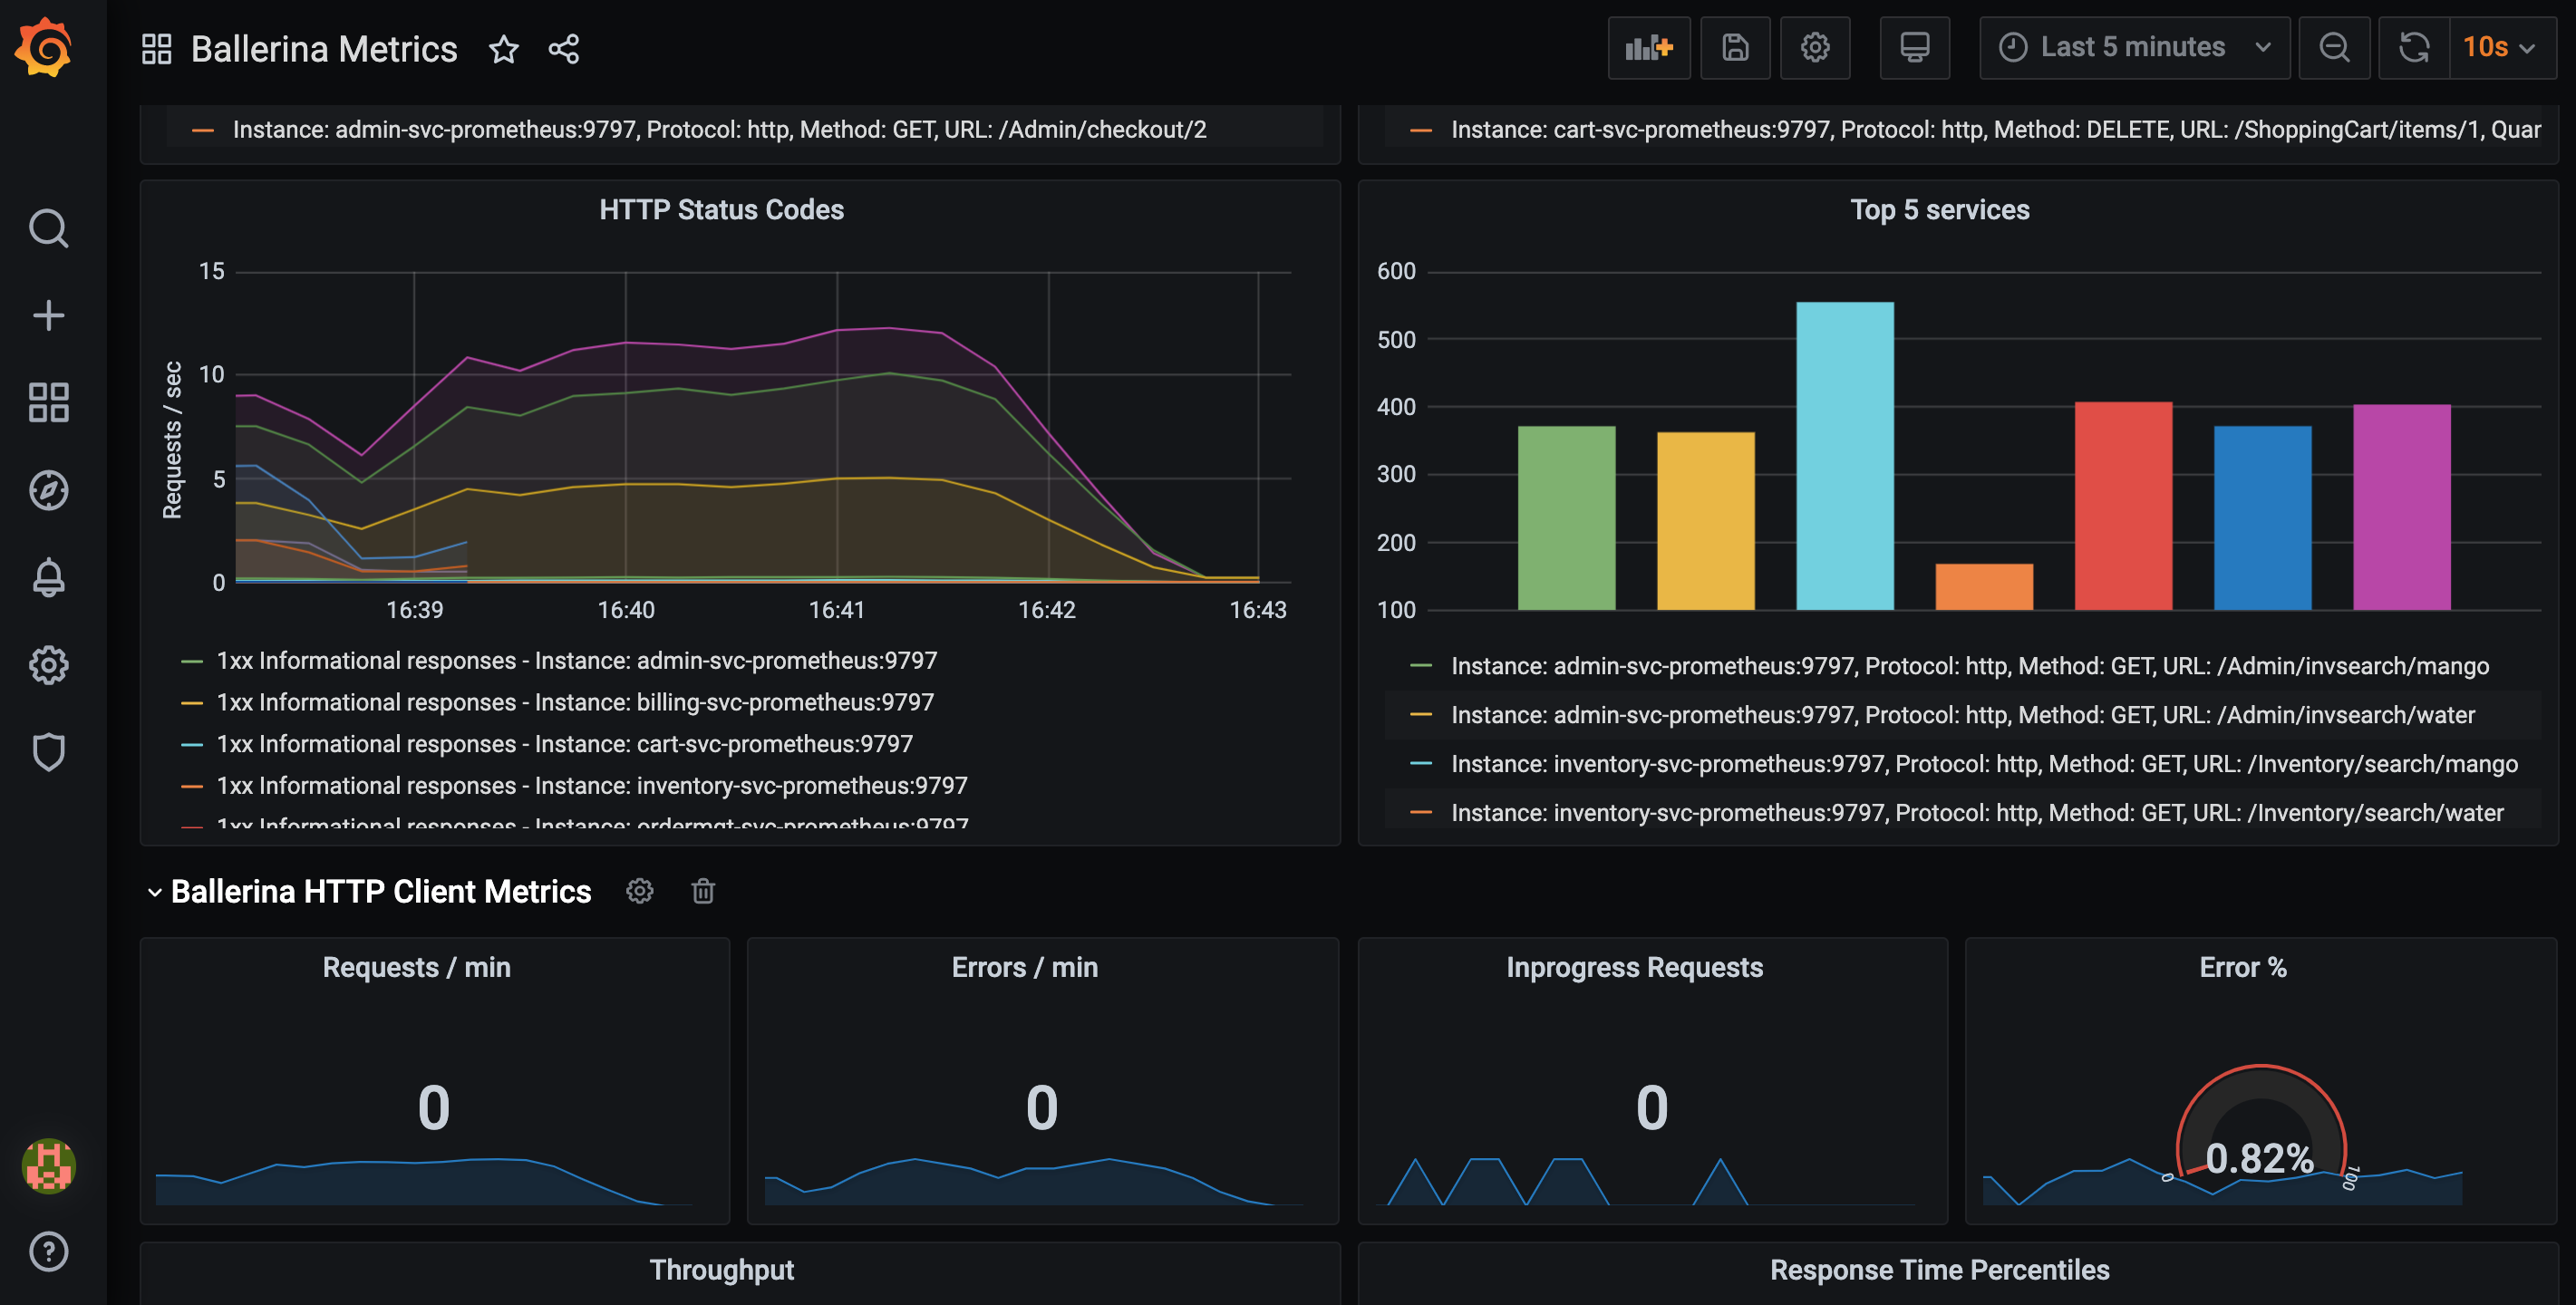
You can access the Grafana dashboard at http://localhost:32000/ (if you deployed in a cloud provider cluster, use the external node IP and the 32000 port).

Here, I have not set up Jaeger, but if you setup Jaeger you will be able to see tracing stats that are collected from the deployed microservices.
Summary
To get the real benefits out of microservice architecture, cloud-native deployment is important in addition to the microservice application code implementations. But one of the common mistakes seen in many projects is not considering the deployment aspect while developing the application. One reason for this is the lack of tools and abstractions support in traditional programming languages that allow developers to write code that just works in these cloud-native platforms.
Ballerina is a new programming language that fills these gaps by providing a rich set of language abstraction and a unique developer experience when integrating cloud-native platforms. This ultimately leads to improved productivity of the whole microservice development life cycle.
Source Code: https://github.com/lakwarus/microservices-in-practice-deployment
Opinions expressed by DZone contributors are their own.

Comments