Micro Frontends With Example
Monolithic frontends are difficult to maintain, develop, test, and deploy. The solution is micro frontends. It is a type of architecture that can increase effectiveness and efficiency across teams.
Join the DZone community and get the full member experience.
Join For FreeIn recent years, microservices have exploded in popularity. Many organizations use this type of architecture to avoid the limitations of large, monolithic backends. While much has been written about this, many companies continue to struggle with 'monolithic frontends'.
In this article, we will describe a trend that is breaking down 'frontend monoliths' into much smaller, more manageable pieces. And how this architecture can increase effectiveness and efficiency across teams. Figure 1 shows an application where the frontend consists of a 'frontend monolith' and the backend consists of several microservices.
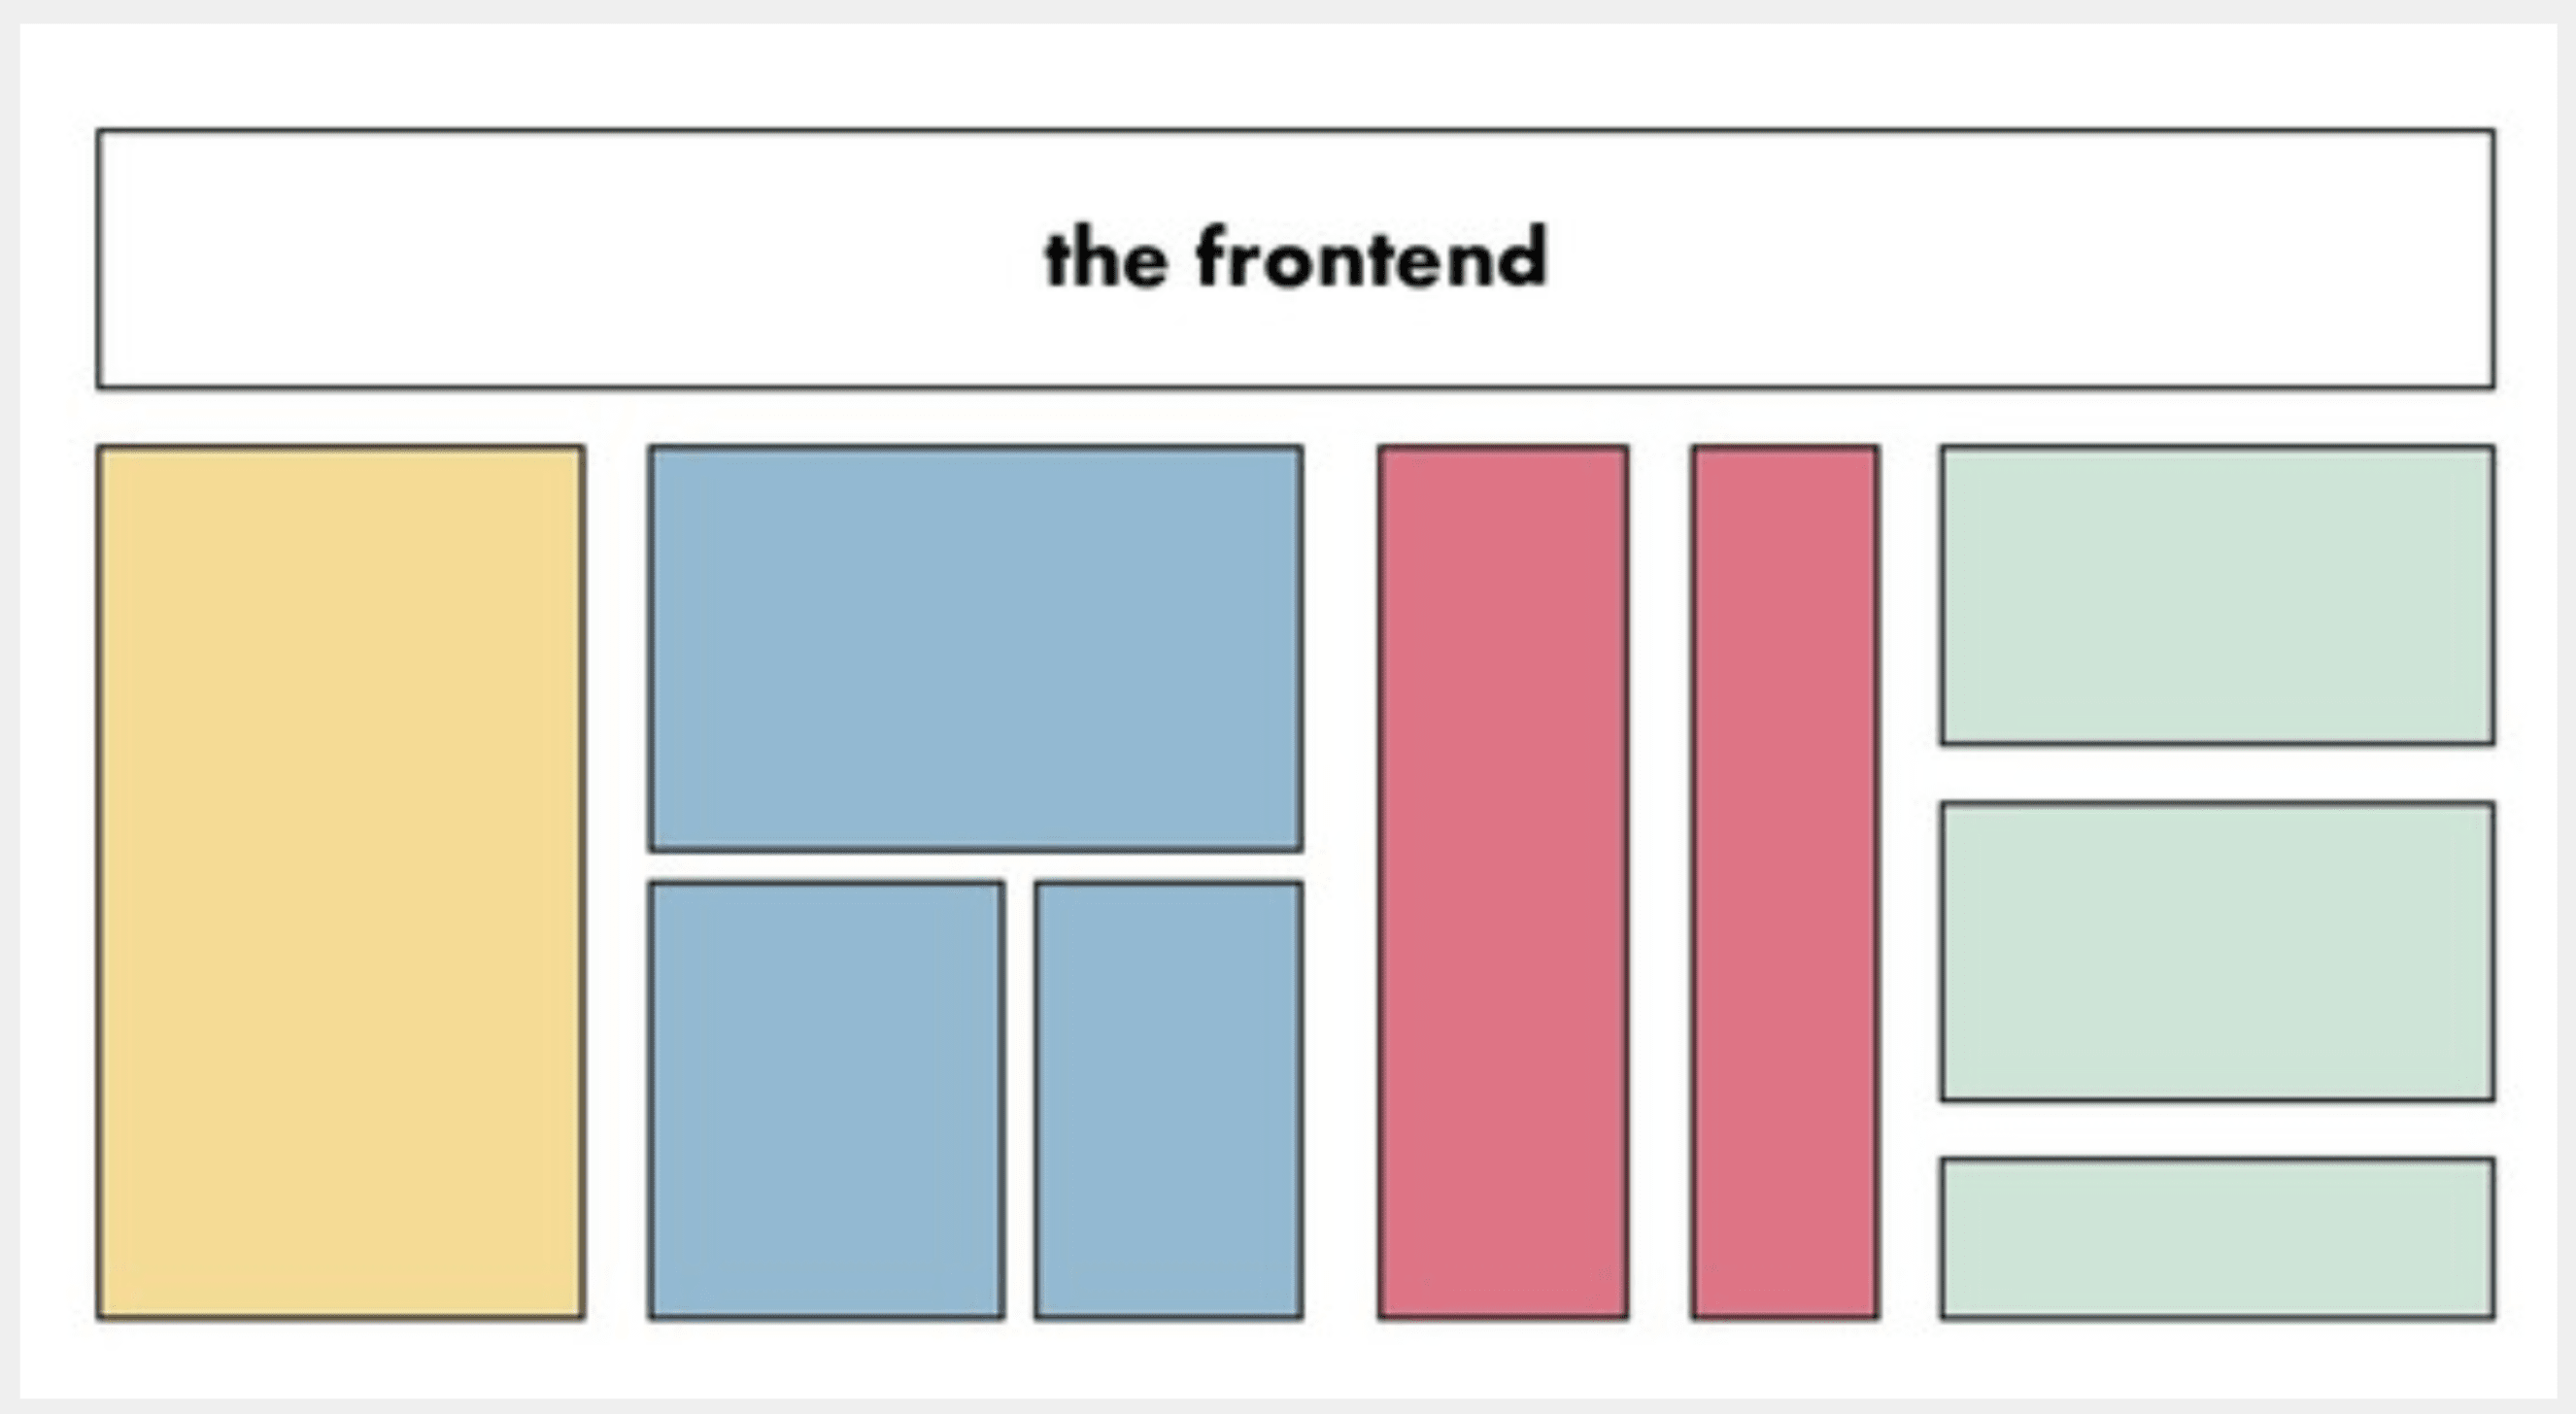
figure 1
What Are Micro Frontends?
The definition of micro frontends is: The idea of micro frontends is to extend the concepts of microservices to the frontend world.
The basic idea of micro frontends is to splitting your frontend into a series of independently deployable and loosely coupled frontend applications (called micro frontends). These micro frontends are then merged/bundled to create a single frontend application (see Figure 2). This bundling of micro frontends is discussed in the paragraph 'Integration approaches micro frontends'.
The first question is: How do you split the front-end applications?
You can show one micro frontend per page and connect it with hyperlinks. Also is it is possible to display multiple micro frontends on a page (see figure 2).
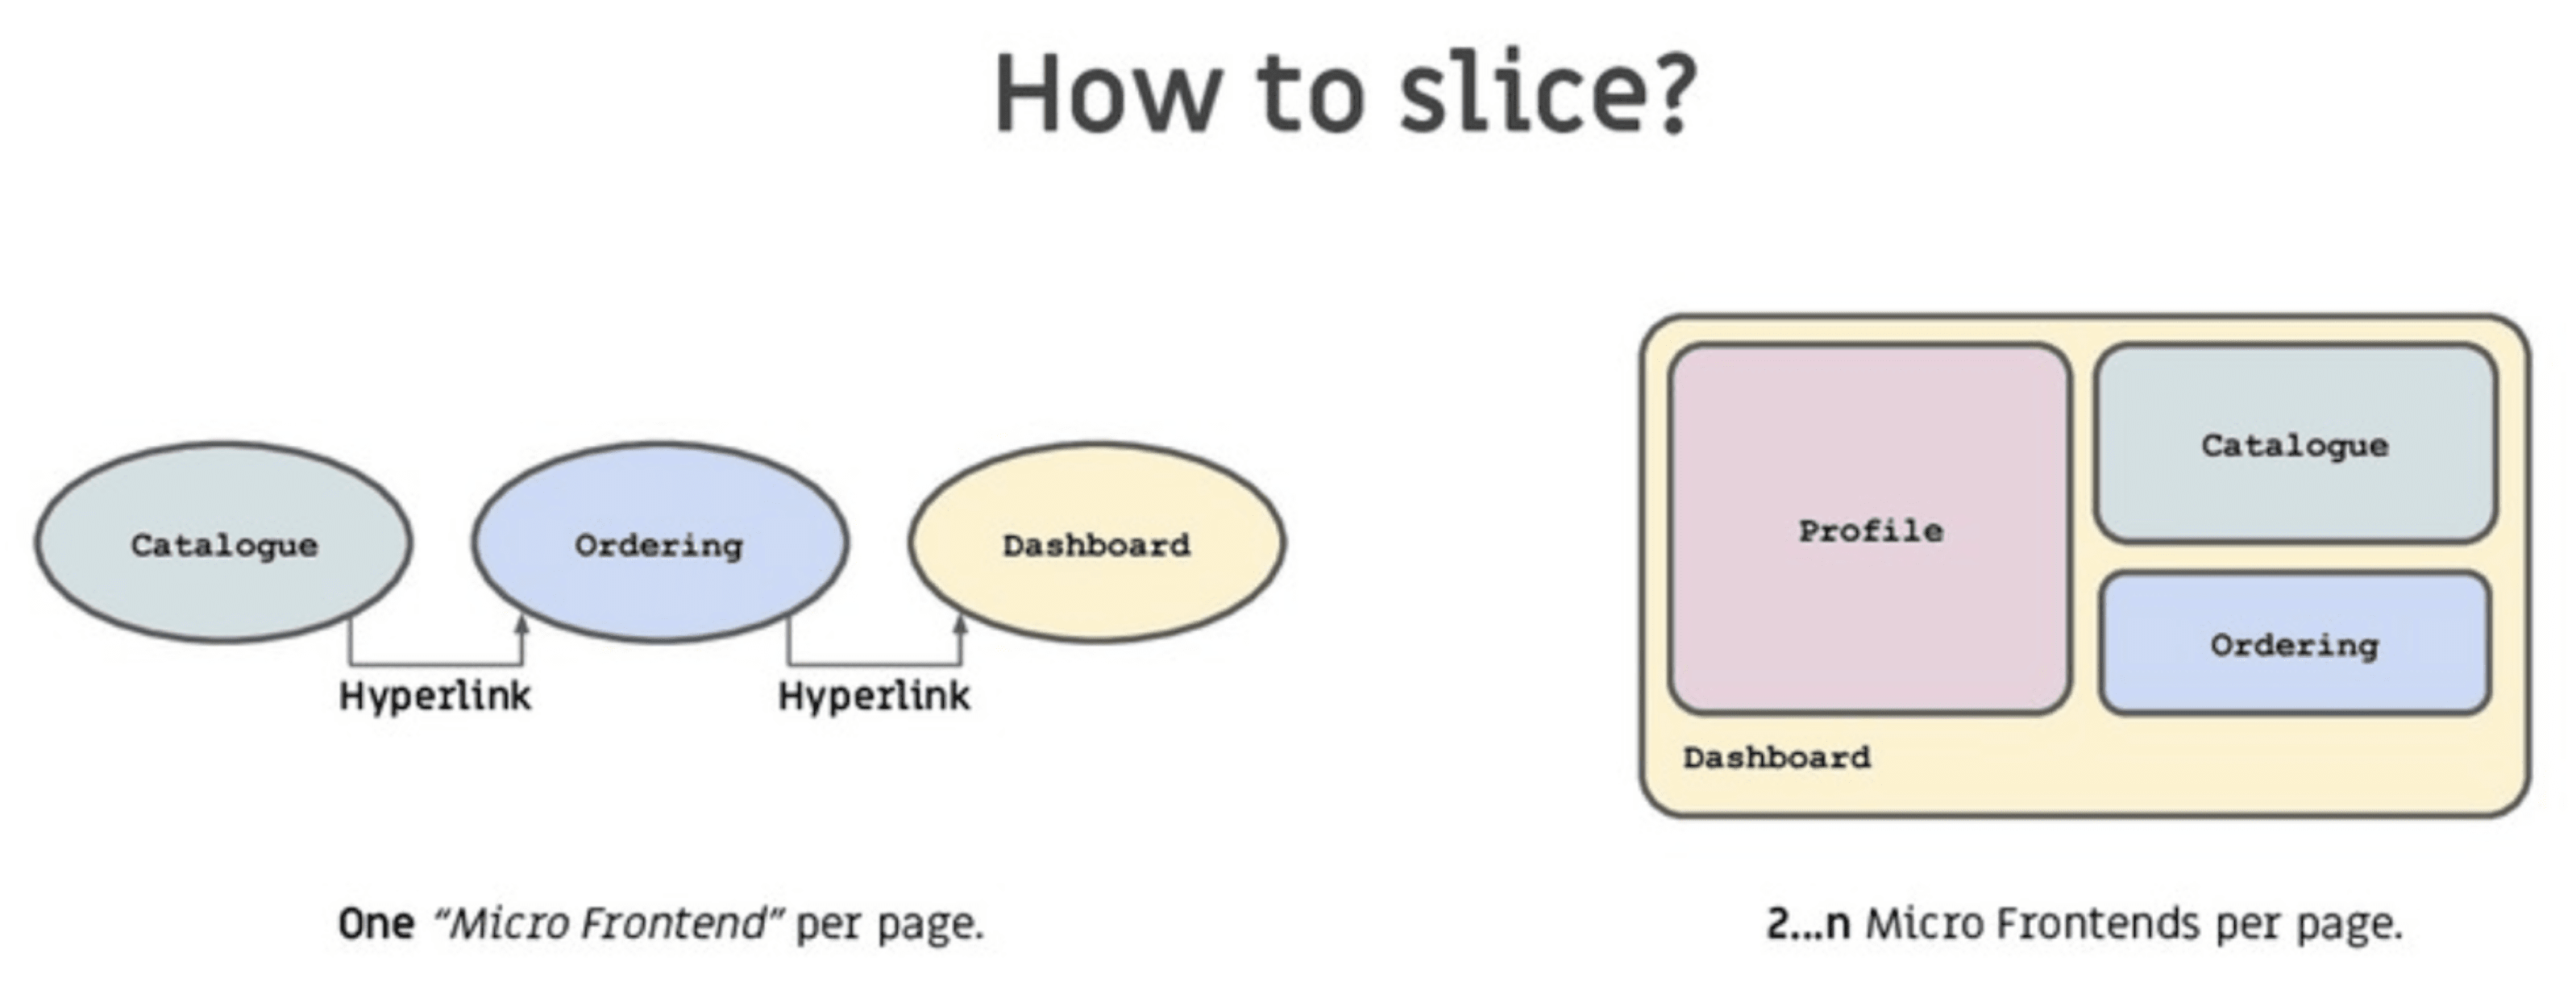
figure 2
To speed up the development of an application, it is practical to think of the micro frontends as separate vertical segments (also called 'verticals') of a web app. Each “vertical” is responsible for a single business domain/use case such as 'Profile', 'Catalog', 'Order'. It has its own presentation layer, service layer (microservice), persistence layer, and a separate database. From the development perspective, each vertical is implemented by one team.
Why does this speed up the development process? Each vertical team is focused on a business domain and therefore needs to coordinate less with other teams. Preferably no code is shared between the different verticals. This improves the speed of the development process. For simplicity, in this article, we focus solely on the presentation layer of a vertical.
Sample Application
Below I describe an example application that uses micro frontends. Imagine a website where customers can order food for delivery.
First, you have a landing page where customers can search and filter for restaurants. This micro frontend is used for this (see figure 4): micro-frontend-browse-restaurants.
Each restaurant then has its own page on which the menu items are displayed and the customer can choose what he or she wants to order (see figure 3). The micro-frontend-order-food is used for this.
Finally, the customers have a profile page where they can see their order history, track the order and customize their payment options. The micro-frontend-user-profile is used for this.
This sample application is used throughout the rest of the article.

figure 3
Architecture
The architecture of this application is as follows:
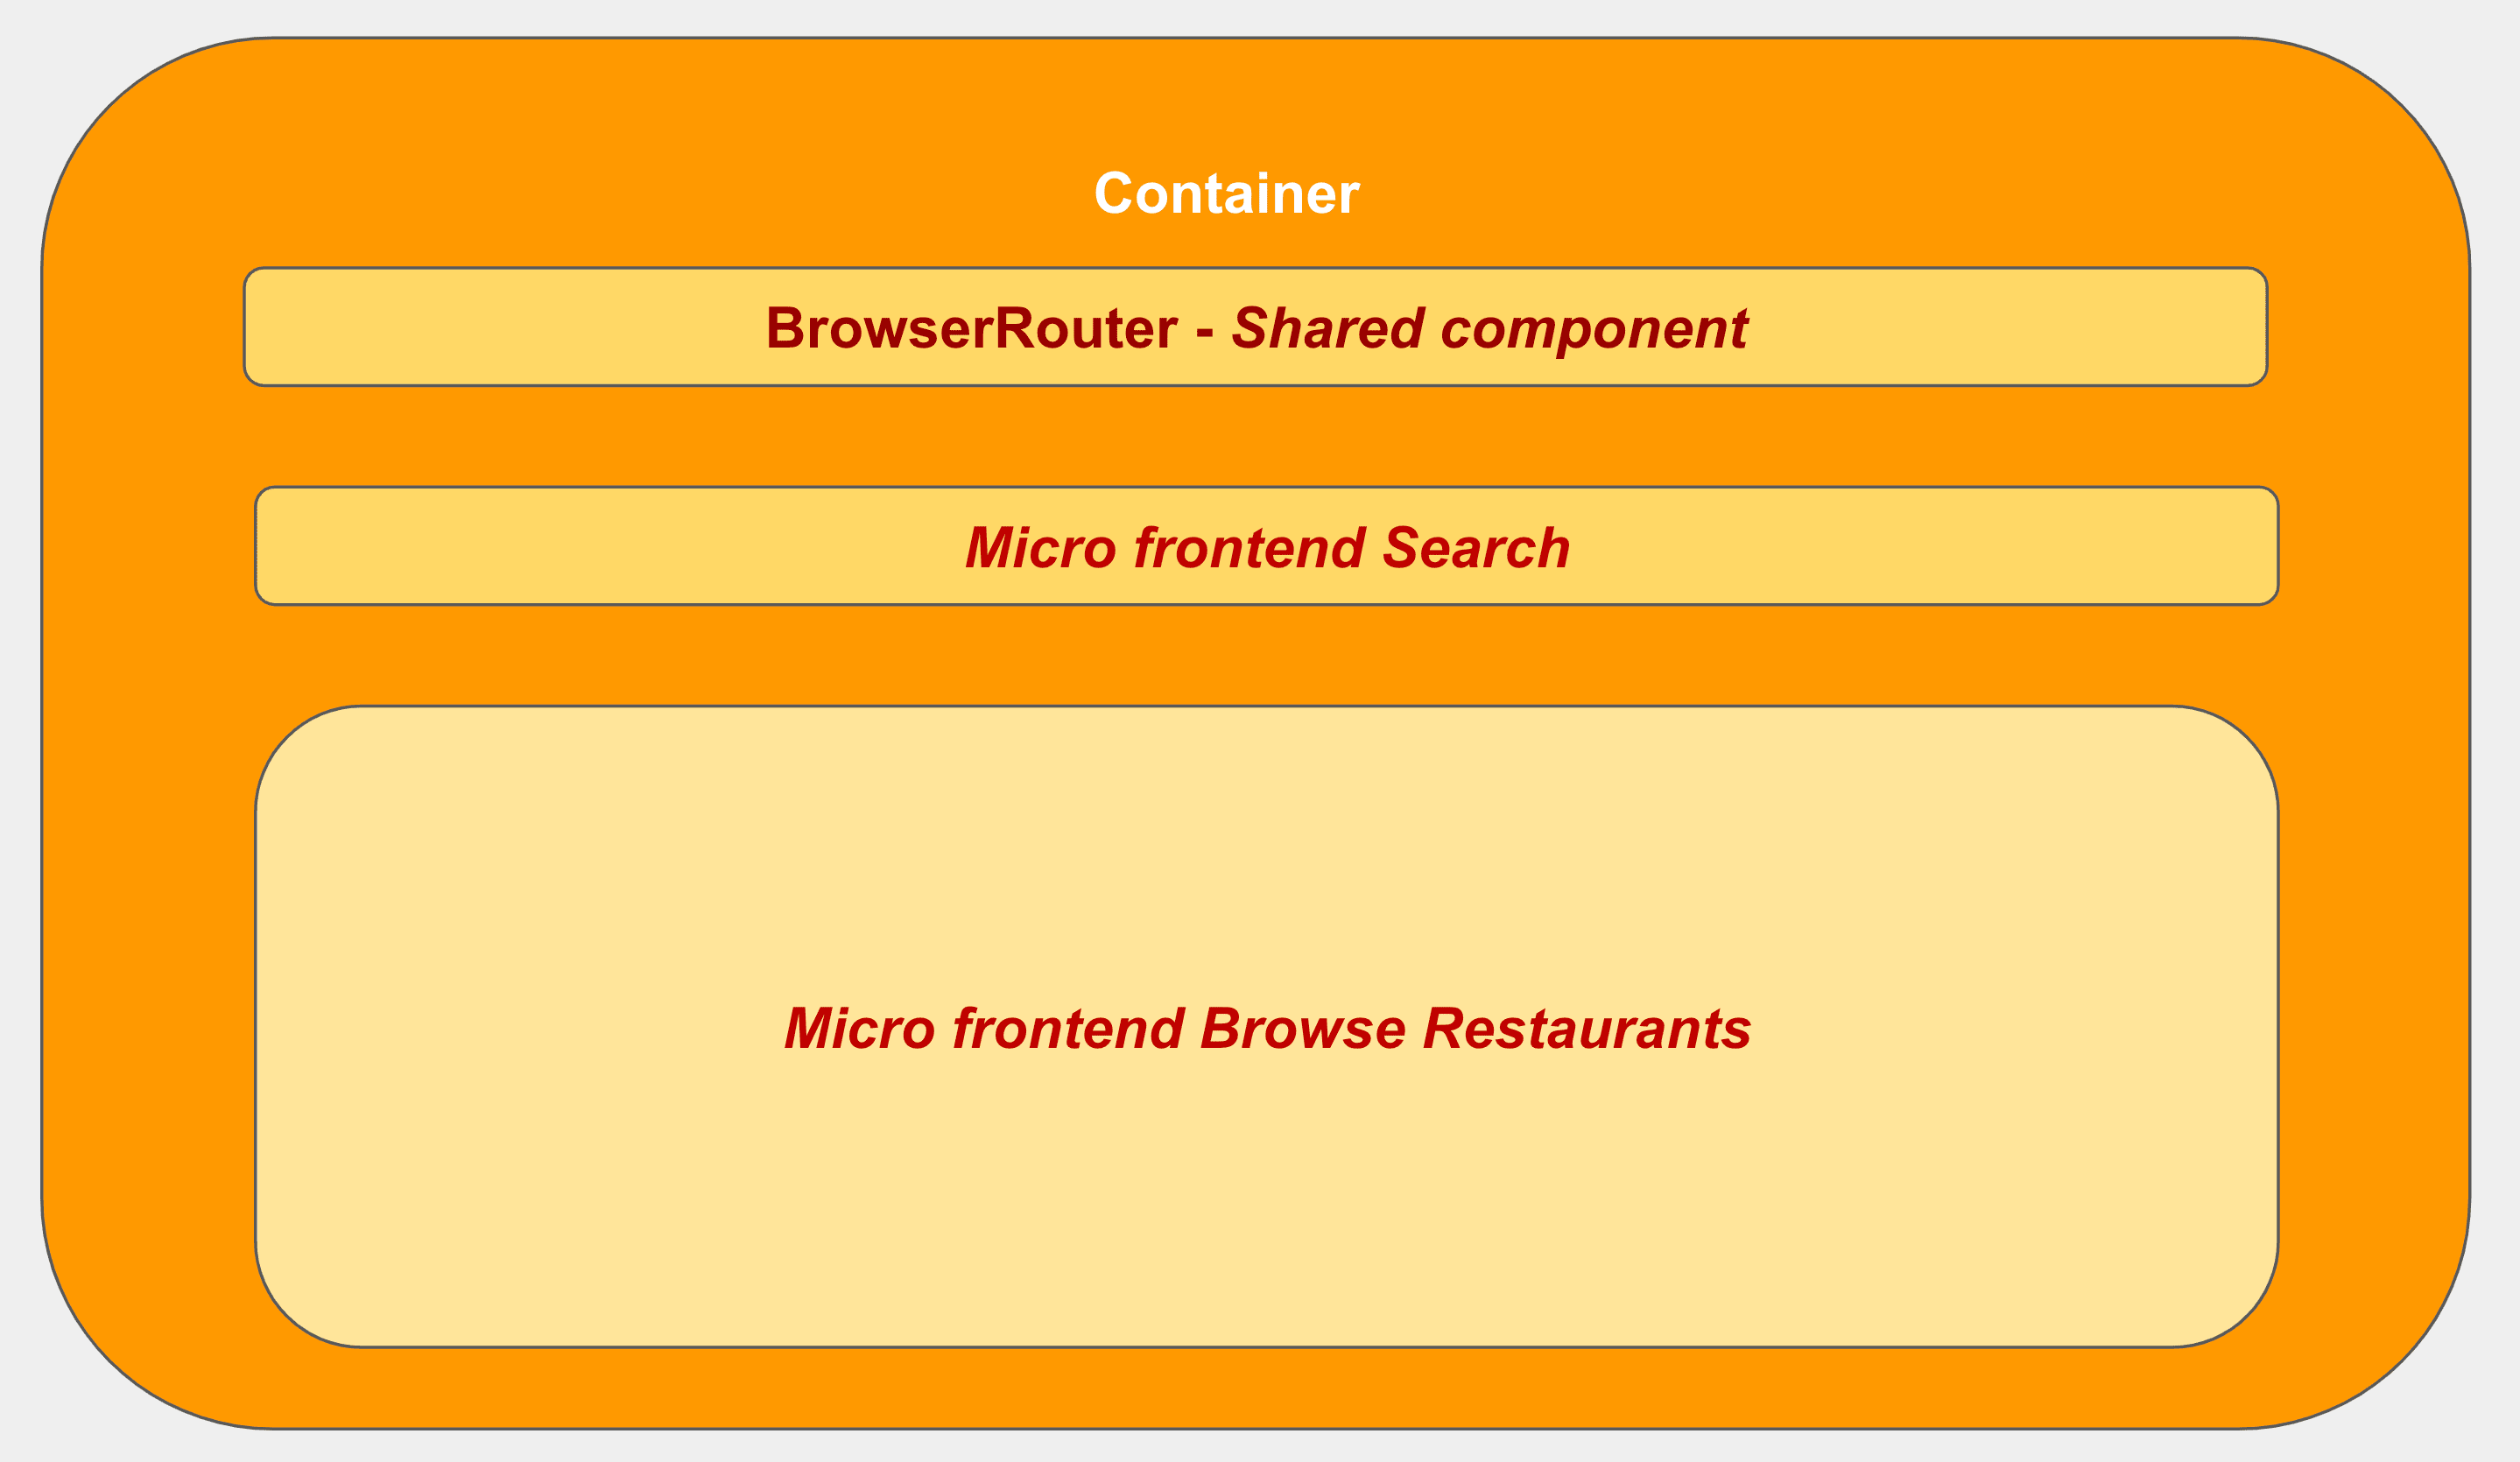
Several micro frontends are shown per page. And a container application is used as the main entry point (see figure 4) is responsible for:
- Routing of requests and aggregating responses from the backend.
- Manages cross-cutting concerns such as authentication, authorization, logging, caching and navigation.
- Brings the different (distributed) micro frontends together on the page and determines which micro frontend should be rendered where and when.
Integration Approaches Micro Front Ends
By 'integration approaches' is meant: How to 'bundle' the micro frontends in the frontend? Figure 5 shows three 'integration approaches'.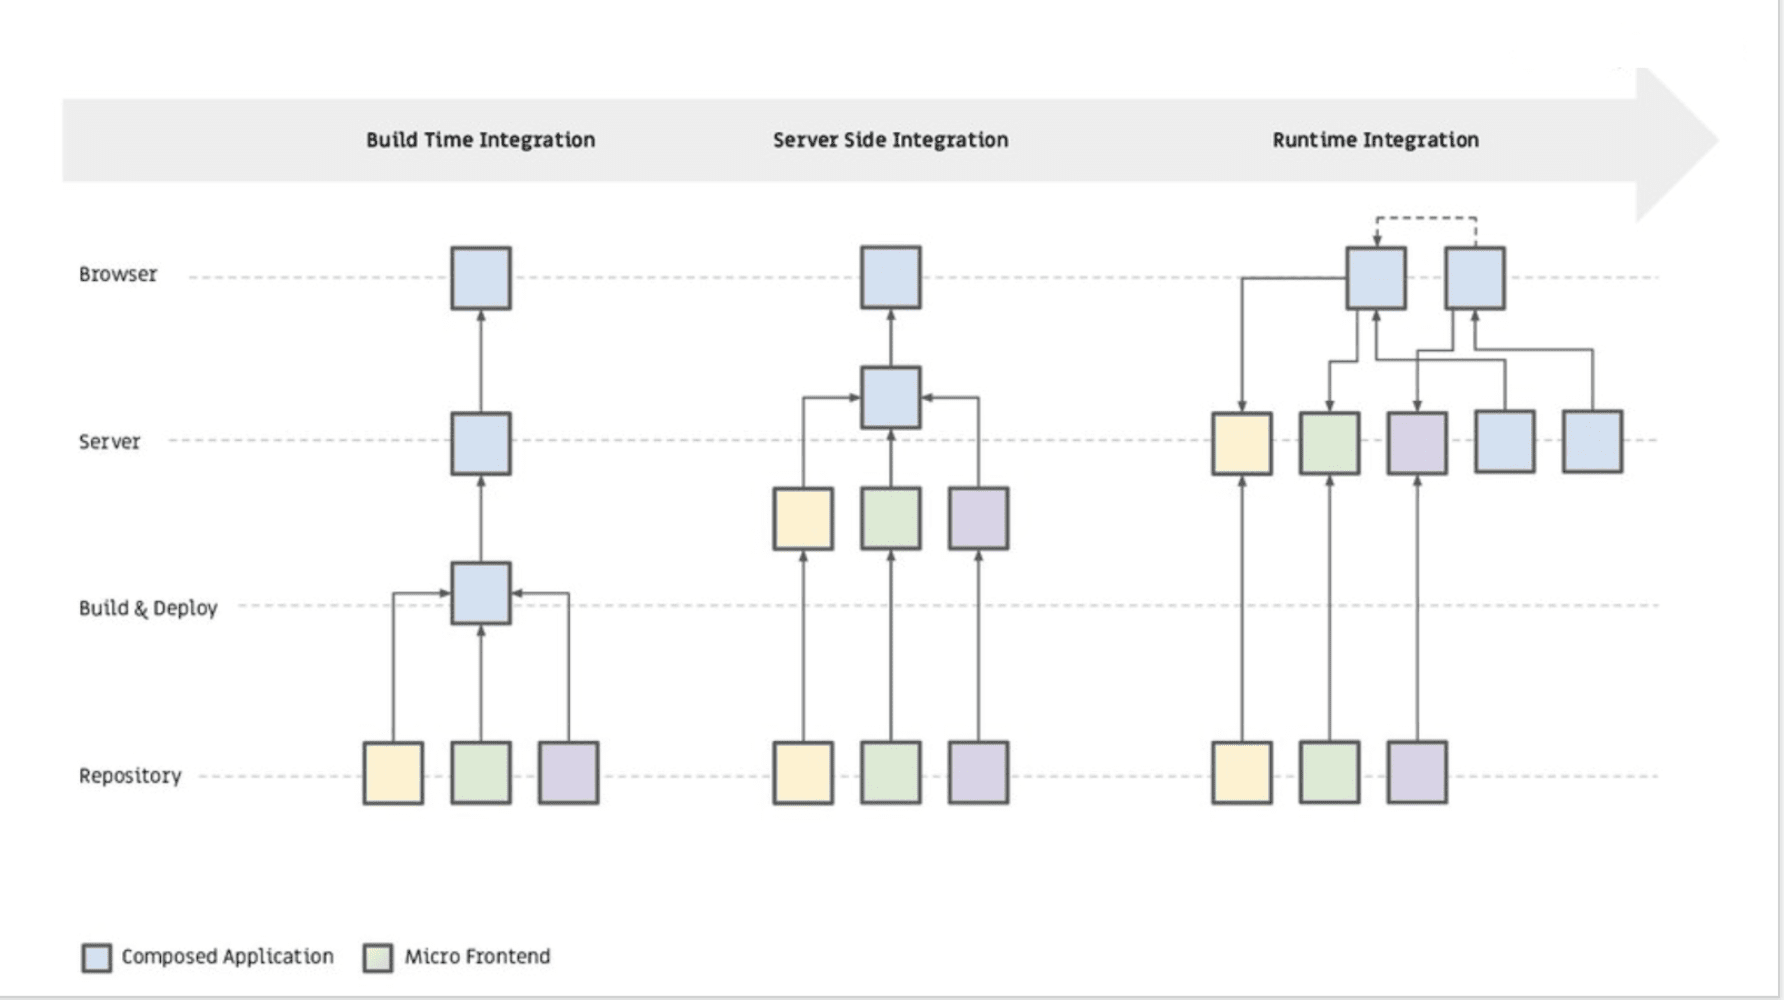
figure 5
Build Time Integration
For Build time integration, we publish each individual micro frontend as a package. At Build time, these separate micro frontends are bundled using a package.json of the container application.
A Monorepo is used for Build time integration. With a Monorepo you can manage all your code in multiple libraries within a repository. Libraries can consist of features, components, utilities, or a UI kit. The idea of this Monorepo is that you can easily reuse your created features within the monorepo.
The big downside of a Monorepo is that we have to recompile and release each micro frontend in the Monorepo to release a change in a separate micro frontend! To maintain a Monorepo you can use Lerna, Nrwl, or Angular Workplace.
Server-Side Integration
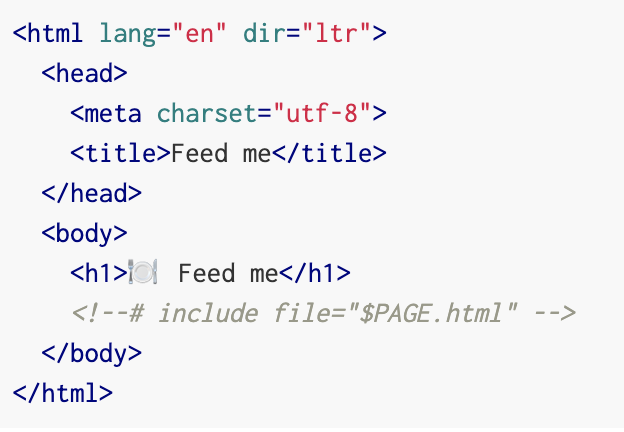 figure 7
index.html
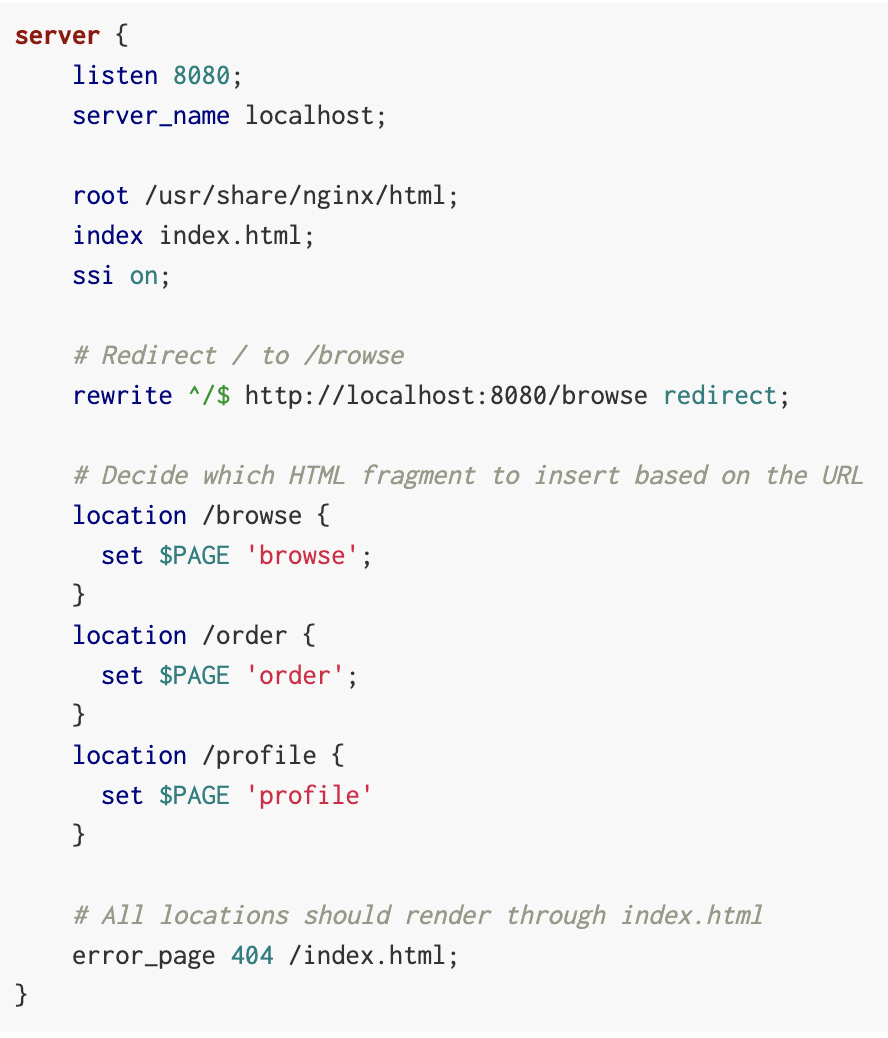 figure 8
Nginx
What is not shown here is how those various fragment HTML files end up on the webserver. The assumption is that each has their own build pipeline, allowing us to make changes to one fragment without affecting another page.Runtime Integration
Runtime Integration is bundling and configuring the micro frontends in the frontend at Runtime (see figure 5). In this situation, a package.json is not used to bundle the individual micro frontends.
In the example below, Web Components are used as a technique for creating separate micro frontends. These Web Components can also be used for the previous 'integration approaches'.
What Are Web Components?
In short, Web Components are isolated components that you can (re)use in HTML pages and web applications. Web Components are also known as custom elements. As a developer, you are able to write your own Custom Element, which is basically your own HTML element with its own CSS, HTML, and Javascript. This Custom Element is based on web standards and can be used in the most commonly used browsers. Web Components are future-proof because they do not depend on a framework or library. And is therefore very suitable as a technique for building a micro frontend.
How To Make a Web Component?
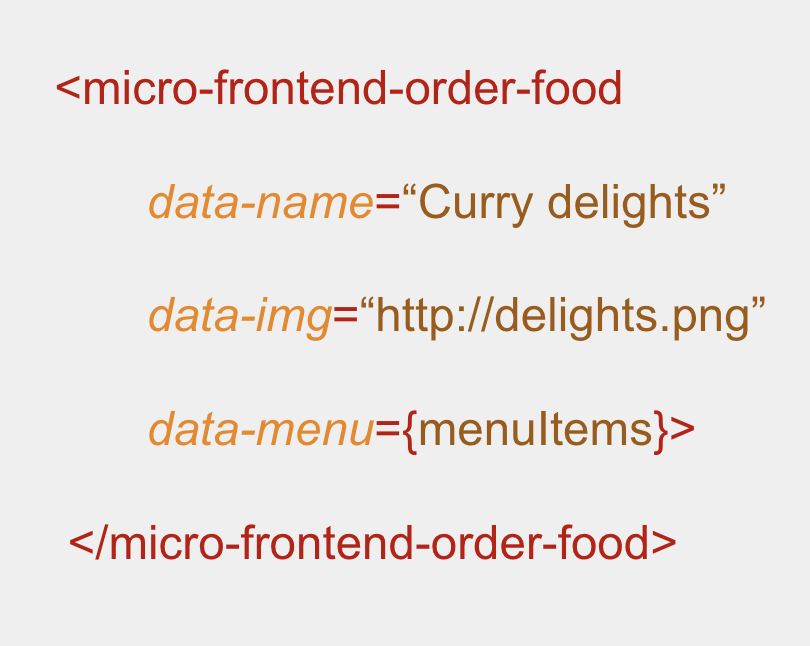
figure 9
The implementation of this Web Component looks like this (see Figure 10). To keep this example simple, the menu items have been omitted.
For this Web Component, we first define a class that extends HTMLElement.
With HTMLElement you can create a Custom HTML element. In the constructor, super() is called first, which means that all the logic of HTMLElement can be used to build a Web Component. Next, we attach a shadow DOM to the Web Component. A shadow DOM is an isolated DOM (or 'View') to display something for this Web Component.
We instantiate the desired image with document.createElement('img') and set the 'alt' and 'src' attributes using the passed parameters: data-name and data-img. Then the image is added to our shadow DOM with shadow.appendChild(img).
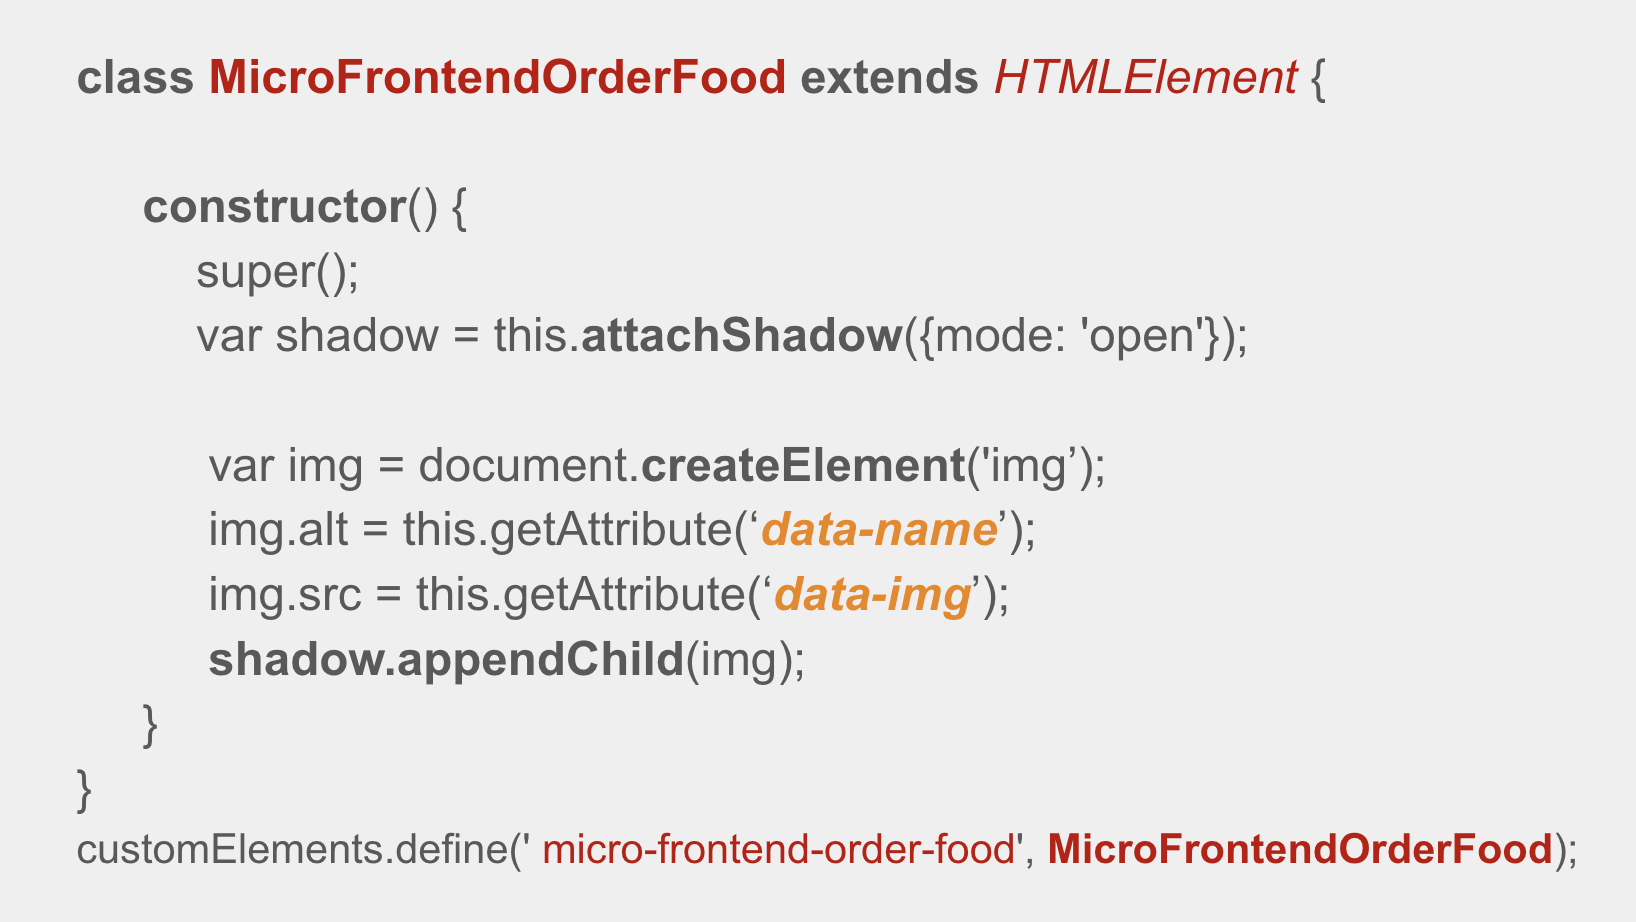
figure 10
And finally, a new Custom Element / Web Component is defined with:
customElements.define(‘ micro-frontend-order-food’, MicroFrontendOrderFood)This Web Component is called micro-frontend-order-food. We can use these in our HTML pages to display an image with text.
Example Runtime Integration With Web Components
An index.html is shown in figure 11 which simulates our sample application (ordering food). This index.html here represents the container application that, among other things, takes care of the routing and rendering of the micro frontends. At the top, our micro frontends are included with <script> tags. The micro-frontend-order-food just discussed, is defined in the JavaScript bundle: https:// order.example.com/bundle.js
The <div id="micro-frontend-root"> is the placeholder where the selected micro frontends are rendered. The constant webComponentsByRoute contains a lookup table for determining the web component / micro frontend you want to render when you select a route.
The constant webComponentType contains the actual selected micro frontend based on the selected route via: window.location.pathname
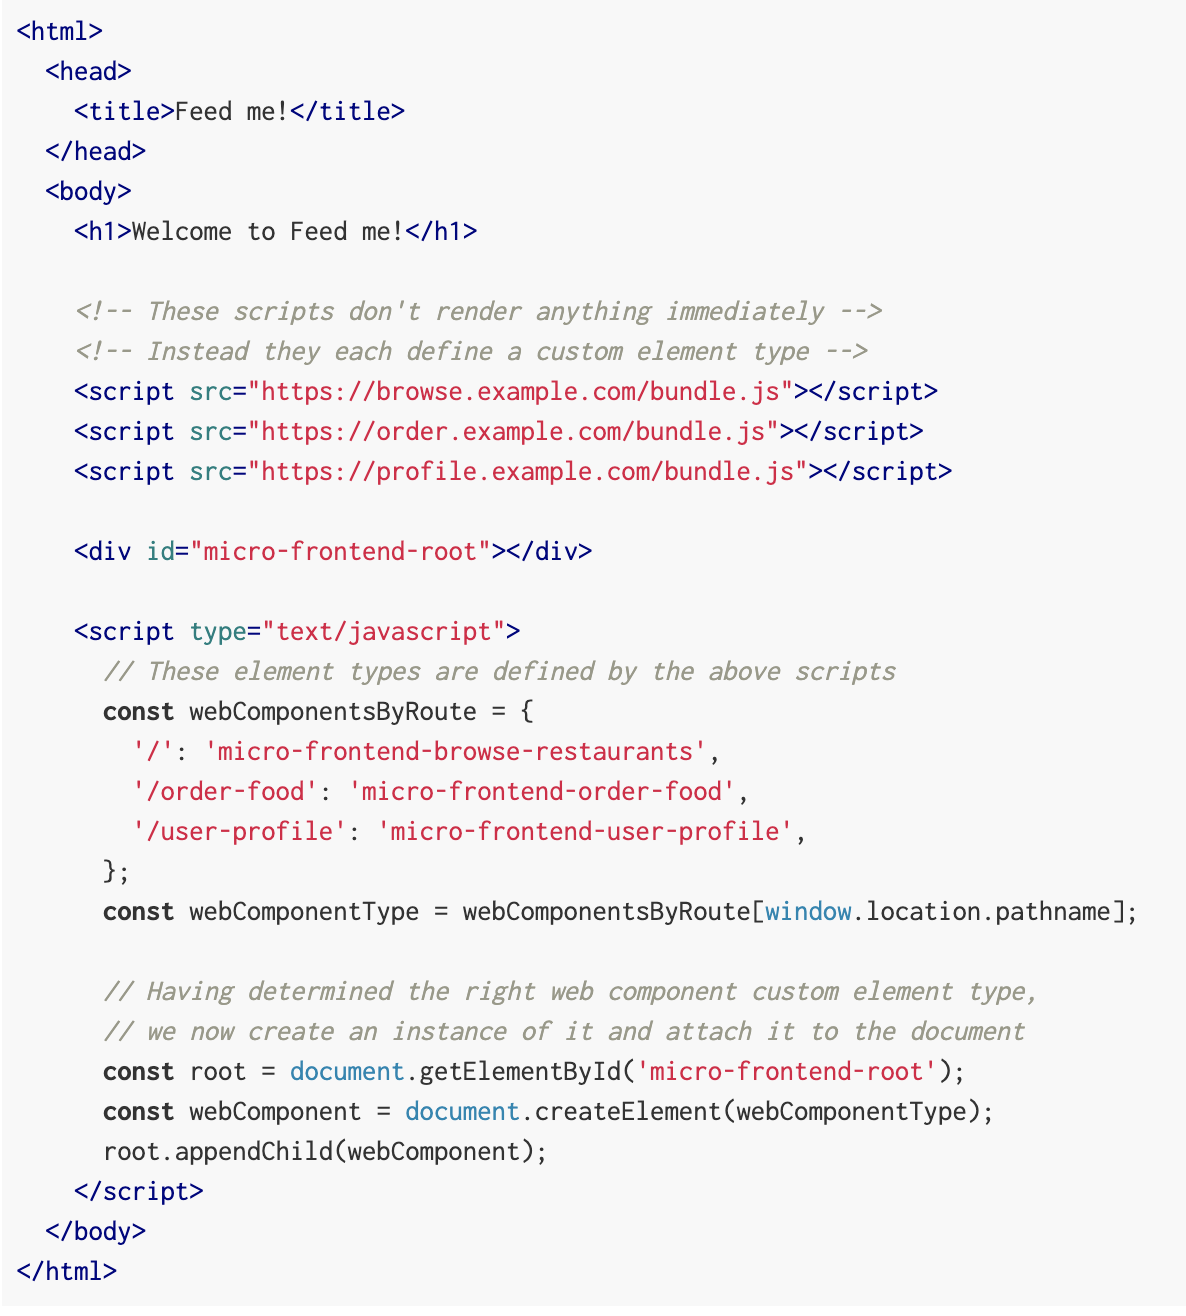
figure 11
Using document.createElement(web ComponentType) we instantiate the selected micro frontend. Finally, it is linked to the placeholder: <div id="micro-frontend-root">. This is done with root.appendChild(webComponent).
The example above is clearly a primitive example, but it demonstrates the Runtime integration approach.
Which Integration Approach To Use?
In the following diagram (in figure 12) you can deduce which integration approach you can use in which situation. For small and/or non-complex applications (where 1 or 2 teams are working on) you can ignore the integration approaches and just assume a frontend monolith.

UI Component Library
A UI component library consists of a series of UI building blocks, such as input elements, lists, tab-bars, and grids, etc.
You could choose that each micro frontend has its own UI Component library (see figure 13). The downside of this is duplicate code and the potential for less consistency in the styling and operation of the UI components.
For more consistency, we can also apply a generic UI Component library. The disadvantage of this is that the micro frontends are then linked through this library. If you choose a generic UI component, make sure it contains only UI logic and no business or domain logic. Placing domain logic in a shared library creates a high degree of dependency between the micro frontends.
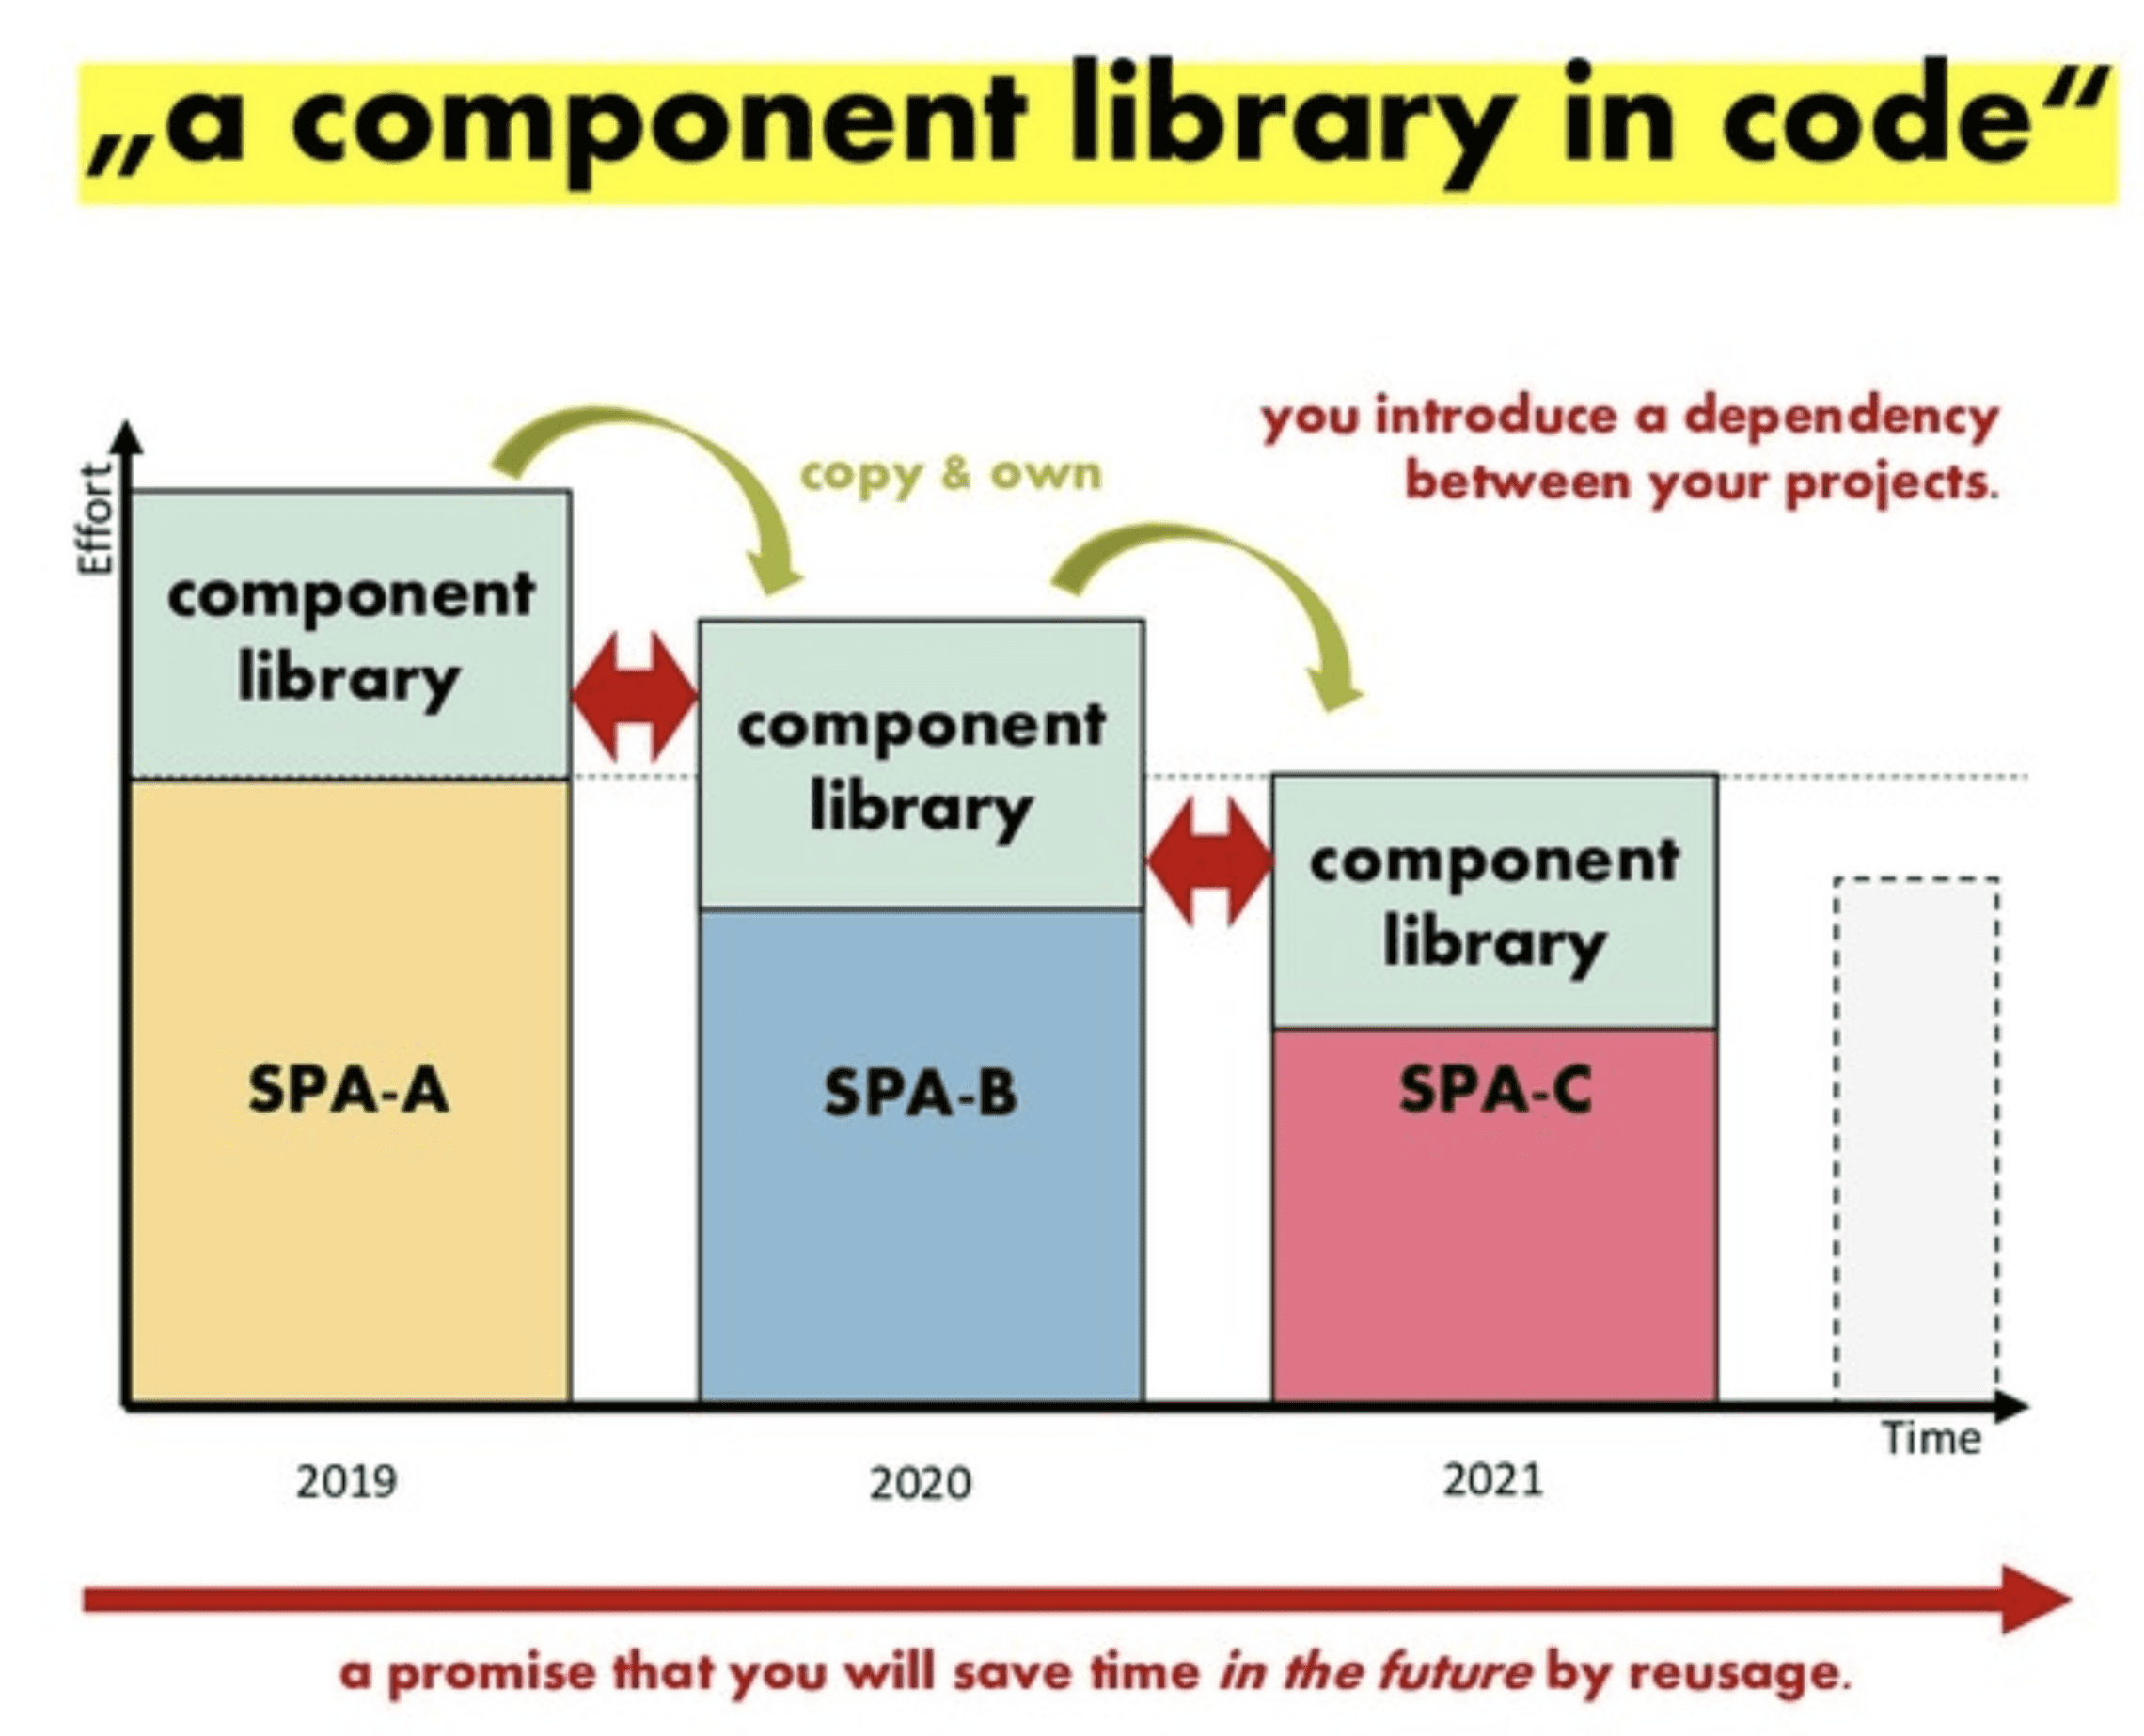
figure 13
Communication Between Micro Frontends
One of the most frequently asked questions about micro frontends is how to make them communicate with each other. It is generally recommended that the micro frontends communicate as little as possible as this introduces an unwanted link that we are trying to avoid in the first place. That said, a certain amount of communication between micro frontends is often required. Custom events allow micro frontends to communicate indirectly. Events can be created with the 'Event constructor' as follows: New Event('build') (see figure 14).
For example, the dispatchEvent can be initiated in micro frontend X to dispatch an event called: 'build'. Micro frontend Y then listens for this event (using the addEventListener method) and handles further processing.

figure 14
Conclusion Micro Frontends
Micro frontends are all about breaking up a large web app into Verticals. Our technology choices, our codebases, our teams and our release processes (CI/CD) can ideally all work and evolve independently of each other, without excessive coordination between other teams. This architecture also has a downside. Here we mention a few:
If you want to make a change to the entire web app, you need to make changes to the individual micro frontends (and microservices) implemented by various other teams.
For integration testing of the entire web app, you have to start many different applications and servers. The difficulty lies in testing the dependencies and communication between the (distributed) micro frontends.
Independently built micro frontends can contain duplicate code. This increases the number of bytes that we need to send to our end users over the network. Duplicate code also means more maintenance, more chance of errors, and less consistency in the styling and operation of the UI components.
In addition, there are many practical cases in which micro frontends offer advantages. Large organizations like Spotify or IKEA have succeeded in gradually applying micro frontends over time to both old and new codebases. With micro frontends, these companies can respond more quickly to changes in the market and deliver customer experiences that drive their brands forward.
Opinions expressed by DZone contributors are their own.

Comments