Learn How to Set Up a CI/CD Pipeline From Scratch
As the basis for modern DevOps processes, it's important to understand CI/CD and learn how to set up a pipeline from scratch.
Join the DZone community and get the full member experience.
Join For FreeA CI/CD Pipeline implementation, or Continuous Integration/Continuous Deployment, is the backbone of the modern DevOps environment. It bridges the gap between development and operations teams by automating the building, testing, and deployment of applications. In this blog, we will learn what a CI/CD pipeline is and how it works.
Before moving onto the CI/CD pipeline, let's start by understanding DevOps.
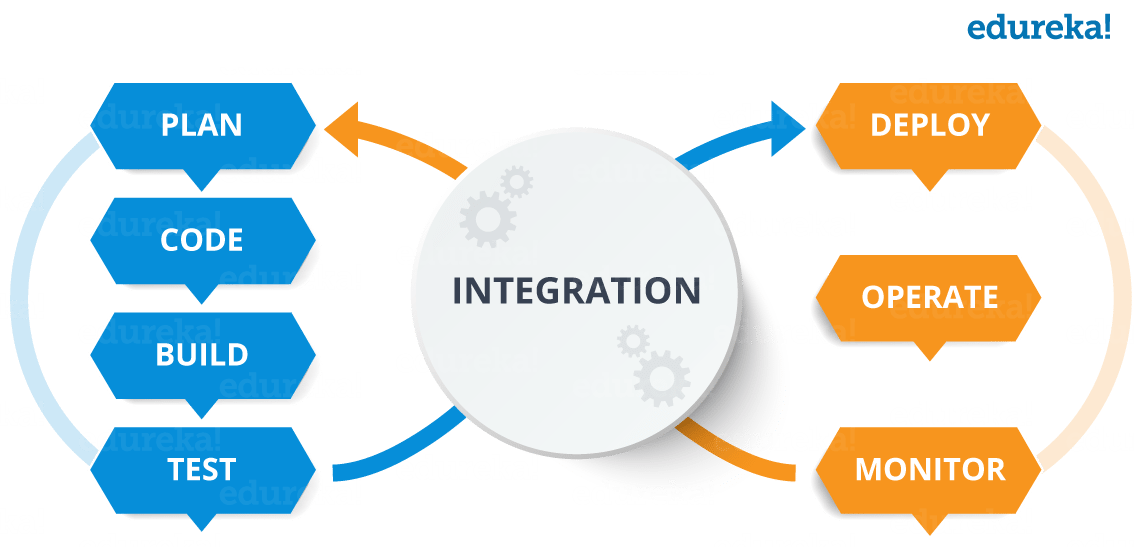 DevOps is a software development approach which involves continuous development, continuous testing, continuous integration, continuous deployment, and continuous monitoring of the software throughout its development lifecycle. This is the process adopted by all the top companies to develop high-quality software and shorter development lifecycles, resulting in greater customer satisfaction, something that every company wants.
Your understanding of DevOps is incomplete without learning about its lifecycle. Let us now look at the DevOps lifecycle and explore how it is related to the software development stages.
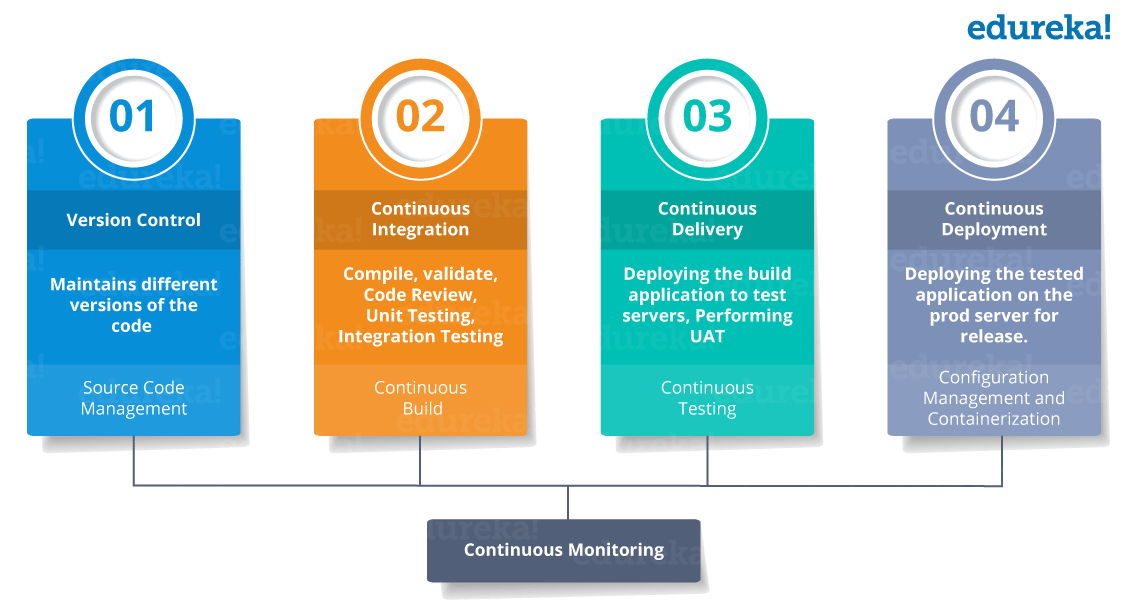
CI stands for Continuous Integration and CD stands for Continuous Delivery/Continuous Deployment. You can think of it as a process similar to a software development lifecycle.
Let us see how it works.
 The above pipeline is a logical demonstration of how software will move along the various stages in this lifecycle before it is delivered to the customer or before it is live in production.
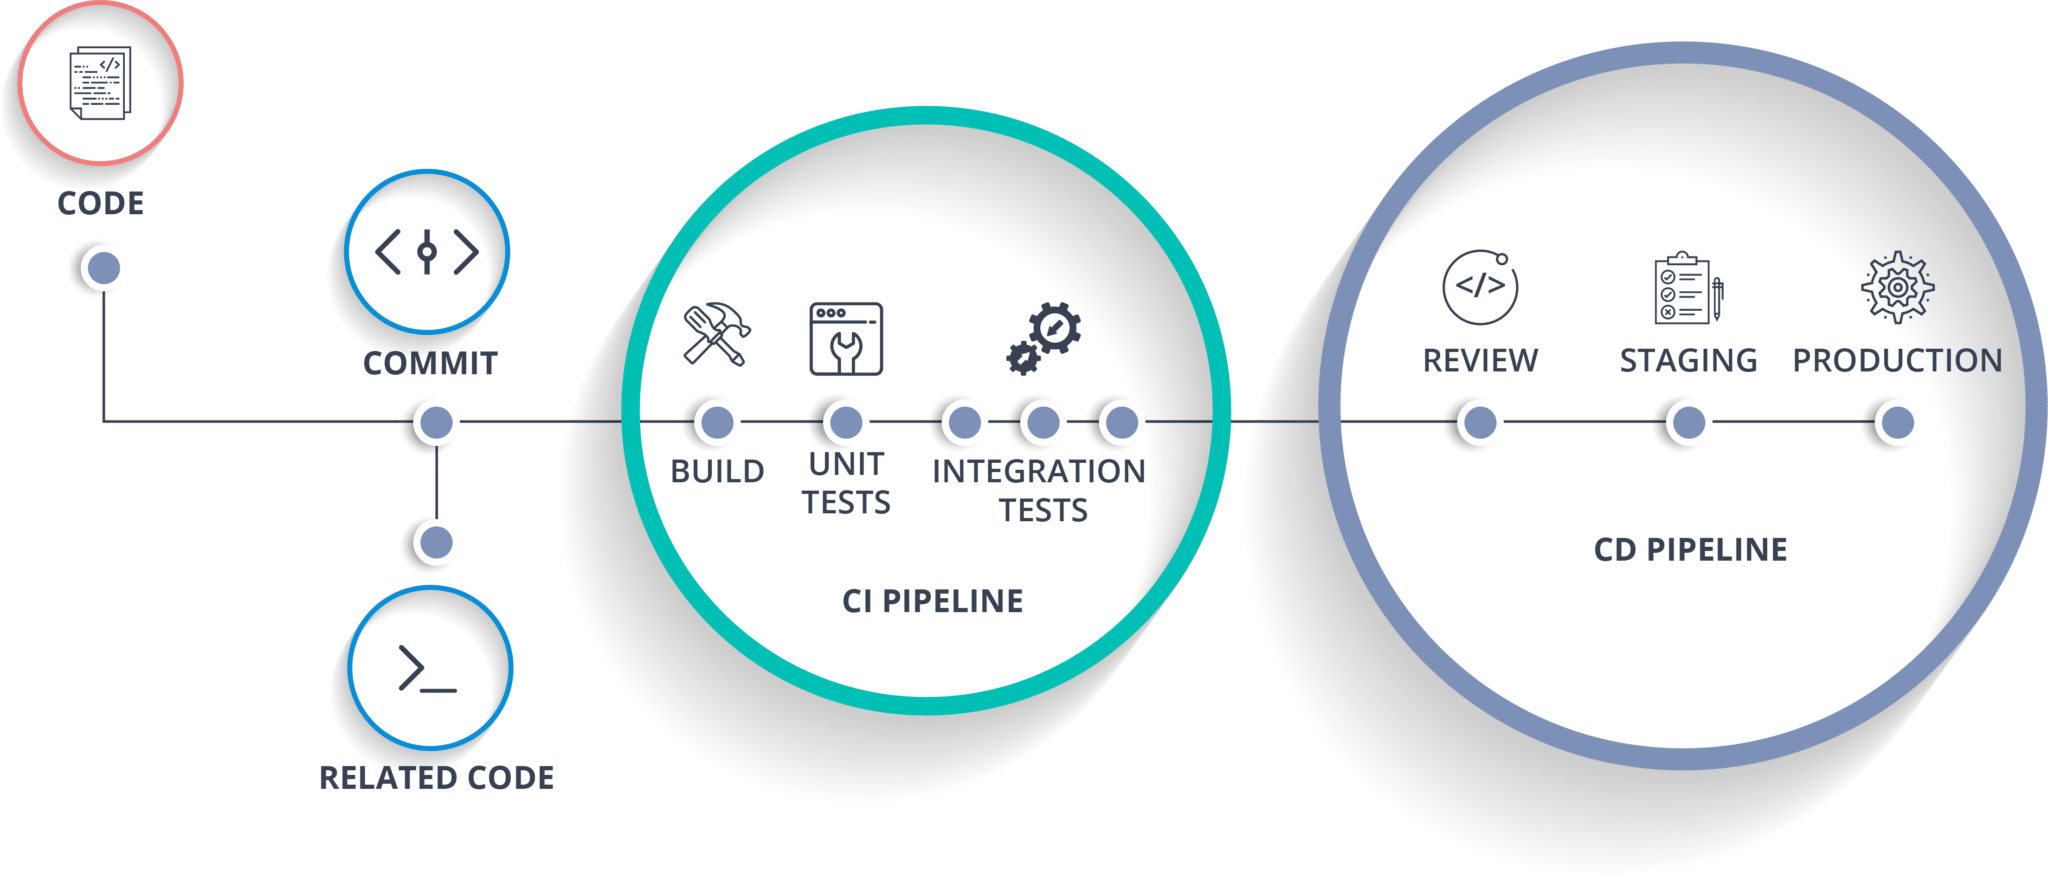
Let's take a scenario of a CI/CD Pipeline. Imagine you're going to build a web application which is going to be deployed on live web servers. You will have a set of developers responsible for writing the code, who will further go on and build the web application. Now, when this code is committed into a version control system (such as git, svn) by the team of developers. Next, it goes through the build phase, which is the first phase of the pipeline, where developers put in their code and then again the code goes to the version control system with a proper version tag.
 Suppose we have Java code and it needs to be compiled before execution. Through the version control phase, it again goes to the build phase, where it is compiled. You get all the features of that code from various branches of the repository, which merge them and finally use a compiler to compile it. This whole process is called the build phase.
 Once the build phase is over, then you move on to the testing phase. In this phase, we have various kinds of testing. One of them is the unit test (where you test the chunk/unit of software or for its sanity test).
 When the test is completed, you move on to the deploy phase, where you deploy it into a staging or a test server. Here, you can view the code or you can view the app in a simulator.

Once the code is deployed successfully, you can run another sanity test. If everything is accepted, then it can be deployed to production.

Meanwhile, in every step, if there is an error, you can shoot an email back to the development team so that they can fix it. Then they will push it into the version control system and it goes back into the pipeline.
Once again, if there is any error reported during testing, the feedback goes to the dev team again, where they fix it and the process reiterates if required.

This lifecycle continues until we get code/a product which can be deployed to the production server where we measure and validate the code.
We now understand the CI/CD Pipeline and its working; now, we will move on to understand what Jenkins is and how we can deploy the demonstrated code using Jenkins and automate the entire process.
The Ultimate CI Tool and Its Importance in the CI/CD Pipeline
Our task is to automate the entire process, from the time the development team gives us the code and commits it to the time we get it into production. We will automate the pipeline in order to make the entire software development lifecycle in DevOps/automated mode. For this, we will need automation tools.
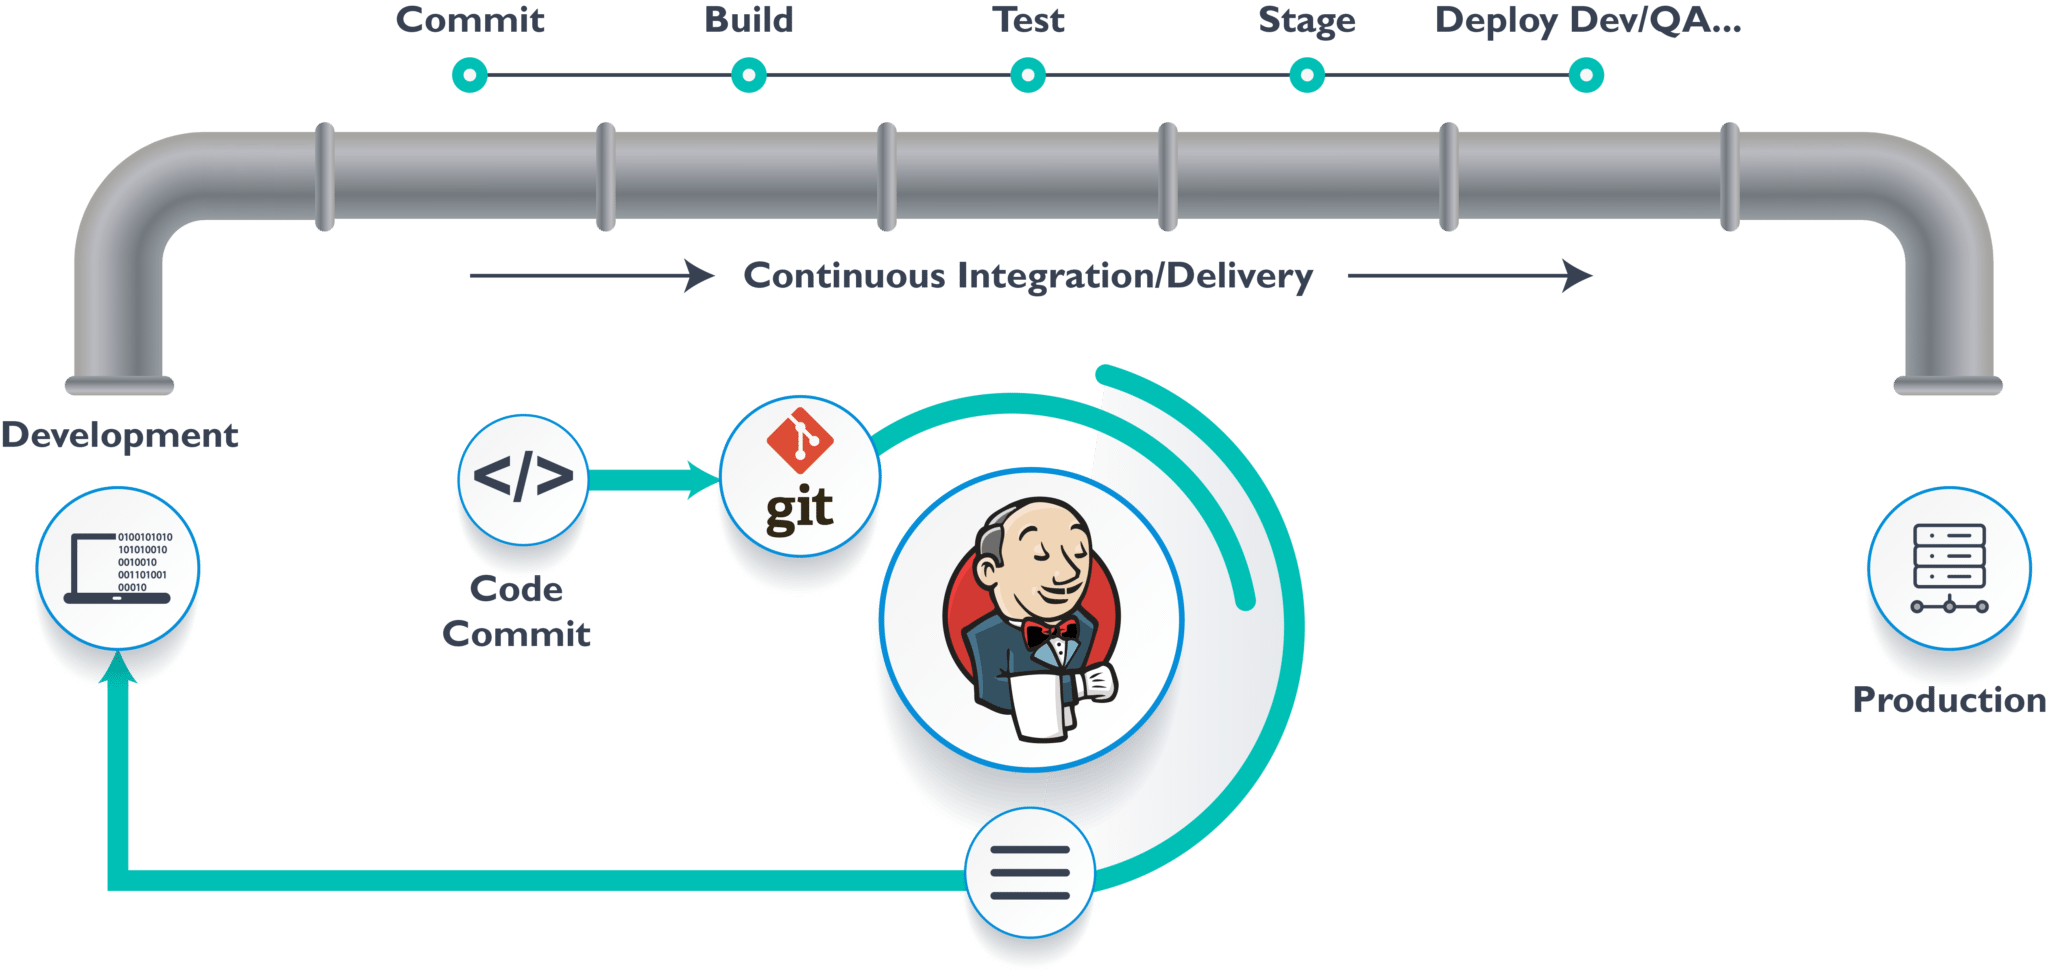 Jenkins provides us with various interfaces and tools in order to automate the entire process.
We have a Git repository where the development team will commit the code. Then, Jenkins takes over from there, a front-end tool where you can define your entire job or the task. Our job is to ensure the continuous integration and delivery process for that particular tool or for the particular application.
From Git, Jenkins pulls the code and then Jenkins moves it into the commit phase, where the code is committed from every branch. The build phase is where we compile the code. If it is Java code, we use tools like maven in Jenkins and then compile that code, which can be deployed to run a series of tests. These test cases are overseen by Jenkins again.
Then, it moves on to the staging server to deploy it using Docker. After a series of unit tests or sanity tests, it moves on to production.
 Docker is just like a virtual environment in which we can create a server. It takes a few seconds to create an entire server and deploy the artifacts we want to test. But here the question arises:
Why do we use Docker?
As we said earlier, you can run the entire cluster in a few seconds. We have a storage registry for images where you build your image and store it forever. You can use it anytime in any environment which can replicate itself.
Hands-On: Building a CI/CD Pipeline Using Docker and Jenkins
Step 1: Open your terminal in your VM. Start Jenkins and Docker using these commands:
systemctl start jenkins
systemctl enable jenkins
systemctl start docker
Note:Use sudo before the commands if it displays a "privileges error."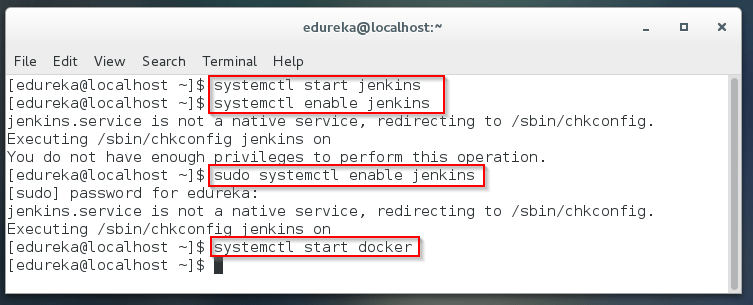
Step 2: Open Jenkins on your specified port. Click on New Item to create a Job.
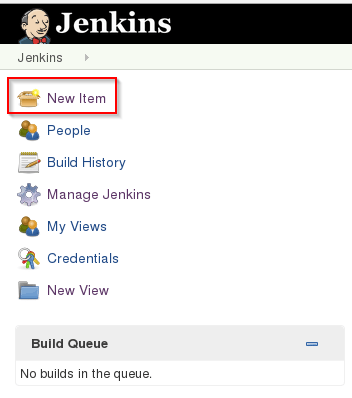 Step 3: Select a freestyle project and provide the item name (here I have given Job1) and click OK.
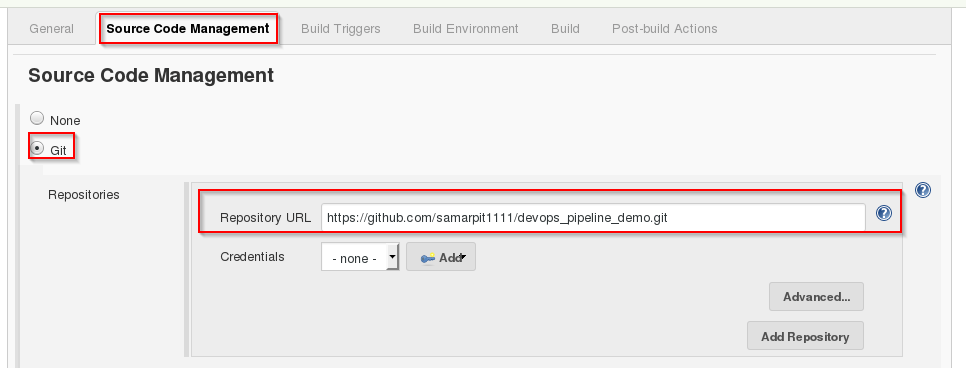
Step 4: Select Source Code Management and provide the Git repository. Click on Apply and Save button.
Step 5: Then click on Build->Select Execute Shell.
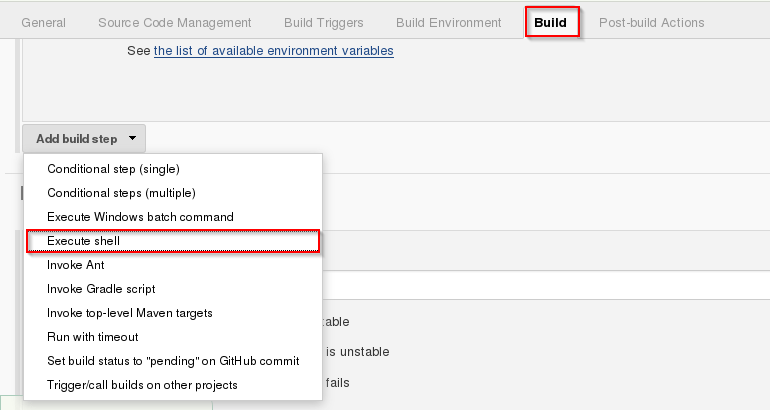
Step 6: Provide the shell commands. Here, it will build the archive file to get a war file. After that, it will get the code which is already pulled and then it uses maven to install the package. It simply installs the dependencies and compiles the application.
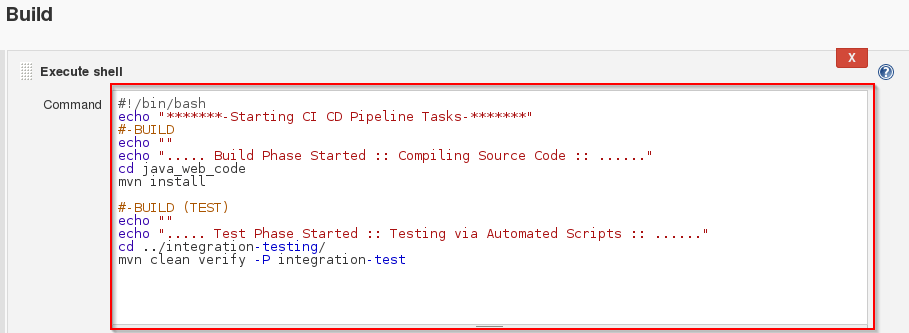
Step 7: Create the new Job by clicking on New Item.

Step 8: Select freestyle project and provide the item name (here I have given Job2) and click on OK.

Step 9: Select Source Code Management and provide the Git repository. Click on Apply and Save button.

Step 10: Then click on Build->Select Execute Shell.

Step 11: Provide the shell commands. Here it will start the integration phase and build the Docker Container.
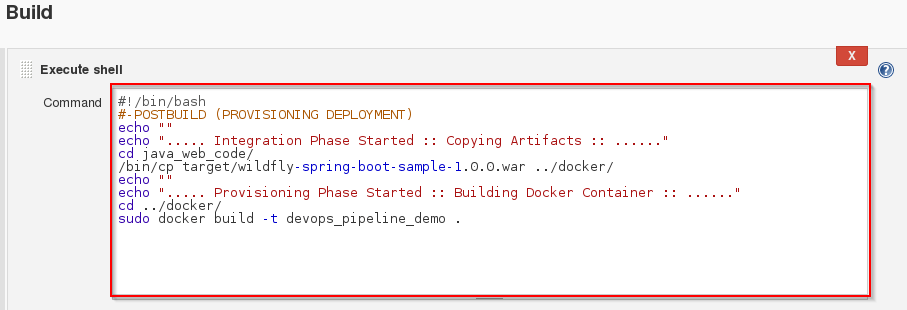
Step 12: Create the new Job by clicking on New Item.

Step 13: Select freestyle project and provide the item name (here I have given Job3) and click on OK.

Step 14: Select Source Code Management and provide the Git repository. Click on Apply and Save button.

Step 15: Then click on Build->Select Execute Shell.

Step 16: Provide the shell commands. Here it will check for the Docker Container file and then deploy it on port number 8180. Click on Save button.
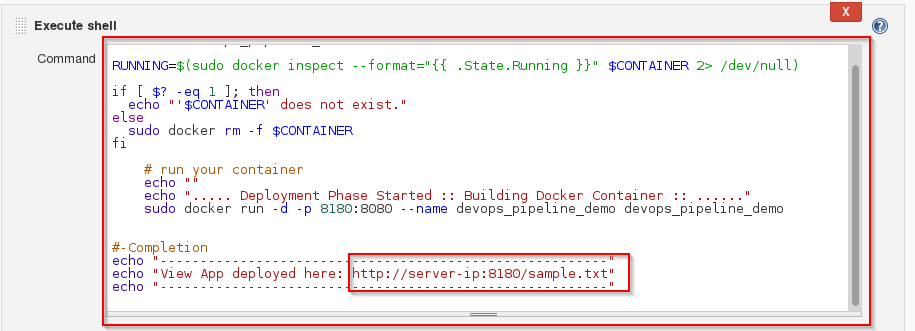
Step 17: Now click on Job1 -> Configure.

Step 18: Click on Post-build Actions -> Build other projects.
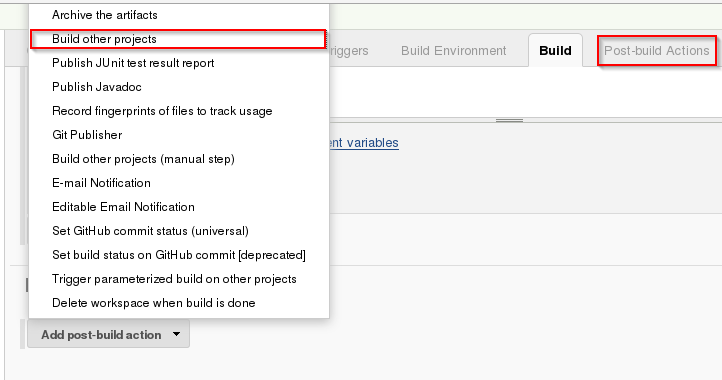
Step 19: Provide the project name to build after Job1 (here is Job2) and then click on Save.

Step 20: Now click on Job2 -> Configure.

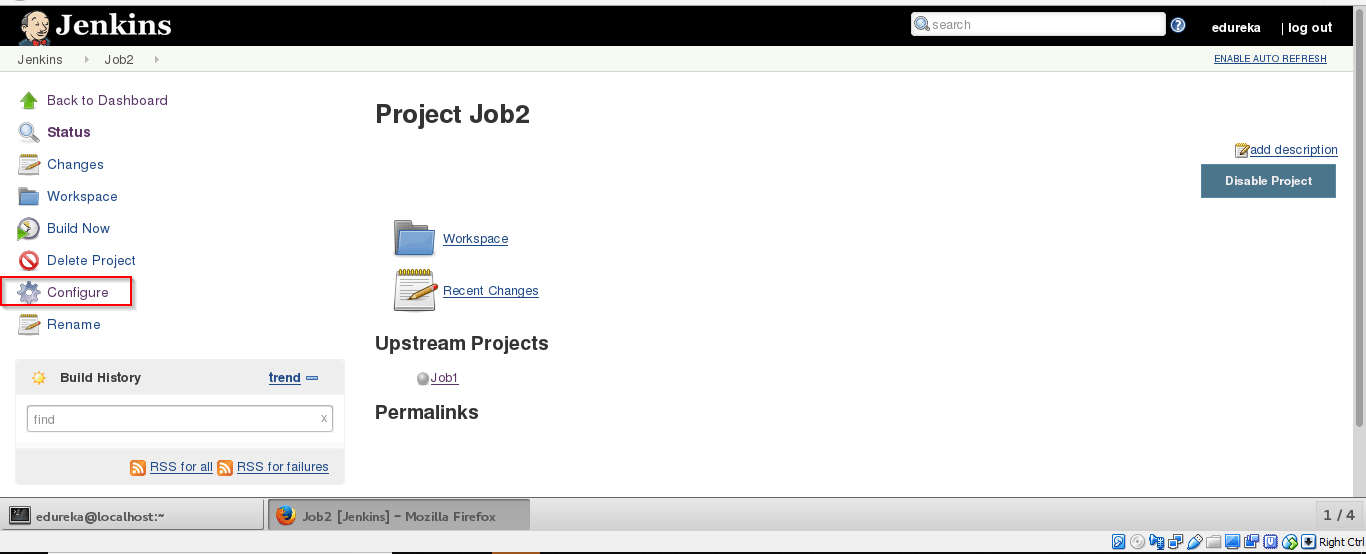
Step 21: Click on Post-build Actions -> Build other projects.

Step 22: Provide the project name to build after Job2 (here is Job3) and then click on Save.

Step 23: Now we will be creating a Pipeline view. Click on the "+" sign.

Step 24: Select Build Pipeline View and provide the view name (here I have provided CI CD Pipeline).
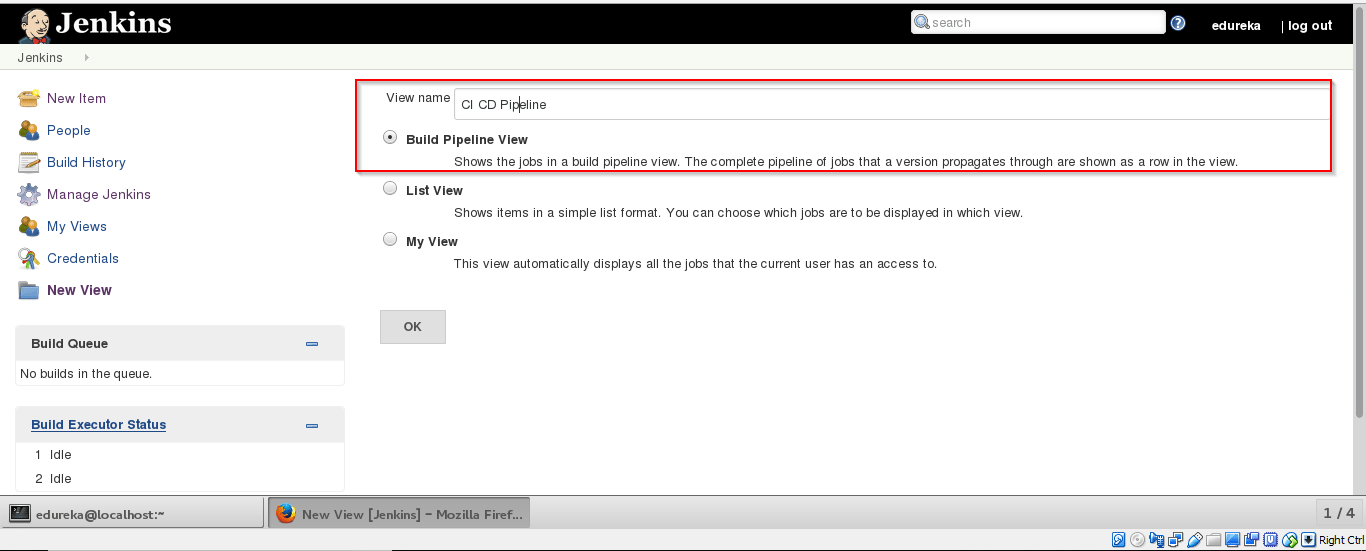
Step 25: Select the initialJob (here I have provided Job1) and click on OK.
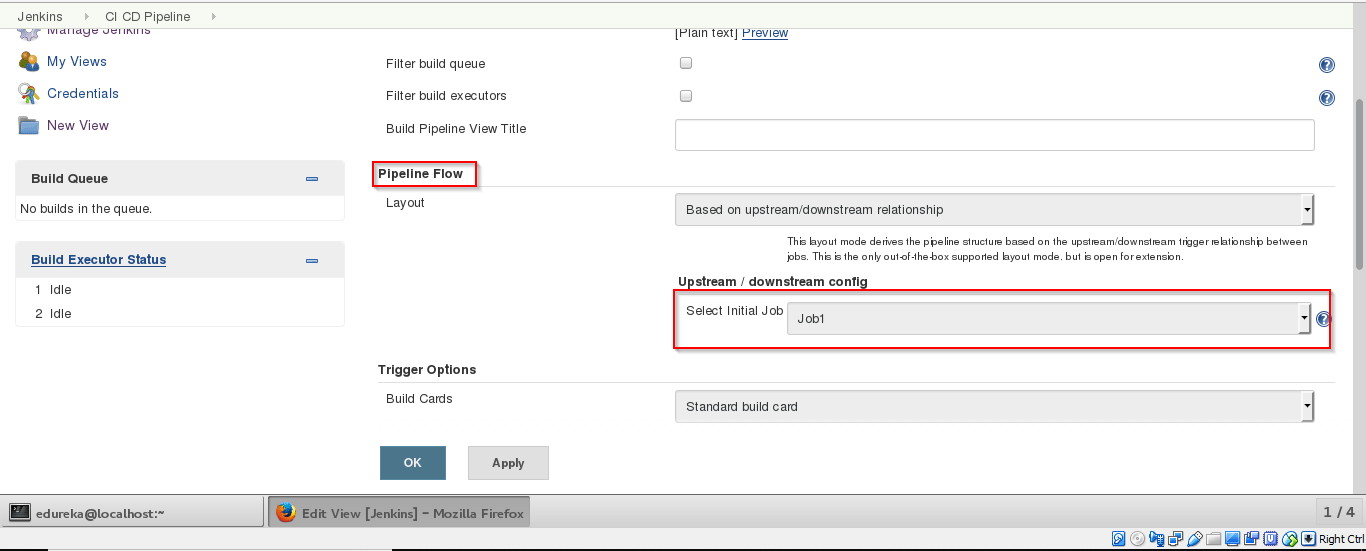
Step 26: Click on Run button to start the CI/CD process.
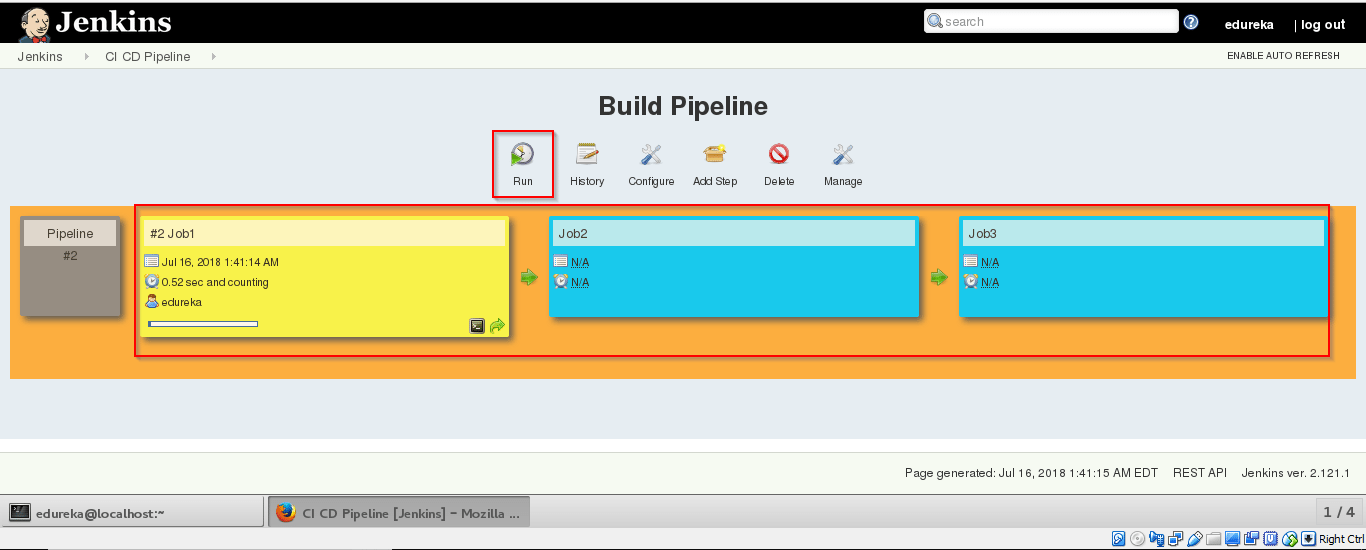
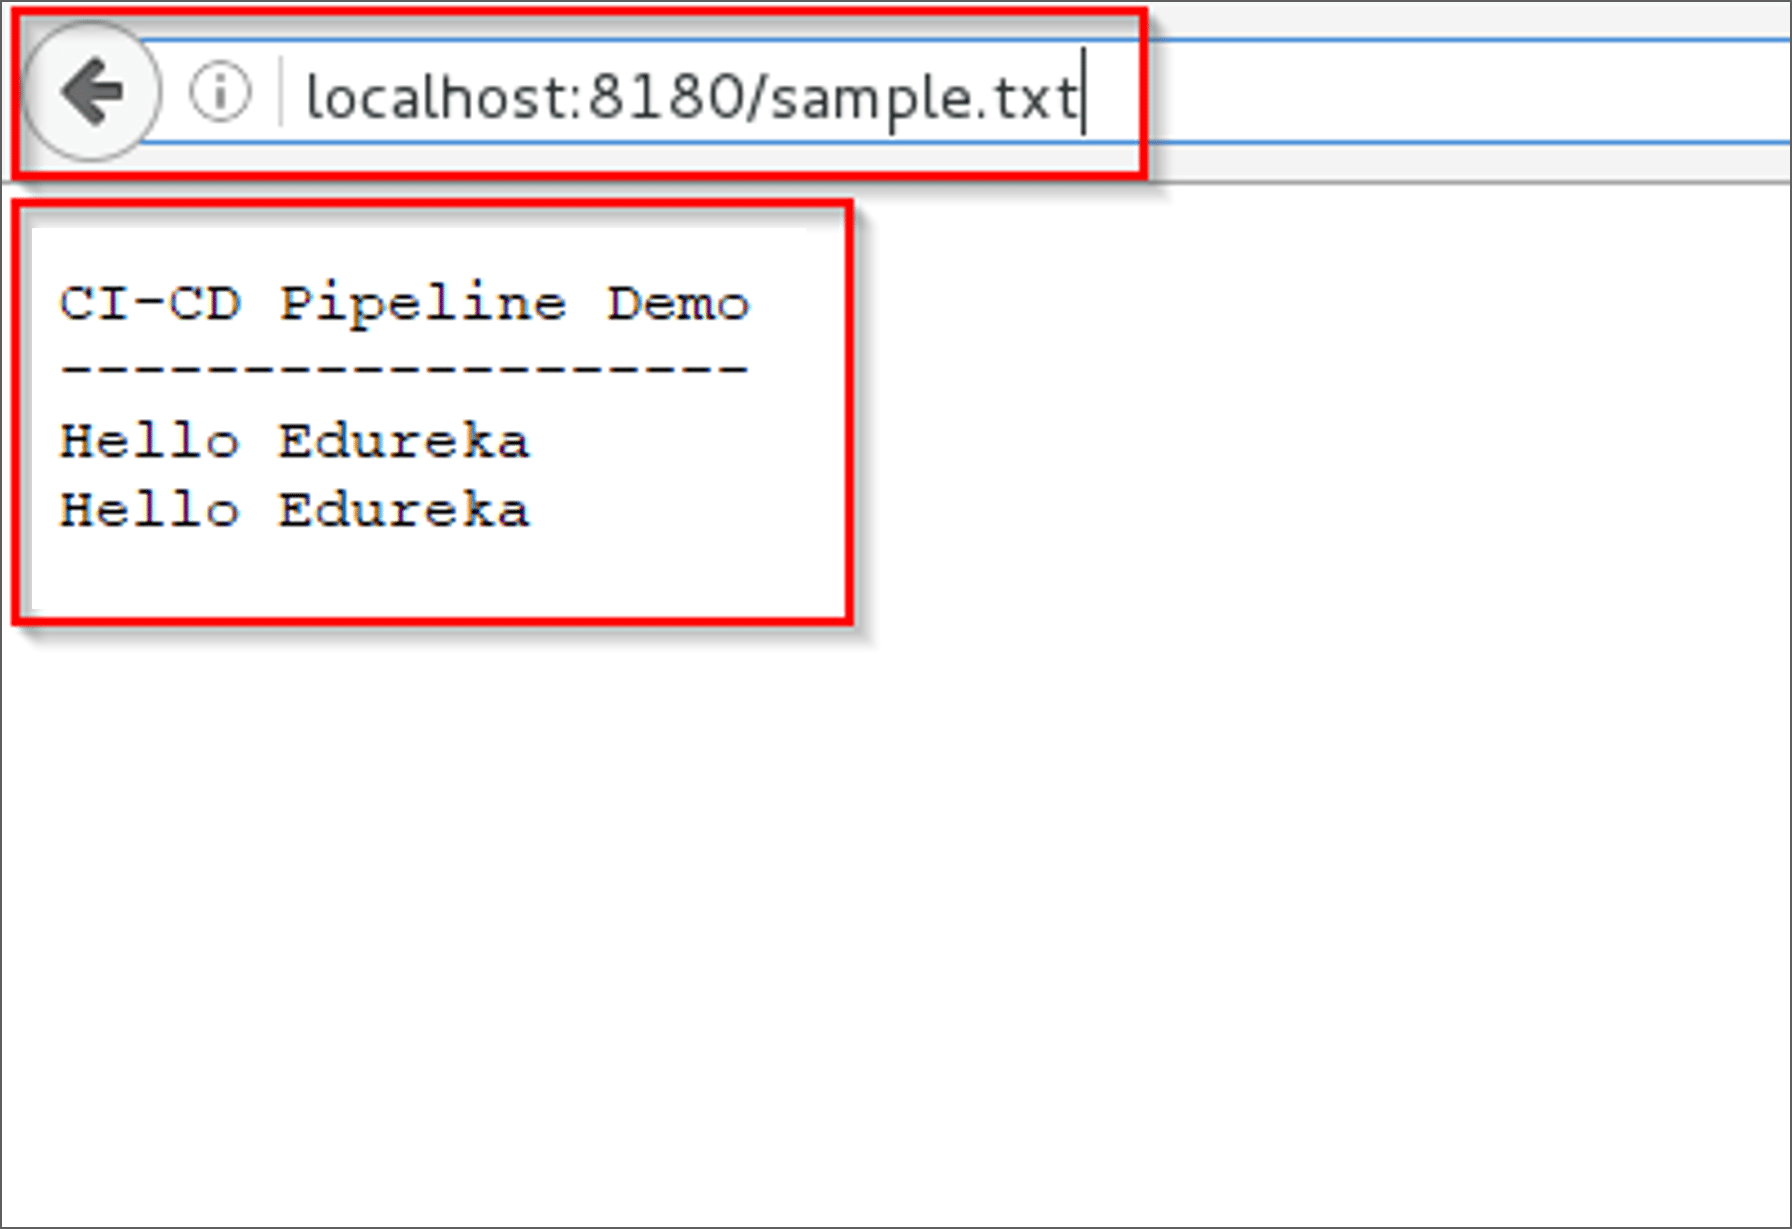
Step 27: After successful build open localhost:8180/sample.text. It will run the application.
So far, we have learned how to create a CI/CD Pipeline using Docker and Jenkins. The intention of DevOps is to create better-quality software more quickly and with more reliability while inviting greater communication and collaboration between teams.
Published at DZone with permission of Samarpit Tuli, DZone MVB. See the original article here.
Opinions expressed by DZone contributors are their own.

Comments